Good afternoon - today we will make a beautiful pine cone to decorate the New Year tree. I'll show you step-by-step master class, and will also give ideas for alternative techniques for making an artificial New Year's cone. I will also show you that you can make ordinary forest cones (pine or spruce) to decorate your home for the New Year.
So let's get started.
How to make a cone with your own hands.
We will need:
- Polystyrene foam blank EGG (sold on shopping websites and in craft shops)
- Large sequins (or cut circles from colored or metallized paper)
- Packing of stud nails
- Rope
WHAT TO DO:
The process is very simple. You need to stick sequin mugs in ALTERNATING ROWS on a foam egg using pins. You need to start from the tapered end foam blank.
We overlap each row over the previous one. So that the lower circles are almost covered halfway with the top. And scales-circles need to be placed with offset... that is, the CENTER points of the top row should be opposite the EDGES of the bottom circles (like the scales of a fish).

If you use gift wrapping paper , then we will get an original cone with patterned scales. Or you can use circles cut out from bright postcards.
And pay attention to the photo below - you can cut the scales into an OVAL shape... and you also get a beautiful cone

You can also use dried WATERMELON RINDS... if in August you collected all the watermelon rinds and dried them in the oven and poured them into a jar... then you have ready-made craft material for making a cone with your own hands. And you don’t have to worry about cutting out the cone scales with scissors.

New Year's cone FROM FELT - how to make it.
But these New Year's cones from felt are also easy to make with your own hands.
If you look closely at the photo below, you will see that the lump is sucking from 20 flat pancake flowers– 10 brown and 10 white.
These flowers are superimposed on each other(like a stack of pancakes)… and from the fact that towards the very end of the cone there are smaller flowers... then our stack tapers towards the bottom, forming an oval pine cone.

The rows, as you can see, alternate - white - brown - white - brown, etc.
In the middle of the cone are the largest petal flowers... at the top (at the tail of the cone) there are medium-sized flowers - towards the tip of the cone the size of the flowers becomes smaller and smaller.
It’s simple - estimate the size... cut 20 flat flowers - and string them onto beads on a thread... alternating sizes so that the cone either expands or narrows towards its tip.
And we get a beautiful lush bump... self made... made with your own hands. Isn't that great?
A fabric cone for a New Year tree.
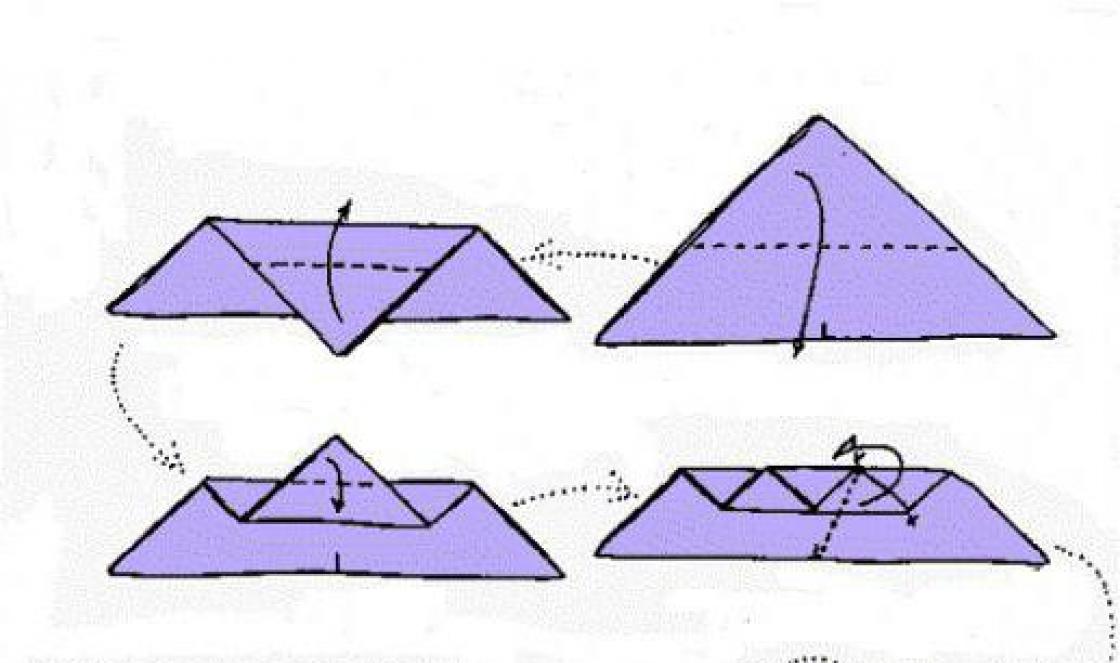
But below in the photo we see the idea when the CONE SCALES look like squares paper napkin(or fabrics) folded 4 times.
That is, we outline the size of the future scale (for example, 1 cm by 1 cm) ... and make fabric blanks.
The blanks will be SQUARE FLAPS - whose size will be the following: so that when folded in half and in half again you get a square 1x1 cm. That is, we need 2x2 cm flaps.... fold them in half and then in half again. – we get a folded neat “handkerchief”... You need to make many, many such handkerchiefs.

And now that we have all the SCALES ready for the future bump. Us need to find a blank blank to which we will glue these scales...
The blank can be a FOAM BALL(or FOAM EGG) - it is sold in any craft store or on the Internet - the product is called a “foam ball” (search in Google\Yandex) - it costs, depending on the size, from 0.5 dollars and more...
The blank can be a BALL OR OVAL MADE FROM FELT. Just take some craft felt + a bowl of soapy water. We put the felt in soapy water - take it out - and roll the ball in our palms (as if it were plasticine), the soapy wet felt rolls very well into any shape we need. The harder we press our palms, the harder and denser the felt blank for our New Year's cone turns out to be.
The blank can be a BLANK MADE FROM WOOL AND BANDAGES... We take ordinary cotton wool... (we buy cotton wool in one lump at the pharmacy)... we take this lump and give it an oval or round shape- and fix it with a wrap of bandage (we make something like an oval mummy) ... then we moisten it all with PVA glue ... to make it harder and denser ... dry it for one night ... And an excellent blank is ready for gluing fabric scales.
NEW YEAR'S DECORATIONS made of spruce and pine cones.
Or we can use ordinary forest cones to implement interesting New Year's ideas by decor.
From the cones you can make a garland(to hang above the fireplace, or on the wall).
We buy threaded hooks... we drill a hole in the cone and screw the hook into it. Using these hooks we hang the cones on a rope. You can also add an LED New Year's garland to the same pine cone garland - just intertwine it with a rope.

Or you can put the cones in a beautiful basket ... decorate the center of the basket with a bow... add a garland there (place it so that the lights mix with the pine cones) - we get a cute New Year's lamp made of pine cones.

You can simply paint the cones different colors ... and arrange them beautifully in a vase.

Can be made from a pine cone Christmas tree decoration... Tie a bright ribbon in the form of a bow... attach a string on which we will hang the pine cone on the Christmas tree.
Or you can make a composition of two cones - tie them together... and make an imitation of SNOW - coat the scales with glue and sprinkle with white sprinkles (this can be sparkling white powder for manicure... or semolina).

You can buy transparent New Year's ball and throw some pine cone scales into it...
Or make a Christmas tree FROM CONE SCALES... unhook the scales from the cone with pliers... make a cone of thick paper... and row by row (starting from the bottom) we paste the paper cone with these scales. It turns out christmas tree from cones.

DIY Christmas trees made from pine cones.
And since we touched on the topic of crafts in the form of Christmas trees, here are some more ideas for Christmas trees made from pine cones.
You can place the opened cone in a small pot or glass... decorate it with beads, a ribbon, and a star on top.
These cones can be painted with paint... and the cone itself can be glued to a base made of a cotton pad...

You can make a Christmas tree from pine cones also on the base paper cone... which is pasted over with pine cones using a glue gun. In addition to cones, you can stick various other materials onto the cone (left photo below)
You can make a FIRST-STACK... this is when the tiers of our pyramid are stacked on top of each other... A layer of vase napkin and a ring of pine cones (we put cotton wool or paper in the middle of the ring)... on top again is a knitted napkin... and again a ring of pine cones... and so on... Each new one the tier should be SMALLER in CIRCUM than the bottom one... so that the Christmas tree tapers towards its top (right photo below)

NEW YEAR'S WREATHS - made from pine and fir cones.
You can also make New Year's wreaths from pine cones. - for home decoration. I will show you in detail how to make a base for wreaths from tape and old newspaper in a special article.
And here below you see what design you can come up with for a wreath of pine cones...
You can arrange the cones ALTERNATELY with the acorns (left photo below)
You can stick pine cones CHAOTICALLY onto a wreath blank (right photo below)

You can arrange the cones in such a way (and glue them together) to create the OUTLINE OF A SNOWFLAKE (left photo below)
Or you can arrange the pine cones in one CIRCULAR direction... like a spiral vortex (right photo below)
These are the ideas for creating a NEW YEAR'S CONE to decorate the Christmas tree... and ideas for DECOR FROM FOREST CONES.
AND ALSO to New Year's table you can make a DELICIOUS SALAD - also in the form of a cone. The filling of salad mounds can be anything (either peas or corn). But then, when two salad heaps are laid side by side in the shape of OVAL HILLS... you just need to STICK them with ALMONDS... add a couple of sprigs of thyme and your salad is in shape New Year's cones ready.

These are the ideas for the New Year.
Good luck to you and happy holidays.
Olga Klishevskaya, especially for the site ""
If you like our site, you can support the enthusiasm of those who work for you.
Happy New Year to the author of this article, Olga Klishevskaya.
DIY New Year's crafts from pine cones
Cones are an ecological material that is a pleasure to work with. Even a child can easily make New Year’s crafts from them. In addition, you can save a lot of money on holiday decorations, toys and gifts for family and friends.
Also read: autumn crafts from cones with your own hands.
New Year's topiary made of pine cones
In order to make a festive topiary from pine cones with your own hands, you will need the following tools and materials:
Cones;
Stable stick for the trunk;
Paper;
Dye;
Leg-split;
Glue gun;
Scissors;
Masking tape;
PVA glue;
Sackcloth;
Decorative branches of pine needles;
Flower pot;
Decor elements.
Making topiary starts from the crown. To do this, you need to crumple up several sheets of newspaper or paper and form a neat ball. Then the ball needs to be covered with masking tape and covered with brown paint. After complete drying, you should use scissors to make a hole into which to pour a little glue and insert a stable stick-trunk. Gently wrap the resulting trunk with twine, its lower end and secure its upper end with a glue gun. Now you can start attaching the cones to the ball. You need to start gluing the cones from the top of the head. The tighter the cones are glued to each other, the better. If, during the work, gaps appear between the cones, they can be decorated with decorative pine branches. It is better to decorate the pot with burlap, securing it with a glue gun. Then the pot must be filled with plaster. After the plaster has completely dried, the New Year's topiary can be decorated with various ribbons, pebbles and garlands.


Christmas trees made of pine cones
In order to get pretty Christmas tree from cones, you will need about an hour of free time, a little patience and effort, and also:
Cones;
Circle and cone made of green or brown cardboard;
Glue gun;
Scissors;
Spray can with gold or silver paint.
First you need to prepare the working material: remove debris, wash and dry the pine cones. After the cones have dried, you can paint them with spray paint, giving them a festive look. Although, this stage is not at all necessary if you want the Christmas tree to look more natural. Now you need to glue the cardboard circle to the base of the cone. When the base of the tree is ready, you can glue the cones. They should be glued in a circle, starting from the bottom and gradually moving up. Larger cones are glued first. The finished Christmas tree made from cones can be decorated with garlands and Christmas tree decorations.


New Year's wreath of pine cones
Christmas wreaths are traditionally woven from fir branches. Modern craftswomen can make a similar craft from various available materials: Christmas balls, satin ribbons, paper flowers, holiday tinsel and much more. A New Year's wreath made of fir cones will help decorate any room or front door. For work you need to prepare the following materials:
Fir cones;
Newspaper;
Fir branches;
A can of brown paint;
Scotch;
Scissors;
Glue gun;
Decor elements.
To make the base of the Christmas wreath, you need to roll the newspaper into a tube. Then make a donut from the tube and secure it with a stapler. To prevent the base from losing its shape, it should be additionally wrapped with tape. The base can be painted with brown spray paint, so the craft will look natural. When the base is dry, it is not necessary to glue it tightly. fir cones. The finished wreath needs to be decorated. For this you can use various beads, tinsel, garlands.


Ball of pine cones for New Year's interior decoration
A ball of cones is an excellent element of New Year's interior decor. Such balloons, hung around the apartment, create a festive atmosphere, etc. In addition, they fill the space of the room with a pleasant aroma. To make such a ball with your own hands, you need the following materials:
Cones;
Balloon;
Glue;
Toilet paper;
Satin ribbon.
For work, you can use a ready-made base, but it’s much more pleasant to do everything yourself. For the base you need to inflate balloon, to the desired size. Cover it with toilet paper, which must first be moistened with a mixture of PVA glue and water, and left to dry for 24 hours.
When the base is dry. It must be coated with brown paint in order to toilet paper could not be seen through the gaps between the cones. Then you should carefully glue the pine cones to the base and attach a beautiful satin ribbon to the ball.


The long-standing Russian tradition of making New Year's toys with your own hands practically died out by the end of the twentieth century. Of course! So many magnificent balls, stars, animals and fairy tale characters, manufactured in a factory! How could simple crafts—or a bronze-painted walnut—compete with them?
Today, fortunately, the tradition is returning, because the point is not what to hang on New Year trees, but to engage in exciting creative work with children, to instill in your sons and daughters the skills of handling scissors, glue, and paints. Among the most popular materials from which you can make Christmas decorations, ordinary cones - pine and spruce.
Cones are not sold in stores, except in those where you can buy a variety of unexpected materials for creativity. However, this is not particularly necessary. By visiting nature with your children, you can create the necessary supply of cones of any size and shape throughout the year, while at the same time collecting other natural materials that will be useful for your New Year’s workshop: acorns with “caps”, beautifully curved twigs, moss, maple and ash seeds, hazelnuts.
The cones are closed, dense or with “ruffled” scales. In order to make New Year's crafts, you will need both, depending on what you plan to make. However, it can be a shame if the toy begins to open up under the influence of home heat - and your finished crafts become deformed.

To prevent this from happening, the cones must be pre-treated:
- so that the cones always remain closed, they are kept in a jar of wood glue for a minute;
- to open, cook for half an hour, and then dry on a radiator;
- You can open the cones by keeping them in the oven for a couple of hours (temperature 250 degrees);
- You can slightly change the shape of the cone by holding it in water, and then tying it tightly with thread and drying it.
Heat treatment, by the way, will destroy microbes on the buds and make the natural material safe, which is very important when we're talking about about children's creativity.

Materials, tools
In addition to the cones, you will need:
- paints,
- tassels,
- cardboard,
- scissors,
- threads and ribbons,
- pieces of fabric and felt,
- PVA glue,
- beads,
- sparkles.

Depending on what toys you are going to make and using what technologies, this list may expand. For example, you may need plasticine and papier-mâché paste, nail polish and wire in beautiful plastic insulation.
Operating procedure
Cones are a very beautiful natural material. To decorate a Christmas tree with them, sometimes it’s enough to simply paint each one in any color (red, yellow, purple) and add glitter. According to the experience of those who have been making crafts from pine cones for a long time and conduct a master class on the Internet, it is better to use enamel for painting pine cones rather than acrylic paints, which do not lie smoothly enough.

It is convenient to use multi-colored Christmas tree tinsel as glitter, the so-called rain, which must be cut very finely with scissors. The cones are dipped for a couple of seconds into a container of varnish used for woodworking, and then sprinkled with shiny multi-colored pieces of tinsel.
The New Year's toy is almost ready. All that remains is to make a loop so that it can be hung on the tree. For this purpose, self-tapping screws with a ring are used.

Now try to take on more difficult work. Make Santa Claus out of pine cones.
- step: paint the pine cone red, dry it.
- step: make a head out of a small ball, covering it with beige fabric.
- Step: Build a thick beard from cotton wool and glue it to your head.
- step: from a piece of red felt or some other thick fabric, make a cap for Santa Claus, provide a loop in its upper part so that the toy can be hung on the Christmas tree.
- step: draw eyes or glue small black beads or beads as eyes.
- step: glue the head to the bump body using hot glue (this will make it more secure).
Your Santa Claus is ready. Now, using the same technology, you can make his constant companion - the Snow Maiden.
A separate master class includes making toys using plasticine. This material, however, has one drawback - its fragility, it can be deformed due to too much high temperature indoors or if the craft is carelessly picked up or dropped.
And the advantage of plasticine is that children who have already acquired skills in handling this material can be actively involved in this work.

Try making a hedgehog. The cone will make a body, and plasticine (lighter in color than the cone) will make a muzzle. You will also need to make paws, a traditional apple or a mushroom, which are placed on the hedgehog’s back. Using the same technique (using plasticine) you can make a swan, owl, penguin, squirrel, crocodile, hare - all those that your child wants to make.
An original effect is achieved by bleaching the cones: to achieve this, the cones are kept in ordinary bleach, used for washing and cleaning, for five hours. The ratio of the drug and water is 1:1.

You can get the illusion of a frosty day by covering the cone with silver (not multi-colored) sparkles: coat the cone with glue, roll in the sparkles, dry so that they have time to “grab” with the glue, and then brush off the excess.
Very cute toys, which, by the way, will look very professional, can be made using old broken and unnecessary plastic dolls and various animals. Taking a pine cone as a basis, you can glue a doll’s head, palms, and legs to it. In this way you can make Santa Claus, Snow Maiden, hedgehog, deer, dog, kitten, mouse, and various birds.

You don't have to hang all your crafts on the tree. To make your room truly New Year's, toys can be hung, for example, from a chandelier. By the way, this way you will be able to examine the toy in all its glory, from absolutely all angles.
It's time for the final part of my trilogy about crafts from pine cones (you can find the first two here: and). Today we will talk about Christmas tree decorations made from this wonderful natural material.
Pine cones are ideal for creativity, including activities with children; finished decorative products from them will not go to waste - with their help you can beautifully decorate your home for the New Year and Christmas. These can be all kinds of wreaths, balls, pendants and garlands. Great scope for imagination opens up when creating from pine cones. Christmas tree decorations. In skillful hands, they can turn into cute birds and little animals, angels, Santa Clauses, and gnomes. 
In order not to be unfounded, this time I myself took out my treasured handicraft box and began to get creative. I took two cones: a pine and a spruce, with the goal of making something simple out of one, and more complex out of the second. To be honest, I expected this activity to take me much less time than it turned out to be. Those who do home crafts whenever possible know that it is quite problematic to accurately implement something from a chosen picture or master class, because... There are always some elements missing. It turns out that we take someone’s idea as a basis, and then we create to the best of our imagination.
From the first pine cone, I decided to make a simple Christmas tree toy, in which it would remain a cone, only slightly embellished. Here are examples of such crafts: 


I pretty quickly went through the first stage - installing a mount for a loop, with which you can hang the toys on the Christmas tree. Both of my cones did not have a “tail”, so I took self-tapping screws - one with a ring, and for the second cone I needed a regular one (later you will understand why). If the pine cone had a tail, you could use a standard mount for Christmas decorations, gluing it using cushioning material. 
My problems started when I was about to touch up the bump, don't try it acrylic paints, nothing will work - they lie unevenly, it is better to use enamel. White acrylic varnish with glitter it didn’t give any effect either. I had to wash the poor thing and come up with something else.
In the end, I came to this decision: I dipped the clean and dried pine cones entirely into a jar of wood varnish, let them drain, and hung them up to dry. While the cones were drying, I took shimmer-colored Christmas tree tinsel and finely chopped it with scissors. Then I generously sprinkled it on the pine cone. It turned out very beautiful, it’s a pity that you can’t see in the photo how shiny and shimmering it is. I liked the result so much that I decided not to add a lot of decorations on top and limited myself to a modest gold bow. Making such a cone does not take much time (if you know how), and the result is wonderful.
If you like my idea, I advise you to make several of these decorations with your children and assemble them into Christmas garland(like the one shown in the first part, as New Year's decoration for piano). 
Now let’s complicate the task and make a toy out of the pine cone. Here, in addition to the base, you will need a round wooden ball for the head. I found some pretty good ones online interesting ideas, but most of all I liked the angel from the first part. 
Martha Stewart's book also had a couple of examples with instructions on how to make Christmas decorations out of pine cones with your children. 

A few ideas New Year's crafts I came across some of the pine cones on my favorite shopping portal for handmade gifts - etsy.com, look at these photos, wonderful, right? 


The angel inspired me the most, so I began to create in this direction, using what was at hand. In principle, nothing complicated, first I took white tinsel with a snowy effect, I had to first smooth it out, and then fold it in half, pass a thin wire through and glue it so that it would not bulge too much. For the angel's head, only a red ball was found (in old wooden beads from the 60s fashion). I was wondering if I should paint it white, but one failure with painting was enough for me, so I decided to leave it as is. Using the thinnest brush I painted a singing mouth and eyes. I attached a snow cape to a self-tapping screw, so that the ends of the wire with a loop could be passed through the bead, and twisted it into the cone until it stops. I placed the bead on top of the wire and secured it. Made braids (found wool threads) and glued them to the head, the finishing touches were a golden halo and the ties of the cloak. This is the little angel I ended up with.
I hope this article was interesting and useful for you! I would be very interested to see the pine cone crafts you and your children made. You will find more New Year's ideas by tag: .
If you want to create attractive Christmas tree decorations from pine cones, then our exciting master class will show you new options and models of such crafts. Collect more cones, stock up good mood- we're starting!
New Year - preparation for which, as a rule, begins long before December 31st. In families where children are growing up, all adults, closer to the holiday, remember how to cut out snowflakes, glue masks, make garlands and other New Year's crafts.
New Year's toys made from pine cones
The most popular material for making beautiful New Year's toys are cones. They come in different varieties – pine, spruce, cedar, fir and have different shapes, “fluffiness” and even color, and therefore it is not difficult to come up with an image for a future toy. And if you use it additionally natural materials- all sorts of twigs, needles, acorns, etc., then you can make a whole collection of fashionable New Year’s toys, among which these will definitely be a success, and decorate the Christmas tree in an original way.
New Year's toy "Christmas tree"
Today we will look in detail at how easy it is to make simple Christmas tree decorations from pine cones, and you can decorate your beautiful New Year tree in a new way.
Christmas toys made from pine cones master class
The peculiarity of this master class is that it can be done by the whole family and it will be an exciting activity for all its members. Involve your children, it will be useful and interesting for them. Creating such a craft develops hand motor skills, imagination, teaches accuracy, and also gives a fabulous mood.
In order to make Christmas tree decorations from pine cones with your own hands you will need:
- medium and large cones;
- glue "Moment";
- medium size beads (color optional);
- gouache, brushes;
- a piece of wire and ribbon.
 Blanks for Christmas tree toys
 We create Christmas tree decorations from pine cones with our own hands
We paint pine cones with gouache green and let them dry. Using a thin brush and white paint, we imitate snow along the edges of the scales. Thus, the cone turned into a miniature Christmas tree, dusted with snow.
 Let's paint our bump
 We take beads and glue them onto each scale. Moment glue is perfect for this; it holds well, dries quickly and leaves no marks. Here is our pine cone tree, decorated.
 Glue the beads
 Now we need to make sure that our Christmas tree-cone can be hung on a branch. We form a loop from a thin wire, insert it into the top of the cone and fix it with glue. A new New Year's toy can be hung on a ribbon or rain. The Christmas tree toy made from pine cones is ready! Isn't it all very simple? To diversify such crafts, you can use beads of different colors or paint the pine cone itself in a different color and sprinkle it with sparkles.
 Wire loop for pine cones
 Can we cover our toys? clear varnish, then they will shine, or make small garlands out of them. Imagine, combine the incongruous, interest the children, their imagination is fine, and your home will be filled with New Year's little things that create festive mood. Good luck!
 Simple and beautiful toys for the Christmas tree
 As examples for New Year's toys, I suggest looking at these options:
You can decorate elongated cones as a Christmas tree using a small pot instead of a stand.
 Little Christmas tree
 Those who love wildlife, all kinds of spider bugs and other animals, can make this funny lover of climbing a Christmas tree. To do this, all you need is a cone, eyes and a wire that needs to be wound onto a thin rod.
 New Year's spider on the tree
 If you have small cones, then you can use them to make a Christmas tree toy in the shape of a star or a snowflake.
 Christmas tree decoration made from small pine cones
 Here are some other toy options christmas tree- turkey cones, here you will need felt and eyes.
 Birds made of cones and felt
 Long fir cones are suitable for making such wonderful mice, you will still need them walnuts, wire and separate scales for legs and ears.
 Collection of New Year's mouse toys
 The same cones are used to create such friendly penguins. The penguin's head is made of a foam ball and the wings are made of cardboard.
 Christmas penguins
 It’s very easy to make such a garland of cones, and it looks simply gorgeous, especially if you sprinkle the top of the cones with glitter and artificial frost.
 New Year's decoration
 You can also completely complement this craft New Year's decor. Well, have you stocked up on ideas for New Year's crafts? Share new information with your friends, subscribe to our updates and you will always have the newest ideas, images, thoughts, ideas and ways to implement them at your fingertips.
I hope that our models will serve you as good tips for creating your own New Year's collection, in which Christmas tree decorations made from pine cones will take their place of honor. Inspiration to you and see you! 🙂
How to make a festive gnome for a Christmas tree from a pine cone is shown in this video: