Now there are a great variety of toys, for every taste, color, and budget. But what could be better than toys and gifts made by yourself? What if it's a cat made of felt? Everyone loves cats, and felt is the most suitable material, it is soft and warm, you want to constantly touch and feel it, which is important, it holds its shape perfectly and does not crumble at all. Let's figure out what we need for our future cat.
Materials:
- 1. Felt;
- 2. White bar of soap;
- 3. Scissors;
- 4. Needle;
- 5. Threads;
- 6. Just a little bit of filler for toys (I use holofiber).
Step one
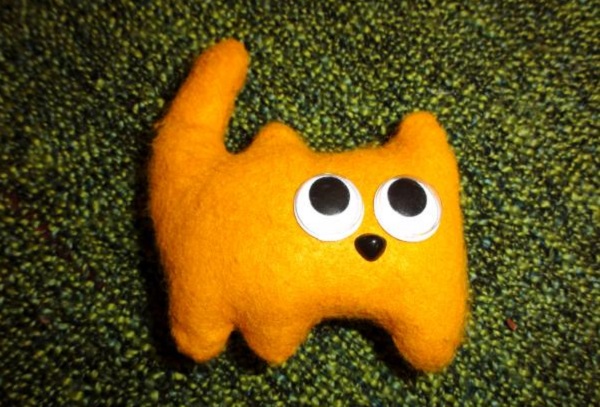
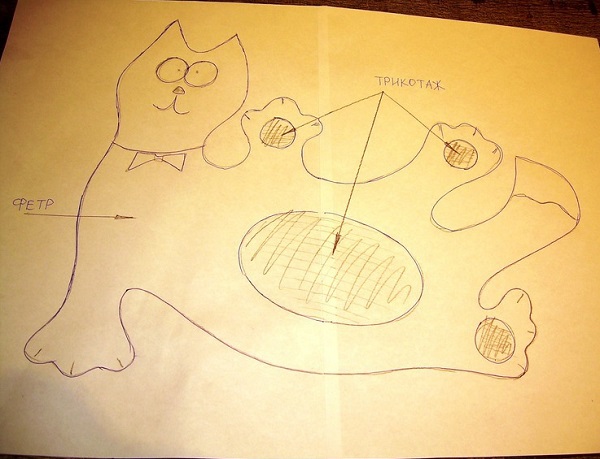
First of all, I drew a pattern and transferred it to felt using a piece of white soap, then using sharp scissors I cut out two body parts and one tail part. Also, I cut out two round pieces from the remnants of white felt; these will be the eyes of the cat.
Step two
Now you need to take one of the body parts and sew a tail to it, I do this using a back stitch with a needle, it looks like machine stitching and is very strong. To the second part of the body, I sew two white circles that will serve as the cat’s eyes.

Step three
I'm starting to embroider the cat's face. I decided to make the cat’s eyes with typical green cat pupils, I embroidered a red nose, white mouth and antennae, with contrasting threads. The face of the future cat made of felt turned out to be funny.

Step four
The two finished body parts now need to be connected. I fasten them from the front side with pins so that the parts do not “move away”, and I sew them together from the front side using a buttonhole stitch. I also leave a small hole at the bottom of the cat. Of course, don’t forget to remove the pins before stuffing the product with filler. Through the hole at the bottom, I stuffed the felt cat with holofiber, and sewed up this stuffing hole using the same buttonhole stitch.

Let's admire the result? I made such a cute, plump, black cat from felt. They say that black cats bring bad luck, but this is far from a misconception, because such a cute felt cat will bring happiness to its owner, and will be an excellent addition to the interior, which will bring comfort to the house, or will become a wonderful toy for children, maybe even a gift to a friend!
You can also sew a string on his head and carry it with you as a keychain. The materials for creating such a cat will be very cheap, and most of the accessories can be found in everyone’s home. The most important thing is that making a cat out of felt is very simple, and most importantly, it won’t take much time to create, it will only take a couple of free hours of your time to create such a cutie.
An example of creating a cat from felt in the video
You might also be interested in:
 Felt fox mask - master class, examples of masks...
Content
Felt makes excellent soft toys because... This is a very pliable and pleasant to the touch material; when cutting, its edges do not fray, and the choice of colors is quite wide. For example, you can make a cute cat out of felt as a gift, or use it as a keychain for a woman’s handbag or a bunch of keys. And if you increase the size of the pattern, you can sew decorative pillow in the shape of a cat for a nursery or living room.
Cute cat
To work you will need:
- Orange felt (medium density);
- Paper pattern;
- Threads to match the base material;
- Sintepon, cotton wool or synthetic padding for stuffing the product;
- Scissors;
- Finished nose and eyes;
- Glue "Dragon".
Work process
We cut out a cat pattern from thick white paper, having first drawn a drawing with a pencil.

We lay out a sheet of felt on a flat table surface, apply the pattern, and trace the contours of the part. We put the same pattern next to it, only in a mirror image, and outline it.

Using scissors, carefully cut out both parts of the future toy.

We fold the two parts face inward, sew them together along the edge with a backstitch with a needle, retreating from the edge of the fabric at least 3 mm. You can also lay a standard machine stitch. Or sew the toy manually from the front side with threads of a contrasting color, using a loop stitch. Last option will be an additional finishing element of the product.
When sewing the parts from the inside out, we leave a small section unsewn so that through it you can turn the product inside out and stuff the toy with soft filling. If you can’t turn out small parts by hand (legs or tail), help yourself reverse side ballpoint pen or pencil.
If there are no ready-made toy eyes and nose, at this stage they can be sewn to the face, having previously been cut out from scraps of black and white material.
To give the product volume and softness, we fill it with any filler (sintepon, padding polyester, scraps of soft fabric, cotton wool). We distribute the filler evenly throughout the toy, helping with the back of a pen or pencil. We pay special attention to the tail and paws so that they do not remain empty inside. But you also don’t need to stuff it too tightly, because... The seams may not hold up and come apart in places, and such a product cannot be called soft.

After filling, sew up the missing section of the contour with a hidden seam or on the outside with neat small stitches. We glue ready-made eyes with a nose to the stuffed toy, having previously adjusted their location on the cat’s face.
You can decorate such a toy in different ways: glue a nameplate, attach a bow near the ear or a butterfly on the neck.
Cheerful cat-fey
This toy will cause a lot of positive emotions, will quickly cheer you up. It’s not at all difficult to make, you just need to have some material on hand with a good mood to boot.

To work you will need:
- 1.5 m of gray thin felt;
- A piece of knitted fabric in gray tones for the legs and belly;
- A piece of black and white leather;
- Red ribbon for scarf;
- Hollow fiber for stuffing;
- 2 eyes;
- Threads with a needle;
- Scissors;
- Sewing machine;
- Paper pattern with a design.
Work process
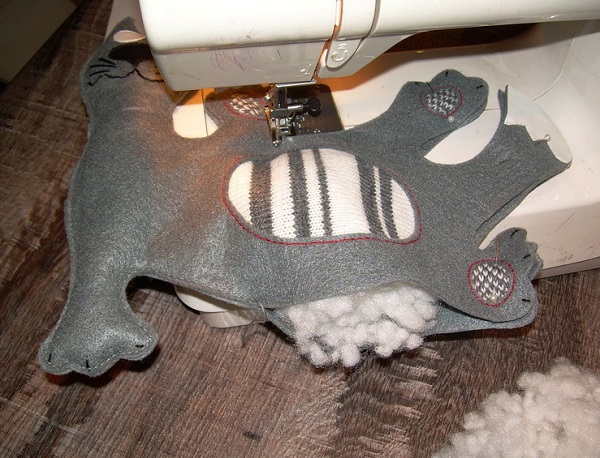
On a sheet of white paper we draw a cat figurine, marking the areas with knitted inserts. Carefully cut out the cat along the contour with scissors, cutting out areas with knitwear (3 legs and tummy).
Per sheet gray felt We apply the pattern, trace it along the contour, not forgetting to mark the holes for the inserts. Cut out the cat and holes for knitted inserts. If the head does not fit on a standard sheet of felt, then it can be cut out separately and then sewn to the body with a connecting seam.

We also cut out the back - the back part of the toy, only without holes, in a mirror image.
You can use any knitted inserts old sweater or golf of a suitable color. If you don’t find such a thing, then small parts can be knitted separately by hand from gray and white yarn with knitting needles or crochet. Size knitted parts there should be a little more than the holes allocated for them so that they can be sewn in neatly. It’s better to cut off the excess after sewing.
From white leather (you can use any other material) we cut out two circles for the eyes. Cut out a nose from black material. We glue the resulting parts, and for reliability we additionally sew them with black thread. We randomly embroider a mouth with a mustache using a stem stitch, making preliminary markings with chalk or a pencil. We also glue or sew a piece of white material onto the tip of the tail.

Now we pin the knitted piece of fabric to the hole on the stomach, and sew it on the machine with threads of a contrasting color (in our case, red threads). We perform the same operation with the pads of the three paws. We cut off all excess knitwear with scissors, retreating 0.5 cm from the edge. We embroider three claws on each foot with black thread. This completes the work on the front part of the toy.
Now let's apply top part toys from above to below. For convenience, we chop off the parts in several places with pins.

We begin to sew along the contour on sewing machine with gray threads, making a seam allowance of 0.5 cm from the edge. Gradually, when grinding the parts, we fill the toy with holofiber or other filler, filling it not very tightly.
Having completely sewn the parts together, we tie the threads in a knot and hide the ends in the fabric. If there are any unevenness along the contour, carefully align them by cutting them off with sharp scissors. The cat is almost ready, all that remains is to glue the toy eyes and tie a scarf around his neck.
These toy cats can be made by the whole family; children will especially enjoy the work. Kids can be tasked with cutting and gluing parts. Older children can embroider themselves or sew parts together under the strict guidance of their parents. Moreover, all the presented patterns are quite simple, and the toys are easy to make. Working with your hands will bring you and your children a lot of pleasure, and felt cats will always please the eye. Everyone good mood and creative success!
Post Views: 718
Felt cats are cute creatures that will decorate any home. It is unlikely that anyone will argue with this. Everyone loves kittens, so decorative items featuring them will be great gifts for your loved ones.
On Aliexpress you can buy inexpensive, high-quality felt in 60 different shades (look at this link). Select the size you need and indicate the desired color in the message with your order.
We offer you a pattern with cats, with which you can create unique and very original accessories with your own hands. These soft toys look cute and very funny.
Such crafts will fit perfectly in a house where there are children. Whatever you decorate (pillow, potholder, towel, etc.), your child will definitely love it. However, adults are also unlikely to remain indifferent.


In the photographs you will find several interesting ideas on using cat patterns. You can enlarge or reduce the stencil to the desired size and transfer the image to any material.


Then everything is in your hands. Feel free to make from a pattern soft toy(stuff it with padding polyester - it will turn out great!), decorate household and household items with felt kittens kitchen utensils, make felt brooches, make appliques on children's things. In short, wherever you want to see cats, put them there!


Hello to all my subscribers and guests of this blog! Ekaterina is in touch with you. As I promised in one of my articles, today I will share with you patterns for felt toys. The selection will not be too large, I offer you only what I liked most, what I found on the Internet.
Remember mine, from it you can also take some ideas and ideas on how you can sew these wonderful, and most importantly beautiful, unique felt toys on different topics. If you are not into needlework, then perhaps you like to crochet such beauty in amigurumi style, then go ahead and knit the most important symbol of the coming New Year.

Well, for those who see and think for the first time about what kind of material this is, I will say right away that this is the most unpretentious and easy-to-work material. With it you will definitely not know grief, it does not crumble and the parts are cut out very carefully and beautifully the first time.
Nowadays the world does not stand still so much that innovation is on the rise, and in this direction too, for the little ones you can even make a carousel over the crib.
And for larger children, there are ideas and options for work from various animated series; just imagine how happy a child will be if you give him, for example, a set from the cartoon Super Wings.

Or, for example, cute little ones.

Little penguin Pororo.

When my kids were a little younger, they really loved watching Peppa Pig, of course, within reason).

Kitty, you can even make it soft, just fill it with padding polyester.

Did you recognize these beauties? Yes, yes, PAW Patrol.

Malyshariki or Smeshariki are perfect for the tiniest kids. I can send the diagrams and master class to anyone who needs them, write a comment at the bottom of this article (I will be happy to share what I have in my piggy bank with you).

We have a felt alphabet at home with animals and animals. Isn't it brilliant? What do you think?


If you need all this fun alphabet in the form of animals, write.

Girls can sew such a doll.

The holidays are coming soon and that’s why I wanted to present you with something so magnificently beautiful, what do you think of this idea? How much is there different options and a squirrel, a lion cub, a zebra, a penguin, bat and even Pikachu.


Master class on how to sew felt souvenirs
Nowadays it has become very fashionable to sew toys for children who have just been born or when they are one year old. Usually they do this in the form of a name and some kind of plot. I suggest you watch this video, just for those who don’t know how to properly sew together the parts of felt toys, this video will help you figure it out, watch all the stages of work:
Well, and of course, if you dream of sewing some fairy tale hero or cartoon characters, then be sure to use this video instruction, based on it you can subsequently make absolutely any animals or people, the main thing is to find and print the template of the one you plan to sew:
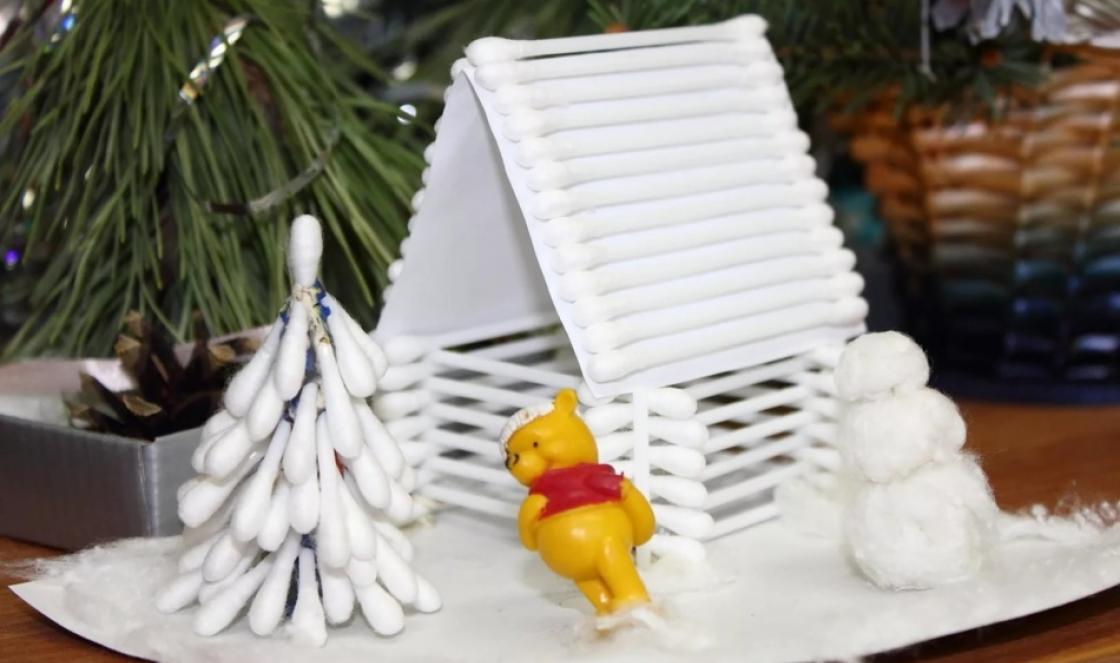
Christmas felt toys for the New Year 2018
When the time comes for the New Year's Eve, everyone will immediately start creating, so here are some small ideas for you.
Craft in the form of a deer.
House with a white snow cover.  Beautiful Christmas tree.

Gingerbread men.

Heart.

The symbol of this year is a dog, so you can make one for the Christmas tree; below I will present you with even more patterns with different breeds of puppies.

Patterns of New Year's toys made of felt
Of course, the symbol of any year is mittens, mittens, Christmas trees, horses, since all these accessories always decorate the spruce.


You can even make a keychain and give it as a souvenir. 


Or this table set.

Christmas bell.

Patterns and patterns of felt animals for beginners
Now I offer you fairly simple diagrams, for those who are at the very beginning of their journey. Choose and do for your health!
Funny cat.


Teddy bear in all its glory.


The giraffe is adorable.


Insects such as butterfly and bee.

Bookmark in the shape of a delicate butterfly.

Foxy sister.


This bunny with long ears captivated me.

Dog and puppy.


These are such mischievous cute puppies.


Owl toy.

A rooster and a family of hens and chicks that can be made for Easter.


You can sew various other animals, for example it could be a monkey, a mouse, an elephant, a lion, a pig or a bear. They all have the same design, just design the face differently.


I also really liked the idea of the angel.

Toys for children that develop fine motor skills
For the little ones there are options for crafts in the form of puzzles, it looks quite interesting:


Or you can make a game like this, choose “clothes” for the animal))).

Or make a finger fairy tale or cute animals.

The most famous fairy tale is Teremok.
Or lacing.


That’s all I have, what I liked I shared with you, so take threads, a needle, scissors and felt and create different masterpieces. Enjoy your creative fruitful work everyone. See you soon))).
Sincerely, Ekaterina Mantsurova
Beautiful gray cat made of felt on a pillow stand will decorate the bedroom or become a baby’s favorite toy.
In this master class you will find a pattern, step by step photos and descriptions of all the steps to help you sew a felt cat with your own hands. You can experiment with size, decor and even colors to get a unique craft. The work will take one evening, no special sewing skills are required. For a symmetrical decor of the sofa in the living room, you can sew two cats at once.
Materials for sewing felt toys
Felt sheets come in different densities; soft and not very dense material with a thickness of 1 to 1.5 mm is suitable here. Thick sheets are more suitable for crafts that hold their shape, such as, or.
To sew a felt cat with your own hands, prepare:
- soft thin felt in gray and pink colors;
- pink, gray, black threads, sewing needle;
- filling for toys (holofiber, synthetic fluff), in order to save money, you can take it from old jackets;
- lace ribbon;
- tailor's soap, chalk or a special pencil for cutting;
- scissors.

The height of the figurine in this master class is 14 cm. If you need a larger cat, increase the proportional template of each part.
Pattern and sewing technique
Transfer the cat pattern onto paper and cut out all the details.

Cut out two identical pieces of gray felt for the front and back of the body and two ears. Cover the front and back components of the head one at a time. For the cat's tail, cut a strip of felt measuring 1*12 cm. From the pink piece, make a nose in the form of a small triangle.

Place the two front pieces of the cat's body together and secure with a seam over the edge. Make the stitches closer to each other.

At the end, leave a small distance (2-3 cm) for stuffing with filler.

Fill with holofiber. If you want the cat to be more voluminous, stuff it more tightly. Sew up the hole.

Make a line in the middle to visually separate the paws.

Sew through using regular stitches, passing the needle wrong side and back.
Tighten the stitches so that the line is clear.

Also assemble the second component of the cat’s body from felt with your own hands.

Sew both body blanks to each other, aligning them along the bottom (where the paws are).

On the front side of the cat's head (which has ears), draw lines for the eyes and nose in chalk.

Embroider the contours of the nose and eyes with black thread. If you don't want to embroider, buy ready-made eyes at a craft store. However, for kids embroidered eyes are safer than sewn fittings.

Then sew the pink triangle nose into the center of the muzzle using blind stitches.

Place the separately cut ears on the back of the head. Align all the cuts.

Place a dotted line along the outer contour of the ears. It is better to do this from the front side.

This is what a felt cat's face looks like after decoration.
Sew the back side of the head to the front seam over the edge. Leave a space in the middle and stuff your head through it. After this, sew up your head.

Connect the head to the body by making stitches around the neck of the toy.

Take the tail. Starting at one end, roll the strip into a tube and secure with stitches.

Sew the entire tail like this.

Without cutting the thread, sew it to the middle of the back of the toy.

The cat figurine is ready. So that she stands confidently on her paws and does not get lost, sew a small pillow. If the toy is intended for children's games, you can do without a stand.

Cut out a rectangle of pink felt measuring 8*16 cm for the pillow.

Fold it in half and sew along three sides, leaving 3-4 cm unsewn at the end.

Turn the product inside the hole and straighten the corners. Fill the pillow with holofiber, but not very tightly.

Tie the cat beautiful bow on the neck.

Place the hand-sewn cat in the middle of the felt pillow and sew the bottom of the toy to the surface with hidden stitches.

This original pillow can complement the interior of a bedroom, living room or nursery, decorating a bed or sofa. See how to sew in our other tutorials.
A master class on sewing a felt cat on a pillow with your own hands was prepared by Zhanna Galaktionova. We also have some made from this beautiful and easy-to-use material.