LOOK AT IT...FINALLY I'M KNITING SOCKS FOR THE FIRST TIME IN MY LIFE.BUT KKKKKKKKKKKKKKKKKKKKKKKKKKKKKKKKKKKKKKKKKKKKKKKKKKKKKKKKKKKKKKKKKKKKKKKKKKKKKKKKKKKKKKKKKKKKKKKKKKKKKKKKKKKKKKKKKKKKKKKKKKKKKKKKKKKKKKKKKKKKKKKKKKKKKKKKKKKKKKKKKKKKKKKKKKKKKKK of its socks for the first time in my life for the first time in my life..
Introduction
Classic socks are usually knitted in stocking stitch using stocking needles (these are 5 identical double-edged needles). Knitting begins with an elastic band (1×1 or 2×2). Yarn consumption is 30-80 grams for children and 100-150 grams for adults.
Required measurements:
OPS (Instep Circumference) - tightly measures the distance from the middle of the heel through the highest point of the instep to the middle of the heel;
DS (Foot Length) - measured from the heel to the end of the little toe.
To knit these socks for 3-year-old children, I needed about 30 grams of thin wool yarn of dark blue color “Warm and Cozy” and blue yarn “Children’s New” from the Pekhorka brand, and of course, stocking needles No. 2.
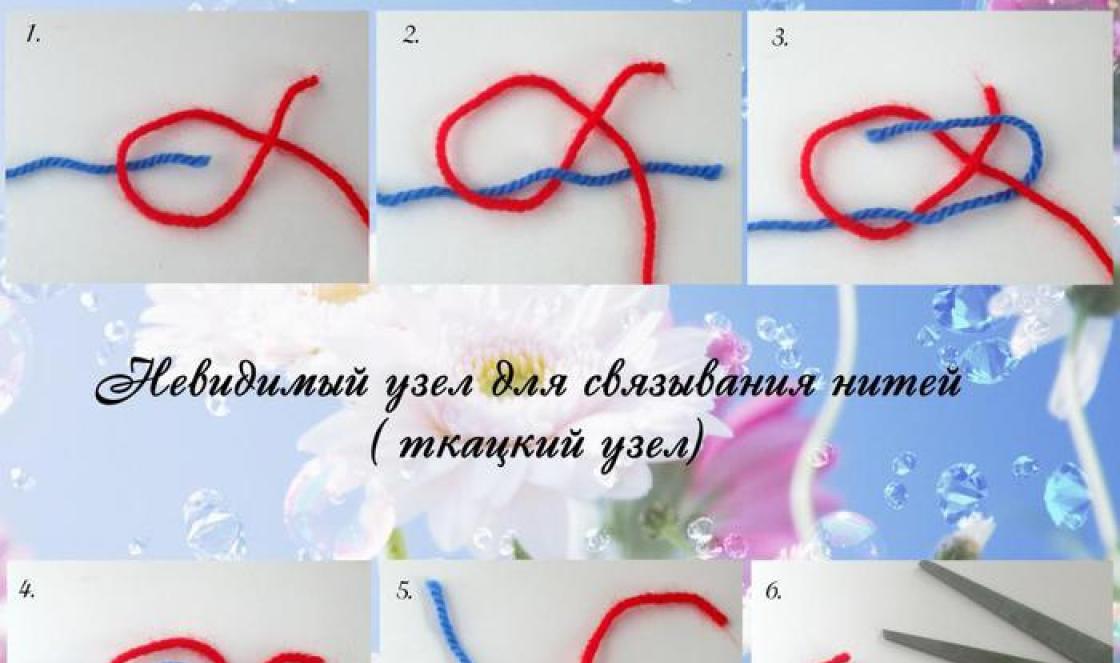
We will start knitting socks (or rather, socks) by casting on 32 stitches on two knitting needles (the number should be divisible by 4) of dark blue color. Did you dial it? Now I want to offer you my favorite way to start circular knitting, which for some time now I began to use constantly (when knitting in the round, of course). ;)
Starting knitting a sock in the round
Cast on the loops and start knitting the sock in the round
To do this, you need to release one knitting needle and carefully distribute 32 loops (8 each) onto four knitting needles without knitting. Pulling up the working thread, we tightly begin to knit the loops of the 1st knitting needle with the 5th knitting needle (photo) with a 2×2 elastic band.
We knit the sock first with a 2x2 elastic band
We knit the sock first with a 2×2 elastic band
We alternate the color stripes in this order:
3 rows - dark blue;
2 rows - blue;
2 rows - dark blue;
3 rows - blue;
2 rows - dark blue;
2 rows - blue;
2 rows - dark blue.
The sock cuff is knitted with 2x2 elastic
Having knitted the sock cuff with a 2×2 elastic band, we move on to stockinette stitch
Having knitted 2x2 3.5 cm with an elastic band, we move on to stocking stitch - stockinette stitch, not forgetting about the stripes (4 rows in each color). And when switching from one color of yarn to another, we cross the threads among themselves (photo) so that there are no unnecessary holes in the transition areas and we pull the threads tighter.
When the height of the entire knitting reaches 9 cm, we begin to form the heel.
To do this, we will knit only loops from two knitting needles, transferring them to one (24 loops) and using blue yarn. We knit an even straight fabric to the height of the heel (usually 3.5 - 6 cm), in our case - 4 cm.
We begin to form the heel of the sock
Shaping the heel of the sock
To prevent the heel of the sock from rubbing too quickly, it is recommended to attach a nylon or some other strong thin thread to the woolen thread, which breaks off after the heel is knitted;
Also, for strength, the heel of the sock can be knitted with crossed loops or “granny” loops, which is what I did in this case.
Having finished knitting with the front row, we begin to round the heel. To do this, we will divide the knitting (24 loops) into three parts, in our case - 8 loops each.
If the number is not divisible by 3, add the remainder to the middle part, but the side parts should ALWAYS have the same number of loops.
On the wrong side we knit 15 loops (8 loops of the side part and 7 loops of the middle part), the next 2 loops (this is 1 loop of the middle part and 1 loop of the second side part) are knitted together with a purl loop (photo above).
Let's start rounding the heel of the sock
Unroll the knitting, remove the edge and pull it tight. We knit the middle part from the front side, knitting together the last loop of this part with the first loop of the side part (photo). We turn the knitting again... It is important to remember that the number of loops in the middle part remains UNCHANGED.
The heel of the toe is ready!
The heel of the sock is connected!
When we knit all the loops of the side parts together with the outer loops of the middle part, only 8 loops of the middle part should remain on the knitting needles. We finish knitting the heel by knitting the front row (photo above).
We continue to knit the sock
Casting on new loops
Using the edge loops of the heel on the front side of the sock, we cast on new loops (in this case, 10 loops) and knit them with knit stitches. Then we knit the loops from the two knitting needles we left before knitting the heel. Again we cast on new loops (10) from the edge loops on the other side of the heel and knit them with facial loops. Thus, we are back to knitting a sock in the round again.
Circular knitting instep sock
Returning to circular knitting
Having distributed the loops as shown in the photo above, we find that on two knitting needles (heel loops) we have not 12 loops each, but 14. Don’t be alarmed - this is how it should be. We will remove the “extra” loops by knitting them two together through two rows of the circle, but the socks will not put pressure on the instep. It is better to make these decreases along the edges of the foot (also for the comfort of the leg). ;)
Knit to the end of the little finger
We continue knitting until the end of the little finger
We continue to knit the sock without decreasing (there are again 48 stitches on the knitting needles), not forgetting to change the colors of the stripes every 4 rows, until the end of the little finger, that is, 6 cm in our case.
Having reached the end of the little finger, we begin to decrease the toe loops. In this case, you can again add a strong thread, as when knitting the heel.
How to decrease the toe of a sock
Reducing toe loops
Depending on the length of the toes, decreasing the toe loops can be done either through a row (if the toes are long) or in each row (as in our case). To do this, we will knit 2 loops together at the beginning of each knitting needle until 1 loop remains on the knitting needles. Now we will break the thread (not very short, of course) ;) and sew the remaining 4 loops with it, pulling them tightly, and hide the end of the thread with a hook and secure it on the inside of the sock.
Toe and toe knitted
The toe and sock are ready!
If you decrease the stitches using knit stitches (as I did), then you can see these cute braids on the toe.
Naturally, we knit the second sock in the same way as the first. As a result we get THIS:
Knitting socks (master class)
Socks are tied, hooray!
Knitting socks (master class) is finished! As I already wrote at the beginning of the post, based on this master class, you can knit baby socks with any pattern and from any yarn in 2-3 days in order to take part in the competition, which, I remind you, is held here.
If you, like me, live in cold areas of our country, then you probably know that the best protection for your feet in cold weather is felt boots and woolen socks. You especially need to take care of your child’s legs, because everyone knows what serious diseases hypothermia can cause in a person’s lower extremities. No synthetic socks will protect you from the cold as much as real wool, even if they are very thick and terry. Synthetics do not allow air and moisture to pass through well; feet in such socks may first sweat and then freeze. This will not happen with wool socks; your feet will always remain warm and dry.
When preparing for a walk, be sure to wear knitted wool socks
How to knit socks for a child: MK with photo

Be sure to take into account the density of the knitting. For example, if someone’s loops are weak, then fewer loops can be cast on. My product turns out to be quite dense. And yes, over time, all knitted socks stretch a little.
What you need
For work we choose regular double needles No. 1(if I'm not mistaken, since they were bought a very long time ago). In general, socks are knitted on 5 needles, but in our case there are few stitches, so 4 knitting needles will be enough, otherwise they will constantly slip out of a small number of loops.
Of course, you will still need threads. For socks It is better to choose threads with maximum wool content. They will still be worn over tights or thin socks, so they will not prick your legs. These are exactly the ones that are used in my MK, but, as I already wrote, they were purchased from local farmers. There are no such things in the store, but there is a good replacement - goat fluff. I always bought it for. It is almost not prickly, very soft and beautiful. True, each time you come across something different: sometimes it is a thin and very fluffy thread, and sometimes it is quite thick. If the thread is thin, then it is better to knit in two threads; as the second, you can use ordinary children's yarn (although it is not scratchy at all, its wool content is small).
Bootleg
Step 1. Cast on 30 stitches and begin knitting in the round. We knit approximately 7 cm with an elastic band - knit 2, purl 2. loops. You can alternate one after another. The height of the boot can also be increased or decreased as desired.


Heel
Step 2. Now we knit another 7 rows and begin to form the heel. To do this, separate 7 loops onto an auxiliary needle (or a pin). Knit the remaining loops (23 pieces) back and forth in stockinette stitch - in knit rows we knit with knit stitch, and in purl rows, respectively, with purl stitch. We knit the outer loops as usual, and not as edge loops.


Step 3. Having knitted 8 rows, the height of the heel will reach approximately 3 cm, you can “round it off”. To do this, knit 7 stitches, and knit 8 and 9 together. The next 5 loops are knit, and 6 and 7 are together.
 Form the heel of the sock. Loops are decreased in marked areas
 Unfold the work, we don’t knit the first loop, we just change it to a new knitting needle. Purl the next 5 stitches, purl the 6th and 7th stitches together.
Turn the work again, slip the first stitch onto the knitting needle without knitting, trace. 5 loops - knit, 6 and 7 - together.
Then unfold the sock again and repeat the above. We knit this way until there are 7 central loops left on the knitting needle.
Foot
Step 4. Our heel is ready. Now on the sides, we need to cast on 7 loops. Note that now we will have 2 loops less than at the beginning of knitting (there were 30 loops, now 28).

 We continue to knit a sock for the child
 Pick up stitches on the sides and begin knitting the foot. Knit in the round with knit stitches. Having tied 9 -10 cm, begin to close the loops. Perhaps your child has a larger or smaller leg, then you will need to close the loops earlier or a little later. Be guided by the little finger: when the toe covers it, you can complete the work.
Step 5. To smoothly complete the sock, decrease 4 loops per row. In our case, we cast 28, which means we need to knit every 6th and 7th loops together (and so on 4 times in a row). On the next row, knit every 5th and 6th stitches together. Subsequently - 4 and 5 together. And so on until there are 4 loops left on the knitting needles. Then cut the thread, leaving a tail about 5 cm long. Pass the remaining 4 loops through it one by one, tighten the thread, tie a knot and cut. Knitted socks for a child are ready!

 The length of the foot of the sock is 15 cm (the photo was taken after wearing, as you can see, the socks have already stretched)
  Toe height - 14.5 cm
  The width of the sock shaft is 9 cm
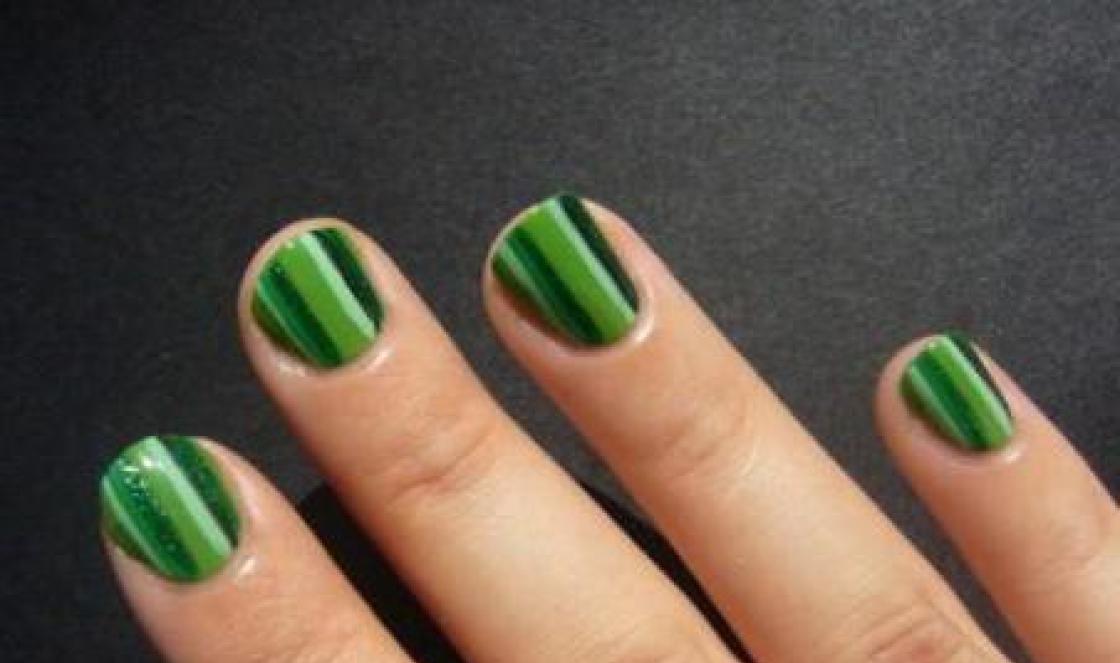
 You can make your socks more elegant by knitting them in strips of different colors of yarn. Another option is to knit socks with a pattern, for example, they will look very beautiful, but from a practical point of view they may not be very comfortable - it will be a little tight for the foot in the boot. Therefore, it is better to give preference to flat patterns created from multi-colored threads.
P.S.: I decided to add a little to the article. This fall I picked up my socks again. My son’s leg has grown a little, now we are 3 years old, so I added 2 loops when casting on, i.e. now I am casting on 32 loops. Just right for legs 15.5 - 16 cm long.
 Socks for a 3-year-old child: number of loops 32, foot length 16 cm
 Knitting for babies is a pleasure, especially if the babies are newborns. Things are knitted quickly and easily, because they are still very tiny. It’s especially fun to knit little socks for babies 3-6 months old. So that the baby’s feet are always warm during the cold season, since when newborn babies are born, they still do not know how to store heat in themselves, to warm themselves, so it is so important for mommy to take care that the baby does not become hypothermic, and that his feet are always warm. But it’s difficult to put socks on a newborn; for babies under 3 months old they will be more comfortable.
If you don’t yet know how to knit socks or perhaps aren’t confident in your abilities that you can handle this needlework, don’t despair, everything will certainly work out. And this master class will help beginners, since all the steps are described in detail and accompanied by photographs.
So, let's arm ourselves with materials:
- cotton yarn 100% gray and a little white
- sock knitting needles No. 3.5
Knitted socks for babies (from 3 to 6 months) - with description and photo for beginners:
We cast on 32 loops on the knitting needles.
Next, distribute all the loops onto four knitting needles in equal numbers on each (in this case, 8 loops). 
From the first to the 24th row we will knit an elastic band for socks, which is knitted alternately from one front and one purl loop. As a result, we get such a tall and neatly knitted elastic band. 
After the elastic is knitted, we decrease one loop on each knitting needle, getting a total of 28 loops.
The next stage is the stage of forming the heel; for this purpose, we combine the loops from two knitting needles on one knitting needle and knit 8 rows with stockinette stitch. 
Next, we knit 10 knit stitches and decrease by knitting two knit stitches together. Turn the knitting over, knit 6 purl stitches and decrease again. In this way, we decrease until there are 6 loops left on the knitting needle. The heel is ready. 
Next, we divide the loops on the knitting needle, which was used to knit the heel, in half into two (three loops on each knitting needle) and begin to pick up 4 knit loops on the side of the heel during the knitting process (so that there are 7 loops on the knitting needle again). 
We knit the next 10 rows in a circle with facial loops. Then we change the gray yarn to a white thread and knit the next three rows with facial loops. 
The final stage of knitting is decreasing the loops. To form a sock, in each next row we decrease one loop on each needle until one loop remains. 
After this, cut the thread, thread it through a tapestry needle and thread it through all four remaining loops. Tie it well into a knot, fasten the thread and cut it off. 
Knitted baby socks are ready. I hope my description and photo will help beginners understand knitting. 
Soft and warm socks are always needed for a child, even in summer there are cold days. Children's socks should still be beautiful and bright. Of course, everyone will choose the color to their own taste, but we will take high-volume acrylic, children's yarn (pekhorka) of three colors, with a weight of 50 grams, the length of the thread is 175 m. You need knitting needles No. 2.5 to knit 5 socks.
We cast on 40 stitches on two knitting needles, place them 10 on four knitting needles, fold them into a square and start knitting in circular rows.
0 row. Set of 40 loops.
1 row. 40 p. We knit an elastic band, one front loop (kl.), one purl loop (sp.).

2 – 8 rows. 40p with elastic band. But, since socks always tend to slide off the leg, we will provide holes for a lace that can be used to pull the sock along the leg.
9 row. We knit in stockinette stitch, but we need to make 8 holes - 8 yarn overs every 5 stitches.

10 row. We knit with knit stitches, after the fifth, we knit the yarn over together with the sixth loop into one.

13 – 14 rows. We let in a blue thread, 1 blue through 3 blue ones.
15 – 16 rows. 3 blue, 1 blue.

17 – 18 rows. We let in a white thread, 1 white, 3 blue, do not cut off the blue one.
19 – 20 rows. 3 white, 1 blue.

21 – 22 rows. 3 white, 1 blue.
22 – 23 rows. 3 blue, 1 white.
24 – 25 rows. The entire series is blue.

Heel in a sock and how to knit it.
Let's do the calculation. For the heel, they usually take half of all the loops, for us it’s 20. But the number must be a multiple of 3, which means you need 21. Let’s remove one loop from the adjacent knitting needle.
1st – 2nd row. Using white thread, we will make a row of 21 loops, which we place on one knitting needle. We will knit with knit and purl stitches, turning the knitting.
3 – 4 rows. Blue thread.
5 – 6 rows. Blue. Then we alternate again.
7 – 8 rows. White.
9 – 10 rows. Blue.
11 – 12 rows. Blue.
13 – 14 rows. White.

If we divide 21 by three, we get 7 loops - this is the width of the heel, which will remain unchanged, it will be in the middle of the row, and those loops that are to the right and left of it will be reduced with each row.
Remove the first loop, knit 12 stitches, knit the next two in order as one.

We turn inside out, those 6 stitches that remain on the knitting needle do not touch yet. We take off the first one again, knit five, and two into one.

There are 6 loops left on the sides, 7 in the middle. Turn to the front side.
We remove the first one, knit 5, two into one. We continue this way until only the middle 7 loops remain.
This is the heel that has formed.
Now we string 7 loops on the free knitting needle from the side surface of the heel.

And we knit with a white thread, as we knitted before, in a circle, until there are 10 loops on the knitting needle.

26 – 27 rows. Let's make two rows of white.
28 – 29 rows. Let's start the ornament: 3 white, 1 blue.
We knit according to pattern No. 2 (see above).
30 – 31 rows. 1 white, 3 blue.
32 – 33 rows. 3 blue, 1 blue.
34 – 35 rows. 1 blue, 3 blue.
36 – 37 rows. 3 blue 1 white.
38 – 39 rows. 3 white, 1 blue.

40 – 41 rows. 3 white, 1 blue.
42 – 43 rows. 3 blue, 1 white.
44 – 45 rows. 3 blue, 1 blue.
46 – 47 rows. 3 blue, 1 light blue.
48 – 49 rows. Blue
50 row. Let's start knitting the toe. The row begins and ends at the side. We will knit the first loop, then two into one.

And to the end of the knitting needle, we also knit the next one until there are three loops left.

We knit two into one and the last one as usual. The third knitting needle is like the first, the fourth is like the second.
We perform such actions until there are 4 loops left on the knitting needles. In the next row, reducing the row by another 4 loops, we will leave 6 loops on two knitting needles.
It remains to close the last row; it is most convenient to use a crochet hook for this. Let's insert it into both first loops (on both knitting needles) and, pulling the working thread through them, lower the loops from the knitting needles.
There is a loop left on the hook, insert it again into the next two and pull it through again, but this time through the loop on the hook until the end.

Cut and hide the thread.

Let's make a crocheted lace, 40-42 cm long, thread it through the holes that were left at the beginning of knitting after the elastic band, make and attach tassels.
The socks are ready, the foot length of our sock is 14-15 cm. It took 30 grams of yarn. Happy knitting!

Knitted items with ornaments always remain at the peak of popularity. Our master class on knitting socks clearly showed how you can tie children's socks knitting needles with a simple pattern in white, blue and blue colors. This color scheme is more suitable for boys; for girls it is better to choose a white-pink-red combination.
Master class from Irina Kiseleva for Handicraft Lessons.
Knitted children's socks for beginners on two knitting needles
This master class provides instructions for making knitted socks with two knitting needles for a child up to 2 years old (foot length 11-12 cm).
Materials
- knitting needles No. 3;
- wool/acrylic/bamboo yarn (50 g/175 m) - 25 g.

Manufacturing Guide
Cuff (back).
We put half of the elastic loops on the knitting needles - 22 pcs.

We knit 14 rows (=4 cm) with a 1x1 elastic band.

We switch to the “front stitch” pattern and knit another 14 rows (= 4 cm).

Heel.
To form the heel, we decrease at the beginning and end of each knit row, knitting 2 stitches together after the first and before the last edge stitch. We make decreases until there are 12 stitches left on the knitting needles. We knit the purl rows using purl stitches according to the pattern. As a result, we get a canvas narrowed on one side.

The second stage of forming the heel detail consists of increasing the number of loops by adding them from the previous (already knitted) edge rows. Use a knitting needle to pick up the edge of the bottom row and knit it. Next we knit all the remaining stitches of the row with knit stitches. After the last loop is completed, we pick up the last edge of the previous row and make it a knit stitch. Thus, there are no longer 12, but 14 loops on the knitting needle. We knit the purl rows according to the pattern. We make such additions until there are again 22 loops on the knitting needles. As a result of the work, we obtain a canvas with a convex part (heel).


Sole.
We knit all the loops with straight fabric for 28 rows (= 8 cm).

We form the toe according to the same principle as the heel detail: first decreasing to 12 loops, and then adding from the previous edge rows to 22 loops.


Rise.
We knit 22 loops with straight fabric over 28 rows (= 8 cm). When making this part of the sock, in each front row at the beginning and at the end, together with the edge loops, we knit the edge loops of the lower part of the sock (sole). As a result, the sole part is connected to the upper part of the foot. The number of loops remains the same.


Cuff (front).
We knit 14 rows (=8 cm) in stockinette stitch, connecting the back of the cuff to the front in the same way as the sole to the foot.

We perform 14 rows (=8 cm) of 1x1 elastic and close the loops.

We cut off the thread, tighten its tip and hide it on the wrong side of the product. The sock is ready.
We knit a pair for this sock in the same way.