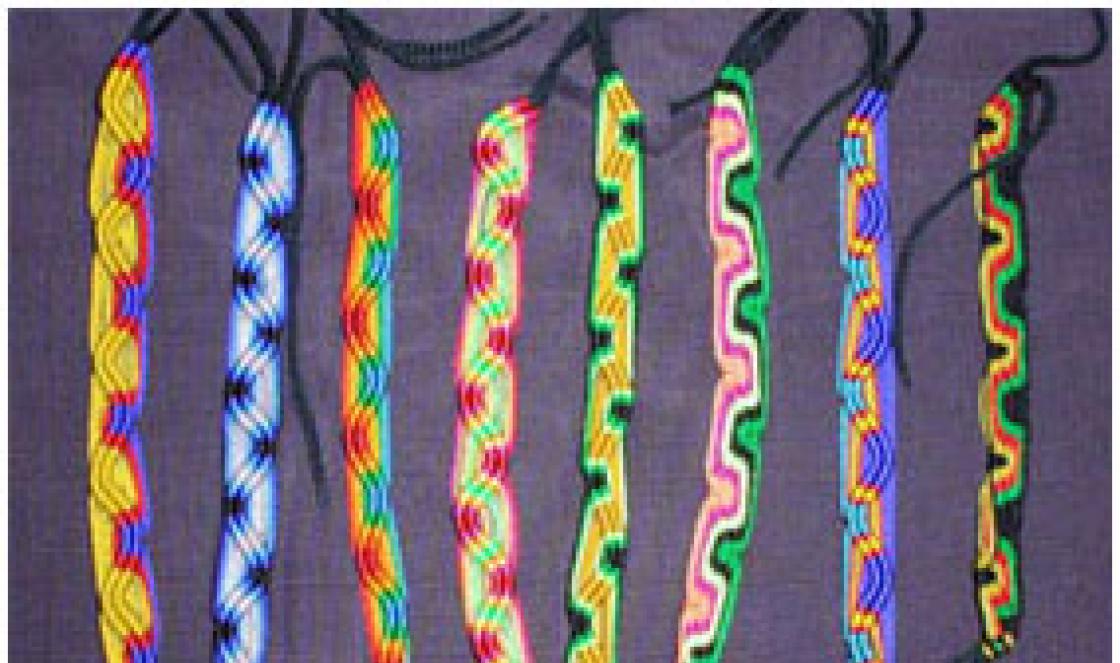
Baubles or friendship bracelets have come to us since the days of the hippies. And to this day, many young people maintain the tradition of weaving baubles. We would like to present to your attention 7 patterns for weaving baubles. They will help you quickly and easily make beautiful bracelets. In order to navigate the diagrams, familiarize yourself with the main weaving knots and symbols. Learn how to do right or left, right-left or left-right knots. Remember that each knot consists of two parts. We weave bracelets in rows. The working thread in the diagram is the one with which the knot is made. The warp thread is the thread on which the knot is made. In the diagram, circles with arrows show types of knots made from two adjacent threads.
The colors that are used are blue, pink and white. These colors mean friendship, tenderness and purity. This bauble is very easy to weave. You will need 3 long threads in blue, pink and white. The threads must be folded in half. Leave 10cm/4in from the edge. Tie in a knot and pin to a pillow or pant leg. Arrange the threads in the sequence 2 blue 2 pink 2 white. We begin to weave according to the pattern. We move from left to right along the rows, performing a sequence of nodes. The diagram shows a fragment of a bracelet. Having finished this fragment, we continue to weave knots in the same sequence, but instead of blue the color is now white.
This bauble is made in the colors of real hippies. Green, orange and white are the hippie tricolor. The scheme uses light yellow instead of white. We will need four long threads of dark green, green, light yellow and orange. We fold the threads in half and tie them into a knot, fastening them. We arrange the threads according to the diagram. We start and end the first row with dark green knots. The diagram shows a fragment of a bracelet with a dark green square. Next, according to the pattern of weaving the baubles, we alternate dark green with green.
Bauble 3 is woven from threads of 8 colors. The colors of the baubles indicate love for nature, sun, sky, trees, flowers, etc. A blue thread is taken twice as long as the others and folded in half. The remaining threads of light blue, yellow, brown, green, dark green, lilac and gray are single. The colors of the pattern constantly alternate according to the scheme.
The fourth pattern for weaving a bauble consists of 5 colors. The bauble is woven from 20 threads. For this we need threads of blue, green, yellow, orange and pink. We take two long threads of double length of each color, fold them in half, place all 20 threads as indicated in the diagram. We repeat the specified fragment of the pattern the required number of times.
The spectacular color combination of white, light blue and pink signifies tender feelings and the desire for love and friendship. This bauble is woven very simply. We will need two double length light blue threads, 1 double length pink thread and 1 double length white thread. Fold the threads in half, tie a knot and secure. Then we weave according to the pattern. We repeat a fragment of the bauble weaving pattern the required number of times.
Bauble 6 is woven from 8 colors. The main color is dark grey. You can use black color, then the bracelet will look more impressive. However, remember that black is a symbol of sadness, loneliness and death. So, the weaving pattern consists of 14 threads. Take 3 long double-length gray threads, 1 double-length pink thread, fold them in half. We take 1 thread each of orange, yellow, blue, green, light blue and lilac. We secure all the threads with a knot and lay them out according to the diagram. Then we weave according to the pattern, repeating the fragment until the desired length of the bracelet.
This bracelet is perfect for Halloween or just for a good mood. A bauble made of two colors: dark gray or black and yellow or orange. In order to weave such a bauble, we will need 5 threads of double length, gray and yellow. Fold them in half and arrange them as shown in the diagram. We make funny faces.
We hope that these 7 patterns for weaving baubles will help you get comfortable with this type of needlework and please your friends with beautiful bracelets.
Are you asking how to weave baubles from floss threads for beginners? Everything is very simple. A bauble is a handmade bracelet, woven from floss threads with your own hands. If you want to become the happy owner of such a product, then you can either buy this accessory through an online store (you are unlikely to be able to find it in a regular supermarket), or weave baubles from floss threads according to the pattern that we will provide you with below. Making a bauble from floss with your own hands is not difficult, the main thing is to follow the instructions and weaving patterns.
What is a bauble and how can beginners weave it from floss? A bauble is, first of all, a symbol of friendship. The history of decoration originates from the Indians of North America. The Indians wore a bauble made from floss thread, given by someone as a symbol of love or friendship, until it was completely worn out. People wore this jewelry as gratitude for the attention and work that a friend put into weaving the product. They took off the bauble only if the friendship ended. Later, the tradition of the Indians passed on to American hippies, for whom the exchange of baubles was a symbol of fraternization. They also used matching baubles as wedding rings. Sometimes beaded rings were also made. Over time, the decoration itself came first, and fraternization was a self-evident phenomenon. You can also find out how to weave with your own hands
In addition, the colors of the threads in the floss, which are used in making baubles for beginners, also have their own important meaning. Thus, a multi-colored thread bauble symbolizes the variety of preferences of its owner.

Now for ordinary people, a bauble is just a decoration. Weaving baubles from floss threads with your own hands can be classified as a special type of macrame. Moreover, there are a large number of styles and types of weaving baubles. But, in any case, you should start learning weaving by studying the basic knots. Knowing these knots will allow you to read patterns of baubles made from floss threads.
Let's look at a simple pattern for a bauble made from floss threads; it uses threads of only two colors. The arrows indicate the sequence of direction of a thread of a certain color. If you manage to complete this procedure, then it should be repeated several times to fully consolidate your skills and master the technique of weaving a bauble. This is also very important because the entire weaving process is built on these simple manipulations. And so let's move on to simple patterns of weaving from floss threads.
Simple patterns for baubles made from floss

Scheme for weaving knots from floss threads for beginners.
An important issue is also the issue of securing threads for weaving. There are several ways to do this. In any case, you will need the following paper clip to secure it.

You can attach the threads to the book using a paper clip. First, the threads are laid out in the order in which they go in the pattern.
You can also secure floss sorted by color using a clip on the tablet.
Another fastening method is to use a pin. Knotted threads can be pinned to any item, be it jeans or a pillow. You can also use electrical tape and attach the threads to the table.
Let's look at the easiest way to weave a bauble from floss threads for beginners - straight weaving.
Scheme of direct weaving of floss baubles
- We bend the threads folded together in half, and make a loop on top. This beginning of weaving is extremely convenient for the direct method of weaving and making a product.

- At the beginning of the loop we tie the leading thread.

- We begin to braid the threads with knots until a loop is formed.

- Then we tie the remaining threads according to the pattern below until a pattern is formed. Moreover, in the pattern, the leading thread needs to braid all the other threads. So the background color is the color of the leading thread.


To complete the pattern of straight weaving of a bauble from floss threads, you should braid the braid on both sides. In the place where the fastener will be located, another thread will be required. And to temporarily secure the braid, you can use either tape or other threads of a different color. After the braids you need to connect and fasten, and pass a bright thread under them.

Then you should braid the pigtails with a bright thread using a square braiding knot. Moreover, you should not tighten the knots too much; the braids should move easily. Let's look at patterns for weaving floss threads with a square knot.
Patterns for weaving floss threads with a square knot

Square knot weaving
In the end you should have a product similar to the one shown below.

When finishing the work, you must tie a double or triple knot. The ends of the threads are trimmed and secured with varnish to avoid fringes. Temporary threads are removed.

When weaving baubles from floss with your own hands for the first time, it is advisable to repeat each step more than once, even if you successfully master the entire process of weaving baubles.
In order to make a fastener on floss baubles, you need to secure the threads in a certain way. Let's look at the general mounting method below.

The method of attaching the threads to the buckle is as follows.

The diagram below shows a straight weave of a bauble. After finishing the work, to prevent the knots from unraveling, the threads should be tied in pairs. The ends of the threads need to be folded inside out and sewn there with small stitches using threads matching the color.
After the product is stitched half a centimeter, the free ends of the threads are cut off. The length of the bauble itself should be approximately two centimeters less than the grip of the wrist.
From thin and soft leather you need to cut two straps with a width equal to the width of the bauble. They are sewn from the inside out in such a way as to cover the ends of the sewn threads.

Afterwards, the straps are sewn on from the front side. As a result, the end of the bauble is sewn between the straps. A hole is pierced in the right place.
The finished product is shown in the picture below.

There are a large number of weaving patterns using floss threads. Direct weaving patterns are presented below. Knots must be made at corners and turning points.
Six-color floss weaving pattern
A six-color floss weaving pattern is presented below. Any colors can be chosen.

Weaving floss in the Yin-Yang style. Good and evil are at the same level of opposition.

If you are a lover of colored geometric shapes, then the following pattern for weaving floss threads with your own hands will suit you.

Pattern of floss threads with hearts
A pattern with hearts is suitable for a gift to a loved one.

Beginners will also be able to weave a bauble with the name “heart”; the colors can be any.

- The pattern is a cross, although it looks like a braid.

- For those who are weaving a bauble not for the first time, the following pattern for beginners is suitable.

There is also an option for weaving baubles from floss threads for beginners.

Here is another pattern of floss hearts on a striped background.

Bob Marley baubles weaving pattern
For good specialists in the field of weaving baubles with their own hands, we can offer the “Bob Marley” pattern. Not the easiest weaving, but the result is excellent.

Our article will certainly help you learn how to weave baubles from floss threads with your own hands. Both simple and complex. Here you can find original and beautiful patterns for weaving baubles from floss threads. These are the ones about how to weave a bauble from floss yourself.
Video on how to weave baubles from floss threads
The bauble is a useful and versatile product, and most importantly, easy to make. In order to make it, you do not need to have a wonderful gift or unrealistic abilities. You only need a little free time and effort. If you are still interested in weaving baubles, we advise you to pay attention to the patterns of direct weave baubles. This method will allow you to get an image on the bracelet itself in the form of letters of the alphabet, numbers, animals or other patterns. There are many types of straight woven baubles: baubles with names, logos, images, etc.
You can make paired bracelets for lovers, you can knit personalized inscriptions. It can be rainbow, or it can be black and white. For a child - beautiful New Year's. Any size - from narrow as a thread to wide for the entire wrist. And you can learn without leaving your home - on the Internet online. Our article contains instructions for beginners and pictures of finished works in the gallery.
An example of straight weaving will be shown on the letter "H". Most often for such weaving take at least two colors, one of which is considered the background of the main picture. It is the background of the bauble that is created by one thread, so its length should be much longer than the other threads.
Using this method, the background color is done with the leading thread, which is used to braid everything else. At the same time, when you have to create a drawing directly, the knots of the drawing should be tied in the other direction, as if tying a background thread. This is so that you can continue your work.
Weaving pattern
When the principle of operation becomes clear, you can begin to weave a more complicated straight weaving of baubles with drawings of different animals.
Gallery: straight weave baubles (25 photos)


Weaving two colors of floss
The traditional pattern of direct weaving of floss products will be dismantled. Thanks to this pattern, you can very easily make a two-color decoration.
First you will need to choose two colors. In our scheme, these are orange and purple. Description:

So we figured out how to weave a bauble of two colors using straight weaving. As you noticed, there is nothing complicated about straight weaving. To simplify the work, there is a generator of baubles patterns direct weaving to make a specific product without difficulty and long searches.
If someone wants to learn how to weave baubles from floss, then first for beginners it is worth mastering the technique of creating “masterpieces” from 2, 3, 4, 6 threads. At the same time, you need to learn to “read” ready-made diagrams of various thread decorations and, of course, practice in this matter.
Methods for securing a thread
First, secure the threads in any of 4 ways:
- Use a wide clip on cardboard, book or notebook.
- Using a regular pin, tying knots on it, and then attaching it to a pillow or any fabric.
- Tape it to a table or other hard surface.
- Using a special tablet with a clip (sold in stores).
It should be remembered that when fastening, the threads must be positioned according to the color scheme of the weave. When the floss is securely fixed, we begin to study the main knots.
Technique for performing the main components
When weaving baubles, only four basic knots are used:
Baubles are very easy to make if you follow the weaving technique.
Bauble made of 2 threads
The simplest bracelet can be woven from two threads.
To make it easier to navigate and not confuse the sequence of steps, use 2 colors of floss thread, for example red and blue:

After you have learned how to weave floss baubles with two threads, you can move on to more complicated patterns. For beginners, it is worth mastering how to make a braided bauble from different numbers of threads.
Braid of 4 strands or other even number
Weaving baubles with a braid from an even number and an odd number has slight differences.
First, it is important to disassemble the 4-strand braid pattern:

For a 6-strand braid, the knitting sequence is the same as for 4:

The principle of weaving a product from an even number of fibers is as follows: the leftmost fibers of the floss are placed to the right, first above the next fiber, and then under the next one. And the rightmost fiber is the opposite - first it is shifted to the left under the next fiber, and only then over the other. This weaving is used in the manufacture of wicker baskets.
Braid of 3 strands or other odd number
The easiest way to make a bauble is to weave a braid of 3 strands.
To do this, take 3 threads (can be of different colors):

Weaving jewelry from 7 threads:

The principle of weaving baubles with a braid from an odd number of fibers is that the left and right outer threads are always first shifted in the opposite direction over the first nearest fiber, and then under the next two fibers.
Straight weaving instructions
One of the popular ways to make baubles is direct weaving. With its help, interesting drawings, patterns, names and paintings are obtained. Straight weaving is a little more complicated than oblique weaving. However, this technique will more fully reveal the topic of how to weave baubles from floss for beginners. Some threads are selected for the background and others for a specific pattern.
At the beginning of the work, all other threads are tied in one direction and the other with the outer leading thread. It looks like zigzags. This is the background color.
When knitting a pattern, its thread ties the leading thread and goes in a different direction, while the leading thread is free.
It's best to start with a simple two-color design:

The technique of oblique weaving floss baubles uses the same basic left and right knots.
Oblique weaving instructions
Oblique weaving is considered classic. It most simply reveals the question of how to weave baubles from floss for beginners. There are 2 options for making oblique weaving.
First option
This weave includes only one basic knot - the main left or the main right. This knot is repeated on all rows until the end of the product. For clarity, it is worth considering oblique weaving with the main left knot. Take 2 threads, for example pink and blue, 100 cm long. 
Weaving:

Second option
The bauble is an arrow or “on the corner”, also known as “braid”. In this version of oblique weaving, both main knots are used - left and right. The result is an arrow-shaped pattern. 
Weaving:
- Fasten the tied ends of six threads of 3 colors to the book with a paper clip. The colors are arranged in the following sequence: at the edges there are 2 blue, then 2 red and 2 yellow floss threads.
- The left extreme thread (blue) is braided with the left main knot in succession with the red and yellow threads on the left. The rightmost (blue) knot is tied with the right main knot, the right red and yellow threads. Knit two blue threads together using a left or right main knot. Now the blue fibers have become central, and the red fibers are outermost.
- Repeat all steps as in point B, only with the outermost leading fibers of red color. After this step, the red fibers become central.
- With the left extreme yellow thread, two threads on the left, blue and red, are knitted with the left main knot. The right extreme yellow thread is used to tie two threads on the right, blue and red. The yellow threads in the center are woven together with a left or right main knot.
This is how the bauble is sequentially knitted to the required length. At the end, tie a regular knot and remove it from the base. Connect the ends of the baubles together, and carefully trim off the excess material. The bauble has a pattern in the form of an arrow.
Two-color weave
Take an even number of meter threads of floss, 4 blue and 4 pink:

This version of two-color weaving from floss is very easy to do, because there is no need to count the number of knots. The bauble turns out dense. It can be used as a watch strap.
How to weave baubles with names
Before you start weaving a bauble with a name, make a diagram. To do this, all the letters of the required name from the proposed letter schemes on the Internet are entered in a box on the sheet. 
A cell corresponds to one node.
Weaving:

Bracelet with a pattern
When you have gained some skills in how to weave baubles from floss for beginners, you can begin to work on more complex weaving patterns.
First, you can make a bracelet with a simple pattern, for example, a two-color one with hearts: 
- Study the weaving pattern.
- Take 4 threads of red and black, 1 meter long. Step back 8 cm from the end and tie a knot.
- Fasten the short part with a wide clamp on a flat surface. Arrange the fibers by color as shown in the diagram.
- Weaving is done in pairs. In the first row, the left half knot is made with the first black and second red threads. The black thread is placed with the left corner above the red thread, brought inside the corner and tightened the knot. Then the black thread is placed with the right corner over the red thread, brought inside the corner and tightened the knot. The pair are set aside.
- The second pair, black and red threads, are woven with a left knot (as indicated in the diagram). Set the pair aside.
- The third pair of red and black threads is woven according to the pattern with a right knot and also set aside.
- The fourth pair of red and black threads according to the pattern is made with a right half knot.
- Row 2. The black outer threads on the left and right are removed to the side. They are not woven, as in subsequent even rows of baubles. Red threads 2 and 3 are knitted with a left knot and set aside.
- Black fibers 4 and 5 are knitted with a left knot and set aside.
- Red fibers 6 and 7 are knitted with a right knot and set aside.
- Row 3. They also begin to knit from left to right. The first black and second red threads are knitted with a right knot and set aside.
- Red 3 and black 4 are knitted with a left knot and left.
- Black 5 and red 6 are tied with a right knot and set aside.
- Red 7 and black 8 are woven with a left knot and set aside.
Methods of weaving with rhinestones and beads
Any bauble will look more impressive if you decorate it with additional beads or rhinestones. The easiest way is to sew beads or rhinestones with matching threads to the finished bauble, as your imagination allows.  The second method is to weave beads into the process of making a bauble using a flat knot. As a warp, take 2 threads of the same color as the 2 leading threads.
Weaving:
- The first 3-4 cm of the bauble is woven with a flat knot without beads. Next, add 1 piece to each node. beads on each side of the base.
- The last 3-4 cm of baubles are made without beads.
- Fastenings are made with two simple braids.
What to do if the thread runs out
While weaving embroidery floss, one of the threads may break, or it may run out, and the work must continue.
In this case:
- Bring the finished thread to the wrong side.
- Take a thread of the same color and put it in place of the previous one.
- The upper end of the new thread is tucked into the wrong side and tied with two knots of the leading thread.
- On the wrong side, the old and new threads are tied in a knot.
- Continue weaving on the front side of the bauble according to the chosen pattern.
How to make a clasp
There are several options for fastening baubles.
Option 1 - braided fastener:

Option 2 - tying the two ends of the braids with a separate thread:

Option 3 - Velcro, button, button:

Once the necessary basics have been mastered, it will not be difficult for beginners to weave simple baubles from floss, and you can also draw your own patterns of designs yourself. On the Internet you can find complex designs of baubles on various topics: emoticons, New Year, sweets, plants, Halloween, flags, etc.
Video: how to weave baubles from floss
How to weave baubles from floss, watch in the video:
Find out how to weave an arrow bauble from floss in the video:
VN:D
Rating: 4.6/ 5 (589 votes cast)
The site already has several articles about baubles, but in the comments the phrases constantly pop up: “I don’t understand anything,” “so how to weave baubles from floss.” Therefore, we decided to write a detailed article about weaving baubles from floss, types of knots and tell you that in reality everything is very simple.
In oblique weaving of baubles, 4 different knots are used, they are designated differently and are woven differently. These should be woven in rows from left to right, or from right to left, and not in any other way, and not as the arrows show. In this case, the arrows only show which knot needs to be tied. You can learn how to weave baubles with oblique weaving using our master class: .
You can also watch how to weave baubles with oblique weaving in our video:

3. How to weave baubles with straight weave with two colors (including baubles with names)
 There are already articles on this topic on our website that tell how baubles are woven using straight weave. This is a master class and... On the generator page you can create your own individual bauble design with any name or text.
You can see how to weave baubles using straight weave in two colors in our video:

4. How to weave baubles with straight weave with a large number of colors
 Straight weave baubles with two colors are woven differently than baubles with many colors. In this article we will not describe this technique; it deserves special attention. We analyzed this weaving in the master class. You can create a bauble pattern yourself thanks to ours.
Also watch the video on how to weave multi-color baubles using straight weaving (more than 2 colors):

5. How to weave baubles with sharp arrows (braid)

 To weave this bauble, take floss threads a little more than a meter long. 6 colors, 2 pieces of each color. Lay out the threads symmetrically, connect them into a bundle and tie them in a knot at a distance of 7 centimeters from the edge. Thread a pin through the knot and attach it to the pillow, or glue the beginning of the bauble to the table with tape. Divide the threads in half.
Start on the left side with the outer color, ours is red. Using this thread, make a figure of four over the second thread, then pass the first thread under it and thread it through the hole as shown in the photo. 
 Tighten the knot by pulling the first thread upward to the right. Repeat this knot again, you will get a double knot, this is what the whole bauble will be woven with. Thus, our first thread moved from the left side one position to the right and became the second. Using exactly the same knot, we tie the second thread around the third and so on until the second thread reaches the center. This is one half of the bauble.
Now take the thread from the other side, ours is also red. We will make knots from right to left. To do this, we do everything symmetrically: we bend the red thread over the orange one in the form of a mirror four. Then we also thread it inside and tighten it to the left up. The main thing is not to forget that this knot must be made twice on each thread. 
 We continue to knit knots with this thread from left to right until it reaches the middle. Tie a knot with two middle threads of the same color in order to tie the halves together. So we have finished the first line of our bauble. The remaining rows are knitted in exactly the same way with two outer threads of the same color.
 When you finish the bauble (you can tell by simply trying it on your hand, take into account only a little free space in order to tie the bauble), tie a regular knot using all the threads, and then braid it.
This bauble can also be made asymmetrical; to do this, first lay out the threads without symmetry. If you don't stop in the middle, you will end up with a classic oblique braided bauble. Don't forget that the knots need to be tied twice. And don't skip the middle when you knit.

6. How to make a bauble with rhinestones

There are many ways to weave baubles, and we will also look at how to make any bauble more unique and shiny.
 We make a bauble with rhinestones. To do this, we will need a ready-made bauble (we will take a woven bauble with arrows), a chain with rhinestones, a floss thread, a needle and scissors.
 Thread the needle and tie a knot at the end. Pass the needle through the bauble from the bottom up at the very beginning of the bauble. Or, to better hide the knot, you can thread the thread through the knot at the very beginning of the bauble. Place a chain with rhinestones in the center of the bauble.
Make a stitch between the first two rhinestones. Then pass the needle from bottom to top again, this time trying to get it in the middle between the second and third stone. 
 Continue this way until the end of the bauble. After the last stitch, tie a knot on the reverse side. Or again, thread it through the knot at the end of the bauble. Then trim the edge of the thread.
Our bauble with rhinestones is ready.
7. How to make a bauble with thorns

 To create a bauble with spikes we will need: any bauble, 5 chrome spikes with fasteners, a screwdriver and scissors.
 Make marks with a marker to ensure even placement of the spikes. Use a ruler, or calculate by thread. Pierce in the marked places with scissors so that the screw can come through.
 Place the screw through the hole and screw it into the tenon using a screwdriver.
Repeat with the remaining spikes in the same way. That's it! Our thorned bauble is ready.
8. How to make a bauble with a chain

 In order to make a bauble with a chain, we will need: any ready-made bauble, a short chain with large links, a floss thread, a needle and scissors.
 Thread the floss thread through the needle. Then untie one knot at the end of the bauble and tie it together with the end of our thread. On the reverse side, thread the needle first from the very edge of the bauble.
Place the chain near the bauble and thread the needle through the first link. Pass the needle through the back of the baubles again, so that the needle is near the second link of our chain. 
 Continue this way until the end of the bauble. The chain will need to be adjusted to the length of the bauble. To do this, straighten the link that extends beyond the length of the bauble and remove the rest of the chain. Make two stitches on the last link. After this, untie the bauble knot and tie it together with our thread.
Trim the remaining thread. Your updated shiny bauble is ready. Does she really look brighter now?

9. How to weave baubles with nuts

Using ordinary hex nuts you can weave a very original bauble. It somewhat resembles a spine. This bauble will look great on a guy’s hand. And nuts can be bought at any hardware store in different colors and sizes.
 For this bauble we will need a skein of cotton rope, hex nuts (the quantity depends on you) and scissors.
 Take three ropes, tie them into a knot, leaving ends 5-10 centimeters long free. After the knot, start braiding with a regular 3-5 centimeter braid.
Next, before making a strand with the left thread, put a nut on it, press the nut tightly to the pigtail and make a strand with the left thread. If your thread or rope is not very thick, then you can make a ring inside the nut (by wrapping the nut with thread), and then weave further. This way, the not very thick rope will not wear out very quickly. 
Hold the left nut with your finger. Before making a strand now with the right thread, put a nut on it and make a strand. Hold the nut with your finger in the same way so that it is pressed tightly against the pigtail. 
 Then there will be a new thread on the left, thread the nut and knit the bauble in the same way. We try to knit tightly so that the nuts do not dangle or become loose after a couple of days of wear.
 We repeat the steps and weave a bauble. We calculate the required length according to our wrist, taking into account the free space before and after the nuts.
 After we have finished braiding the nuts, we again make 3-5 centimeters of a regular braid, tie a knot and leave another 5-10 centimeters of the free end of the ropes.
We wrap the bauble 2-3 times around the wrist and tie it. Our bauble with nuts is ready!

10. How to weave baubles and tied chains

 Shiny chains tied with multi-colored floss threads look impressive, right? And they are made very simply. Let's learn how to weave them. We will need: a chain with large links, floss threads of different colors, two hair clips and scissors.
 Let's cut 2 sets of 15 threads each. The length of one thread should be 4 times the length of our bracelet. Tie both sets of threads into one knot, leaving 5 centimeters free. Put a pin on each set of threads; they will help you easily thread the threads into the links of the chain and weave a bauble.
 Place the threads to the left of the chain. Pull the first set of threads through the first link of the chain using a bobby pin, as shown in the photo.
 Place the second set of threads on top of the first. Thread the second set of threads through the same chain link from the bottom up.
 We move on to the second link, again put the first color on top of the second and thread it into the second link from the bottom up. We repeat in the same way with the second color. We have a chain with fairly large links, so in each link we make a braid with each set of threads. If you have a bracelet with smaller links, you can weave one pass into each link.
 Repeat the steps until you reach the end of the chain, then tie a knot and trim the ends. So our bauble is ready. You can tie the chain on both sides, it will also turn out interesting. To do this, simply turn the chain over to the other side and weave according to the same instructions.

11. How to weave a friendship necklace
Let's learn how to weave a wonderful necklace. It looks interesting. It can also be given as a gift, just like a friendship bracelet. And they are quite easy to weave.

 Well, we will need: cotton rope, floss threads, nuts and washers, spools of thread and scissors.
In order to make a necklace of two colors, we take two skeins of floss and wind them on spools to make it easy to weave. Then we take a rope of the required length and tie it together with the threads in one large knot. We fasten the end with tape to the table, or with a pin to the sofa. Let's start weaving in red, which means we hold the purple color in our left hand so that it is taut along with the rope. We take the red color in our right hand, make a loop in the shape of a four with a thread over the rope, then thread the spool into the resulting loop from the bottom up (see photo) and tighten the knot by pulling the spool up to the right. We repeat this knot many times until you decide to change the color.

Changing the color is very easy. To do this, simply transfer the red spool to your left hand and pull it, and with the purple thread we begin to knit knots, as described above.

You can change the colors as you wish. You can add washers or nuts in the middle of the friendship necklace and then tie the knots again. When you are finished knitting, untie the first knot and tie both ends of the necklace into one knot. In addition, the necklace will look much more interesting if there are more colors. You can weave a large number of thread colors in the same way, just hold all the currently unused thread spools in your left hand. It turns out such beauty!

12. How to weave a bauble wrapped chain with rhinestones

 For this bauble we will need: 110-140 centimeters of leather cord one and a half millimeters thick, 30-40 centimeters of a chain of balls or crystals, 150-180 centimeters of thread, a brass nut and scissors. The length varies depending on your wrist size. It is designed to be wrapped twice around the wrist and tied.
 Fold the leather cord in half to create a loop. The size of the loop must be selected in such a way that the nut, which will act as a fastener, fits tightly into it. Run the thread along a leather cord a couple of centimeters long. Then we begin to wrap the rest of the thread around the cord in the opposite direction from the loop. Pull the thread tightly so that the end does not jump out and unravel.
 Place a chain with balls between the two halves of the leather cord. Wrap the thread tightly between each individual ball.
 Continue wrapping the chain until the bauble reaches the required length.
 When you reach the required length, tie a knot with three threads (thread and two halves of leather cord).
 Then thread the nut and tie another knot. Trim off any excess ends.
 The bauble with wrapped rhinestones is ready. Please note that the size is designed for two rings around the wrist. If you want to make one turn, or vice versa more, calculate in relation to these dimensions.

13. How to weave macrame baubles
Square knots, which are used in macrame, also look very impressive in baubles. Only we will take brighter materials. Instead of thread, we will use nylon cord of different colors. Add shiny metal and stones and get shiny macrame baubles.

 So, we will need: four meters of nylon cord half a millimeter thick, metal jewelry or stones, a needle and scissors.
 Cut the nylon cord like this: 2 pieces of 75 centimeters, 2 pieces of 50 centimeters and 1 piece of 25 centimeters. Fold one half-meter piece of nylon cord in half, thread the resulting loop into the ring, and thread the end of the thread into this loop and tighten. Repeat with the second half-meter end on the other side. This way we will fix the ring. These threads will remain motionless for us.
Take one piece of nylon cord 75 centimeters long, bend it in half and place the center under the cord tied to the ring. Turn the right part of the cord to the left, place the left part of the cord above the right and thread it into the loop formed on the right from the bottom up as shown in the photo. 
 Pull the knot tightly and push it up until it stops.
 Next, we turn the left part of the cord to the right, lift the right part above it, and then thread it into the loop on the left in the same way from bottom to top and tighten the knot. It turns out to be a mirror image of the previous node.
 We repeat the knots left and right until the required length of the bauble is reached. Please note that the fastener will take up about one and a half centimeters.
When you're done, take the left side of the cord first and thread it along the center part 4-5 knots from the back of the bauble. 
 Repeat the same steps with the right half of the cord.
 When you thread the cords, cut off the excess part, and the small pieces that remain sticking out can be additionally melted and sealed using a lighter for better fixation. We weave in the same way on the other side of the ring with a second piece of cord 75 centimeters long.
 Next we will make it so that the bauble can be moved apart and tightened. It will turn out solid and without knots. Take the piece of cord that we cut off as excess and temporarily tie the cords of the ends of the bauble together.
 Next, take the last piece of nylon cord 25 centimeters long, fold it in half, and start knitting the same left and right knots as we knitted earlier on the bracelet itself.
Make knots about one and a half centimeters long. Thread the ends of the cord that we knitted back and seal them with a lighter. Remove the temporary knots that tied the two ends of the bauble. 
 Thus, with the help of the central cords we can now adjust the size of the bauble. Select the desired length and tie knots at the ends, and then trim off the excess.
All. The adjustable macrame bauble is ready! As a decoration in the center, you can take whatever your imagination comes up with.

14. How to weave beaded baubles

 Let's make another unusual bauble - threads plus beads. For this bauble we need 1.2 meters of thread, beads, a button, and scissors.
 Cut the thread into two pieces, one 70 cm, the other 50 cm. Fold the long thread in half. Then attach one end of the short thread to the ends of the long thread and make a bend at half of the long thread. Look at the photo what it looks like. You get a loop and three ends of thread 35 centimeters long and one short end.
 We tie a knot, leaving a loop of such a size that the selected button fits tightly. Then cut off the fourth short tip.
 We begin to weave a regular braid with three threads. After three centimeters of the braid, we thread the beads onto the left thread.
Press the beads onto the braid and cross the center thread with the left thread. Now put the beads on the right thread and cross the center thread with the right thread. 
 Hold the beads with your finger as you weave to make the bauble tight. Continue braiding the braid, alternately threading the beads from the left to the right.
 When the size of the bauble is sufficient for your hand, we again braid a bead-free braid of the same length as at the beginning. Tie a knot at the end.
 After the knot, put a button on the threads and tie a double knot.
 Cut off the excess part. So our bauble with beads is ready.
You can take threads and beads of any colors, try, experiment, you will like it!

15. How to weave a bauble with hooks
Let's look at another option on how to weave baubles. This will be a bauble with hooks. It is not difficult to make, in addition, it has one interesting advantage, which I will talk about at the end of the master class.

 Well, let's get started. For this bauble we will need:
- a cord 2 mm thick, about 60 cm long, instead you can use flexible wire, twine, or something similar;
- copper hook;
- ruler;
- pliers;
- lighter.
 Before you begin, seal the ends of the cord with a lighter so that it does not unravel when worn. Take a pair of pliers and bend the hook on one side until it stops so that the cord cannot come out. Bend it on the other side too, but so that the cord can pass through.
 Now we will make an adjustable knot. Thread one end of a 15cm long cord through the fully folded side of the hook. Bend 8 centimeters of the cord back towards the hook, 5 centimeters of which turn towards you. We will tie a knot with this end.
 Wrap it around all the threads, making two circles towards the left loop. Thread the end through the left loop.
 Hold it with your left hand and with your right press the skeins to the left until the knot is tied tightly. You can check that you have tied the knot correctly by holding the hook in your right hand and pulling the cord with your left. The knot should move close to the hook.
 At the other end of the cord you need to make the same knot. There is no need to thread it through the hook. In this case, the turns of the end of the cord must be wound in the direction to the right.
Pass the end of the cord into the right loop and tighten the knot, moving the turns to the right as well.
Trim the ends of the cord and resolder them with a lighter if necessary. Now our bracelet is ready. It needs to be wrapped around your hand 2-3 times and adjusted with the second sliding knot.

Now here's an interesting point. Instead of a hook, you can use anything. You just need a hook on one side, and on the other you can drill a hole if necessary. This is how you can make this bauble for a guy. Especially if he is a fisherman, it will be very relevant. A designer version of a fish hook is used here.

If you show your imagination, you can use any item that can highlight and convey the owner’s hobbies. For musicians, for example, you can take a keychain in the form of a note, on one side you can fasten the cord to its tail, and on the other, drill a hole in its base. It will also look stylish and interesting. Show your imagination and surprise your friends!
Write in the comments what you liked, what other baubles you want to learn how to weave, what baubles you like, is it worth writing more articles and master classes of this kind. The team of the site 3 children tried for you. Subscribe to news on social networks, stay tuned for updates.