On the great and bright Victory Day, everyone logically has a desire to do something nice for the people who gave their strength and years to gain a peaceful sky above our heads. Brooches for the holiday of May 9, quickly and simply with your own hands, of course, will not be able to fully convey all the gratitude to these great people who conquered our homeland, but they will become a pleasant gift that will remind us of how much we appreciate what they did for us.
Learn how to make a beautiful brooch for May 9 with your own hands with decor
Let's consider a simple method of making a brooch from black and black-orange (St. George) ribbons.

You will need:
- two pieces of St. George's ribbon of greater and shorter length;
- black satin ribbon;
- needle, thread;
- glue;
- scissors;
- candle or lighter;
- brooch clasp or pin;
- decor.
The St. George ribbon of the required size (30 centimeters) must be folded in the shape of a figure eight.
Using a piece of tape of shorter length, we wrap the resulting workpiece in the center, and secure it from the inside with glue or walls.
Now let's take the black ribbon. From it we put the foundation of the bank. To do this, we join the ends from the bottom in the center, connecting them with a cross.
All that remains is to assemble the product. The resulting day from the St. George ribbon is fixed on top of the black cross.
Add decor to the top center.

A brooch decorated with a flower using the kanzashi technique will look appropriate and at the same time stylish.
You will need the following materials:
- St. George Ribbon
- Black and orange ribbons
- Decor
- Scissors
- Tweezers
- Lighter or candle
Stages of work:
Black and orange ribbons are cut into squares with sides of 5 centimeters. In this way, seven black and 14 orange elements are prepared. It is imperative to process the cuts over a fire to prevent shedding.
Let's start making the petals. Since the resulting parts are different small in size, it is recommended to use tweezers for convenience.
The orange square is folded in half diagonally to form a triangle. Then in half again.
We take the opposite corner with our fingers, and cut off the edge that we held with tweezers. The cut is fixed over the fire.
Now you need to secure the petal with tweezers and bend the ribbons in a parallel way. The cut is processed over fire.
Let's start with the black square, which is folded in the manner described above. The resulting black petal is applied to the orange one.
The result should look like this: inside the orange blank there is a black blank containing a small leaf.
The sharp corners formed behind the tweezers are cut off and the edges are processed.
As a result, you should get seven petals from three layers, which must be connected with glue. The junction is decorated with any element.
A loop is formed from the St. George ribbon, which is the basis and is placed under the resulting flower. Finally, the clasp is attached. And the wonderful brooch is ready.
The location and number of petals can be varied to get, for example, a brooch like in the photo:

Let's consider a master class on decorating the St. George ribbon with the tricolor of the Russian flag.

The following tools and materials will be required:
- St. George's ribbon;
- ribbons of white, blue, red colors;
- rhinestones or beads;
- pin;
- scissors;
- glue;
- tweezers;
- lighter, matches or candle.
We take ribbons of three colors of the flag and again cut them into squares with side lengths of five centimeters. Prepare two blue and red squares and three white ones.
Each square is folded twice diagonally, as in the brooch obtained earlier. Then fold it again until you get a droplet. The corner is cut off and the cut is treated with fire. We carry out similar manipulations with all seven petals.
We begin the assembly with white petals. We connect the two elements together at an angle, fastening the ends with glue. The third leaf is placed between them. The result should be a symmetrical design, with the central petal protruding slightly above the side petals.
Then blue and red petals are glued in pairs.
A piece of about 20 centimeters is cut from the St. George ribbon, from which a loop is formed, and the junction is secured with glue. Carefully lubricate the inside of the resulting tricolor with glue and firmly attach it to the front side of the ribbon blank. The corners of the tape loop are cut off and secured over the fire. This will prevent the threads from fraying.
We decorate the junction with rhinestones or beads, which we attach with glue. The main thing is not to overdo it. Do not forget that a brooch for the May 9 holiday should not be flashy and provocative.
The original and symbolic brooch is ready, the manufacturing stages are shown in the photo:

Video on the topic of the article
The St. George ribbon is usually worn on a holiday as a tribute to past events. Most often, a simple loop is made from it and attached to clothing, or even tied to the handle of a bag. But there are other options, for example, you can make a bow from a beautiful St. George’s ribbon quickly and easily with your own hands, turning it into a beautiful holiday accessory. Various methods for making such a memorable decoration will be discussed in this article.
Making a bow from St. George's ribbon with your own hands
In this version, fold the tape into a loop, then the top free end pull it to the place of overlap. Before attaching to clothing, the center of the bow can be secured with threads to prevent the structure from falling apart.
The next method is a little more complicated; such a bow will be made from three pieces of ribbon.
First you need to decide on the size of the bow and cut two ribbons, the length of which will be twice as long. Also prepare a short piece of ribbon.
Step by step instructions:
1) Cut out corners on both sides of one of the long ribbons. We process all the edges with a lighter.
2) Fold the second tape in half so that the junction of the ends falls in the middle of the folded workpiece from below. Secure with thread or glue.
3) We wrap a short piece of tape around the workpiece in the center and secure it with reverse side.
4) Fold the tape with the corners into the letter “L” and attach it from the inside out.

For this option you will need two 45 cm ribbons and one small one.
Stages of work:
1) Fold the long ribbon, connecting the edges. We squeeze the sides of the circle so that we get a “figure eight”. We secure the result with a pin.
3) We wrap a short piece of ribbon around the center of the bow and fasten it on the back side.
4) From the remaining tape we form a loop, which we attach from the inside to the center at the crossing point.
Manufacturing stages:
1) We lay a part of the tape 40 cm long on the surface, holding the rest to the hand.
2) We form the second layer in the opposite direction, measuring about 20-25 cm.
3) We continue to fold the tape in a zigzag pattern so that each new layer is 4-5 cm shorter than the previous one.
4) We leave it for last free part ribbons about 20 cm long.
5) Secure the middle with glue or simple stitches, place the ends of the tape with a corner and fix them.
6) Cut out the corners and trim the edges with a lighter.

Simple and unusual option making jewelry from St. George and black ribbons, as well as an antique decorative element.
Stages of work:
1) We fold the St. George ribbon into a figure eight, securing the joint of the edges. Its length should be 30 cm.
2) We wrap a short piece of ribbon around the center and secure it on the back side.
3) Using black ribbons, we make the bases of the bows, the ends of which meet in the center at the bottom, and connect them with a cross.
4) We assemble the product. We attach a bow from the St. George ribbon on top of the black cross. We decorate the top with a decorative element.

MK on decorating the St. George ribbon with a flower in kanzashi style
A festive accessory in the form of a St. George ribbon with a flower made using the kanzashi technique will look very interesting and original. A distinctive detail of this style is the use of small pointed petals. It won’t be at all difficult to create such a product; the following master class will help you with this.
You will need:
1) Satin St. George ribbon;
2) Orange and black ribbons;
4) Hot glue;
5) Scissors;
6) Tweezers;
7) Lighter.
Step by step instructions:
1) First of all, cut the black and orange ribbons into squares measuring 5×5 cm. You should get seven pieces of black parts and fourteen orange ones. We process all edges using a lighter.
2) Let's start making the petals. We use tweezers, because... the details are very small. Take the orange square and fold it in half into a triangle. Then double it twice more. The result is a tiny petal. We cut off the edge by which we held the workpiece with tweezers and treat it with fire.
4) We fold the black square several times in the same way and apply it to the finished orange petal. The small petal should be inside the black blank, and it, in turn, inside the orange one.
5) Sharp corners have formed behind the tweezers that need to be cut off. We also process the edges.

6) There should be a total of seven three-layer petals, which are joined together using hot glue. We decorate the junction of the parts with decorative elements.
All that remains is to form a loop from the ribbon and attach the finished flower. The result is an original and beautiful holiday brooch, as in the photo below.
Video on the topic of the article

Option 1: Simple round kanzashi petal.
1. From satin ribbon Cut orange into squares. From these we will make 7-8 round petals.
2. Fold the square diagonally.
3. Then we bend the corners of the triangle to the top as shown in the photo.
4. It is more convenient (for a beginner) to do this one at a time.
5. First, seal one side over fire.
6. And then the second one in the same way.

7. This is how it should turn out.
8. Fold the resulting part in half, that is, with the corners back.
9. Cut off the corners.
10.Solder the lower sections separately.
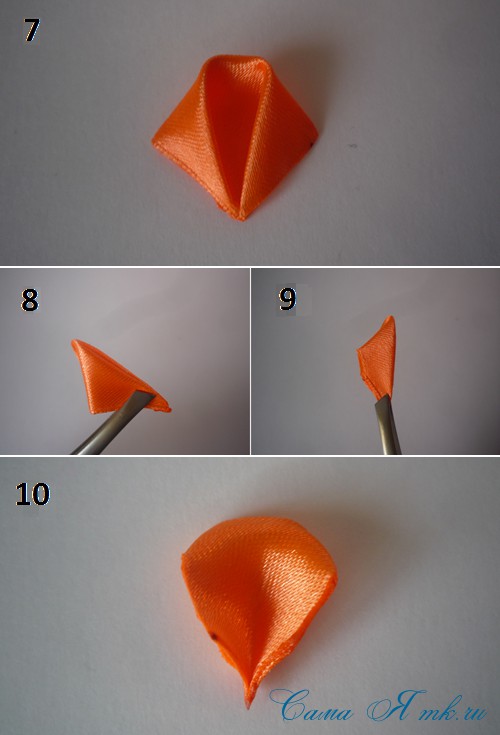
Front and back views of the petal...

Make the required number of petals. For a flower you need 7-8 pieces. You can fold it the way I did it, or you can do it in any other way. I secure it with a hot glue gun.
We fix it with hot glue on a small circle of thick black felt so that the flower does not bend in the center, and attach any suitable decoration to the center.

We attach it to the St. George ribbon and attach the brooch base using hot glue.


Option 2: double round kanzashi petal.
Additionally you will need: sharp scissors, a candle, a small piece of black felt, a brooch base, a decoration for the center and a St. George's ribbon.
To connect the parts we use hot glue (you can sew or use instant glue).
2. Fold them diagonally and place them on top of each other as shown in the photo. For convenience, you can use a needle.
3. Bend the side corners to the bottom corner (shown by arrows). It's more convenient to take turns.
4. First one.
5. Seal the seam on the candle.
6. Then do the same for the second one.
I seal the seams, it seems more convenient to me. If you are soldering only the corners, then pre-process the edges of the squares on the candle.

7. Fold the resulting part in half, that is, with the corners back. You can solder the base of the petal on the candle a little.
8. Cut off the corners.
9. Solder the lower sections separately.

Front and back views of the petal...

If you solder the lower sections together, you will get a different version of the petal, but, in my opinion, no less interesting.

We connect 7 petals together on a small circle of felt and decorate the middle.
We attach the St. George ribbon and the brooch base...


Option 3: Simple sharp kanzashi petal.
Materials: satin ribbon 4-5 cm wide.
1. Cut squares from satin ribbon. Let's start making sharp petals.
2. Fold the square diagonally.
3. Let's fold it again.
4. Connect the corners again.

5. We seal the base of the petal well.
6. Cut off the corner.
7. We process the cut on fire.

Front and back views of the petal...

In a similar way, we make the required number of petals of the desired color.
Option 4: Double sharp kanzashi petal.
Materials: satin ribbon 4-5 cm wide in two colors.
Additionally you will need: sharp scissors, a candle, a brooch base, any jewelry and a St. George ribbon.
1. Cut two squares of different colors from a satin ribbon.
2. Fold them diagonally and place them on top of each other as shown in the photo.
3. Attract each corner in turn to the opposite corner of the resulting figure.
4. This is what should happen.

5. Fold it towards the middle and seal the base of the petal well so that it does not fall apart.
6.Cut off the corner.
7. We process the cut on fire.

This is what the finished double petal looks like.

Make the required number of petals. You can fold it into a spikelet or in any other way. I secure it with a hot glue gun.
We fix it on the St. George's ribbon and attach the brooch base.


Option 5: Triple spicy kanzashi petal.
A triple kanzashi petal can be made in two ways: combining single and double petals or soldering each petal to the previous one in turn. In the second case, the petal will be smoother.

Or each petal separately...

We make the required number of petals, sew them together or assemble them using hot glue...

An original decoration for clothes for you or as a gift on Victory Day for family and friends is ready!
Have fun creating!
![]()
Hello dear readers! I’m a little late with this master class, because tomorrow is Victory Day, but I made these kanzashi for May 9th for my daughter’s hair for a matinee in kindergarten dedicated to Victory Day. I did it the day before, you could say it was done in a hurry in two hours). Somehow I don’t have enough time for my favorite creativity.
I try to find it as best I can). I also want to have time to make at least small and simple brooches by May 9, if I make them later I’ll share them, albeit belatedly, they will come in handy by next year).
So, I made the easiest patriotic bows with elastic bands to make. I have already shown how to make similar petals in some master classes. Here you can see the formation of such petals in the video tutorial, where I did it.
For these bows we will need:
- Satin ribbon 4 cm wide - matching the color of the Russian flag
- St. George ribbon narrow, 2.5 cm wide
- White felt
- Blue centers
- Tweezers
- Candle
- Glue gun
- White hair bands
In our handicraft store, I saw a ribbon in the color of our flag and decided that I would make patriotic bows, here both Russia and the St. George ribbon would all be there at once. This kind of ribbon is more expensive, but it was enough for two bows of one meter.
Kanzashi master class for May 9
So, first you need to cut the flag-colored ribbon into pieces 8.5 cm long, and the St. George ribbon 6 cm long. For one bow we will need 5 pieces of the flag color and 5 pieces of the St. George ribbon. I made two bows, so in total I made 10 of those and 10 of the other.

The next step is to form the petals. To do this, we use a candle and tweezers. We fold the tape as shown in the photo so that we get an isosceles triangle at the bottom.
Now we fold the ribbons in half, bend one and the other edges of the ribbon inward and form a petal, for clarity, you can watch the formation of the petals in this video, the petals are identical, just the material is different.

But in essence, nothing more is needed, the rest is all clear and understandable. We form the petals from both types of ribbons using the same technology, the petals just differ in size. Now you need to warm up the glue gun and start gluing the flag-colored petals together, lubricating the side of the petal, apply another petal to it and gently press them together with your fingers or tweezers. We glue only 5 petals.
We also glue the petals from the St. George ribbon. Now we lubricate the lower part of the flower from the St. George ribbon and apply it to the flag-colored flower so that it is in the middle and looks good from above.

Now you need to cut it out of felt small circle diameter suitable for the diameter of your center. I found blue centers, they fit perfectly, although you can use red or white, whichever you want. Using hot glue, first glue the felt base onto the middle, then coat it with glue and glue it onto the bow itself.
The next step is to cut out a circle with a diameter of 4 cm from felt and coat it with hot glue and glue it to the bottom of the patriotic bow for May 9th. Now all that remains is to attach the hair tie.
To do this, cut out a strip of felt, 1-1.5 cm wide and 4.5-5 cm long, and after threading the strip of felt through the elastic band, grease it and part of the elastic band with hot glue and apply it to the felt base on the bow. Press well with your fingers and allow the glue to “grab” and dry a little.

If desired, you could decorate the bow with beads, half-beads and stamens. Due to lack of time, I didn’t do this, but if you have the opportunity, be sure to make your hair kanzashi even more beautiful by May 9th.
Such a bow can easily be used as a brooch, and not just for hair, then instead of a regular elastic band for the hair, we attach a base for a brooch, or a very ordinary pin, on the back side. I’ve already seen a lot of people walking around the city with beautiful brooches for May 9th. We also need to have time to do something for ourselves, especially since all family members need time to build kanzashi by May 9th.

Do you wear brooches on Victory Day? Previously, we always bought just a St. George ribbon and folded it in a certain way and attached it to clothes, now I’m not allowed to just wear a ribbon, I can make something more beautiful), so my relatives are waiting for brooches from me).
See how the petals for the rubber bands I showed are formed in the video, although it does not relate to this article, the petals are the same.
I wish you all good, peaceful and warm holidays! Happy upcoming Victory Day!
I wish all living WWII veterans good health and a deep bow! And for those who are not with us - eternal memory!
With respect and love, Elena Kurbatova.