A cute thread sparrow will also be a wonderful decoration for a school exhibition. But most of all, I’ll tell you a secret, mothers love. Who doesn’t want to receive an original souvenir from their beloved child? is just around the corner, so a master class on making a cute sparrow from yarn is more appropriate now than ever.
For work, please prepare:
- yarn,
- tape,
- sparrow paw dart,
- scissors,
- glue gun,
- beads for the bird's eyes,
- a piece of newspaper,
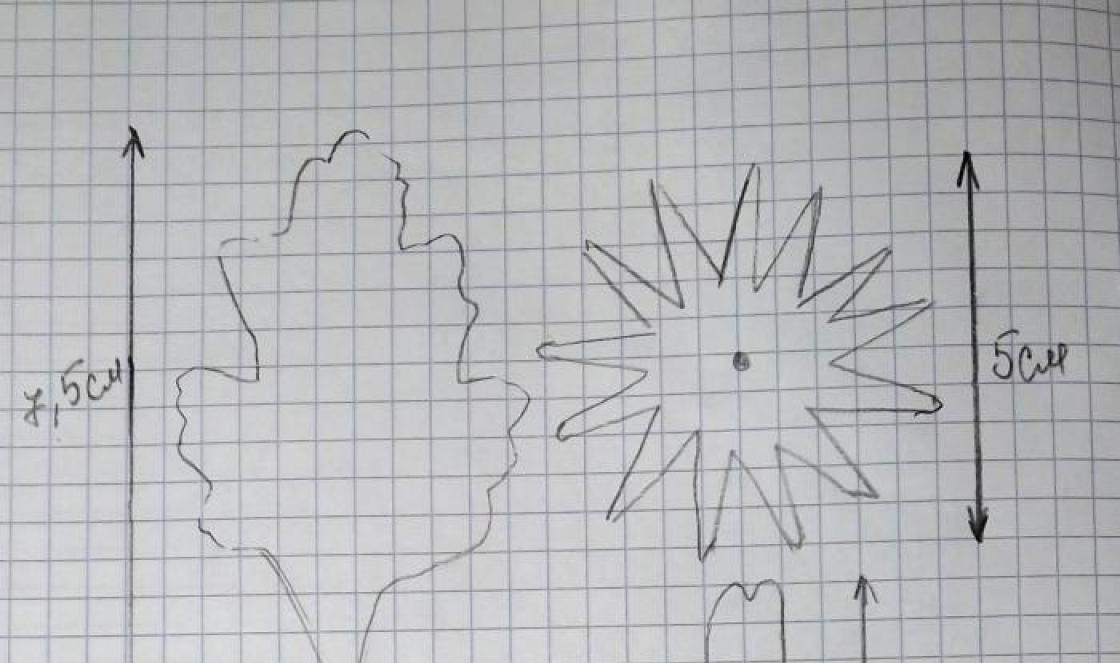
- template 9x12 cm.

1. To make blanks for the wings and brisket, wind the yarn across the template, and for the back - lengthwise.
Pay attention to the colors of different parts of the sparrow’s body: the back is brown, the breast is gray, the wings are made of dark gray and brown yarn.

2. Cut the yarn from one end of the template as shown in the photo. Tie the middle of the yarn for the wings with thread.

3. Fold the yarn for the brisket and back crosswise.

4. Wrap the back yarn around the brisket and tie with brown thread.


5. Tie the brisket in the same way.

6. Wrinkle a piece of newspaper.

7. “Hug” it with wing yarn.

8. Place the tied brisket and back of the sparrow on top.


9. If necessary, comb the threads with a comb.

10. Knot and trim the yarn.

11. Now tie the sparrow’s wings (tie it to the tail with a thread).

12. Make sparrow legs from wire. Wrap it with tape.


13. Using scissors, make holes and glue the legs. Sew black beads in place of the eyes. Make a beak from a seed.


Congratulations, your yarn sparrow is ready! Let this little clever bird bring real spring on its wings and become a wonderful gift or a holiday gift. And if you take multi-colored threads, you can make sparrow’s friends - tit and.
Good day, Country of Masters!! I fulfill the request and display the MK of this chick! It's perfect for beginners! In total, this particular chick required 77 white, 149 blue, 10 light blue and 7 orange modules.
The chick was made based on the book by T. N. Prosnyakova “Funny Figures. Modular origami" Link to the book is below. I was simply asked to show how I make such a chick.

Cutie!!!

To make this chick we will need: - white paper - blue paper - orange paper for the beak and legs - blue paper if desired - scissors or a stationery knife The chick is made from paper modules. The link to their creation is below.

1. You need to take 7 white and 9 blue modules for the 1st row and the same number for the second. Start connecting them, as in the photo:

2.When several modules of the first and second rows are connected, start attaching the modules of the third row (they are on the right in the photo). It contains 6 white and 10 blue modules.

3.Collect three rows and close the chain into a ring.

4. Turn out the workpiece. ATTENTION!!!This must be done very carefully! Personally, I turn it out only when the modules of the next row are ready. I just turn them out and put them on right away so they don’t curl back up.

5. In the fifth row there are 6 white, 10 blue modules, in the sixth row there are 7 white, 9 blue modules. Next, you need to bring the modules together a little. In the seventh row, the modules must be put on with their short sides outward. This is done to transition between the body and the head. In the seventh row there are 6 white and 10 blue modules. I recommend not putting them on too deep.

6.Place the modules of the remaining rows with the long sides facing out. Eighth row - 7 white, 9 blue modules. Ninth row - 6 white, 10 blue modules. Tenth row - 7 white, 9 blue modules. Eleventh row - 6 white, 10 blue modules. Insert the beak - an orange module - into the middle of the old modules.

7. Twelfth row - 5 white, 11 blue modules. Thirteenth row - 16 blue. The fourteenth row is 16 blue (you can make this row with blue modules or alternate with blue ones). Fifteenth row - 8 blue modules, putting them on through one (skip two corners).

8. For those who did not quite understand me about the fifteenth row of special photos.

9.Make wings, each from 1 blue and 1 blue module (2 blue ones are possible).

10. Turn over the future chick. For the paws, insert the orange modules into the pockets of the bottom row modules and into the spaces between them. The tail can be made from three blue modules, but I liked this option better.

11.Cut a strip of paper into a fringe, curl it and twist it into a tuft. Draw cunning and curious eyes for the chick.

It turned out to be somewhat shy, but I really like it, just like its predecessors.

Especially for Imenno.

A little closer to the curious face.


These birds are made in approximately the same way as the chick, but with changes. An owlet's head is larger than its body, while a baby penguin's is the opposite. I saw the perfect execution of the owlet here by Tinsanna. Link below, I really liked it.


Triangular origami module
Another option for folding the module
Owl from Tinsanna
Thank you for reading to the end!! See you again!

After all, working together is much more effective. In addition, such an activity will even be useful for children, since it develops certain skills, perseverance and hand motor skills. Although even without all this, your swan will look great, believe me! In this lesson you will learn what modular origami is and will be presented with an assembly diagram for a double swan, which you can assemble with your own hands. We place the modules on glue, and we try to do it evenly, so that our swan can subsequently stand firmly on its “legs”. 16. When the first row is dry, glue the second one. 17. Let's move on to the second component of our gift - the inner wings. In the same way as in the previous rows we put on 12 modules.

This is one of the simplest paper triangle swan designs. If that doesn't work, you can put it on glue. 30. With a neck, you have a lot of wiggle room. We recommend starting to assemble it with 3 or 4 modules. Their number may differ here - you choose the degree of cervical bend yourself. You can also put the first few “base” rows on glue to prevent the possibility of this part breaking off. Well, that's it! We do both wings at the same time, making sure that the height of each row is at approximately the same level. 13. When raised by 10 rows, for each subsequent one we spend 1 module less. 14. The result should be a product like this, consisting of 770 modules. We will allocate 10 modules for each. 20. Raise by 3 rows, as shown in the picture. 21. After this, we begin to reduce each subsequent row by 1 module. 22. The end result is inner wings like these! 23. We begin work on the third component. Very, very cool models in the form of characters from the cult game Angry Birds.

You can stretch the process over several days or weeks. And if you have family and friends who are ready to help, invite them to work for a common cause. Origami itself is a very exciting activity that has spread across the Earth with instant speed. 1 2 3 Next ". The lion's share of the work has been done, for which we congratulate you. 15. For the stability of the structure, we will make a stand. Here, from the tail side, you need to put on the module in the same way as shown in the figure below. 11. We continue to put on the modules in the same way, spending 10 pieces on each row. 12. Gradually raise the wings of our swan to 10 rows.
1 Creative work CHICKY
2 Modular origami - this fascinating technique - creating three-dimensional figures from triangular origami modules - was invented in China. The whole figure is assembled from many identical parts (modules). Each module is folded according to the rules of classic origami from one sheet of paper, and then the modules are connected by inserting them into each other. The friction force that appears in this case prevents the structure from falling apart.
3 The triangular module is made from a rectangle of colored or white paper. The aspect ratio of the rectangle should be approximately 1:1.5. You can get the desired rectangles by dividing the A4 format into equal parts.
4. Take 1 rectangle and place the back side towards you. Bend in half.
5. We bend and unbend to mark the middle line.
6 Turn over Bend the edges towards the middle. (At this stage, you can turn the part upside down towards you and fold the edges towards the middle on the other side. Everyone can find the most convenient way for themselves).
7 Raise the edges up. We bend the corners. (it is better to leave a small gap between the folded corner and the upper triangle).
8 Fold the triangle. The resulting module has two corners and two pockets.
9 We take 16 modules for the first row and the same number for the second. We begin to connect them, as shown in the figure. When several modules of the first and second rows are connected, we begin to attach the modules of the third row as shown in the figure. There are 16 modules in the third row.
10 We collect three rows and close the chain of modules into a ring. (see picture) Turn the workpiece inside out so that the modules point out with their long sides. We make row 4 using 16 modules. (see picture)
11 Complete the fifth row as the third, the sixth as the fourth. Let’s bring together the modules of the sixth row a little. We put the modules of the seventh row on with their short sides facing out. In this series of modules. We try not to put them on too deep. (see picture)
12. We put the modules of all other rows on with their long sides facing out. The eighth and tenth rows are performed as the fourth, the ninth and eleventh as the third. In the twelfth row we fix 16 blue modules. Insert a beak - an orange or other color module - into the middle of the middle one. (see picture)
13. In the thirteenth row we fix 16 modules. In the fourteenth there are also 16. The fifteenth row is made of 8 modules, putting them on through one (that is, passing two corners). Finally, bring all the modules together as close as possible. (see picture)
14. We make wings, each of 2 modules. We insert them on the sides of the workpiece between the modules. (see picture)
15. Turn the workpiece over. To make the paws, we insert the colored modules with their corners into the pockets of the modules of the bottom row and into the spaces between them. Make a tail out of 3 modules. (see picture)
16. Insert the tuft into the hole on the top of the head and attach the eyes. We cut a strip of paper with a thin fringe, curl the fringe on the rod for the pen and twist the tuft for the chick.
Svetlana Filatkina

To make this wonderful chick we needed: 72 white modules, 145 dark pink modules, 7 yellow modules and 8 light pink modules.

For the first and second rows we used 7 white and 9 dark pink modules. For the third row we needed 6 white and 10 dark pink modules. After assembling 3 rows, we closed the chain of modules into a ring.

In the fourth row it was used 7 white and 9 dark pink modules, which we put on with the long sides facing out.

The fifth row was performed as the third, and the sixth as the fourth. They are all worn with the long sides. The modules of the seventh row were put on with their short sides facing outwards, in this row 6 white and 10 dark pink modules.

We put the modules of all other rows on with their long sides facing out. The eighth and tenth rows in terms of the number of modules were performed as the fourth. The ninth and eleventh are like the third. In the twelfth row we used 5 white and 11 dark pink modules. In the middle of the middle white module we inserted a beak - a yellow module.

In the thirteenth and fourteenth rows we secured 16 dark pink modules. We completed the fifteenth row of eight light pink modules, which were put on through one (that is, passing two corners). At the end, all modules were brought together as close as possible.

We made the wings from three dark pink modules each, inserting them into each other. And the paws - each of three yellow modules, which we inserted with corners into the pockets of the modules of the bottom row and the spaces between them. Of three dark pink modules we made a ponytail.

Our chick is almost ready. All that remains is to make a chupchik and glue the eyes. That's it!

With the onset of spring, the children and I hung up birdhouses. As you know, children are very impatient in their desires. They constantly asked: “Well, when will the birds have babies, little chicks?” I had to explain that nature has its own laws, the chicks will appear later. And so that the wait wouldn't be so long, we decided to make a chick out of paper using the modular origami technique. The children learned to fold triangular modules and became excellent helpers.
Sequence of making modular origami “Chick”. To make a chick you will need triangular modules 3 colors. We took blue, white and orange paper. You can take any other colors. We cut each sheet into 16 identical rectangles and fold them into modules (see photo). Then you need to take 3 modules and arrange them as shown in the photo. We insert the corners of the 2 modules into the pockets of the 3rd module. Please note that the corners of 2 different modules are inserted into the pockets of each module. Then we take 2 more modules and attach them in the same way to the 1st group. Next, we connect the modules according to this principle.
- For the first row we took 16 modules, 7 white and 9 blue.
- The same for the 2nd row. With the last module we close the ends of the chain into a ring.
- In the 3rd row there are 6 white and 10 blue modules.
- Now, holding the edges of the workpiece with your fingers, turn it inside out. The modules are positioned with their long sides facing outwards. In the 4th row there are 7 white and 9 blue modules.
- 5th row - 6 white, 9 blue modules.
- 6th row - 7 white, 9 blue.
- We put on the modules of the 7th row (6 white, 9 blue) with their short sides facing out.
- We put the modules of all other rows on with their long sides facing out.
8th - like 4th; 9th - like 3rd; 10 - like 4th; 11th - like 3rd; 12th - 5 white, 11 blue. An orange module, the “beak,” was inserted into the middle of the middle white module. 13th row and 14th row - 16 blue modules each. 15th row - we put on 8 blue modules one at a time, passing two corners at a time. Bring the modules together as close as possible. Then we made wings, each of 2 blue modules, and inserted them on the sides between the modules. Turned the workpiece over. We made legs, each from 3 orange modules, and inserted them with corners into the pockets of the modules of the bottom row and into the spaces between them. A tail was made from 3 blue modules. Then we twisted the crest for the chick and inserted it into the hole on the top of the head, attaching the eyes. Our chick is ready! We assembled the stand and placed the chick. The children named him Gosha and composed a poem: Our chick is not real. It's paper. Not alive... But he’s a wonderful friend to us. Gosha, dear, dear. Sincerely. Children and I, teacher of kindergarten No. 5 “Forget-me-not” Natalya Alexandrovna.
Good afternoon, today we have prepared for you a selection of crafts in the form of paper birds. We have collected all the ways to make a bird that are suitable for kindergarten and school. That is educators and primary school teachers They can take any idea and it will be within the power of children’s hands. Here you will find birds made of colored paper and cardboard birds in different techniques. We also have a special article for those who are interested in crafts from paper origami modules
Let's see what bird crafts you can now make with your children.
Simple birds made of cardboard
For children.
Here is the simplest DIY spring craft in the form of birds. Here silhouettes of birds are cut out of cardboard and wings are cut out separately from colored paper. The wings are glued to cardboard. A hole is cut out on the back of the bird with a hole punch and we hang the bird on a branch with a string.

You can glue the silhouette of a bird from several layers of colored paper (or a colored napkin) and then the tail can be fluffed up - separate these layers, as in the photo below).

You can make an accordion fan out of a napkin. Make slits in the silhouette of the bird and insert a fan like the wings and tail of our paper bird. A simple craft for children.

Here is a stencil template with beautiful silhouettes of birds for such children's crafts made from cardboard or paper with their own hands.

Birds are two-sided
From cardboard with your own hands.
The essence of this craft is that a round piece of cardboard is bent in half. And we get a semicircular double-sided blank for the bird. Further inside - along the fold line of the workpiece - we glue a strip of paper (also bent in half lengthwise) - on one side this strip is cut into feathers (this is the tail), on the other side the strip is cut obliquely (this is the beak). Next we glue the wings and eyes, the craft is ready. If desired, you can glue on a semicircular part of the breast. A beautiful and simple DIY bird.

We can improve this craft and add a variety of elements to it. For example, make the wings not from a flat part, but in the form of a fan inserted into a slot on the back of the bird. And decorate the tail part in the form of painted chicken feathers. Feathers are painted in colored water (food coloring or gouache).

Using this technique you can make any bird with your own hands. Depending on the color of the breast and plumage, it may look like a sparrow, bullfinch, or titmouse.
Here's an interesting one master class on titmouse made of paper and cardboard. We bend the cardboard round in half. On the fold line we place a rectangular long strip of paper on the glue so that so that its tail part sticks out. After gluing, we lift this tail part of the black strip up - we turn the bend outward. Next, we glue round pieces of black paper on both sides (this will be the head), and glue the wings on the sides of the bird. And what remained was the beak, eyes and white cheeks of the plumage.

Here's another thing - in the photo below we see birds. They are made using exactly the same technique. Only here it’s not just a circle in half – but changes have been added to the shape of the circle. Below I specially drew you a drawing of this bird - so that you can see for yourself how such changes were created.

Firstly, we slightly changed the shape of the circle - we made it more oval (since part of the circle will go on the back of the bird). Secondly, appendage details were added to the circle - in the tail, in the beak, and where the legs are. We cut it out of cardboard and use colored paper to cover the beak and paws of the bird. And bend along the fold lines. There is a secret how to bend cardboard in half with a perfectly straight line without creases or wrinkles - place a ruler on the intended fold line - from the tip of the beak to the edge of the bird's tail - and, pressing the ruler firmly, bend the cardboard upward. The line turns out straight and smooth like in a factory.

Here's another craft - figured bird made of cardboard or thick paper. Here the bird is also made from a ROUND PIECE of cardboard, which was folded in half into a half-disc in the same way - but then worked with scissors to give the cardboard half-disc the shape of a bird.
Let me draw too diagram for assembling such a bird from paper. That's a really good idea. Don't be too lazy to tinker with the graphics. So that you can quickly make these birds with your own hands in classes with children.

Using the same principle of SLOTS and inserting new parts into the slots, you can make a wide variety of birds.
For example, such swifts or swallows (see diagram below).


You can hang your paper birds on a spring tree branch. Or make a mobile pendant to decorate a child's room. Dilute the birds with flowers, leaves, clouds.

Or you can place our homemade paper bird inside a new craft - a cage made with your own hands.
To create a cage, we need one wide strip of paper (this is the bottom part of the cage). We twist it into a ring and attach it with glue or a stapler.
And we also need 4 narrow strips (these will be the rods). We make a hole in the center of each narrow strip with a hole punch. We thread a rope into it and tie it so that the twigs stick to each other in the central part. Leave the end of the rope dangling (we will tie the bird to it later).
We glue the ends of the narrow strips in a circle to the lower wide ring-base of the cage.

BIG bird crafts
from corrugated cardboard.
Here's an idea for a craft where birds are cut out of ordinary gray corrugated cardboard packaging left over from boxes. We cut out bird silhouettes, round heads, tail petals, oval wings and long strips of legs. We fasten all the parts with a stapler or glue. And after that, we take either gouache paints or colored paper and paint or paste over the bird with bright details.
The good thing about this bird craft is that each child comes up with their own bird design. And it turns out that with his own hands he creates a new, author’s bird, reflecting his idea of beauty.

You can cut out a bird with open wings from cardboard, and cut many, many feathers from colored paper, and methodically cover the wings with feathers, starting from the bottom row and gradually rising to the top rows. Bird breast cover with wavy strips of colored paper. The tail part is made of long narrow feathers.
In kindergarten, such a craft can be a collective one, when the whole group of children cuts out feathers in one lesson, and in the second lesson they cover the bird with them. You can make a long-lasting DIY craft.

Of course, you may not have a large cardboard box, then your bird craft can be simpler and smaller. For example, like the one in the photo below. And by the way, you can make a nest for it. Make several of these birds - one per child - and let them paint them during drawing lessons. There are always plenty of cardboard boxes in the kindergarten kitchen (they bring food to the children in them) - go down and ask the cooks, they can supply you with such material every day.

Paper birds
using the VEER technique.
As we said above, a paper fan looks like the wings of birds. Therefore, we can use it in various bird crafts. Here, for example, beautiful duckling– the beak for it can be made two-bladed so that it opens. You can make a whole duck family with your own hands with these wing fans.

A long narrow strip folded into an accordion can become a long neck ostrich, and his own feet.

If we take several sheets of colored paper, fold them like accordions and glue them side by side, we will get a large colored fan, which can become a fluffy tail for a turkey or peacock made of cardboard.

But it can be done more economically. This one is perfect for kindergarten peacock bird craft. When a peacock's tail is made from ONE sheet of paper. The accordion folds - and then bends in half - into a semicircular arch. The tail of a cardboard bird is inserted between the halves of this arch fan. This is the fastest way to make a peacock bird. You don’t have to draw the spots, but cut them out of colored paper - it will be more elegant.

Using a similar principle of a “fan bent along the floors,” the wing of the bullfinch bird is made in the children’s craft below. In the photo we see that a triangular piece of paper is folded into an accordion. Then this accordion is bent in half and its halves of blades come together (like the peacock above) - and we get an oval pointed wing. An excellent bird craft for kindergarten, easy and quick to make with your own hands, even for small children.

And if you take a long strip for a fan, then an accordion from a long strip can be folded into a circle. And this circle can become a fluffy wing of a paper dove. Or this round fan will become the body of a bird.

Paper birds
in loop technique.
And here are children's bird crafts, where the plumage is made using the paper loop technique. An ordinary strip of paper is folded edge to edge with glue - we get a paper loop. Such paper loops can become the feathering of a peacock's tail.

You can even make entire birds out of paper loops. Or loops can become an element of flat swan appliqué.

Below, you can take a good look at what parts such a paper bird consists of.

DIY birds
from paper rolls.
Wide strips of paper can be rolled up. Make two rolls like this - one for the head, the other for the body of the bird. The rolls can be left hollow, or they can be filled, for example, with rolls of smaller diameter (as in the right photo).
Below we see several handmade designs of such paper birds.

The body of the bird can be made not in the shape of a round roll, but in the shape of a paper loop. And then a long tail extension can be glued to such a body. You can glue layers of paper curls onto the tail as in the photo below.

You can attach wings to the side. The wing consists of one whole strip, it is glued inside the roll and its two ends stick out from different sides - you get two separate wings.

You can make a whole family of birds out of paper with your own hands in a nest, also made from paper strips.

A strip of paper folded into a wide ring can become a source for new bird crafts. This is such a beautiful white paper swan. But what a bright turkey.

Craft birds
from paper plates.
Regular disposable paper plates can also be a source of inspiration for bird-themed crafts. A round plate can become a nest-basket for a family of chicks.

The plate can become the curve of a swan's neck, or the round, lush tail of a peacock.

Paper birds
from toilet bushings.
Toilet paper rolls can be a source of inspiration when creating paper birds. Children love such crafts - turning an unnecessary object into a beautiful thing is interesting.
You can simply paint the roll with paint. You can paste it over with a sheet of colored paper. And add accessories: feathers, beak, etc.

Or you can cut a cardboard sleeve from the top on both sides - and insert the silhouette of an owl into this cut, and then the sleeve will become its tummy.

The sleeve can be turned the other way - placed horizontally. And then your imagination will go in a different direction and you will see new ideas for birds. Here is a chicken made of paper, here is a cheerful parrot.

Volumetric cardboard crafts
DIY birds.
If a sheet of cardboard is rolled into a tube and secured with a stapler, then we will get a blank - the body of the future bird. Feathers, beak and eyes make this template a beautiful bird. And here your imagination is free to do what it wants.

The cardboard can be rolled not in the shape of a tube - but in the shape of a cone, also fastened with a stapler. Based on the cone, you can also come up with your own bird crafts.

We also have other articles with interesting bird-themed crafts.
These are the ideas for paper birds. Now you can not only take a ready-made craft from this article, but also, based on any technique described here, CREATE your own bird. After all, copying is boring, but creating something new with your own hands is very interesting.
Good luck with your bird crafts. Best wishes to them and you.
Olga Klishevskaya, especially for the site
If did you like this article
And you want to thank our free author for this painstaking work,
then you can send any amount convenient for you
Today we will make funny birds - flamingos, storks, crows, parrots and yellow chicks. One of the current topics for creativity in kindergarten or holding a homework competition is bird crafts.
Before you start creating this craft, you can first conduct a thematic lesson with your children, talk about the life of birds in the summer, and why it is at this time that we most often hear bird voices around us.
If the goal is an interesting DIY bird craft for a kindergarten or early development center for a competition, then you need to use the most beautiful and original materials to create it.
Undoubtedly, real feathers will decorate such a craft. From them you can lay out a whole image of a bird, based on the color of the feather. For example, white feathers can turn into a charming stork. To create the beak and legs, use three-dimensional materials, and for greater naturalism, place the bird in a nest made of real straw or dry grass.

A very original postcard with a stork will be made using voluminous paper elements.

You can use feathers to decorate the finished image - create a crest, wings or a tail from them. Here, for example, is what kind of parrot can be made from feathers and ice cream sticks.

You can make a bird out of paper, but place it in a large basket made from two disposable plates.

A wonderful chicken can be made from folded paper or a cardboard roll.

Eggshells dyed with food coloring make adorable chicks. If we plant them in halves of unpainted shells, we will get a touching “hatched chickens” composition!

And here is a lovely couple - a cockerel and an eggshell hen.

Another option for making chicken and chicken is made from felt.

This craft would make a wonderful Easter basket.

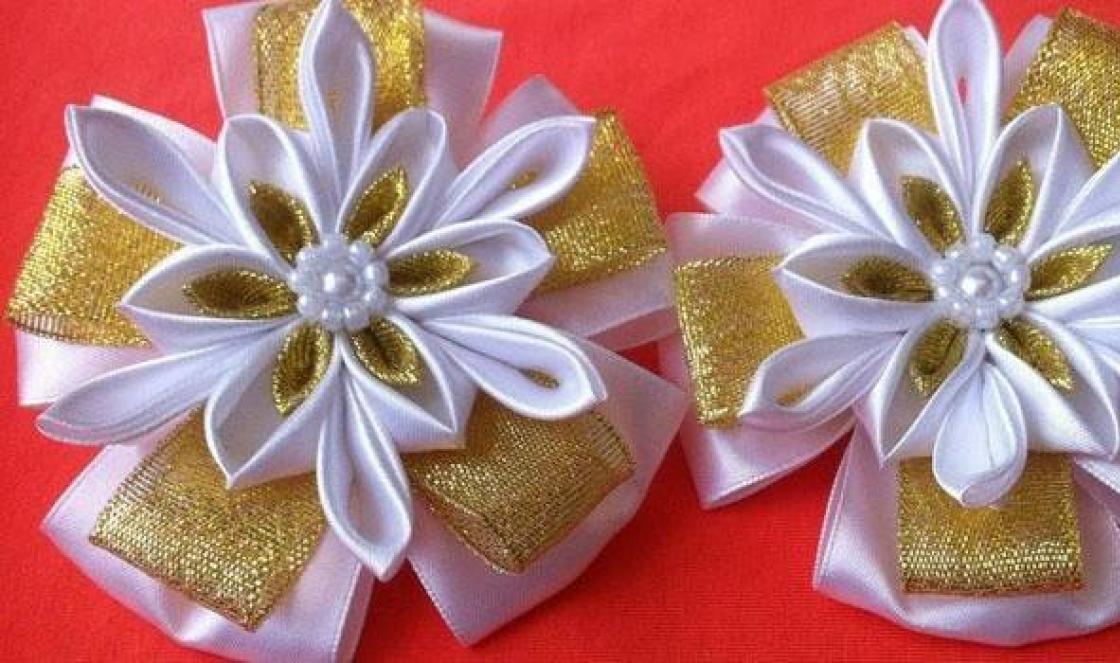
Easter basket "chicken"
You can make a wonderful souvenir in the form of a chicken with a flower from felt and satin ribbons.

Another adorable chick in a shell can be made using the quilling technique.

Watch the video “how to make a bird in a cage:”
You can add some zest to the applique by extending the bird’s paws and head beyond the cardboard base.

If you have multi-colored wings, you can make a fantastic flamingo. Its body will be an old CD, its paws will be made of chenille wire, and its head and neck will be made of felt or velvet cardboard.

You can do without feathers.
A beautiful three-dimensional stork will be made from cotton wool and thick knitting yarn.

Or from round, folded in half, white and black paper blanks. An application made from such modules looks very strict and impressive.

Instead of paper, it is convenient to use disposable plates to create semicircular modules. One plate becomes the body of one bird.

And this is a funny applique “flying birds with a feather”.

Very impressive bright birds are made from plain paper. Thin sticks are glued to two opposite sides of the paper circle. The circle is folded in half - the sticks are connected together to form the legs of the bird. They can be fixed with plasticine - then the bird will stand. The beak, wings, tail and comb are made from bright colored strips of paper.

A variety of birds can be made from natural materials. For example, a cockerel made from apples can become a real table decoration.

A smart penguin with glasses can be made from eggplant and carrots.

The penguin can be made using the appliqué technique from paper and cotton wool.

Penguin applique made of paper and cotton wool
A stunning penguin figurine can be made from painted walnut shells.

A funny turkey can be made from maple leaves.

And wings made from a variety of prints of different colors will be useful for a chic, bright parrot.

You can do the opposite - draw the body of a bird, and make the wings from a different material. For example, a disposable plate.

A spectacular lark is made from cardboard and paper folded like an accordion.

Using the same technique you can make a variety of colored birds. Look at the video on how to do this:
A paper lark can also be made using the popular origami technique:
You can decorate the finished applique with touches of paint, which will look much more interesting if you use wood glued together from wood-colored decorative film and colored paper as the main background.

The application “birds in a nest” can turn out to be very touching and spring-like. An application in which a combination of materials will be used in the nest looks interesting. For example, to make this application we used paper, napkins and plasticine.

Application “birds build a nest”
Using various creative materials, you can make a three-dimensional applique with birds and insects.

See how to make a beautiful spring applique with birds and birch trees:
Very interesting birds can be made using the trimming technique. The base of the craft is smeared plasticine. Using a small stick or toothpick, insert pieces of paper into it. We made a graceful swan using the cutting technique.

But such a charming swan can be made from a pine cone, a CD and plasticine.

Cones can be used to make extremely charming owls.

Another awesome way to make a swan is to glue it together from beautiful white shells.

A very beautiful bird is made from smooth pebbles.

Perhaps the most original idea for making birds is to make them in the form of soap.


Another wonderful bird is made from nuts.

A wonderful fluffy winter bullfinch can be made from thread.

Look at the video “how to make a beautiful bird from threads”:
A painted bullfinch will be a wonderful decoration for a winter picture or postcard.

Drawing "Bullfinch"
The smallest artists can draw birds using their palms and fingers.

Drawing with palms and fingers “birds”
Spring birds on a branch, gouache drawing:

This is how different do-it-yourself bird crafts can be, photos of which you could now see.
DIY bird craft reviews:
“How many different options) do it, you can’t change it”) (Ksyu)
I really liked the bullfinch made of threads) (Sasha)
In the master class we will tell you in detail how to make a bird with your own hands from yarn and other materials quickly and beautifully.
The idea is very simple and kids will definitely love it. You can bring this craft to school or kindergarten and decorate the interior of a child’s room or living room with it.
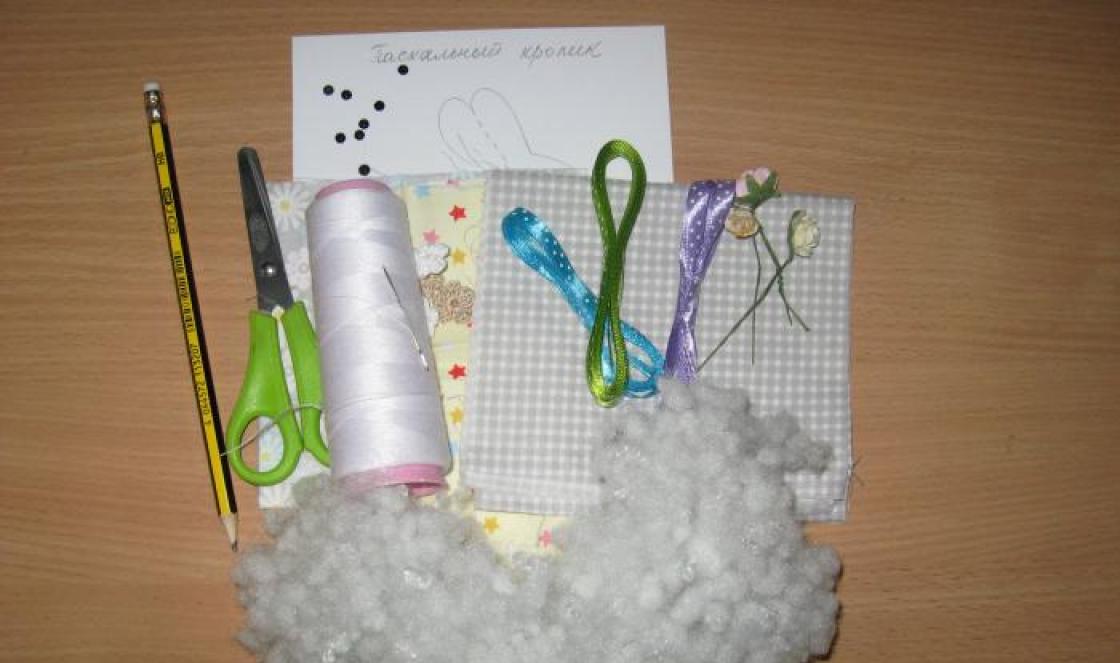
What we need:
Yarn in 4 different colors;
scissors;
cardboard;
ruler;
PVA glue;
wire cutters;
2 medium sized black beads;
black thread with a needle.
copper wire (jewelry).
To begin, we will prepare 3 rectangles of cardboard: 2 – measuring 9 x 7 cm and 1 – measuring 12 x 7 cm. The dimensions of the rectangles will depend on the size of the future bird. 
We wrap yarn of different colors on each of the rectangles. We wind along the rectangle until the thickness of the yarn layer reaches 1 cm on each side. 
When choosing the color of the yarn, it is advisable to wind darker yarn on a 12 cm long rectangle (the upper part of the future bird), on the first 9 cm long rectangle - light yarn (the lower part of the bird) and on the remaining rectangle - a combination of yarn of 2 colors (bird wings) .
Holding the wound yarn tightly, we cut it on one side, resulting in 3 parts. 
Now we place the dark part (12 cm) horizontally and place light yarn on it perpendicularly. The result is a cross. 
Then fold the dark yarn in half, twisting the light yarn. Then take one strand of dark yarn and tie it tightly around the dark yarn folded in half at the fold. 
In the same way, fold the light yarn in half and tie it tightly around it with a thread of light yarn. 
At this stage it is also necessary to align the ends of the yarn.
Add a third group of yarn. To do this, put it under the groups already connected together perpendicularly. The dark yarn knot should face up, like in the picture. 
To form the body of the bird, take a piece of paper (newspaper) and crumple it into a ball and place it between 3 groups of yarn (see picture). 
Holding the ends of 3 groups of yarn, which lie evenly on the paper ball, tightly tie a thread of any color around them. 
We also straighten the ends of the yarn if necessary. 
Now we will create the missing elements for our bird. From orange cardboard we cut out and glue a cone that will serve as a beak. 
We will make legs from decorative wire and insert them into the yarn of the lower part of the bird, first bending the free edges of the wire. 
Let's add eyes to our bird, for which we sew 2 black beads on both sides of the head. 
All you have to do is glue the beak and you're done!!! We came up with such a great craft for children: 
We got a simple and very cute bird made from threads, which we made with our own hands. You can experiment with different colors of yarn to create a unique bird color. 
By Camilla Bellezza
http://bellezza4u.ru/diy/dlya-detey/item/254-ptichka-iz-nitok.html