Group Regional machine seams includes the following subgroups of seams: edging, turning, hem.
1. Edge machine seams
Edging are divided into types:
edging with an open cut,
edging with a closed cut,
edging with braid,
edging with a double finishing strip.
Edging with an open cut
For the manufacture of a edging seam with an open cut, a strip of finishing fabric is applied to the front side of the part. Lay the strip face down, equalizing the cuts. The strip is stitched with a seam width of 0.3-0.5 cm.
The finishing strip should be cut along an oblique or transverse warp thread 2.0-2.5 cm wide.
Then the cuts are bent around the strip, directing the cut of the strip to the wrong side of the main part. The strip is fixed by laying a machine stitch in the seam of attaching the strip.
Edge machine seams with an open cut are used to process cuts in order to protect them from shedding, as well as to finish armholes, necks, bottoms and other cuts of clothing.
Seam with closed cut
To make an edge seam with a closed cut, a finishing strip of fabric is placed face down on the front side of the part.
The strip is stitched with a seam width of 0.3-0.5 cm, equalizing the cuts. Then, with a finishing strip, the cuts are bent around, directing the cut of the strip to the wrong side of the main part. The cut of the edging strip is folded inward and fixed by laying a line from the seam of the strip's attachment.
The finishing strip should be cut along the oblique warp thread or transverse - 2.0-2.5 cm wide.
A edging seam with a closed cut is used for processing cuts of armholes, necks, upper cuts of pockets, etc., protecting them from shedding, as well as for finishing.
Tape seam
To make an edging seam with a braid, you first need to prepare a braid. To do this, the braid is bent along so that one edge protrudes 0.1 cm relative to the other and ironed.
Then, the processed section of the part is inserted into the ironed braid and a machine line is laid 0.1 cm from the edge of the braid.
The edging seam with a braid is used to process cuts of armholes, necks, top cuts of pockets, etc., in order to protect cuts from shedding and decorate them.
Piping seam with double trim strip
To make a piping seam with a double finishing strip, you first need to prepare a strip. The strip is bent wrong side inside, along so that one edge protrudes 0.2 cm relative to the other and ironed.
Then a strip is applied to the front side of the part, combining the cuts of the strip with the cut of the part. The strip is stitched with a seam width of 0.3-0.5 cm, equalizing the cuts.
Then the cuts are bent around the strip, directing the fold of the strip to the wrong side of the main part. The strip is fixed by laying a line in the seam of attaching the strip.
The finishing strip should be cut along the oblique warp thread 4.0-4.5 cm wide.
The edging seam with a double finishing strip is used to process sections of clothes made of thin fabrics.
2. Turned machine edge seams
Obtachny seams are subdivided into types: obtachny in an edging, obtachny vraskol, obtachny in a simple frame, obtachny in a difficult frame.
Overlap seam in piping
The facing seam in the edging is used to connect the upper flap with the lower one, the upper part of the strap with the lower one, the upper cuff with the lower one, the ribs with the shelves, the upper collar with the lower one, etc. That is, the lap seam is used to connect parts that consist of two parts - the lower and upper.
To make a seam, fold two pieces right sides inward and grind.
When turning the valve from a non-shrinking fabric, a stitching seam is made with a width of 0.3-0.5 cm, and from a crumbling one - 0.5-0.7 cm.
Backstitch seam
A split seam is used when processing the sides at the inflection of the lapel, in the manufacture of a double seam.
To make a hem seam, fold two parts right sides inward and sew them with a seam width, depending on the type of fabric.
So, when turning the bead from a non-shrinking fabric, a seam seam is made with a width of 0.3-0.5 cm, and from a crumbling one - 0.5-0.7 cm.
They straighten the corners with a special peg and sweep the edge of the part, placing the machine line exactly along the edge. Kant (perekantovka) do not form.
Backstitch in a simple frame
To process a folded seam into a simple frame, you first need to prepare a part, which subsequently forms a frame. To do this, a strip of fabric is folded along the middle with the wrong side inward and ironed. Then they attach it to the product.
The distance from the fold of the frame to the line is 0.4-0.7 cm and depends on the thickness of the fabric - the thicker the fabric, the wider the frame.
The stitching seam of the frame is ironed towards the main part.
A stitch in a simple frame is used to process welt pockets and stitch loops.
Overlap seam in a complex frame
To process the facing seam into a complex frame, the facing is applied to the main part with a cut under the intended line. The facing and the main part are folded with the front sides inward and stitched with a seam width of 0.4-0.7 cm, the thicker the fabric, the wider the frame.
The seam is ironed out, the cuts are turned around with a facing and a line is laid in the seam of turning the facing.
A stitch in a complex frame is used for welt pockets and stitch loops.
3. Edge machine seams in a hem
Seams in the hem are divided into types: hem with an open cut, hem with a closed cut.
Hem seam with open cut
To make a seam in a hem with an open cut, the cut of the product is swept to the wrong side and built up.
The distance from the edge of the product to the line depends on the model, from the cut to the line - 0.3-0.5 cm.
A hem seam with an open cut is used for stitching the bottom of the product, the inner sections of the bands, the facing of the neck, etc.
Hem seam with closed cut
To make a seam into a hem with a closed cut, the cut of the product is first folded to the wrong side by 0.7-1.0 cm. fold.
A hem seam with a closed cut is used for stitching the bottom of the product, internal sections of the bands, facing the neck, sections of flounces and frills, etc.
If during the study of the implementation of machine edge seams, questions arise, write in the Comments, in Contacts or in the feedback form Have Questions Click Here.
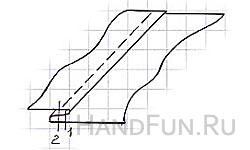
Dear readers, I would be very grateful if you share this article with your friends in in social networks(of course, if you liked the article and found it useful), by clicking on the buttons below. Thank you!Edge seams , widely used in the repair of clothing, are structurally different from each other (Fig. 18).
Turned edge seam(Fig. 18, I) is used in the design of sides, valves, straps, etc.
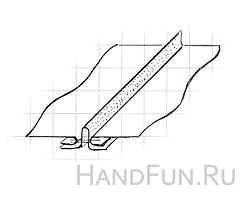
:I - overcast seam. II - a seam with an open cut, III - a seam with a closed cut, IV - an edging seam: a, b - details; c - detail from the main fabric, d - strip of lining fabric; 1 and 3 lines; 2 - edging details; 4 - note line; 5 - finishing line; 6 - note line; 7 - finishing line; 8 and 9 - machine lines.
To make a facing seam, parts a and b are folded with their right sides inward and fastened with line 1 0.5-0.7 cm from the edge. At the same time, the base material is planted. The width of the seam depends on the type of part and the fraying of fabrics. After fastening, the parts are turned out to the front side and the edges are carefully straightened so that an edge 2 1-3 mm wide is formed from the base material. The size of the edging is done depending on the thickness of the fabric.
The prepared edge of the part is fixed with a manual or machine basting line 3, which is placed 7-10 mm from the edge (Fig. 18, I).
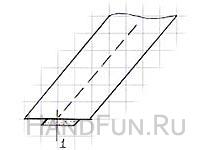
Edge seams in a hem (Fig. 18, II, III) are divided into seams with an open and closed cut. The former are widely used in the design of the lower edges of lined products, for example, the bottom of jackets, cardigans, sleeve coats, etc.
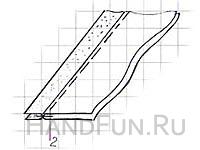
Seams with a closed cut, that is, with a double hem (Fig. 18, III), are used to decorate products sewn without lining, for example, tunics, summer jackets, underwear and dresses, etc.
A seam with an open cut is made simply: the edge of the part is folded towards the wrong side by a set value and fixed with a note line 4 (Fig. 18, II), and then it is tightly ironed. Finally, the edge is fixed with a machine line 5 or hand or left without a line, depending on the style of the product.
A seam with a closed cut (Fig. 18, III) is performed as follows: the cut of the part is folded towards the wrong side by 5-7 mm and fixed with a note line 6; then the edge of the part is again folded to the required value and swept hand stitches or lay machine line 7.
If the edge of the part was noticeable, it is sewn to the part with hand hemming stitches or machine stitch 7 (Fig. 18, III).
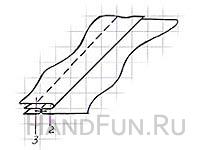
Edge seam(Fig. 18, IV) is used to secure the cut and finish it.
These seams are usually trimmed with the edges of the bands, the side edges of the floor and the bottom section of the coat, sports jackets, cardigans and other products lined up to the waist.
Sections of products are edged with strips of lining fabric, cut along the weft threads, or with a special braid. The strip of fabric has a width of 2.5-3 cm.
To make a seam, a strip of fabric r is applied to the part c so that their cuts are exactly aligned, and line 8 is laid along the edge of the parts at a distance of 0.3-0.7 cm from the cuts (Fig. 18, IV). When applying a stitch, the r strip must be pulled.
After that, the edge of the strip r is transferred to the side of the wrong side of the part c, tightly bending around its cut. The prepared edge of the strip is sewn with stitch 9 to part c. Line 9 is laid as close as possible to the fold of the edging, due to which line 9 becomes inconspicuous.
Edge seams are used to process the edges of various parts. Details in this case lie on one side of the seam (the bottom of the sleeves, the bottom of any product, frills, jabots, mold molds, frills, etc. are treated with edge seams).
Rice. 13
Rice. fourteen
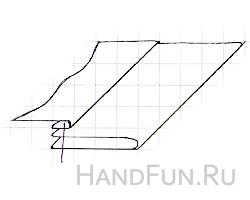
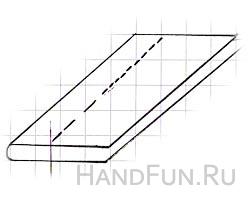
Hem seam with open cut(Fig. 13) is performed as follows:
- We pre-overcast the cut of the part, bend it to the wrong side by 0.5–0.7 cm and sweep it;
- We lay the machine line at a certain distance from the edge, depending on the model;
- If, according to the model, the machine (hem) line should not be visible from the front side, then we hem the seam allowance with manual blind stitches;
- We iron the seam.
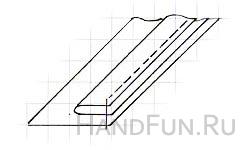
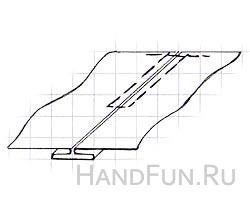
Hem seam with closed cut is performed as follows (Fig. 14):
- The processed section of the part is folded inside out by 0.7 - 1.0 cm, we fold;
- We iron the folded edge without capturing the note line;
- Then we impose a folded edge on the part, by the amount of the allowance provided for by the model, and we lay a machine line or hem it manually with blind stitches;
- We remove the weaving threads;
- We iron.
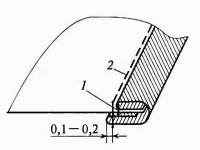
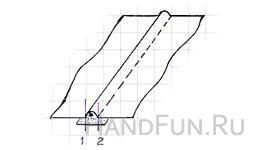
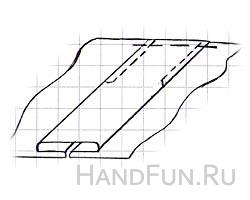
Overlap seam in piping
Rice. fifteen
Overlap seam in piping(Fig. 15) process cuffs, collars, valves, straps, bead edges. We form a piping from a part located on the front side of the product so that another part and a seam are not visible.
We sew the seam as follows:
- We fold the two parts with the right sides inward, equalize the cuts and grind (line 1). Seam width 0.5 - 0.7 cm for light clothing, 0.3-0.4 cm for outerwear;
- We carefully cut the seam allowance in the corners, on curved sections we notch or cut the seam allowance, not reaching the turning line by 0.1-0.3 mm;
- We turn the part of the product on the front side, carefully straighten the corners;
- We straighten the edge. The size of the edge is 0.1-0.2 mm. We sweep out the edge;
- We iron the part carefully with slight moisture;
- We remove the basting threads;
- We iron the part again;
- You can lay a boring stitch (2) by bending the seam allowance towards the part that will not be visible from the front side of the product;
- If a finishing line is provided, then we lay it on the front side of the part. In this case, it is not necessary to lay the stitching line. The finishing stitch can be laid at a distance of 0.1-2 cm from the edge, depending on the model.
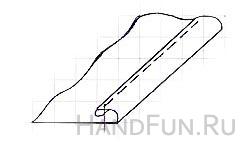
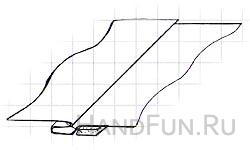
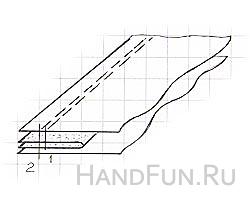
Framed seam simple
Rice. 16
A seam is used (Fig. 16) for processing stitched loops and welt pockets. The width of the frame is 0.3-0.5 cm. The seam is made with one line.
- The part from which the frame will be made is bent in half, wrong side inward and ironed;
- We mark with chalk or soap on the front side the line for attaching the frame, we also outline the transverse lines, from the beginning to the end of which a machine line will be laid;
- We impose a facing with the front side on the front side of the main part, bast and stitch with a seam 0.5-0.7 cm wide from the edge. We fix the beginning and end of the line;
- Iron the stitching seam. Then we bend the part near the line and iron it again.
Edge seam
A piping seam with closed sections is used (Fig. 17) for processing the edges of parts in light women's and children's clothing (flounces, frills, bottoms of products).
Ready-made bias trim for edging sections can be purchased at the store.
- We bend the finished oblique inlay along and iron it;
- We put the edge of the workpiece between the sides of the inlay and tack;
- We adjust the inlay with a machine line at a distance of 0.1-0.2 cm from the edge.
You can make a slanting inlay yourself.
- To do this, cut out a strip of fabric 3-4 cm wide, at an angle of 45 degrees to the warp threads;
- We fold the cut strip of fabric inside out and iron it;
- We put the ironed strip on the front side of the part to which the strip will be stitched, we equalize the sections. We grind the inlay (Fig. 18 a) at a distance of 0.3-0.5 cm;
- We go around the seam sections and lay another line along the front side (Fig. 18 b) at a distance of 0.1 cm from the edge;
- We iron the edging.

Rice. 17
Rice. 18a
![]()
Rice. 18b
Finishing seams
Finishing seams are used for finishing various products. Finishing seams include pleats, raised seams, seams with piping.
Raised seams
Embossed seams include stitched, tucked, vystrachny with a cord, embossed stitching seams.
Topstitches(Fig. 19) are performed on the front or wrong side of the part. Basically, this type of seam is sewn on folds on products. The distance from the inflection line to the line is 0.1-0.2 cm.
Drawstring seam(Fig. 20) is used for finishing light women's clothing and coat. To make a seam, you need a special foot with a groove in the sole.
- From the inside of the part, a strip of the main fabric is laid and the first machine line is laid from the front side along the pre-planned line;
- Put a cord between the layers of fabric and lay the second line.

Rice. 19
Rice. twenty
tucked seams(Fig. 21, 22) are used for the manufacture of reliefs, non-cut coquettes.
- We outline the seam line with chalk from the wrong side;
- Along the intended line, we bend the part with the front side inward, put a strip of fabric (cut along an oblique or transverse) and stitch it at a distance of 1.5-2 mm from the inflection line;
- We iron the seam (Fig. 21) or iron it out (Fig. 22).
Rice. 21
Rice. 22
Raised seams are used to obtain a relief line in light and outerwear.
Tuning simple seams (Fig. 23) are performed as follows:
- On the wrong side of the part, we outline the seam line;
- On the intended line, we bend the part with the front side inward and stitch it to the width of the seam;
- Ironing the seam allowance;
- We set up the detail for the allowance.
Rice. 23
tuning difficult the seam (Fig. 24 c) is performed as follows:
- On the front side of the part, we outline the seam line;
- From the inside of the part we enclose a strip of fabric. The middle of the strip should match the marked line. On the front side, along the intended line, we sew a strip of fabric (Fig. 24 a);
- We bend the part along the seam of stitching the strip with the front side inward, bend it to one side, and the stitched strip to the other side;
- On the front side of the part, we outline the stitching line;
- We lay the second line at a distance of 1-2 mm from the fold. We nullify the line at the end. In this case, a relief is formed on the front side (Fig. 24 b);
- To fix a strip of fabric, we bend it to one of the sides of the part and lay a line on the front side of the main part according to the model (Fig. 24 c).
Rice. 24a
Rice. 24b
Rice. 24v
Rice. 25a

Rice. 25b
simple folds
simple folds can be finishing, which in turn can be unilateral or bilateral.
The fabric in simple folds is bent in a straight line or with a slight bend. Simple finishing folds are made from one piece.
AT simple finishing one-sided fold the folds of the fabric are directed in one direction on the front side and in the other direction on the wrong side of the part (Fig. 25 b). The fabric allowance during cutting is equal to twice the depth of the fold. (If the finished fold is 3 cm, then the allowance is 6 cm).
- On the wrong side of the part, we outline a fold with three lines:
The lateral line is the line of the outer fold of the fold;
The middle line is the line of the inner fold; - We lay the stitching line to the third line, which limits the length of the stitching of the fold. We fix the end of the line (Fig. 25 a);
- We iron the folds;
- On the front side, you can lay a finishing line;
- We remove the basting thread in the unstitched area of \u200b\u200bthe fold.
Rice. 26
Can be counter, while the folds of the fabric are directed towards each other (Fig. 26).
Allowance for the depth of each counter fold is equal to the depth of one fold of the fold multiplied by 4. For example, the depth of one fold is 4 cm, then the allowance is 16 cm.
- Counter folds are marked on the wrong side with three lines:
middle line,
the third line is the line limiting the end of the fold. - We bend the part along the midline with the front side inward and sweep along the side line;
- We lay the grinding line to the third line. We fix the end of the line;
- On the stitched area, we remove the basting thread;
- We place the part face down, lay out the fold allowance on both sides of the stitching line. The middle line must be located along the stitching seam;
- On the upper cut, we fix the spread out fold across with a machine stitch;
- We iron the folds;
Rice. 27
Simple finishing bilateral pleats can be bow(Fig. 27), when the folds of the fabric on the front side are directed in opposite directions. bow pleat represents the seamy side of the opposite fold. The allowance for the depth of each bow fold is equal to the depth of one fold of the fold multiplied by 4. For example, the depth of one fold is 5 cm, then the allowance is 20 cm.
- We mark the bow folds on the front side with three lines:
middle line,
lateral line - the line of external folds,
the third line is the line limiting the end of the fold. - We bend the part along the middle line with the wrong side inward and sweep along the side line;
- We lay the stitching line to the third line, which limits the length of the stitching of the fold. We fix the end of the line;
- At the grinding site, we remove the basting threads;
- On the stitched area, we remove the basting thread;
- We place the part with the wrong side down, lay out the fold allowance on both sides of the stitching line. The middle line must be located along the stitching seam;
- On the upper cut, we fix the spread out fold across with a machine stitch;
- We iron the folds;
- On the front side, you can lay a finishing line, including fixing the folds in width.
Seams with piping
Stitch seam with piping(Fig. 28 b) is performed as follows:
- On one of the main parts of the product on the front side, a strip folded in half is applied and a stitching line 1 is laid;
- We impose on top face down another piece from the main fabric and grind. Line 2 is laid exactly in the seam of attaching the strip;
- We iron the seam sections from the wrong side.
Rice. 28a
Rice. 28b
Patch seam with piping(Fig. 29 b) is performed as follows:
- We cut out a strip of fabric for the manufacture of piping;
- Fold in half inside out and iron;
- We put a strip folded in half on the front side of the lower part and stitch it at a distance from the fold equal to the width of the edging plus the stitching width (Fig. 29 a);