When decorating your home for the New Year, it’s so nice to put a toy under the Christmas tree, made with your own hands or together with your child. The time has come to replace factory gifts with soulful crafts, in which the very first child labor was invested. An original Snow Maiden with your own hands can be made from felt and other fabrics, threads, a plastic bottle, nylon, beads, plasticine or the simplest materials at hand. Interesting master classes for the New Year with step-by-step photographs describe unique products of varying complexity. For competitions and exhibitions, for kindergarten or school, you can do interesting work at home. Convenient lists and photographs will help you prepare and calculate source materials.
If you need a New Year's character very urgently, making your own Snow Maiden from a paper template is the easiest quick option. A plasticine figurine is an excellent choice for a master class for a preschooler. Modeling develops motor skills and creative work skills, and is often practiced in kindergartens. In this case, apart from plasticine, matches and a simple tool, you will not need any consumables. A paper and bottle doll is also suitable for kindergarten. Older children, especially school-age girls, will love the idea of felt or beads. It will be interesting even for boys to make a figurine for the New Year from scraps. More complex types of needlework (knitting, sewing and working with nylon) are suitable for school in high school. Beautiful sewing and knitted items will be useful not only for home decoration, but also as exclusive gifts for the Christmas tree.
The simplest Snow Maiden made from paper and cardboard - we use cutting templates


Do-it-yourself voluminous Snow Maiden in the form of a doll - a master class made from nylon tights for an exhibition at school
Complex creative work, which will be appreciated by the jury of any competition at school or other educational institution, is made from simple nylon tights.
Do-it-yourself cute Snow Maiden (master class from nylon tights) is a great idea for the creativity of a middle and high school child. Since in this example you will have to sew a lot of parts on a typewriter, the entire work will take more than one free evening. A mother can help her daughter prepare a unique work from home supplies of material and any decorative stones, beads, and ribbons. According to the recommendations of this master class, to make the Snow Maiden with your own hands from nylon tights, use a base from an empty plastic bottle. Clothes for the Snow Maiden can be sewn in any other way, depending on the range of your materials. The main emphasis in the step-by-step instructions is on making a doll's head from nylon. From such a head you can make a toy for a kindergarten puppet theater.

List of materials:
- a piece of nylon of the lightest flesh tone
- plastic eyes for doll
- white padding polyester
- white thread, fine needle
- shadows and blush
- sewing machine
- white and blue fabric (plus, if desired, faux fur, beads, guipure for a dress)
- plastic bottle 1 l
- hot glue gun
- artificial hair threads
- Take a large, well-knit ball of padding polyester. Wrap in nylon, pull into a bun and tie the fabric or secure with stitches. Trim off any unnecessary residue. On the front side of the ball, manually select a small lump of padding polyester, pressing the soft filler through the nylon. Start sewing deep stitches and forming a convex nose on the workpiece.

- Using the same stitches, tightening the padding polyester, sew the relief ridges for the cheeks and mouth.

- Use dark brown shadows to tint the pits in the eye area and other depressions on the face. Use pink blush to highlight your cheeks and nose.

- Glue on the plastic eyes. Make hair from artificial threads and a headdress from fabric trimmed with beads.

- Take measurements of the bottle. First, wrap the bottle in white material. Cut a rectangle from blue fabric that is 1.5 times the circumference of the bottle. On a rectangular piece, hem the gathers at the waist. Sew hand blanks with two tubes and sew mittens. Turn the blanks inside out and stuff them with padding polyester. Sew the mittens to the sleeves by hand and cover the seams with a fur frill. Cover the edges of the rectangular robe fabric with fur. Wrap the robe around the base and glue the top edge to the bottle. Sew or glue the arms. Complete the outfit with any jewelry. Hot glue the head to the base. The finished toy can be taken to school.


DIY beautiful Snow Maiden - surprise for New Year 2019 made from fabric with patterns
A cute DIY Snow Maiden for the New Year 2019 made from fabric with patterns is ideal not only as a creative work for a schoolchild. A mother or grandmother can sew such a toy for a child for kindergarten. A stylish souvenir can be made very small. At school, the teacher will definitely give you a high grade for such work. Using simple patterns, you can sew the Snow Maiden from fabric with your own hands before the New Year 2019. The most basic details of the master class are offered in the patterns (templates in the photo).


List of materials:
- Thick blue and white cotton fabric
- Cotton lined fabric and plain white jersey
- Supplex flesh color
- Red and brown thread (acrylic)
- Thin beige and white sewing threads
- Coarse sand yarn for hair
- Two black beads
- Decorative ribbons
- Corrugated cardboard
- Scissors
- Mother of pearl beads for buttons on a dress.

Manufacturing process step by step:
- Using the pattern template, make two pieces of white jersey with indentation for the seams. Prepare a cardboard base of the same size. Machine stitch a fabric cover for the body. Stretch the inside out piece onto the cardboard.

- Cut out 4 pieces for the legs from the same fabric (indented). Sew paired boots on a machine. Fill with padding polyester. Sew up the legs. Sew them to the bottom of the body and finish finishing the bottom edge of the large base.

- Cut out a blue skirt and sew on a decorative ribbon as shown in the photo. Make a border from thick fabric and stitch to the edge. Sew the blank on the wrong side with one line (you will get a skirt that looks like a cylinder). Sew the same piece (but without the border) from lining cotton. Sew the lining to the inside out hem on the inside out. Turn the skirt completely inside out.

- Sew a vertical strip of thick white fabric to the skirt, covering the seam. Decorate with mother-of-pearl beads. Place the skirt over your body so that your legs are visible. Sew along the top edge. Draw a template for an oblong mitten. Sew 2 pairs of hand blanks, turn them inside out, and stuff them with padding polyester. Finish the details on the wrist with white edging.

- Make a dense ball of padding polyester and cover it with supplex. Secure the gathered fabric with stitches and cut off the excess. Use a thin beige thread to mark the nose: pull the fabric with a portion of padding polyester in the center of the front side of the ball. Embroider the heads and mouth with brown and red thread. Sew on beads for the eyes. Sew (or glue) threads onto the top of your head and braid them. Tie bows from thin blue ribbons. Sew a collar with rounded edges made of white fabric near the neck.

- Make a hat for the Snow Maiden. To do this, on the wrong side, sew 2 semicircles of blue fabric with sewn stripes of white edging. Turn it inside out and put it on the doll's head. For a more complex headdress, use the template suggested in the photo. Be sure to show the finished Snow Maiden at school.


The budget Snow Maiden is made with your own hands from scrap materials according to step-by-step instructions (with photo)
A unique Snow Maiden with your own hands from scrap materials step by step (with photos) - this is a master class for the New Year using the most unexpected materials. From simple trinkets you can make the basis of a toy. To dress a miniature figurine, you will not make a single seam. The most painstaking stage of the work will be sculpting very small details of the face. Even a schoolchild will be able to make the Snow Maiden step by step (from the photo) from scrap materials with his own hands. At a competition at school, you can present this craft as an environmentally friendly New Year's toy, which is made from recycled unnecessary items. A child who goes to older groups in kindergarten can make such a souvenir at home together with an adult.

List of materials:
- halogen bulb
- yellow dish sponge
- plastic egg from Kinder Surprise
- plastic container for shoe covers
- white shoe lace
- white or yellow threads
- balls of pink (or beige), red, black, white plasticine
- thick blue fabric
- superglue

Manufacturing process step by step:
- Glue half of the plastic egg and the lamp together as shown in the photo.

- Apply glue to the outer circles of the workpiece. Wrap in thick blue cloth.

- Trim the fabric along the edges and glue the seam at the junction.

- Cover the shoe cover box with a thin layer of light pink plasticine.

- Glue on a round piece of fabric for the hat. Use pieces of lace to mark the edges of the Snow Maiden’s outfit, placing them on glue.

- Cut a thin piece of yellow sponge. Cut out a U-shaped piece. Glue it to the back of the Snow Maiden's head. Use thread to give the foam ends the appearance of braids.

- Roll the blue fabric into a small tube about 3-4 cm long. Cut one end at an angle, roll the other inward. Glue the white edge to the sleeve. Make another hand like this. Glue both parts to the sides of the body. Make miniature eyes, a nose and a mouth from multi-colored plasticine. Take this beautiful figurine to school or kindergarten.

Do-it-yourself Snow Maiden from plasticine - a craft for kindergarten for the New Year (master class)
A simple DIY Snow Maiden - a craft for kindergarten (master class) requires the participation of an adult. A preschool child will not be able to make such a gift based on step-by-step photographs without the participation of one of the parents or an older sister (brother). Some details, such as braids and bangs, are best left to someone older. To make a girl from plasticine, you also need to prepare the surface, take a board or sheet of cardboard so as not to stain the furniture. With your own hands, following the example from the master class, you can make the Snow Maiden and another important craft for kindergarten for the New Year - Santa Claus.

List of materials:
- plasticine yellow, blue, white, black
- plastic knife for modeling
- match
- support (board or cardboard) for the finished work.

Manufacturing process step by step:
- Knead the blue plasticine well. Make the main part for the Snow Maiden’s body in the shape of a pear. The height of the workpiece should be about 7 cm.

- Roll out one tube up to 1 cm thick and 3 tubes, half as thick, from white plasticine.

- Roll a white ball for the head. Use one pea of white plasticine to mark the nose. Press the two black peas for the eyes a little harder. Use a modeling knife to mark the mouth. Form 2 oblong blanks for hands from blue plasticine. Round the bottom edge of each piece and give it the shape of a mitten, highlighting 1 finger. Stick the white trim onto the sleeves.

- Roll two thin tubes of yellow plasticine. Take the edges of the two tubes in one hand, and with the other hand, using your fingers, twist them together, creating one spiral. Set the braid aside. Roll a small ball from yellow plasticine. Press it onto the table, making a not too thin disk with smooth edges. Stick the yellow header onto the Snow Maiden's head, pressing it tightly in a circle. Use a knife to draw bangs. Make a flat kokoshnik from blue plasticine (as in the photo). Attach the headdress.

- Divide the spiral-wrapped plasticine into 2 braids. Attach small blue bows. Place the braids on your head (behind the kokoshnik). In the neck area, place your head on a match. Insert into the body. The original New Year's gift is ready.

Do-it-yourself miniature Snow Maiden - a bead craft for school for the New Year's competition
Traditionally, beads are used to weave bracelets, animal figurines and keychains. Now, thanks to an interesting master class with a diagram, you can make a beautiful New Year's toy to decorate the Christmas tree. From beads you will make a DIY Snow Maiden - a craft for school for a competition, the weaving of which will take about an hour of free time. According to the universal scheme, you can make a single (flat) figurine or a more complex, voluminous product. After participating in a craft competition at school, the self-created Snow Maiden can be attached to a backpack, keys, or given to someone for the New Year. Inexpensive souvenirs can be prepared in advance for friends in kindergarten or school and presented on New Year's Eve.

List of materials:
- beads blue, white, black, beige, red
- thin wire
- large round bead
- scissors
- printout of the diagram

Manufacturing process step by step:

Hand-knitted original Snow Maiden from threads
A do-it-yourself soft toy, the Snow Maiden, made from threads is a great idea for creativity in high school and an exciting hobby for adults. A small child will enjoy playing with such a doll. For a beginning needlewoman in middle school, a toy will be the first difficult task. You can experiment with the choice of colors, and also add a mouth to the doll with stitches of pink thread, and knit a miniature nose. A Snow Maiden knitted from threads with your own hands can be brought to school for a thematic exhibition or to a charity fair for the New Year.

List of materials:
- knitting threads blue, beige and white
- portion of padding polyester
- hook
- needle and thread for sewing
- two beads
Manufacturing process step by step:
- With an air loop, start knitting the part in a circle. Knit 6 air loops, connect into a ring. Knit 7 rows with an increase of 6 stitches on each.

- Start knitting the body upward with 5 circular rows without increasing. Knit three rows, decreasing 4 loops. Make row 1 unchanged. This is followed by 2 rows with the reduction of two loops, one row is simple, one with two decreases and again simple. Another 5 rows need to be made with a decrease of 2 loops, 1 row minus 4 loops and another row minus 6 loops. Next, tie the head with a body thread: 1 row - increase in each loop, 2 - simple, 3 - plus 4 loops, 4-6 rows - simple. Next, fill the body with padding polyester. Knit the toy in a circle, decreasing the loops to the top of the head.

- Using the principle of circular knitting, knit handles for the Snow Maiden from white and blue thread. Fill with padding polyester.

- Tie small hemispheres from white thread. Fill with padding polyester.

- Knit a decorative strip to decorate your coat. Sew it in the center of the toy. Sew on the white legs.

- Attach white threads to the Snow Maiden's head. Braid your hair.

- To make a kokoshnik, cast on 25 loops in a circle. Knit 3 chain stitches and 3 yarn overs. Continue: Pull 2 double crochets and 4 more double crochets from the same point. Skip 2 loops at the base and repeat knitting. And so 2 times. Sew the finished hands, kokoshnik, and beaded eyes.

DIY simple Snow Maiden from a plastic bottle - an idea for a competition in kindergarten
In search of an interesting master class that even a child can repeat step by step, pay attention to the idea of paper, ribbons, cotton wool, bottles and glue. Do-it-yourself Big Snow Maiden made from a plastic bottle for a competition in kindergarten will serve as a good training for drawing and cutting skills. A bottle base is a simple, inexpensive solution for a stable frame. You won't need any diagrams or templates as all the paper parts are very simple. The Snow Maiden, made with your own hands from a plastic bottle, can be taken to a competition in a kindergarten or placed under the Christmas tree at home before the New Year.

List of materials:
- plastic bottle 0.5 l
- blue and white thick paper
- blue cardboard
- sequins (about 50 pieces in stock)
- thin ribbons (orange and blue)
- felt-tip pens
- scissors

Manufacturing process step by step:

DIY Little Snow Maiden made of felt for the New Year (photo without a pattern)
To make the perfect Snow Maiden with your own hands from felt for the New Year, patterns can be drawn in accordance with the cut out parts in the photo. If the toy is being made by a child for kindergarten or a high school student, paper cutouts will be needed to create even fabric blanks. Experienced needlewomen can apply the contours of parts directly onto felt. A little Snow Maiden made from felt for the New Year, made with your own hands without a pattern, can be a wonderful souvenir for a friend or a decoration for a room or classroom.

List of materials:
- felt blue, white, pink, blue, beige, yellow
- scissors
- thin threads for sewing (to match the felt)
Manufacturing process step by step:
- Cut out the details for the Snow Maiden with your own hands, as shown in the photo. Additionally, cut out an oval from blue felt. Its circumference should be equal to the length of the lower edge of the body, multiplied by two. The details of the body, eyes and collar must be paired and absolutely identical.

- Using beige thread, sew the circle of the face onto the front blank for the body. Using yellow thread, sew on the detail for the girl's hair.

- Using white threads, first sew the white ovals of the eyes to the face. Then secure the blue circles with stitches. Sew the mouth with pink thread.

- Sew a white frill for the coat. Sew white felt pieces onto the sleeves and neckline. Prepare the back of the toy in the same way.

- Using blue thread, sew a stitch down the center of the front of the body.

- Sew the two pieces (back and front) together using dark blue thread along the edges using simple circular stitches. Leave the bottom unstitched.

- Stuff the toy with padding polyester. Using light blue thread, sew on the base of the Snow Maiden.

To please your family and friends with a pleasant surprise, you don’t have to buy it in a store at exorbitant prices. Try to make a toy with your own hands with minimal investment of money and time.
Here we provide a master class on making a New Year's toy from cotton wool with your own hands.
New Year's holidays are an amazing time of magic and miracle, a time of fulfillment of desires. In any Russian family, Christmas trees are decorated with toys at this time. Traditions have developed so that we always place Father Frost and the Snow Maiden under the Christmas tree. You all probably remember the nice little cotton wool toys our grandparents made. Let's look at the technique of making toys from cotton wool.


Christmas tree decorations can be made from cardboard, paper, plastic bottle or cotton wool. We present to you a simplified version of making the Snow Maiden from cotton wool.
To make an unusual fake in the form of the Snow Maiden from cotton wool, you will need the following materials:
- Cotton wool;
- Wire for creating a base;
- Paper;
- Brushes for painting toys;
- Paints;
- PVA glue;
- Decorations – beads, sparkles.
- Potato starch (1 tablespoon);
- Wooden stand.

We will make the craft in three stages:
- Let's prepare a wire base and cover it with cotton wool;
- Let's make the Snow Maiden's head and draw her face;
- Let's color the resulting toy.
First, we make a wire base and connect it to the stand. Any material made of wood or plastic can be used as a stand.

We prepare glue from starch - dilute potato starch in cold water, mix thoroughly until all lumps disappear and pour in 200 milliliters of boiled water. We sort the cotton wool into strips. We generously lubricate each strip of cotton wool with the resulting paste and wrap it around the frame, carefully straightening it along its length. Apply cotton wool to the required volume.

Do not forget to thickly cover the cotton wool with glue to form a strong crust. At this stage, it is necessary to dry the workpieces near the battery for one or two days. To more clearly express the contour, you can re-glue the frame. I am sharing with you an example of the resulting workpiece.

To make the head and face, you need to select a doll or figurine. We prepare several layers of paper and coat each one with PVA glue. We blot the base with water so that the paper does not stick. After laying all layers of paper, let it dry and remove.

Svetlana Olegova
What blue bottomless eyes,
What a light, fluffy braid!
What a fur coat: silver and turquoise!
So nimble and mischievous all over.
Master class on the topic: "DIY New Year's characters"
Erygina Natalya Nikolaevna, teacher of additional education of the first qualification category, MBOU DOD SUT Angarsk
Description: The New Year holiday is one of the most beloved. Making Christmas toys with your child with your own hands is a very interesting and useful activity from all points of view. Teachers and parents consider children’s participation in making Christmas tree decorations as one of the forms of labor education, teaching children to do handicrafts and developing their taste. In addition, in the days following the production of the toy they liked, as the students themselves note, relationships improve, work is very good and joyful, studying is successful and enjoyable, teachers are liked, and the New Year’s mood is gaining momentum. This material will be useful for additional education teachers, technology teachers, and kindergarten teachers when preparing for New Year-themed classes; children of primary and secondary school age and creative parents.
Application: The Snow Maiden toy can be used to decorate the New Year's interior, as New Year's gifts.
Target: Introducing students to independently making holiday souvenirs, developing skills in making toys from plastic bottles.
Tasks:
educational:
- teach how to make a New Year's souvenir - the Snow Maiden, using an action algorithm and step-by-step photos;
- expand knowledge about the possibility of using non-traditional materials;
developing:
- promote the development of attention, fine motor skills, aesthetic taste, creative abilities;
- awaken the desire to engage in applied creativity;
educational:
- cultivate accuracy, the ability to achieve successful achievement of the goal.
To make a toy you need:
- blue or transparent plastic bottle, volume 0.5 l;
- knife;
- scissors;
- corrugated yellow and white paper;
- PVA glue or glue stick, “Master” glue;
- threads;
- templates for the face, kokoshnik, sleeves;
- a simple pencil or knitting needle, felt-tip pens;


Execution algorithm:
1. Cut the bottle at a distance of 16 cm from the top of the cork.

2. Cut a strip 10 cm wide from the bottom of the bottle.

3. Cut a strip 10 cm wide from a roll of yellow corrugated paper.

4. Making the Snow Maiden's head.

Glue a piece of cotton wool or corrugated paper onto the cork to create volume.
Then we wrap a cork around the middle of the strip, connect the ends of the strip and tie it with thread under the cork.

5. Straighten the ends of the yellow strip and cut them into 3 parts.

6. Braid the braid.
7. We pull the end of the braid with a thread, cut off the excess, and create a ponytail.

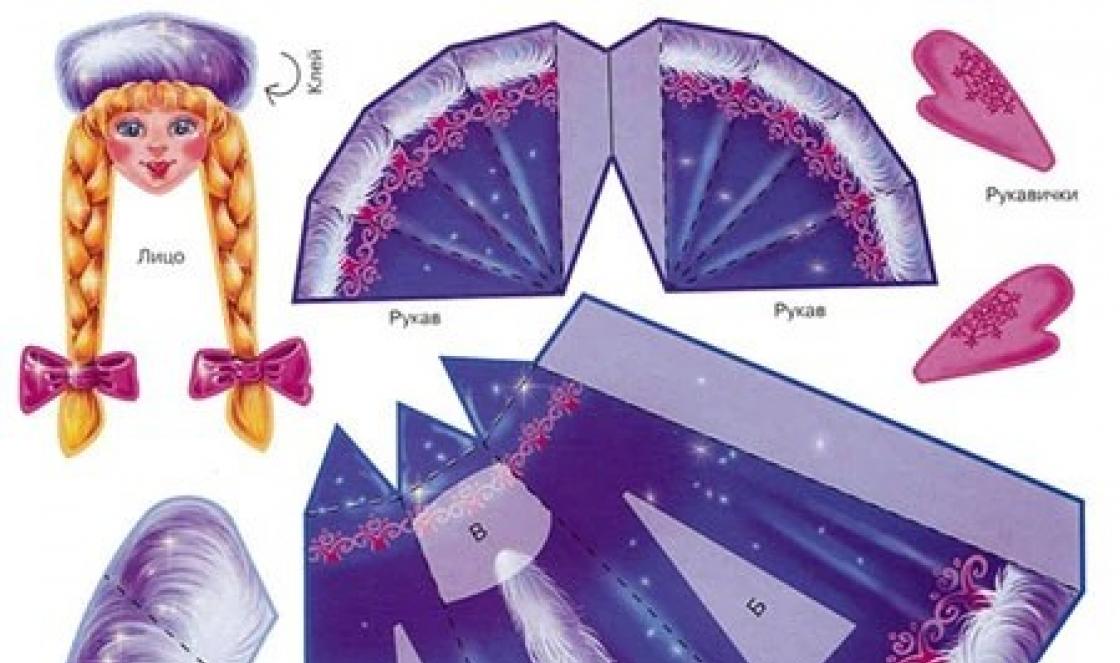
8. I will cut out the templates for the face and kokoshnik.

Glue the face into the circle of the kokoshnik. We decorate the kokoshnik with snowflakes.
Glue the resulting blank to the head.

9. Making fringe.
Cut a 10 cm wide strip from a roll of white corrugated paper.

10. Fold it once in width and 5 times in length. Cut off 1 mm along the contour.

11. Apply glue in the middle of each strip and glue them together.


12. Cut the fringe along the edges of the long sides and glue it around the cork head, thus we design the collar.


13. Cut another 10 cm wide strip from a roll of white corrugated paper.
14. Fold the strip in half lengthwise. Cut it, you get 2 strips 25 cm long.

15. Measure 2 cm on one strip, fold 5 times along the length, unfold, you get 5 strips. Cut along the fold lines.
16. Apply glue in the middle of each strip and glue them together.
17. Cut the fringe on each side.
18. Glue the fringe along the bottom of the dress.

19. With another strip 25 cm long, proceed in the same way (item 15-item 17).
20. Glue the fringe from the collar to the bottom of the dress.

21. We trace the sleeve templates on a strip of plastic with a felt-tip pen and cut them out.


22. Glue the sleeves to the dress.

23. Decorate the dress with snowflakes.
A gift for family and friends does not have to be purchased in a store; you can create it with your own hands. The most pleasant thing is to receive such gifts, knowing that the giver has invested a lot of time, effort, and most importantly, his whole soul into it. For New Year or Christmas, a DIY Snow Maiden can be a good gift.
Snow Princess
There are many different ways to make the Snow Maiden. It can be either a paper, cardboard, knitted, or drawn girlie, or made from scrap materials. Below we present a master class on creating a Snow Maiden from a bottle.
What you will need to complete the job:
- plastic bottle;
- wire;
- padding polyester (or cotton wool, depending on what you like);
- blue fabric;
- a skein of yarn (matched to the color of the snow maiden’s hair);
- paints (acrylic, gouache);
- brush;
- foam egg;
- ribbons (satin multi-colored);
- scotch;
- hot glue gun;
- needle and thread;
- scissors;
- glue;
- self-tapping screw;
- New Year's rain, tinsel.
Let's get to work.
Wrap the wire around the neck of the bottle.
The hanging ends should be the same length; they will become the girl’s hands. The handles should not be close to the bottle; they stick out a little to the sides, but not completely horizontally.
Using tape, secure the wire.

Do the same with your hands, giving them more volume. Secure with glue or tape.

Next we move on to the fur coat itself. It is worth taking measurements: the height of the future doll and the width (the clothes should be wider than the bottle itself). Cut two cone-shaped pieces from the fabric. The width of the bottom is approximately 25 cm, the top is 17 cm.
Prepare squares for the sleeves and sew the mittens. The elements are sewn together either using a machine or simply with your own hands.

Try on the robe on the doll, put on sleeves with mittens. Cover the bottom hem of the fur coat and the lower part of the sleeves with a little synthetic padding.

Glue the tape onto the snow maiden’s chest (measure before doing this) with simple glue or hot melt glue. You can also wrap the Snow Maiden’s neck with a satin ribbon. The photo shows how the descending end of the ribbon is twisted with silver tinsel. This can be used as a beautiful decoration by gluing it in the middle.
To create a belt, you can take a white satin ribbon and cover it with tinsel on top. Tie a bow.

All that remains is to prepare the hat. Cut a circle from the same blue fabric. Diameter 15 cm approximately. Thread a circle onto a thread and pull it off. Fill with padding polyester or cotton wool. Walk the padding polyester around the edge. For decoration, you can sew snowballs or any other elements you like.

Creating the head.
Take a white foam egg and cut off the small top with a utility knife. Insert a self-tapping screw into the bottle cap, apply glue to it and screw it into the egg.

Face painting: paint the Snow Maiden’s face with paint, trying to bring it closer to the natural color of the skin. After drying, draw eyes with eyelashes and eyebrows, nose and lips. Before applying paint, it is advisable to draw all the elements with a simple pencil.

The finished head should be screwed to the body.
Hair: prepare the yarn of the required length and wind it to the required thickness of the strands. Tie in the center with threads.

To attach the hair, apply hot glue to the sides of the head, attach the strands and straighten. You can also braid your hair by securing it with a blue ribbon at the end.
The Snow Maiden is ready!
New Year's origami
What you will need:
- colored paper;
- diagram for origami;
- glue;
- scissors.
Manufacturing scheme:
- Cut out a blue square. Fold on both sides, unfold, defining the axes. Fold up the vertical edges. Fold the top corners toward the center and tuck the bottom rectangular edge.

- Turn the craft over to the other side. Use a pencil to draw lines from the central corner at the top, divide it into four smaller corners, and fold the sides into the center. Hide the protruding corners from below inside. Bend the top corner to the front side, then place the product with the front side facing you.

- Fold the white rectangle twice as shown below. Glue to the center of the fur coat.

- To make the head: prepare yellow paper. Bring two corners (opposite) to the center, thus folding again. Draw a line diagonally and bend the edge of the craft along it. To get a rounded chin, bend the bottom corner.

- Mittens: take two blue squares. Bend opposite corners towards the middle, turning one edge about 10 degrees. Unfold, determine the bend line of the finger for the mitten. Glue to the fur coat.

- Headdress: fold the blue rectangle horizontally, bend the corners at the top towards the center. Fold the bottom strips of the triangle on both sides. Fold the top of the hat back. Place a hat on the Snow Maiden's head. Draw the girl's eyes, lips and nose. You can attach a bow to your hair.

Origami is ready!
Video on the topic of the article
Irina Samoilova
For manufacturing this craft will need two empty plastic bottles, glue gun and a little imagination. Santa Claus let's make it from a 5 liter bottle, and Snow Maiden from 1.5 liter empty plastic bottle.

Bottles wrap it in blue or red cloth. These are our fur coats Father Frost and Snow Maiden. I simplified the work a little and used children's tights.


We make hands from cotton wool and fabric of the same color and sew them with threads to our product.


Snow Maiden we make braids from cotton wool or woolen threads and a hat. For the hat, you can use any empty cream jar, covering it with fabric of the same color as the fur coat.


We design the face according to your wishes.


Then we make a hat for Grandfather Frost and decorate it and the hat Snow Maidens using tinsel.


Now we use tinsel to decorate our fur coats Father Frost and Snow Maiden. Sleeves first

Then the hem


And of course the collar


The Snow Maiden is ready.
Grandfather frost We make a beard from tinsel. To do this, first glue the tinsel onto cardboard cut out in the shape of a beard, and then glue this cardboard to Grandfather Frost.

And the final touch. What kind of grandfather Freezing without a staff and a bag of gifts? We will make a staff from a pencil or any stick. To do this, you need to wrap the pencil in foil.


And decorate with tinsel. The top of the staff can be decorated with a perfume cap.

For a gift bag, you can use any elegant gift bag, of which there are a lot now. It needs to be stuffed with cotton wool and tinsel to make it look full.

Glue the staff and bag with gifts to Grandfather Frost.

That's it. These are such cute Grandfathers I got Frost and Snow Maiden.

They decorated our group in kindergarten.