Western countries have long been practicing decorating for the New Year not only the interiors of houses, but also the streets, paying special attention to the decor of the garden area. For example, ice creams are very popular among them. New Year decorations for the street, but such decor is quite suitable for our latitudes. Moreover, making street decorations from ice is very easy, as well as fun, entertaining and completely inexpensive. Basically, to make ice street decorations you will need water, a couple of decorative elements (we’ll talk about this in more detail below), suitable shape, as well as a spacious freezer or severe frost outside.
How to make street decorations from ice.
How to make an ice wreath.
Festive wreaths You can decorate the branches of trees or bushes.
Method number 1. Take a prepared pudding mold with a vertical insert in the center. Place bright berries and green twigs (spruce, fir or thuja) along the bottom of the mold and fill the mold with water. Place the mold with water in the freezer until the water completely hardens. After the water turns into ice, pour hot water into a basin and immerse the mold with ice in it; with a sudden change in temperature, the ice inside the mold will melt at the edges, and you can easily pull out the wreath. It's retarded just to hang the wreath on a satin ribbon.

Method No. 2. We take ready-made small molds for puddings, put a composition of berries and thuja branches on the bottom, fill each mold cold water and put it in the freezer. After the water turns into ice, you can immerse the mold in hot water for literally one minute, take out the miniature wreaths and hang them on the trees using ribbons.

Method number 3. Place a glass or jar in the center of a deep round shape, lay out twigs, berries, leaves, citrus peels around it, and pour in water. To prevent the jar in the center from floating, you can pour water or sprinkle stones into it. All that remains is to expose the mold to the cold, wait for the ice to harden, take out the wreath and hang it on a ribbon.

Method number 4. Place acrylic snowflakes in a baking dish with a vertical insert in the center and Christmas balls, pour in a little water, put the product in the freezer. When the first layer of water freezes, lay out a few more balls in a circle, add water again and put them in the freezer, after freezing, add more balls and put the mold in the freezer for the last time, take out the wreath, tie a ribbon and hang the product on a street tree.


Photo of ice wreaths.


How to make ice balls.
Method number 1. We prepare the required number of balloons, pour water into them and pour out food coloring, mix the water inside by shaking the balloons. We tie the balls and put them in the freezer or in the cold outside. When the water inside the balls hardens, cut the shell with a knife and take out the colored ice balls.


Method No. 2. You will need a special mold for making ice balls (for drinks), you can put berries or spruce branches on the bottom of this mold, and also put in strings of pendants, pour in water and put it in the freezer until it hardens completely.


How to make an ice candle holder.
Method number 1. Place a glass of stones in the center of the food container (for weighting). Pour in water and lay spruce or thuja branches on top, and also add viburnum, lingonberry or dogwood berries. Place the mold in the freezer, after the water has hardened, take out the candlestick and place a lit candle in the center. 

Method No. 2. We take two bottles of different sizes with a volume of 1.5 liters and 0.5 liters, cut each bottle in half, put the smaller bottle into the larger one, secure them with tape, put berries, leaves and tree branches between the walls, pour in water, and send the product into the freezer. After turning the water into ice, remove the future candlestick from the mold and place a lit candle inside.

Photos of various ice candle holders.


Ice tree pendants.
Round flat pendants are made as follows: various berries, twigs or flowers are laid out on the bottom of a flat round plate, everything is filled with water, a thread pendant is placed on top, the composition is placed in the freezer, then pulled out, separated from the plate and hung on trees.


Ice stars.
- To make stars, you can use star-shaped ice molds or baking molds; to create regular stars, fill the molds with water and freeze in the freezer.
- To create colored stars, you must first add food coloring to the water.
- For bright compositions, you can put berries, various twigs, leaves in the molds, or add sparkles.

Ice cubes.
Place various flowers or fruit slices in square ice molds, pour in water and freeze. Then we take out the ice cubes and decorate street flowerpots, tree branches and other yard elements with them. 
Ice shards.
We paint the water blue, pour it into a rectangular mold in a thin layer, put the mold in the freezer, after hardening, hit the ice surface with a kitchen hammer, select beautiful fragments and place them somewhere outside.

Icy heart.
Method number 1. Place heart-shaped pebbles on the bottom of a round plate, fill with water and place in the freezer, then take out the product and place it edge-on on a flat surface.

Method No. 2. We put berries and pine needles into a heart-shaped baking dish, put the mold in the freezer, then remove the product from the mold and place it somewhere in a visible place in the yard. 

How to make garlands from ice.
In the ice mold, lay out a thick woolen thread in a circle, pour in water, and put the mold in the freezer. After the water has hardened, carefully pull the tip of the string, all the pieces of ice should jump out of the mold. To obtain a colored garland, the water must first be tinted with food coloring.
Instead of an ice tray, you can use the base of a box of chocolates.


How to effectively decorate your home for the New Year:
New Year's ice decorations will help you quickly, easily and inexpensively decorate your area for the upcoming holiday. If you have not yet tried to create street decorations from ice, then we recommend urgently rectifying the situation; we assure you that you will definitely enjoy this pastime.
The Decorol website reminds its readers that you have the opportunity to receive notifications regarding the release of new reviews by email (fill out the subscription form in the sidebar).
When winter finally comes into its own, falls asleep and covers every corner with snow, erects dunes and mountains in one night, the most fun time for children comes. Snow is an endless source of games and entertainment.
Kindergarten teachers take the coming of winter especially seriously. The snowy period makes it possible to organize excellent games with children on the street, to set up an entire fairyland in the area near the kindergarten, to create an entire entertainment complex only through the efforts of children and teachers. Children approach this task with great enthusiasm. They build amazing things with their own hands, which then become a place to play throughout the winter.
The easiest way to have a beautiful front lawn
You've certainly seen the perfect lawn in a movie, on an alley, or perhaps on your neighbor's lawn. Those who have ever tried to grow a green area on their site will no doubt say that it is a huge amount of work. The lawn requires careful planting, care, fertilization, and watering. However, only inexperienced gardeners think this way; professionals have long known about the innovative product - liquid lawn AquaGrazz.
- frameless - consist only of snow;
- frame - a wooden frame is installed at the base of the figure.
Preparing for work is simple. Before you go outside and start constructing a figure, you need to carry out some preparatory work indoors.

- Come up with and draw a future creation on a piece of paper, drawing out all the details as much as possible: nose, eyes, beard, braid, clothes. If these are animals or animated characters, then tails, wings, beaks, etc. During a drawing lesson, you can ask the class to draw with their own hands pictures of characters that they would like to make out of snow, and offer them a specific topic to work on. Or play such a game with a garden group.
- You need to draw not only the shape of, for example, a tail, but also how this tail will be located in space.
- Then you need to make small models of figures from plasticine. Such work will also captivate the entire class, and not just the first one, and the children will be happy to do it with their own hands.
- If you plan to create an entire composition from snow, then you need to recreate with the help of models how these figures will be located in relation to each other.
- When planning not only decorative elements, but also functional ones, such as a slide, a labyrinth or a magic house that children can climb, it is necessary to accurately calculate the dimensions of the future structure so that it is comfortable and safe.
- To create wireframe figures, you need to draw their diagrams.
Frameless figures
Such figures consist entirely of snow. This method is used to create low snow figures, no more than human height, having a solid shape without individual elements(raised hands, spread wings, etc.).

If you plan to make many figures, the snow for them needs to be collected in advance, for several weeks, for which the snow is raked with a shovel and placed in formwork or other suitable-sized container. The whole class can collect such snow with their own hands, preparing for the upcoming fun. Snow that accumulates over time becomes durable and easier to work with. To check whether snow is suitable as a material for creating figures, you need to press on it from above with a sharp object; if the object easily penetrates the thickness of the snow, then the snow is not ready. When making any figures from snow, you must remember that only clean snow is suitable for them, without dirt and debris, otherwise the figure will be ugly and it will be difficult to sculpt details on it.
Creating single figures allows you to collect snow immediately before work. For this, as for making a snowman, snow is rolled into huge snowballs, which are then placed on top of each other. This game will also captivate the entire class or kindergarten group. If necessary, fill the narrowing areas with snow. You can collect snow in this way only if it is sufficiently sticky. If the snow is crumbly, you can make it sticky by pouring water on it and then quickly raking it into a pile with a shovel and compacting it well, in which case the snow will quickly set in the cold and the workpiece will be dense. You can also shovel sticky snow into the formwork.
When a block sufficient for work is ready, they begin to decorate it. To do this you will need a small tool. Suitable construction tools: spatula, scraper, grater. If they are not available, improvised means are quite suitable; you can first take a knife from home and a wooden spatula from the kitchen. If the snow is not very hard, you can also use a children's sandbox set, but you need to be careful with it; if the snow is hard, the fragile plastic can easily break, which will cause great distress to the child.
At this stage of the work, you will need a model of the figure made at home and a drawn portrait. You need to sculpt parts from it, like from a model. First, a general outline is created, then the details are drawn.

The photo shows a figurine that still needs to be decorated
There is no point in being upset if something goes wrong; snow is the material that makes it easy to restore and redo the resulting defect.
Wireframe figures
Creating a frame from plywood and wooden sticks helps to capture the figures in different poses and make them seem alive, allowing you to use them to embody the complex theme of any fairy tale. An example is visible in the photo.
Such work begins with the creation and installation of a frame. The frame serves as the skeleton of the figure, that is, a support for the snow. Therefore, all distant details must be reflected in it, since, for example, long neck the swan will not withstand the load and will quickly break without a skeleton. To do this, you need to connect wooden sticks and pieces of plywood with wire or bunches. It is important to make the frame strong and stable.
It is also necessary to make a frame for parts that can be used in children’s games for climbing, so that the snow partitions do not collapse during play and do not injure the child.

After installing the frame, it is filled with snow inside and sculpted on the outside. For greater strength of frame figures, it is recommended to coat them on top with the so-called “snow dough”, when the snow is half diluted with water and the entire figure is coated with such dough; after hardening, the figure will acquire icy strength. Do not forget about the need for rubber gloves for this part of the work. After all the parts of the skeleton are hidden with your own hands under the thickness of the snow, and the blank has reached the required size, you should start making the details, as shown in the photo.
At this stage, the process is similar to working with a frameless figure, the only difference will be the higher complexity of the parts being performed.
Ice figures
Ice figures are a separate creation. Transparent figures, shimmering in the sun or in the rays of artificial lighting, look like an imitation of expensive stones or valuable glass (see photo).

Creating them is quite difficult, since ice is a very hard material and not easy to work with. In addition, it is impossible to restore an incorrectly broken area, so the work requires training and skill.
To create such figures, you need natural ice, taken from a reservoir or glacier. If you try to freeze tap water yourself, it is unlikely to turn out transparent, and the figure will not have the appropriate appearance. Although this option is also suitable for training.
The video demonstrates how to make ice sculptures:
Decoration of figures
Just a white figure made of snow is boring, especially for children. The entire first class will be happy to join in the game of designing the resulting work. They will help make the winter picture brighter. Use a brush to apply small details: eyes, nose, mouth. Larger areas are best spray painted. For coloring, you must use paints that are safe for children, such as watercolors. Gouache can also be used, but after the figure melts, it will be more painted and can stain the whole class in the spring.

Colored ice figures that need to be prepared in advance by freezing tinted water in molds are suitable for decoration. Children can also do this with their own hands. See photos for examples of figures.
A good way to decorate is fabric; you can use colored scraps or whole canvases. In order for the fabric to fit well on the figure, you need to use it wet, then, when frozen in the cold, it will keep its shape. Small pieces are glued to the figure using snow dough. You can ask the class to bring such scraps from home. Unnecessary knitting threads will also come in handy; they will allow the sculptures to create original hairstyles.
Suitable for decoration natural materials: cones, rowan and hawthorn berries. The class can also collect such decorations in advance.
In winter, when the leaves fall from the trees and even the late flowers fade, the garden becomes gray and dull. Even the most beautiful courtyard loses the lion's share of its charm in the cold season. However, there are many ways to decorate your site. Find out what DIY winter crafts you can make for your yard and garden. Learn to create unique decor from the most unexpected materials - ice, snow, pine cones, plastic bottles and much more.
What crafts can you decorate a winter garden with?
In summer, the main decoration of the garden is flowers and trees. With the onset of cold weather, we have to look for new solutions. The most important thing that can be done is to provide a place for evergreen shrubs or plants with decorative berries and bark at the landscape design stage.
Green bushes of boxwood, thuja, and bright spots of rowan or viburnum berries look elegant in the cold season. For the same purposes, plant hellebore, rose hips, dogwood, pampas grass, and holly.
Even in winter you can make your garden beautiful and cozy
And to make the area look even more elegant and interesting, make creative winter crafts with your own hands. Involve children in the work; they will certainly enjoy creating unusual things from ordinary materials.
Snowmen and company are traditional winter guests
What's most in a winter garden? Of course snow! With its help, you can turn your site into a real winter fairy tale. The first thing that comes to mind is to make a snowman. This children's fun can be put to good use by decorating the finished snowman with a cute scarf and hat, and handing him a decorative broom.

Cute snowman
Together with your children, you can sculpt the most fantastic figures out of snow and decorate the finished creations. Regular watercolors, gouache, food coloring and even brilliant green are suitable for this. Adding color to your snow creations is very simple:
- First, prepare liter jars or cut plastic bottles for stirring paints. Fill them with water.
- Dilute the paints in water. Remember that the solution must be quite saturated so that the finished figure turns out bright, not pale.
- Start painting the snow. It is convenient to paint a large area of the same color using a spray bottle. If you hate to smear the sprayer with paint, just pour the solution into a plastic bottle and make more holes in its lid. Narrow stripes or lettering are best achieved using a small watering can with a thin spout. Paint complex elements with large brushes or a piece of foam rubber.

Creative craft made from snow
Instead of snow figures, you can build a real castle, build an Eskimo dwelling or an impromptu fence. For construction you need to make snow bricks. Very useful for this cardboard boxes. They are packed tightly with snow and then carefully shaken out. The finished blocks are stacked on top of each other according to the principle of brickwork.
Kingdom of ice on your own property
Another available material for unlimited winter creativity is ice. If you have children, invite them to make winter crafts from tinted ice with you. Multi-colored ice figures do this:
- Prepare a sufficient amount of water in separate containers and stir the paints in it. The richer the solution, the brighter the figures will be.
- Pour water into molds. To do this, use children's “pasties”, buckets, inflatable balls, and rubber gloves. It is convenient to pour water into the balls using a watering can. Tie the filled balls or gloves tightly. Leave all preparations in the cold overnight.
- Dip the frozen blanks into a bucket of warm water and remove the mold (just tear the balls). That's all. Figures similar to candy canes can be placed along paths, under trees, at the gate.

Ice figurines resemble candies
Ice pendants for trees are made using the same principle. Use as molds silicone molds for baking, children's sand molds or any other suitable container. Before pouring water, do not forget to put a piece of rope in each container to attach the finished crafts to the branches. Pendants made from frozen water look very attractive. clean water various berries, flowers, petals.

Ice pendants on the branches
If you plan to spend winter evenings in the garden, make unusual candlesticks from ice. Sequence of work:
- Prepare two cylindrical tin cans of such a size that one of the cans fits easily into the other. The gap between the walls should be 1.5-2 cm.
- Fill a large jar with a 2-4 cm layer of water and leave until frozen.
- Insert a second jar into a container of frozen water and pour water between the walls.
- Dip the frozen mold into warm water and carefully remove the jars.
- Place a tablet candle or light bulbs from a Christmas tree garland into the resulting ice vase.

The combination of ice and fire is mesmerizing
Evergreen decorations
There is a catastrophic lack of greenery in the winter garden. Add color with evergreens. The most affordable material for such decor is spruce or pine branches. You can decorate a fence or gate with garlands or wreaths of thorny paws. Evergreen compositions will replace flowers in empty flower pots and flowerpots.

Frame for wreath
Wreath of spruce branches on the gate or entrance doors do this:
- Bend a ring from thick flexible wire for the base of the wreath and secure the ends so that it does not fall apart.
- Cut the twigs into pieces 20-25 cm long.
- Secure the branches with thin soft wire around the circumference of the base, overlapping each subsequent branch with the attachment point on the previous one.
- Decorate the finished wreath with ribbons, cones, and clusters of winter berries such as rowan or viburnum.

Connecting branches to the base

All branches are fixed to the frame
If you want to make a composition for a flowerpot, the branches also need to be connected with wire and, if possible, attached to the flowerpot so that the winter bouquet is not scattered by the wind.

This is what the finished wreath looks like
Fabulous winter crafts from pine cones
An empty flowerbed will be completely revived by a basket of pine cones. You can also make tree pendants or unusual garlands from them. When working, keep in mind that the craft will be exposed to the weather, so the pine cones should not be fastened together with glue. It is better to connect them with soft wire, passing it imperceptibly between the scales.
Arrangements of pine cones in the garden look elegant on their own, but if you wish, you can paint them in different colors with spray paints. The work must be carried out in the fresh air, but not in the cold, otherwise the paint will lie unevenly.

Cones for decorating a fence
Elegant vine compositions
If you are at least a little familiar with the principles of wicker weaving, decorate your area with openwork figures made of flexible rods. The advantage of such compositions is that snow practically does not linger on them and the figures are always in sight.

Balls made of vine
Wicker balls look very impressive different sizes, and making them is very simple:
- Prepare a sufficient number of long willow twigs. If there is no vine, you can use any smooth, flexible branches, for example, the root shoots of maple, viburnum or lilac. The rods must be damp and flexible.
- Bend one twig into a ring along the diameter of the future ball and secure the ends with wire. Prepare 6-8 such rings.
- Insert the rings one into the other, forming the outline of a ball. Secure the intersections with wire.
- Using thinner twigs, braid the ball in different directions. Tuck the ends of the twigs inward so that they do not stick out.
- The finished ball can be tied to a thread and hung on a tree or attached to a strong thin stick and stuck in a flower bed.

Wicker balls with garlands
Snowman made from plastic bottles
What to do when there is not enough snow, but you really want to decorate your yard in winter? Make a cute snowman from plastic bottles! The work seems difficult only at first glance. In fact, making such a winter craft with your own hands is very simple.
To create a snowman you will need:
- many clear plastic bottles of the same size;
- a skein of thin flexible wire or synthetic twine;
- thick wire for the base;
- strong scissors or a construction knife and awl.

Snowman frame
Stages of work:
- First of all, make the frame of the snowman. For the large bottom ball, bend the pieces of wire in an arc, then stick them into the ground, forming a dome.
- For the snowman's head, bend 6-8 wire rings and insert them into each other to form a ball frame. Fasten the rings at the intersections.
- Connect the upper and lower balls with wire and use it to loosely braid the frame for greater strength.
- Cut off the bottoms of the bottles. To make the craft neat, all the pieces must be the same height and diameter.
- It is unlikely that you will be able to find the required number of white bottles, so the cut off bottoms will have to be painted. Use spray paint or regular enamel. If you decide to paint the blanks with enamel, then simply pour a little paint into each bottom and distribute it, tilting the blank from side to side.
- Collect the prepared bottle bottoms into long garlands. Pierce each piece on both sides with an awl and pass wire or strong synthetic twine through the holes.
- Start forming a snowman by wrapping the tape from the bottoms around the frame from bottom to top. To prevent the bottles from slipping, secure each turn with pieces of soft wire.
- Draw a face and buttons for the finished snowman.

The bottoms must be the same color and size

Connected bottle bottoms

These are the snowmen you can make from bottles
How to decorate a porch or terrace at home
With the arrival of cold weather, the summer outdoor terrace becomes a completely uncomfortable place. To make your house look attractive, attach homemade lanterns under the roof or on the windows, and decorate the porch with cute crafts.
Openwork lanterns made from cans
Tin cans usually end up in the trash, but they can easily be turned into unusual street lanterns. The walls of the cans, covered with a through pattern, transmit light well and color the surrounding space with light spots.
To make lanterns from cans, prepare the following materials and tools:
- small tin cans;
- spray paint;
- wire;
- a printout of a beautiful dot pattern to fit the size of the jar or a hand-drawn design;
- enough sand to fill the jars to the top;
- hammer, nail;
- candles-tablets.

Lanterns made from cans
Sequence of work:
- To prevent the cans from deforming during operation, fill them to the top with sand, fill them with water and leave them in the cold overnight. The frozen mixture will prevent the walls from losing shape when using a hammer.
- Wrap the patterned paper tightly around the jar and secure with tape to prevent it from moving while you work.
- Cover your work surface with a scrap rag. Using a nail and hammer, punch holes in the jar along the outline of the design. At the top edge, make two holes for a loop from which the flashlight can be hung.
- Wait until the tin thaws, shake out the sand and dry the workpiece. Attach a wire loop to the top edge.
- Cover the flashlight with 2-3 coats of spray paint and leave until dry.
- Place a candle in the finished craft.

The lights behind the glass look very cozy
Lantern made of garland and glass jar
You can also make a beautiful lantern from an old New Year's garland, in which half of the light bulbs are no longer lit, and from an ordinary glass jar. It's extremely simple to do:
- Take a glass jar with a volume of 0.2-0.5 liters. The jar can be either the most ordinary one or a shaped one, for example, a coffee jar. Wrap a wire loop around the neck and attach a hanging loop to it.
- Do not fold the garland too tightly into the jar, leaving the end with the fork outside.
- The flashlight is ready, all that remains is to connect the garland to electricity and enjoy the effect.
If you want to make the craft even more elegant, apply your favorite design to the jar using a can of spray paint and a paper stencil.

A family of pumpkins will decorate the porch
Bright pumpkin street decor
Pumpkin is a wonderful autumn vegetable that is quite capable of serving as a decoration for a porch or terrace. Dried pumpkins are frost-resistant, so feel free to use them to create winter crafts with your own hands.
Carefully cut off the tops of decorative pumpkins, remove the seeds and some of the pulp. Leave the pumpkins to dry in a warm place for a couple of weeks. It is most convenient to make pumpkin preparations in the fall, immediately after harvesting.
Dried pumpkins are decorative in themselves and can simply be placed on the steps of your home. Another option is to turn dried vegetables into lanterns by drilling lots of holes in them using an electric drill.
Crafts for the New Year holidays
When decorating your home for the New Year, don’t forget about the yard and garden. With skillful hands it is possible to turn a site into a real New Year's kingdom.
Luminous sculptures made from cling film and tape
You've probably seen shimmering translucent figurines of deer and other New Year's characters in the windows of shopping centers, and just on the streets. Few people know that such beauty can be made with your own hands.

Glowing deer made of film and tape
The most interesting thing is that to work you only need a couple of rolls of cling film, a roll of wide tape and a luminous garland. The only difficulty is to find a suitable form for wrapping with film - these can be large garden sculptures, interior figurines and other interesting things.
Stages of work:
- Wrap the selected shape tightly and evenly with cling film in 5-6 layers. The more layers, the stronger the sculpture will be.
- Apply 2-3 layers of tape over the film. It is more convenient to work with segments of 25-30 cm. Try to ensure that the tape lays flat and does not wrinkle.
- Using a construction knife or scissors with sharp ends, cut the workpiece and remove it from the mold.
- Place a garland inside. To ensure that the light bulbs fill the space evenly and do not bunch up, fix them in the desired position with pieces of tape. Be sure to take the power plug out.
- Cover the cut with tape. The magical glowing sculpture is ready!

Winter home porch decor
How to make New Year's garlands outdoors
Decorate tree branches, a fence or the facade of your house with bright garlands made of various materials. Even children can be trusted to make these simple winter crafts - they will certainly enjoy making funny little things with their own hands.
First of all, to make garlands you will need strong rope. You can attach anything you like to it - Christmas figures cut out of felt, snowflakes, flags made of colored paper covered with tape to protect it from moisture, burnt out light bulbs painted with paints and much more.

Luxurious snowflakes
Openwork snowflakes made of wire
Another easy-to-make holiday decoration is wire snowflakes. The wire base is decorated with Christmas tree tinsel, foil, and knitting yarn. Such snowflakes are appropriate not only in the yard, but also indoors. They are easy to make, so short time you can make a lot of snowflakes, for example, for a garland.
Stages of work:
- Prepare a coil of flexible wire that holds its shape well, wrapping material such as yarn and pliers.
- Print or hand-draw a star template. Bend the wire using pliers according to the template and twist the ends.
- Wrap the workpiece with threads, secure the ends with a small piece of tape. Tie a loop in the corner of one of the rays.
Wire snowflakes can be made into any other shape by bending the wire in the desired direction.
Creating winter crafts with your own hands is a real pleasure. Take an evening to work and use your imagination to enjoy a stylish and beautiful area all winter long.
Ice is a whole world of fun in winter. Ice is beautiful. Ice is creative.
Ice is space for imagination and original ideas. Dishes, decor, games, candles and lamps, home...
I'll try to tell you something...
Ice is frozen water. Is it possible to put flowers there? Someone came up with this idea - to put a rose in ice "vase" - it will melt, gradually opening the flower... romantic... But only for a winter party.
Ice wreath.
A regular cake pan will work to make this. 
They will look bright and elegant in a snowy winter garden.

But you can decorate them not only winter garden, but also used as holiday table decor.

In order for the “filling” to shine through the ice beautifully, it must be transparent.

HOW TO MAKE ICE TRANSPARENT AT HOME?
But “cloudy” opaque ice is also effective. From such ice you can make ice buckets for champagne and lamps for candles.

Transparent and opaque ice can be combined to achieve the desired effect, as in the bottom photo.
This is such a “wreath-candlestick”.

You can freeze any filling inside - for example, shells. 
Original openwork candle can be made with ice.

Follow the link MK
ICE LANTERN FOR OUTDOORS
The trick to making ice lanterns is that the water near the walls freezes faster than inside.
Therefore, when a sufficient layer of ice has frozen, the excess water is simply drained.

Whether to supplement it with something or not is up to the creator himself) 
ICE DISHES
You can make ice glasses using almost the same principle. 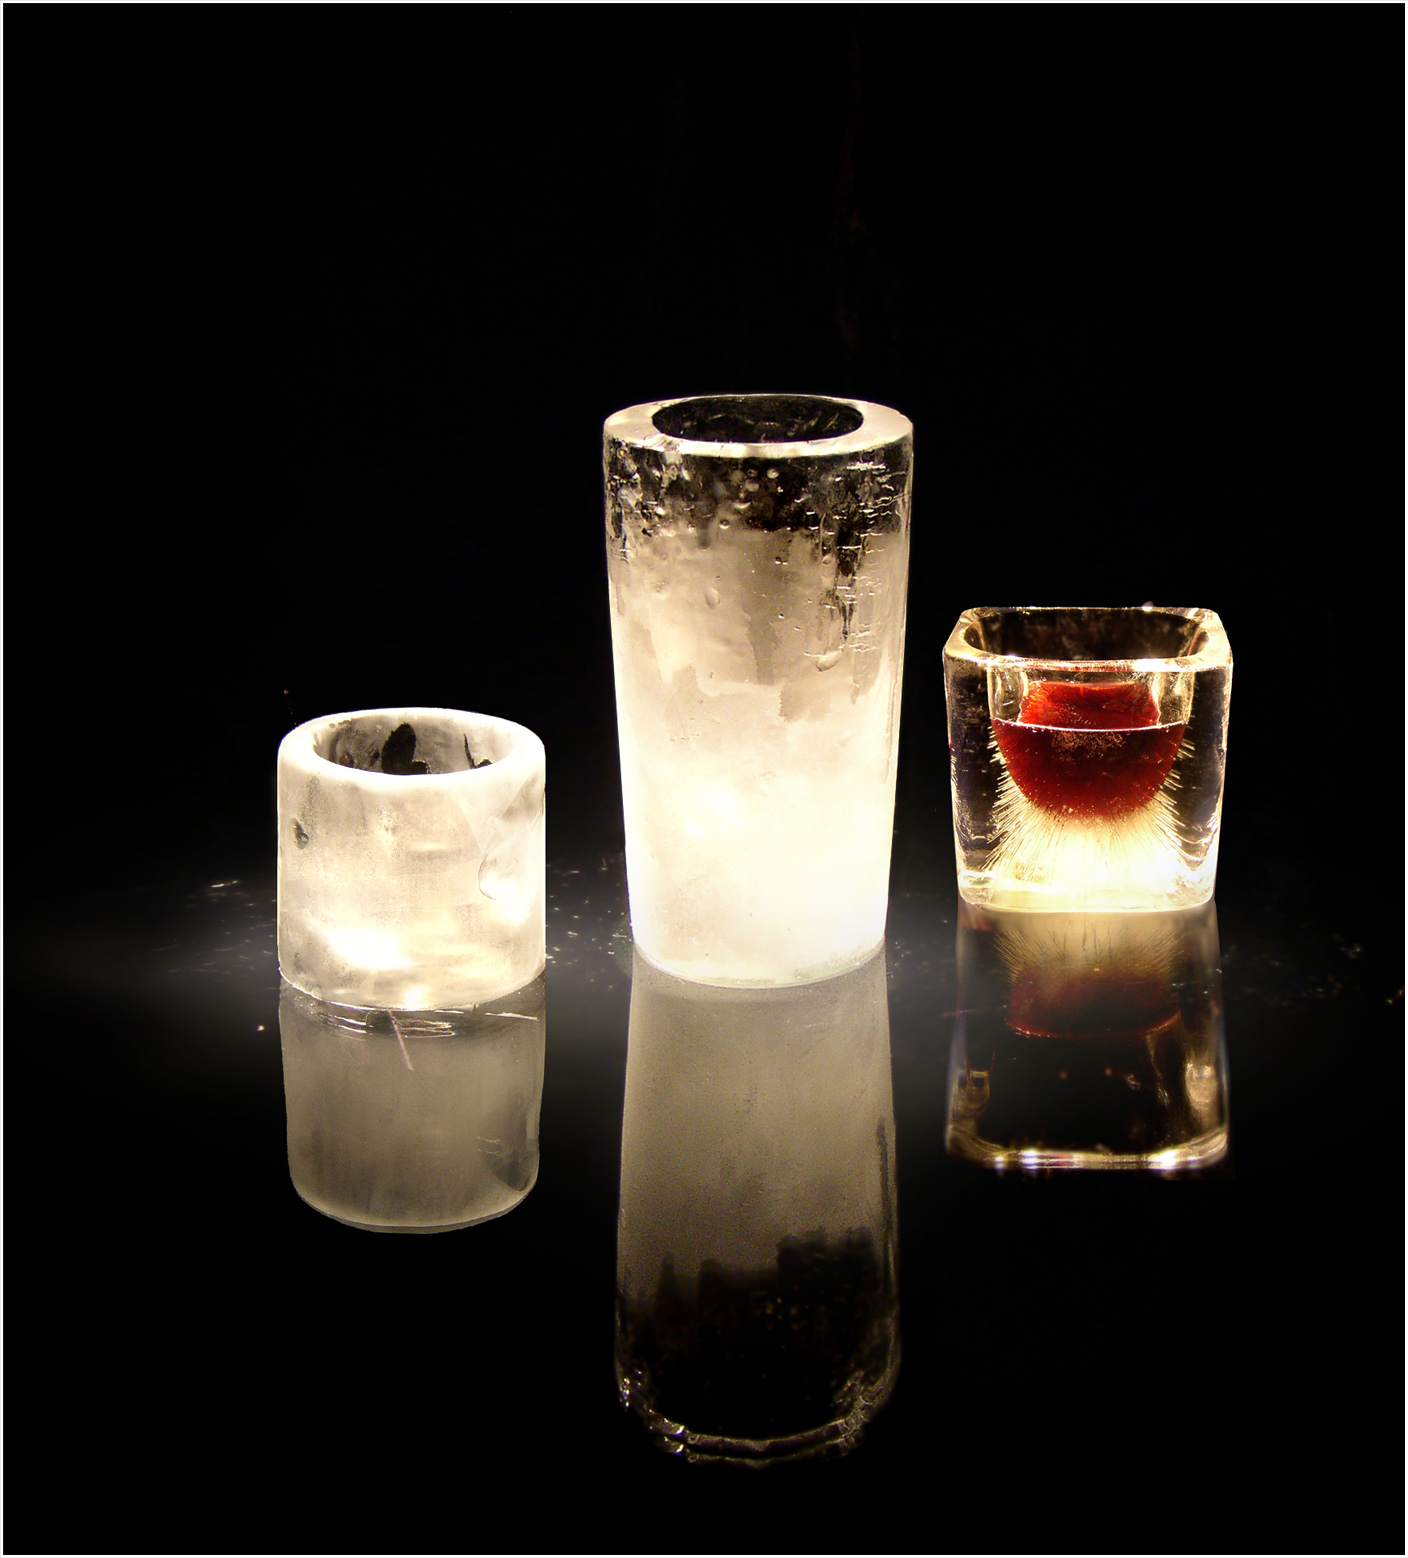

Containers for caviar from ice.
Ice dish for fruits It’s also easy to do - the shape of a 5-liter water container is recognizable, and the technology is the same: pour, freeze, drain excess water.
And these summer ones ice containers with walls made of flowers and herbs are unusually good, and just as simple to make.

Ice cream bowl. What a beauty)))

Different containers, different fillings, different uses.


By the way, the bottle does not have to be frozen - you can do it ice stand under it.

Two containers of different diameters: the smaller one should correspond to the size of the bottle and be heavy (you need to fill it with something) so that the water does not push it out.

And here is a very laconic stand.
In general, ice dishes are already made to order, professionally. 
Ice buffet table at the wedding.

JUST ICE CUBES
Ice cubes are the simplest thing you can create. But even ordinary cubes can be made festive and original.

Cubes with rosebuds, for example.
Or with cherries. 
Or - with berries cut into pieces? 
Or - with fruit juice or puree.

Or - very gently - with flowers. 
FIGURED ICE.
Ice figures - the simplest - can be made by pouring it into disposable glasses or yogurt containers, adding your choice of dyes, berries and leaves, bright plastic toys.
And the thread must be frozen there - hung on the branches. 
A more complex mold can be made from foil.

And confess your love to your (your) beloved (beloved). Inexpensive and touching idea for Valentine's Day.

You can freeze ice in children's molds.

It’s a good idea to freeze a snowflake inside or paint it.

Different shapes are also perfect for ice.

And just freeze a layer of water in a dish, put something in there - you’ll get a round ice pendant.
Inside is a frozen napkin.
There is lime inside. 
Pendant with orange and berries. 
UNUSUAL FIGURES
By purchasing original forms, you can make, for example, ice rings.

Different shapes - different figures.
But with the help of a rubber glove you can make the famous halloween ice hand.
For a cocktail.
For cold soup.
How about playing?
ICE SKINLITS
Need to:
9 plastic bottles filled with 0.5 - 1 liter of water,
1-3 hot air balloon, a small amount of ink or other paint,
1 night time for the pins and balls to freeze.


ICE BOTTLE
Your first
Now - how others do it.


ICE HOUSE.
For those who are not lazy and live where it is “minus” Celsius, so that it doesn’t melt. Winter fun. The kids will be delighted.

All you need is milk cartons, water and patience))) 
Instructions at the link
At first glance, such a craft as colored ice may seem absolutely unremarkable. However, this is not true. Try making bright ice cubes with your children and you will see how much delight they cause. Make your own ice Even kids can do it, so this type of craft is ideal for kindergarten. Winter crafts– these are not only snowballs and snowmen, but also original ice cubes of different colors that can be hung on a tree during a walk.

DIY winter crafts for kindergarten


Here's what the toys will look like:

If you have the right shape, you can even make ice candlesticks. Show your imagination and you can make any shape, even without special forms. For example, a candlestick can be made by connecting two glasses of different diameters, while it is advisable to grease the smaller one so that it can be removed after the water has hardened.

Making colored ice is very interesting. If you use natural or food coloring, then such ice cubes will decorate your cocktail or ordinary mineral water. Dear educators, diversify winter crafts in kindergarten and try making ice figures.