In the world of handicrafts there are a lot of ideas, the implementation of which allows you to make simple crafts for the New Year or another holiday to please yourself and your loved ones. Modular origami for beginners is a very interesting activity. A person can learn to create small figures from modules quite quickly, it's easy. There are simple diagrams on the Internet, the description of which will allow you to make a rooster out of paper, a temple, a flower, etc.
Using this technique, even from white paper, you can step by step create products of incredible beauty. New Year's pictures and patterns, a variety of animals - you can't count them all. For beginners, it is better to take something light, from a small number of modules, for example, 20.
Modular origami for beginners is a very interesting activity
Step by step instructions:
- There is an option to purchase separate paper for modular origami at an office supply store. But for assembling the rooster, ordinary colored paper will also work, although it is thinner. It is recommended to use yellow material.
- A square sheet of paper is folded in half. The resulting side strip should be folded and cut along the fold line.
- The paper is then folded in half to form a rectangle.
- It is important to ensure that the top and bottom edges match. The fold line should be ironed.
- After this, the sheet unfolds. The square is folded again, only this time on the other side.
- The paper is folded vertically, that is, from left to right.
- After the fold is made, the leaf unfolds. If everything was done correctly, then there should be a cross in the center of the sheet.
- The upper right corner is applied to the lower left corner. Then a fold is made. The action is repeated, but only on the other side.
- The bottom right side of the folded paper is folded toward the center. The resulting square is folded into a rhombus. This method should not produce triangular leaf shapes. If triangle figures were formed, this means that the needleworker did not follow the plan correctly.
- The corners of the figure need to be collected towards the middle. The top corner adjusts to itself. Next, a fold is made. The other three folds are folded back.
- The upper corner of the square rises along the fold line upward. The other two folds are folded inward.
- The upper edges of the sheet fold inward. We need to straighten them out.
- The outer edges of the resulting diamond are folded in the center. The right fold bends towards the left.
In the last step, the figure is flipped over and the top corner of the bottom layer is folded towards the top corner.
Gallery: modular origami (25 photos)


Modular origami for beginners: swan (video)
Christmas tree using modular origami: step-by-step instructions
Such a voluminous creation as a paper Christmas tree can decorate paintings, stands or wooden decorative boards.
So, the detailed technique:
- The Christmas tree should be made of green paper. You can use both colored and plain paper. If the choice falls on the usual one, then you should use paints so that the material acquires a green tint.
- The Christmas tree should be assembled from a square sheet. Fold lines are made in height, width and diagonals. The paper unfolds.
- Then the basic model of the figure is formed - a triangle. A fold line is outlined in the figure. The right side turns towards her.
- Next, use a fold line so that the right corner of the figure is centered at the base of the triangle.
- All corners are turned.
- Then you need to use scissors so that the Christmas tree becomes voluminous. Three cuts should be made on the right and left sides.

Such a voluminous creation as a paper Christmas tree can decorate paintings, stands or wooden decorative boards
At the last stage, the resulting segments are bent to the sides.
Small human figurine: simple description and diagram
For each detail of the man, you can use paper of different colors, for example, make the top yellow and the pants blue. But to simplify the task, it is better to use one-color material. You don't need a pencil to create a man.
- So, the square material is bent in half, then the side corners of the figure are bent.
- A zipper fold should be made at the bottom of the sheet. The corner is lowered at the top. Then the figure turns over.
- The corner is slightly bent. You don't need to bend it too much, just lightly mark the fold line.
- After this, you need to carefully flatten the “pockets” of the resulting shape, bending the resulting triangle.
- One half of the product is bent back.
- The corner is pulled up, part of the paper is pulled out. The elongated figure is an almost finished man.
- After pulling the figure up, only the “nose” of the triangle should remain visible.
- The corner bends inward, and the man’s head rises up.
- The remaining top corners bend inward on each side.
For each detail of the man, you can use paper of different colors
At the end, the arms and head of the man should be glued to the body.
Tips for those who do modular origami
- By connecting several origami with a thread, you can decorate your room. Lots of ideas! For example, you can hang the craft on a nail near the door. It looks very beautiful, especially if the origami is multi-colored.
- A beginner who wants to improve his skill can experiment with different materials and colors.
- You need to thread origami through the thread very carefully so as not to damage the paper.
- In such work, it is recommended to use thin paper designed specifically for modular origami. Why? It is thinner and easier to work with. Although people who fold paper very intensively may tear it, if everything is done carefully, the craft will turn out very beautiful.
- Origami is a great gift. You can make a Christmas tree for the New Year, and a tank for February 23rd.
- There is an alternative material for creating modular origami - this is foil. It makes crafts more durable, and they are also shiny.
- To follow your green plan to save the environment, you can use recycled paper rather than new paper.
- If a person plans to give origami as a gift, then the last step of completing it is recommended to be done not in advance, but before delivery. This way the craft will not look “crumpled”.
To create a beautiful craft, the main thing is to make smooth edges. That is why it is not recommended to use poor quality material. If the sheet is torn, then elegant origami will not work.
How to make modular origami in the shape of a heart?
- Take a square sheet of paper. The colored side is facing. The upper left corner bends towards the center. The edges should be evenly adjacent to each other.
- The action is repeated with a different angle. As a result, the material should have several fold lines. There is no need to unfold the leaf after this.
- The lower part of the material is folded towards the center.
- Then the leaf straightens completely and turns over to the other side. If everything was done correctly before, then a bulge should form in the center of the sheet.
- Next, a horizontal fold is made.
- The sheet is turned over again.
- The two edges of the paper are folded towards the center. The edges of the figure should touch.

PS).
search
Tips for photographing crafts) or filmed (see how to upload a video).
Attention: User Agreement
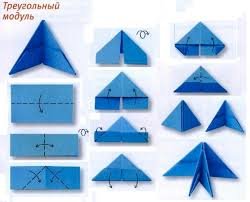
How to make a triangular module (diagram)
How to make a paper module (video)
What can be done from modules
Modular origami is a special manufacturing technique various volumetric figures from paper triangular modules. It was invented in China.
To make, for example, a swan, a snake or a Christmas tree using this technique, you need to prepare many paper triangular modules and then connect them to get the desired shape.

Triangular-shaped origami modules and how they are made from rectangular pieces of paper. These rectangles can be of different sizes, for example 53x74mm or 37x53mm. To get the right size, you need an A4 sheet.
Prepare A4 paper (standard paper from a sketchbook, or paper for printing or copying).

1. Fold the paper in half, then again and again - if you unfold the paper, you will have 16 divisions.
* You can fold the paper one more time, then there will be 32 divisions, and they will be smaller.
2. Cut the paper into 16 or 32 rectangles.
* You can use either scissors or a stationery knife for this; the latter will be faster.
3. Fold one of the resulting rectangles in half in width.

4. Now fold it in half lengthwise and return it to its original position (go back to step 3). In the middle you now have a line with which you can fold the module evenly.

5. First fold one side of the rectangle towards the middle, then the other (similar to folding an airplane).

6. Now bend the edges of the pieces that protrude.

7. You need to bend the protruding sections upward.

8. Bend your structure in half (connect the 2 sides of the module).


You need to make as many such modules as needed to assemble the desired structure.
How to make a triangular module (diagram)

How to make a paper module (video)
Modular origami. How to make a module.
The main thing you need to have for modular origami is paper and a lot of patience. Due to the fact that the figures in modular origami are not very small, you need to prepare many modules for them, from several hundred to several thousand.
Each module has 2 pockets. With their help you can connect modules.
Typically, when folding modules, no glue is used, since the friction force prevents them from falling apart. But it happens that in some places the paper structure is not stable, then it is strengthened by gluing several modules PVA glue.
Can be used both pure white and colored paper. Office paper will do, but you can also use pages from magazines and even candy wrappers. Regular colored paper is quite thin and tears at the folds. It can be used to create small modules (if you divide A4 paper into 32 parts).
To connect modules, simply insert them into each other. This can be done in several ways.
For example, like this:

What can be done from modules
And if you take up this type of art with passion, you will very soon be able to make, for example, the following models:


Triangular module
This module is used in most crafts modular origami
The A4 sheet is divided into equal rectangles, and choose the size yourself. The more rectangles, the smaller the module. I make modules based on this ratio.


1. Bend the rectangle in half lengthwise.
2. Bend it across, find the middle, and straighten it. Place at a bent corner
3.Fold the edges towards the middle.
4. Turn the product over
5.Fold the protruding edges up.
6. Place the corners behind the triangle.
7.Fold the bottom
8.Follow the resulting lines, lay the corners and lift
Bottom up
9. bend the module in half
10.triangular module is ready
assembly video
————————————————————————————————————————- Here is another origami module made of paper, although the running one first. The process of sheet alignment

The rectangles are narrower and fit almost the same way, but there are slight differences in module assembly.
———————————————————————————————————— for tangram models.
Tangram models are usually assembled from modules folded into a triangle, the so-called basic modules. The second type of modules - additional - due to their narrow long shape, is used to create leaves, heads and necks. The basis of both types of modules is a square. Folding the modules is a fairly simple process.
Origami modular assembly diagram:

Basic module from a square.
Let's start making paper origami -
module.
1.First, place a sheet of paper on the table with one corner facing you. Then bend it diagonally upward to form a triangle. The long side is at the bottom.
2.In the second stage, attach the right corner to the upper, middle corner and make a fold.
3. Now the left corner is next. It also needs to be attached to the top corner. Now you have a square in front of you.
4. Turn the square over so that all corners remain up.
5. Bend the top sheet of the square down and make a fold.
6.Then fold the right square down.
7. Do the same with the left corner: bend it from top to bottom. If you did everything correctly, you will get another triangle.
8.Finally, fold the right half of the triangle to the left.
9.Basic module is ready for assembly modular origami from paper.
10.This is what the base module looks like from the side. Two slots for inserting other modules are clearly visible. From this perspective module stands on its long side, the double end (goal) points back.
——————————————————————————————
Additional module.

- First, place the square with one facing you. Then fold it diagonally and open it again. Now you see a vertical fold.
- Fold the right side towards the center fold so that the narrow corner is at the top.
- Then fold the left side in the direction as shown in the picture. A narrow corner is formed from below.
- 5.Fold the right and left sides towards the middle again to form a diamond shape.
6. Fold both sides of the diamond together along the middle crease
7. Finally, fold the triangle again - up - and the additional module is ready.
This is how the modules are assembled.
There are no similar articles.
Decor, DIY
Regina Lipnyagova

Photo © Regina Lipnyagova
Modular origami is incredibly popular today. Beautiful three-dimensional figures from triangular paper origami modules look luxurious. This type of needlework is also called 3D origami; it is believed that this art originated in China. Another name for it is Chinese modular origami. You can make almost anything from small triangular modules. Once you understand the intricacies, you can make origami vases from modules, an origami swan from modules, an origami Easter egg from modules, origami flowers from modules, an origami peacock from modules, a modular origami dragon and much more.
In this instruction we will show you the basics - how to properly make an origami module. The scheme is quite simple, the main thing is to try to make all the pieces of paper as identical as possible.
We will need:
- scissors
Materials:
- paper
Step-by-step instructions on how to make an origami module:

To make an origami module, we need paper and scissors.

Cut the sheet into 16 equal parts. You need to try to do this as carefully as possible, all parts must be the same. Some people prefer to fold a sheet of paper in half and cut it until they get a piece of paper of the required size, while others use a ruler to mark the sheet and cut several sheets together at once.

Fold the paper in half lengthwise.

Fold in half crosswise.

After making the fold, unfold the rectangle back.

We bend the right side to the fold line at a right angle.

We bend the left side in the same way.

We turn the module over.

Fold the base of the triangle up.

Turn the workpiece over.

We cut off the remaining ends with scissors.

We bend the workpiece in half. It turns out that making an origami module is very simple. He's ready!

To connect the modules to each other, you need to put the module on the tips of two elements.
Leave your opinion about the article:
Modular origami is a very exciting activity that gives a lot of scope for creativity to everyone who has mastered the simple technique of making paper modules.

You can use special paper sheets designed for making origami, but their cost is usually quite high, so at least at the learning stage it is better to use regular high-density printer paper - from 80 g/m3 and higher (for example, Spectra Color).
Take a sheet of A4 format. Depending on the size of the modules, the paper sheet will need to be divided into 16 or 32 fragments. If we need 16 parts, fold the sheet horizontally twice, if 32 - three times. In the picture below, we folded the blank three times, if you need 16 blanks, then do not do the last fold.
Now we unfold the sheet and fold it in half vertically (the fold should remain on the left side). Then we bend it in half horizontally 2 times. Expand the sheet. On it we will see the fold lines along which we have to cut blanks for the modules.
The sheet to be divided into 16 parts looks like this.
And this is what a sheet looks like, which will be divided into 32 parts.
Cut the sheet along the fold lines. From each small rectangle we have to make an origami module, the assembly diagram of which is presented below. For beginners, it is better to start assembling modules from a 1/16 sheet of paper. Modules made from 1/32 are more miniature and elegant, but the process of assembling them requires some skill.

1- take a small rectangle;
3- now fold it in half vertically;
5- bend the “wings” on both sides;
7- bend the corners;
9- bend the module, it takes the shape of a triangle.
11, 12 - fastening modules to each other using pockets.
Using modules as parts of a construction set, you can use them to create the most bizarre three-dimensional figures that your imagination can suggest.

Required materials:
Origami modules - step-by-step instructions


By threading the corners of some modules into the pockets of others, we can create voluminous paper crafts of any shape and size.
The creation of three-dimensional figures from triangular modules, the so-called 3D origami, was invented in China. The whole figure is assembled from a huge number of identical parts (modules). Each module is folded according to the rules of classic origami from one sheet of paper, and then the modules are connected by inserting them into each other. The friction force that appears in this case prevents the structure from falling apart. Therefore, such models are assembled without glue.
You can experiment with different types of paper. Suitable office paper of different colors, coated colored paper. Sometimes such figures are made from magazine clippings and candy wrappers. School colored paper is not suitable because it is too thin, friable, breaks and tears at the folds.
Cut a sheet of A4 paper into approximately 16 pieces (4 pieces wide and 4 pieces long). You can do this: fold the sheet in half into a booklet and fold this half in half again. We turn the long side towards us and again fold it into a booklet in half and then in half again. Let's expand. Cut along the resulting lines.
These will be blanks for the corners. I will make a reservation that the dimensions of the blanks for triangular modules depend on the size of the craft.
Fold the corners as shown in the photo:


If you are seriously thinking about learning a new type of creativity, then be sure to try your hand at modular origami. We learned to make figures from paper at a very young age, but at that time few people knew that you could create beautiful figures from modules: for beginners, this type of art, which came from the East, may seem difficult. Therefore, do not rush in any way, because this is an art that requires calm and attentive work with your hands. Just look at what masterpieces you can create using this technique:

If just one look at three-dimensional figures made using the modular assembly technique, many questions arise in your head about how to repeat such a masterpiece, then be patient and have paper. Any animals, flowers, fruits and much more can be created by your own hands only from paper modules.
Modular assembly lessons
How to fold a module for this technique is clearly seen in this diagram:
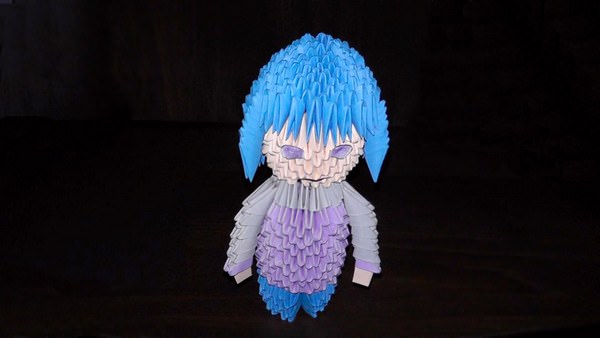
For example, using a detailed video master class, you can fold a very cute penguin:

But this is not the only master class. Origami crafts made from modules, the diagrams of which are very clear, will be your first step into the world of three-dimensional figures. To make the work clearer, it will be useful for beginners to watch a video with detailed comments on each step of the work.
Crafts from origami modules: Swan
The first creation will be a small swan made from modules. Therefore, stock up on paper and get to work, following my instructions.
Materials:
- 69 white modules;
- 1 black module.
Work progress:
We begin to assemble the figure from the body of the swan. The first row will consist of 12 modules connected to each other in a circle. The connection of the modules is clearly shown in the diagram:

In the second and third rows we will also have 12 modules.

We turn our workpiece over and start making the tail and wings from the 4th row. For the tail, we fix 2 modules in an arbitrary place.

In the 5th row we complete the tail with 1 module, the short side of the element should be outward.

Now, symmetrically from the tail to the left and right, we begin the formation of the wings.
For the wing, we return to the 4th row again and attach 4 modules to the left of the tail.

To narrow the wing, you need to reduce the number of modules in each subsequent row. Those. in the 5th row - 3 modules on top of the previous 4 elements, in the 6th - 2 elements, in the 7th - 1 element. In the 8th row we again fasten 1 module. The right wing must be done according to the same pattern.


We smoothly moved on to the final stage of creating a small swan. Now we just have to make the neck, and we again move on to the 4th row. We fix 2 elements on the remaining free modules.

In the 5th row we add another module, to which we need to add 5 white elements nested inside each other.


For the beak, add 1 black module at the end of the neck. Thanks to the design of the neck, its bend can be changed at will
This is the swan we got:

Now you can try to create more complex crafts; a triangular origami module is easy to make, and the figures made from these modules are truly breathtaking and amazing in their beauty. The MK below will convince you of this.

This paper folding technique is very easy to learn. The main thing is to get good at making triangle basics, and then any figure is within your grasp.
Flowers from modules
For example, flowers from origami modules will be a great way to create a summer mood during cold winter evenings.

By the way, creating such a flower is not at all difficult. For this we need 55 yellow and red modules.

The first row consists of 5 yellow modules (to fix it, it is best to lubricate the internal pockets of the modules with transparent glue).

We begin the formation of petals. To do this, insert the yellow corners of the first row into the pockets of the red modules. Add 8 modules:

We close the petal with the ninth connecting corner:

We repeat this operation for 4 more petals:

So that our flower can be placed in a vase, using a cocktail tube and a strip of paper we make a stem:

And glue it to the base of the flower:


Most importantly, remember to remain patient and concentrate on your work. Creating large volumetric figures from modules is not an easy task. But the result will meet all your expectations, inspiring you to new achievements.
In the meantime, while you are practicing forming modules for origami, I will prepare another MK that will reveal modular origami from a new side for you.
Crafts from origami modules on video
Making an Easter egg:
Another egg for Easter:
Father Frost:
White dove: