Every child knows what bumps are. They come in pine, spruce, and cedar. You can make a variety of crafts from them. This requires a little time, imagination, desire and patience.
The process of making any craft will give you a lot of pleasure. And as a result, you and your child will admire your creativity for many more days.

From this natural material you can create:
- Decorative compositions: candlestick, ikebana, door wreath.
- Animals: bear, hedgehog, penguin, squirrel, owl.
- New Year's products: Christmas decorations, star on the Christmas tree, New Year tree.
The process of preparing buds
Before you start making a craft from this natural material, you need to carefully examine and process it. Dirty buds need to be washed and dried; you can use an old toothbrush for cleaning.
Since it is warmer indoors than outside, unopened buds will begin to open. Spruce trees will look like hedgehogs, and pine trees will look like fluffy Christmas trees. And if you need unopened cones to make a craft, then they need to be placed in wood glue for 30 seconds and then dried.
 If you need the opened material, but there is no time to wait, then you need to spread it on a baking sheet and put it in a slightly preheated oven. The oven door should be slightly open. After some time they will begin to gradually open up.
There is another way that will help open the cones - this is cooking. Boil them in boiling water for 30 minutes and then dry. They will become fluffy and will no longer change shape.
These two processing methods not only help the natural material to open up, but also kill all microbes.
If you don't like the shape of the cones, this can be corrected. To do this, they must first be soaked in water and then handed over to them. the required form and tie it with thread. After drying, they will have the shape that you gave them.
For making crafts, this material can be used not only in kind, it can be covered with varnish, paint, artificial snow.
In order for them to have a white tint, they must be soaked in a special solution for five hours. To prepare the solution, you need to mix water and white in equal proportions. After soaking, they should be washed in clean water and then dry.
Now you know the rules for working with this natural material and you can safely start making crafts.
DIY Christmas tree-cone
Making such a Christmas tree is not difficult, you just need desire and patience.
To make it you will need:

Step-by-step instructions for making a Christmas tree:
- First you need to make a base - a cone. To do this, draw a circle using a compass or plate. The radius of the circle corresponds to the height of the Christmas tree. Cut out a circle and fold it in half. For a cone you will need one half of a circle. Connect the workpiece with glue. The cone for the craft is ready.
- Now take the prepared cones and glue them to the cone. You need to start from the bottom and the biggest ones. There should be smaller bumps at the top.
- The void between the cones can be filled with tinsel.
The Christmas tree is ready!
Small Christmas tree made of pine cones and plasticine
This craft is very easy to make; even a very small child can handle it.
To make a Christmas tree you will need:
- Fir cone;
- Cotton wool;
- Plasticine;
- Braid;
- Green paint.
Manufacturing stages:
- Paint the bump with paint using a brush. A child can do this.
- Make a stand for the Christmas tree from plasticine. To do this, roll the ball and flatten it.
- Stick an open fir cone to the base, its scales should look up.
- Roll small multi-colored balls from plasticine. Attach them to the Christmas tree in different places.
- Using cotton wool you can depict snow.
- You can make a peak from plasticine and attach it to the top of the craft.
- All that remains is to decorate the craft with braid.
Small and original Christmas tree ready!
Step-by-step master class on a Christmas tree made from pine cones
To make such a New Year's beauty, you will need the following materials:
- Cardboard;
- Glue gun;
- PVA glue;
- Pine cones;
- Gold paint.
- Beads and sparkles.
Stages of work:
- You need to make a base from cardboard - a cone for the fluffy beauty.
- Glue the cones in rows onto the base. The rows need to be fastened with a shift inward, they should resemble a triangle.
- Now apply paint to the Christmas tree and decorate it with beads and sparkles.
The fluffy beauty is ready!
Miniature scale tree
To make such an elegant Christmas tree you will need scales from pine cones, cardboard, scissors, glue and paint of your favorite color.
Manufacturing stages:
- Cut the required number of scales using scissors.
- Make a cone for the Christmas tree out of cardboard.
- Glue the scales to the base. You need to glue in circles, starting from the bottom. The rows can be staggered or placed on top of each other.
- The top of the Christmas tree can be decorated with dried cloves.
- After the glue has dried, the Christmas tree needs to be painted, for example, gold. Spray paint is better suited for this procedure.
- Apply PVA glue to the ends of the scales and sprinkle them with glitter.
The miniature beauty is ready!
By making one of these crafts, you will not only get great pleasure, but also make your baby happy. Don't be afraid to imagine and create.
Attention, TODAY only!
Everyone associates the New Year with the smell of tangerines and pine needles, with miracles, and also, of course, with fir cones. At first glance, the cones do not look festive at all, but you just have to use your imagination, just like an ordinary natural material will sparkle with completely new colors. We invite you to learn how to make a Christmas tree from fir cones with your own hands!
Making such a Christmas tree is very simple, even a child can cope with this task, so making a Christmas tree from pine cones can be a great way to make New Year's gifts or holiday decorations for home.
Preparation rules
Very often, cones falling from spruce and pine trees turn out to be closed and only after a while they open, thereby changing the original appearance, in which this lump was delivered to your home. This can somewhat overshadow the craft, so before you start making a Christmas tree from spruce or pine cones, you can familiarize yourself with some of the intricacies of preparing cones for the craft.
- If you want to leave the cones closed, after collecting them you need to put them in a container with wood glue for literally 20-30 seconds, this will not allow them to open.
- If you have collected closed cones and want them to open as soon as possible, There are several ways to achieve this:
- you can let them cook for half an hour and then dry them on the radiator;
- send the cones to the oven, preheated to 250 degrees, for 2-2.5 hours.
- Plus, heat treatment will kill microbes and small insects living in the buds and make them safe.
There is also a way to adjust the shape of the cone: you just need to soak it in water for 5-10 minutes, tie it with thread and dry it on a radiator. To bleach the cones, they need to be soaked for 5-6 hours in water with diluted bleach (1:1), then rinsed thoroughly and dried.
Let's get started
For work we will need:
- Cones. Their number depends on how large a decorative Christmas tree you want. The more cones, the larger and more magnificent the Christmas tree made from pine cones. Cones for crafts need to be chosen that are good, without defects;
- Glue gun;
- Spray paint cans. The color depends only on your imagination;
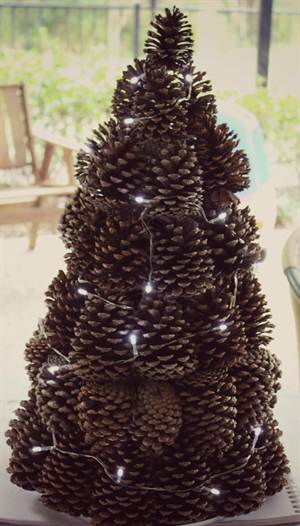
- Garland;
- You can make such a Christmas tree in two ways: by gluing the cones onto a pre-prepared cardboard cone or onto a fiberboard base. In our master class, production will be carried out using the second method, with a base made of fiberboard (instead of fiberboard, you can take a sheet of chipboard or any other dense material that can be easily cut).
Now that the cones have been processed, the first thing you need to do is sort them into large and small. This task can easily be entrusted to a child.

The size of the sheet will vary depending on how much big Christmas tree you want to receive.
We have a sheet measuring 30x30 cm. We draw on it with a compass smooth circle and cut out with a jigsaw. Only dad can handle this task, and in this way you can involve the whole family in the process of creating a fluffy beauty with your own hands!
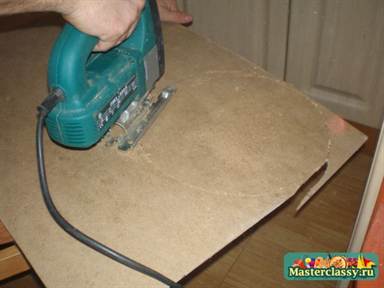
In the cut out circle you can make another smaller circle, as shown in the photo. This is necessary in order to then place a garland inside the future Christmas tree, thereby creating beautiful tints and glow.
You can also make legs for the tree to make it more stable. You can use special iron legs, or you can buy plastic furniture legs in the store. The main thing is that the base stands firmly on the surface.

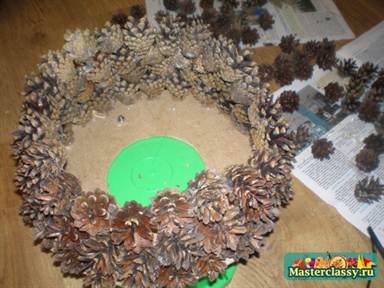
Now let's proceed directly to gluing the cones. To do this, take the largest cones and use a glue gun to glue them along the edge to our base. Glue is applied directly to the cone itself, both to its base and to the sides, in order to fasten adjacent cones together. When the first circle is glued, you need to wait for the glue to completely dry and harden, otherwise the entire structure may fall apart.


The second row is a little more difficult to make: the cones are attached to each other, in the spaces between the cones of the first row. There is no need to skimp on glue if you want to get a stable structure. Again, we wait for it to dry completely when we finish the second row. And in the same way we glue the remaining rows, with each row moving the cones a little towards the middle, forming a cone.


For the top of the Christmas tree, it is best to choose an oblong cone with a pointed tip to make it look more realistic.

Next we have an important step to take - painting. This is not necessary if you want to preserve the natural colors of the material. We will cover the Christmas tree with silver spray paint. Let us repeat that you can choose absolutely any color.

It is best to paint with aerosol paints outside, since such paints have a specific smell that is not so easy to air out, or we open all the windows in the apartment, and cover the walls and floor in the place where painting will be done with newspapers so as not to stain anything around. After painting, you need to wait for the paint to dry completely.
With the onset of annual winter holidays Every family faces a pressing question: which Christmas tree to buy, artificial or natural? It seemed that everything was clear: in order to save forests it was necessary to purchase a fake one. But it turns out that not everything is so simple. After all, a Christmas tree made from artificial materials, has a number of flaws.


Artificial Christmas tree from the store
The most important disadvantage is that artificial trees are made from plastic, which over time releases toxic substances, poisoning our body. In addition, after some time, spruce trees made from artificial materials become unusable and are thrown away, which leads to environmental pollution.
DIY Christmas tree: cones
Cones are an extraordinary and versatile material for making crafts. It’s not difficult to stock up on them, especially if there is a forest somewhere nearby. Holders of this gift of nature can use cones for any purpose. After all, with pine cones you can make a gift, decorate the interior, prepare medicine and light a fireplace in cold weather.
Cones are used especially actively during periods New Year's holidays, because they carry a piece of magic and miracle.

In our article we offer step-by-step instructions for making an environmentally friendly and safe Christmas tree from cones. This tree is an excellent solution to the issue of choosing a Christmas tree for the New Year holidays.
And most importantly, you can make a miracle Christmas tree together with little children.
Preparation
Before making the Christmas tree, the pine cones must be prepared for work. If the cones are brought from the forest right before making the craft, then keep in mind that in the heat the cones may open for some time.
To avoid deformation of the product, we recommend dipping the pine cones in wood glue for about thirty seconds and then drying them well. If you plan to change the shape of the cones, soak them in water for a while, and then change the contours, firmly fixing them with threads.

Method No. 1. Christmas tree made from pine cones, classic version
To make a medium-sized Christmas tree using glue you will need:
- Cones.
- Warp. It is better to choose cardboard as the base material.
- Liquid glue and gun;
- Scissors;
- Gold paint.
When preparing to make a Christmas tree, the cones need to be sorted by size; cones from spruce and pine will suit you , larches. Before starting work, you need to cut off the petals of the cones. Let's take cardboard as a base and make a cone. It is better to choose cardboard as the base material.

Using glue and a gun, attach the pine cones to the cone. The cones should be glued onto the cone, layer by row. For more convenient application of paint, it is better to choose them in aerosol form. After gluing the cones, we paint the tree, and our craft is ready.
Method number 2. Fluffy Christmas tree
To perform unusual crafts in the form of a fluffy Christmas tree you will need the following materials:
- Thick cardboard;
- Pine cones;
- Glue and gun;
- PVA glue;
- Christmas tree decorations (beads, sparkles);
- Dye.
A cardboard circle is suitable as a base. We carefully place the cones on the circle and glue them to the base using liquid glue and a gun. After the first row is ready, proceed to the next one.
Pay attention to how the cones are located. It is better to fasten all rows with a shift inward and in the form of a triangle. Once gluing is complete, paint your Christmas tree.
Method No. 3. Christmas tree made of plasticine and cones
To work you need to prepare:
- Cone;
- Plasticine;
- Cotton wool;
- Braid.
Prepare the base of the Christmas tree from plasticine. Select a cone with open petals and place it on the base. Made from plasticine different flower roll out small balls and attach them to the petals. Cotton wool is an excellent option for simulating snow. Decorate the cone with braid and the Christmas tree is ready.
Method number 4. Christmas tree made of pine cones and puff pastry
This version of Christmas trees will fit well into any New Year's composition, prepared with my own hands.
To make a Christmas tree you should prepare the following materials:
- One bump;
- Dye;
- Flour;
- Fine salt;
- Water.

To prepare salt dough, prepare flour, salt and water in a ratio of 3:2:1. If desired, you can add paint to the water. Pour water into a container with flour and salt, knead the mixture until smooth. Take one well-opened cone and paint it with spray paint.
Form small balls from the salt dough and glue them into the gaps between the petals of the pine cone. Also use the resulting dough as the base of the Christmas tree.
New Year. This holiday is beautiful because it does not fly by in an instant, and we prepare for its meeting long before the celebration itself. It is truly felt when we are waiting for it, preparing for it. Every year, we again and again plunge into the holiday bustle. Bright lights, the smell of tangerines and, of course, what New Year does without a Christmas tree. The Christmas tree is the main attribute of the upcoming holiday. If you do not plan to display a real forest beauty, then you can celebrate with its smaller counterpart, created from scrap materials, such as pine cones. You will learn how to make a Christmas tree from cones in the further description of MK.
I dedicated this master class to creating a cone-shaped Christmas tree from pine cones. Such a Christmas tree can decorate the interior of any apartment or serve as a an original gift to your loved ones.
So, for work we will need:
- pine cones;
- cardboard (or any thick paper);
- hot glue gun;
- 3 – 4 pcs. transparent glue gun sticks;
- a can of silver acrylic paint;
- scissors;
- stapler;
- beads for decoration.
How to make a Christmas tree from pine cones: step-by-step instructions
To begin with, I went for a walk in the forest with my children. We don't have snow yet, so we quickly replenished our autumn supplies of pine cones, which we didn't have enough of. At home we sorted through the pine cones: we threw away the broken ones, cleared the good ones of debris and sorted them into large and small ones. If the buds are too closed, you can dry them in the oven. The hot air will cause them to open. By the way, you can make a lot of different things from pine cones. New Year's crafts- penguins, spiders, mice, etc.
Collected cones
The next stage is preparing the base of the Christmas tree. I rolled the cardboard into a cone, secured it with glue and a stapler. At the base, I cut off the excess paper with scissors. I did not paint the base for the Christmas tree. But if you want everything to be perfect, you can do it.
 Cone - the basis for the Christmas tree
 Now, using a glue gun, you can start building up the first row. We will start with big cones and finish the craft with small ones. If you don't have a glue gun, you can use any super glue. But still (to speed up the process and to make the tree of cones neat) I would advise you to buy it (even the most inexpensive one will do), because hot glue sets instantly, which significantly reduces work time. I applied hot glue to the bottom of the cone base. We attach the cone to it, pressing it tightly. Glue the next bump next to it, trying not to leave any gaps. The first row is ready.
 Let's start gluing the cones
 Thus, moving from bottom to top, I glued the cones tier by tier. While working, I tried to select the cones so that the next ones would fit with the smallest gaps. If there are any spaces left, that's okay. You can cover them with scales from cones. But this work seemed painstaking to me, and I want to enjoy the process. So I left it as is, and when I painted the entire Christmas tree, they became invisible.
 Cover the cone with cones
 I tried to attach the smallest cones to the last two rows. The most beautiful elongated cone was reserved for the top. Apply a generous amount of glue onto it and secure it. To make a tree made of cones more decorative, you need to decorate it with garlands and tinsel. But first, let’s “sprinkle” it with silver snow.
 Coloring a Christmas tree from pine cones
 Yes, if there are threads left from the hot glue, carefully remove them so as not to spoil them appearance our beauty. In my opinion, such a Christmas tree is already ready to fulfill its festive function. But I optimized it a little more.
I took ordinary silver paint from a can and painted the entire surface of the tree.
It is necessary to paint somewhere outside, as the paint has a very specific pungent odor. Since when spraying, even in calm weather, its vapors will fly in different directions, I advise you to wear clothes that you don’t mind getting dirty.
Spray paint in different directions. We are waiting for the paint to dry completely. Next, I glued the decorative elements using a hot gun. First I cut the Christmas tree beads. In short, you can use whatever is at hand. If you have beads, they will do just fine. We glue them in a chaotic order.
 Cut the beads into links
  Gluing decorations to the Christmas tree
 You can add some decorations and New Year's tinsel, put on small ones. It all depends only on your taste and imagination, experiment! This is what you should get approximately:
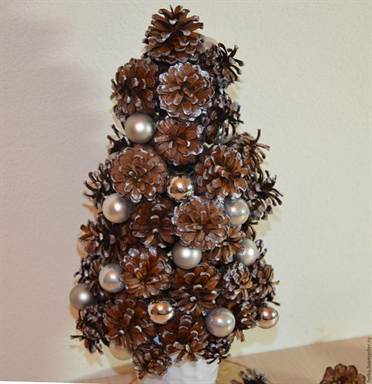
 Christmas tree made of pine cones
 The width of the Christmas tree is about 20 cm, and the height is just over 30 cm. Here it is christmas tree We made it out of pine cones, made with our own hands! How do you like it? In my opinion, everything is simple and beautiful. Such an elegant beauty can even be placed on a festive table.
Do you feel the holiday approaching? Share your emotions and impressions, offer yours New Year decorations. In order not to miss all the most interesting things, subscribe to updates via RSS or to your mailbox. Enjoy your creativity and happy new year!