AUTHOR OF TOYS AND MK:katerina12
Many of you have little mischievous children who are difficult to keep in place! And this Parsley rattle toy is primarily for them! And also for parents!
This story began at an exhibition in Moscow five years ago. Mom bought a similar toy for my sister. Since then, Masha grew up, and Petrushka lay in the attic, along with many unnecessary things. And it’s so interesting in the attic! So I found this toy. I looked at it and decided to sew such a toy for my neighbor Anyuta and her sister Mashenka, who turns two years old in August!
So let's begin!
Required materials:
1. a piece of white fabric (for the head), and bright colors (for the shirt, cone and cap).
2. cardboard
3. a stick for attaching the structure (I used a plastic one from a flowerpot, but you can also use a twig)
4. Titan glue or other strong glue, as well as PVA
5. a piece of felt for hands, beads for eyes, nose and mouth
6. braid, lace for decoration
Time spent on making a toy max. 3 hours.

We cut out a semicircle with a radius of 14 cm from strong cardboard and form a cone with a diameter of 7-8 cm.

We cover the cone with fabric, wrapping it inside the cone.

Making a shirt pattern. (All my sizes are approximate). Important: the size of the bottom of the shirt (+ 2 cm for allowance) is equal to the diameter of the cone!

We sew the head of the future Parsley: square 6 * 6. We sew a shirt, leaving holes for the neck, palms and for attaching to the cone. We assemble Parsley by first inserting a stick into the head, fixing it with padding polyester, and tightening it with threads at the base. Then we put the shirt on the stick and sew the shirt to the neck. Poor Petrushka!

We make hair for Parsley (I used yarn), sew a cap from a triangle, glue beads, sew on gloves and decorate.

Apply strong glue to the inside of the edges of the cone, approximately 2 cm in height. And glue Parsley’s shirt to the cone. Important: the size of the bottom of the shirt matches the radius of the cone. I ended up with a very short shirt because I made the diameter of the cone incorrectly when gluing. And I had to lower Parsley lower into the cone! Please don't repeat my mistake!!!
Application “Cheerful Parsley - balance beam toy” master class with templates
Gorbunova Elena Valerievna, senior teacher of MDOU kindergarten No. 5 “Zvezdochka”, Furmanov.Description: The master class is intended for educators, teachers additional education and just creative people, can be used with children aged 5 years and older.
Summer this year is not every day conducive to long and fun educational walks. It's raining, the sky is gloomy, and it's cool. There are days when, as they say, “you can’t stick your nose out into the street.” However, children need interesting developmental activities. I think that making fun paper crafts that you can play with and experiment with can be an interesting pastime.
Purpose of the master class: making a funny paper balance toy.
Tasks:
- develop constructive and creative abilities
- learn to observe symmetry and proportions in parts
- develop fine motor skills of hands and eye
- develop interest in the work process and the results obtained
- to develop children’s basic scientific and technical knowledge
Materials and tools: cardboard, colored paper, templates, scissors, glue, paper clips.

Progress:
Today I suggest you make Parsley, a fun toy.
"Parsley"
Its a funny cap
Dashingly shifted to the side.
He's a fun toy.
This is a merry fellow - Petrushka.
V. Orlov

Some interesting information about Parsley:
Parsley- one of the characters in Russian folk puppet shows. Depicted in a red shirt, canvas pants and a pointed cap with a tassel; Traditionally, Parsley is a glove puppet (glove doll).
In V. Dahl's dictionary it is: the nickname of a booth doll, a Russian jester, a jokester, a wit in a red caftan and a red cap.

In Russia, Parsley has been known since the 17th century. Russian puppeteers used marionettes (string puppet theater) and parsleys (glove puppets).
Petrushka's appearance is by no means Russian: he has an exaggerated big hands and the head, facial features, large almond-shaped eyes and a huge hooked nose.
He inherited Parsley's appearance from the Italian Pulcinella.
Until the middle of the 19th century in Russia, Parsley did not yet have its own name. Most often he was then called “Ivan Ratyutyu” or “Ivan Ratatouille”.
From various memoirs and diaries of the 1840s it follows that Petrushka was called Pyotr Ivanovich Uksusov. The famous Russian puppeteer Sergei Obraztsov called Petrushka Pyotr Petrovich Uksusov or Vanka Ratatouille.

Our Petrushka will be a balancing act acrobat.
There are many ready-made balance toys.


But creating a toy with your own hands is much more interesting.
Let's start doing Parsley.
First you need to cut out a symmetrical base from cardboard.
To do this, we need a sheet of terady in a checkered pattern, on which a symmetrical pattern is drawn.

Preschoolers, of course, are given a ready-made cardboard blank, and schoolchildren will be able to draw and make this toy on their own.


We attach paper clips to Parsley's hands (if the paper clips are metal and heavy, then two are possible for each hand, and if they are light yellow metal, then it is better to connect them in a chain of two - for each hand of Parsley you get four paper clips).


Look, our Parsley is ready and is already balancing and does not fall even on the smallest surface. We draw Parsley’s face, not forgetting that the workpiece must be turned upside down.


I suggest decorating - dressing Parsley (be careful, cut it evenly, Parsley should remain symmetrical, the result depends on this - if the symmetry disappears, then the toy will balance crookedly).


Place Parsley with its cap on your finger or any thin limited surface - Parsley, swaying, will balance, but will not fall.

I'm not at all green from the garden,
Even though I’m called Parsley,
I will be there for you guys
A doll-toy!
In the same way, you can make a balance toy of any shape, the main thing is that the picture is made of cardboard and has a symmetrical shape. These could be butterflies, airplanes, dragonflies and much more that you can come up with.


Thank you for your attention!
I wish everyone a warm and sunny summer!
Good evening, Country of Masters! Today I decided to show my first master class! Many of you have little mischievous children who are difficult to keep in place! And this Parsley rattle toy is primarily for them! And also for parents!
This story began at an exhibition in Moscow five years ago. Mom bought a similar toy for my sister. Since then, Masha grew up, and Petrushka lay in the attic, along with many unnecessary things. And it’s so interesting in the attic! So I found this toy. I looked at it and decided to sew such a toy for my neighbor Anyuta and her sister Mashenka, who turns two years old in August!
So let's begin!
Required materials:
1. a piece of white fabric (for the head), and bright colors (for the shirt, cone and cap).
2. cardboard
3. a stick for attaching the structure (I used a plastic one from a flowerpot, but you can also use a twig)
4. Titan glue or other strong glue, as well as PVA
5. a piece of felt for hands, beads for eyes, nose and mouth
6. braid, lace for decoration
Time spent on making a toy max. 3 hours.
We cut out a semicircle with a radius of 14 cm from strong cardboard and form a cone with a diameter of 7-8 cm.

We cover the cone with fabric, wrapping it inside the cone.

Making a shirt pattern. (All my sizes are approximate). Important: the size of the bottom of the shirt (+ 2 cm for allowance) is equal to the diameter of the cone!

We sew the head of the future Parsley: square 6 * 6. We sew a shirt, leaving holes for the neck, palms and for attaching to the cone. We assemble Parsley by first inserting a stick into the head, fixing it with padding polyester, and tightening it with threads at the base. Then we put the shirt on the stick and sew the shirt to the neck. Poor Petrushka!

We make hair for Parsley (I used yarn), sew a cap from a triangle, glue beads, sew on gloves, decorate and sew a fishing bell onto the cap.

Apply strong glue to the inside of the edges of the cone, approximately 2 cm in height. And glue Parsley’s shirt to the cone. Important: the size of the bottom of the shirt matches the radius of the cone. I ended up with a very short shirt because I made the diameter of the cone incorrectly when gluing and therefore Parsley doesn’t quite hide! So I had to lower Parsley lower into the cone! Please don't repeat my mistake!!!

Now attention! Holding the cone with your hand, raise and lower the stick. And you will see what will happen! I promise it will be very interesting for you and your children!
Doll “Petrushka” based on a modern household form.
Do-it-yourself glove theater puppet. Master class with step by step photos
Yumasheva Antonina Mikhailovna, teacher at MBDOU kindergarten No. 5 of a general developmental type, Rasskazovo, Tambov region.
Description: The master class is intended for older children preschool age, children of primary school age, preschool teachers, as well as lovers of home theater with children, will be useful for those who love do-it-yourself crafts from waste material, household forms, for those who want to give a used item a second life.
Purpose: Craft, gift, doll for a puppet theater with your own hands, souvenir.
Target: Creating an original doll for the theater with your own hands based on modern household packaging materials.
Tasks:
Educational:
1. Introduce the history of the appearance of the Parsley doll;
2.Teach to see artistic image in ordinary forms;
3. Teach how to use a do-it-yourself theater puppet.
Educational:
1. Foster a caring attitude towards Russian traditions and the historically established respect of the Russian people for the theater;
2. Cultivate respect for one’s own work;
3. Cultivate perseverance, the ability to finish what you start.
Educational:
1.Promote the development of imagination, fantasy and creativity;
2.Develop manual skills, fine motor skills hands and fingers, eye.
Safety precautions for children of senior preschool and primary school age when working with scissors:
1. Maintain order in the workplace, do not stuff scissors with paper or other materials.
2.Be attentive while working, do not get distracted and do not distract others.
3. While working, the scissors are on the right with the rings facing you.
4.The blades of the scissors must be closed when not in use.
5.The blades of the scissors must be sharp.
6. Scissors should be passed only rings forward with blades closed.
7. You cannot hold the scissors with the ends up.
8.When working with scissors, you must pay attention to the direction of cutting and the fingers of your left hand that support the material.
9. You cannot cut while moving, turn, or bend towards the floor.
10. Scissors should only be used while sitting at a table.
11.The scissors are put back in their place every time after work.
Safety precautions for children of senior preschool and primary school age when working with needles and pins:
1. Place the needle on the magnet and the needle bar on the table to the right, with the sharp end facing away from you.
2.Pass sharp objects with the sharp end away from you.
3.When working with a needle, use a thimble or a magnet.
4.Do not stick needles or pins into clothing or random objects.
5.The broken needle should be given to the teacher,
6. Do not put needles, threads, buttons or other objects in your mouth.
7. It is advisable that the needle always have a thread with a knot tied at the end.
8. Every time after work, sharp objects are put back in their place.

Materials for making dolls by children of senior preschool age independently using plasticine:
1.Shape – a container from a Kinder surprise with a finger hole cut out on one side for adults.
2. A piece of yellow plasticine.
3. A little plasticine in white, black, pink, orange.
4. Finished shirt made of fabric measuring 11x16 cm.
5. Ready-made cardboard cap.
Additional materials and tools for the master class for making dolls for children of primary school age and adults from fabric and yarn:
6.Shape – a Kinder surprise container with a hole cut out for a finger on one side.
7.Yellow yarn.
8. Fabric for a shirt.
9. Fabric for the cap.
10. Fabric for the backing - a circle equal to the diameter of the Kinder-surprise container
11.Plasticine
12.Needle and thread on a magnet.
13. Scissors.
14.Sandpaper.
The story of the birth of Parsley, the people themselves spoke through his lips!

Oddly enough, Petrushka is not a native Russian puppet theater character. Its prototypes can be found in different countries. In Italy - this is Pulcinella, in Germany - Kasper, or Gansvut, in France - Polichinelle, in England - Mr. Punch, and in Turkey - Karagöz, in Hungary - the knight Laszlo, in India - Vidushaka. All of them are theatrical dolls - marionettes and are controlled using threads. The only analogue of Petrushka in terms of driving technique is the Guignol glove doll, which appeared in Lyon at the beginning of the 19th century. Traditionally, Parsley is a glove doll.
The famous Russian writer Maxim Gorky, characterizing the image of Parsley, wrote the following: “... a figure was created... known to all peoples... This is the invincible hero of the folk puppet comedy, he defeats everyone and everything: the police, the priests, even the devil and death, but he himself remains immortal. In a crude and naive image, the working people embodied themselves and their belief that, in the end, it is they who will overcome everything and everyone.”
Petrushka's clothes, therefore foreign: a red cap with a tassel, the same red shirt, a cloak and canvas pants.
And the appearance of the doll cannot be called Slavic. She is by no means Russian: he has exaggeratedly large hands and head, exaggerated facial features, it itself is carved from wood and treated with a special plant liquid, which makes it look darker. Large almond-shaped eyes and a huge nose with a hump, completely white eyeballs and a dark iris, due to which Parsley’s eyes appear black. He inherited Parsley's appearance from the Italian Pulcinella. Many people mistakenly believe that a wide-open mouth is Parsley’s smile, but this is not so; being a negative character, Petrushka constantly stretches his lips in a grin. He has four fingers on his hands (a possible symbol that Petrushka is not a person, but some character from another world).
Parsley as a folklore character, an indispensable participant in street performances. Only men (“parsleymen”) could “drive” it. The doll acquired its voice with the help of a special device - a “peeper” or “talker”. Petrushka also has a full name - Petr Ivanovich Uksusov. He was also called “Samovarov” or “Vanka Ratatouille”. Bold statements, vulgar jokes, witty remarks - Petrushka got away with everything, because he is a doll, and what can he take from it? The people themselves spoke through his lips, criticizing and showing dissatisfaction with the authorities or the clergy. There are quite a lot of stories about the adventures of Parsley. There were main plots: Parsley's treatment, soldier training, the scene with the bride, buying a horse and testing it. The stories were passed from actor to actor, by word of mouth. Not a single character in the Russian theater had the popularity equal to Petrushka.

At the puppet Parsley there is a real prototype. This is considered to be the favorite jester of Empress Anna Ioannovna Pietro Mira Pedrillo. He was the son of an Italian sculptor, and came to Russia, to the court of the ruler as a musician. His wit helped him get closer to the empress's entourage and then become a court jester. He had many nicknames: “Adamka”, “Antonio”, and finally, “Petrushka”. The last name became entrenched in all puppet shows.
Over time, Parsley stopped being just a street performer. He is increasingly invited to manor houses, where our hero loses his edge. He no longer kills, but only disperses his enemies. His speech ceases to be common people, because the “parsley man” is now not a street actor, but a salon actor. The stage is decorated with lush draperies, and the participants themselves dress in satin and shiny tinsel, which turns the performance into a formal, theatrical one. Parsley becomes a participant in children's matinees, thereby turning into a children's character.
Hello kids
Girls and boys!
I'm wearing a beautiful cap
With a rattle in hand.
I'm a fun toy
And my name is...Petrushka.
During Soviet times the doll leaves the stage and becomes the hero of literary plays. Now Petrushka campaigns for sanitary hygiene or participates in the collection of waste materials. The only thing left from the old Petrushka is accusation.
Reanimate the image of Parsley Samuil Marshak took over. In 1922, the puppet comedy “Petrushka” appeared in his collection of plays, and five years later the play “Petrushka the Foreigner” was published. Although Marshak finally cemented the image of Petrushka as a child’s one, he restored the tradition of the doll getting into ridiculous stories.
Ballet "Petrushka" sometimes identified with the emblem of the Russian seasons, and for its creators it became a kind of historical milestone. Probably, in the ballet “Petrushka” the tragic image of the doll was fully revealed. The plot is reminiscent of the past adventures of the street Parsley. In the ballet, for the first time, the line of Petrushka’s dependence on his creator, the Magician, appears. The doll rebels against him. Parsley no longer turns to the public for help, but is reborn in the role of an avenger. Resurrected, he shakes his fist at the Magician and lets out a mocking cry.
The eternal loser Petrushka, as always, will defend his rights and prove that a human heart beats in the chest of a pathetic doll, a homely jester.
Ways to control the glove puppet Parsley.
The index finger enters the doll's head, the thumb and middle finger enter the sleeves of the suit, the little and ring fingers bend toward the palm.

An image of a doll that restricts the actor’s hand movements less than the previous one, since the ring finger bends toward the palm along with the middle finger.

And so let's begin our master class on making a Parsley doll
1. To make a doll in a Kinder surprise container mold (hereinafter referred to as the mold), you need to make a hole for the index finger. The hole must be made by an adult for safety reasons. The hole is small, the shape is smooth and the knife can slip off!
The hole must be cleaned with sandpaper to remove burrs.
And so the form with a hole for the finger is ready. A shirt made of fabric, a cap made of cardboard - pre-made by children at manual labor, sewed a shirt and glued a cap according to patterns, you can start!

2. Divide a piece of yellow plasticine in half and, kneading it, roll one part into a plate - this is the doll’s future hair. Children use the remaining part for bangs and at their own discretion. Let's roll two white balls and two black ones - these are the doll's eyes. For the nose, you can combine two colors – orange and yellow – to bring it closer to the color of the shape. Make the mouth out of red plasticine.
The advantages of using plasticine extensively in a doll are that all the parts fit together easily and the created heaviness helps the child manipulate the doll.
She behaves well even in dancing.

3. Everything is ready to decorate the doll’s head, you can connect everything, as shown in the figure, in which I connected all the stages of execution using a slide in Microsoft Office, the stages are not complicated, but together they are perceived better for quickly and successfully connecting the parts.

4. The shirt is traditionally red, but here it is not red, so that later in the master class the dolls will be different.

5. And now Parsley is ready!


Next, I propose to make a Parsley doll with yarn hair,
Such a doll is more attractive, durable and easy to store; it can be used for games, like the Presenter at performances and matinees.
1. For the hair, take the yarn and wind it around the backing, tie it with the same yarn, cut it in the direction of the arrows, as shown in the picture I made in the Drawing editor. You will get hair with bangs.

2. The picture shows how to cut and sew the shirt and cap. A backing circle will be needed to attach the hair and cap to the form.

3. Take a shape with a hole cut out on one side and glue a circle on the other side. This circle will allow us to sew hair and a cap to the form.
It is advisable to glue the circle in the same color as the hair; here I used contrast only for better demonstration.

4. We place the finished hair on a circle, place it so that the bangs are on the front of the doll’s face, spreading the hair apart, sew along the entire length of the circle’s circumference.


5. And now our perky, mischievous Parsley is ready! You can play with him!

Simple types of needlework are very popular today; they are coming back from the past and perfectly coexist with fashion trends.
A funny nursery rhyme doll made using papier-mâché technique will complement your home puppet theater and become the first character in it. Manufacturing does not require special skills or expensive materials, it will also take very little time, but the pleasure from the process and the result will be great. The craft can be used instead of a rattle for babies or games for preschoolers.
What to prepare for creativity
To get started, as usual, prepare your materials and tools. To make a nursery rhyme doll with your own hands, prepare:
- klester,
- paper,
- scissors,
- skewers or a thin strong stick,
- a stack or cup as a form,
- scraps of fabric,
- ribbons,
- big bead
- glue Moment,
- threads with a needle,
- two plastic clamps.

Step-by-step manufacturing technique
Wrap the stack in plastic and start gluing pieces of paper on top of it, creating a papier-mâché shape for the nursery rhyme.


In order not to get confused in the layers, you can make one layer white, and the next with beech trees and pictures.

After every 3-5 layers, let the workpiece dry. Since the form must be hard and durable, at least 20 layers will be required.

While the mold is drying, there is time to make a stick for a nursery rhyme doll. Wrap the bamboo skewers with tape or a strip of fabric, securing it well at the edges with Moment glue. Place a bead on the end of the resulting stick, securing it with glue.

If the bead is not large enough, you can apply papier-mâché to it to increase the size.

Carefully glue a piece of light fabric onto the bead, wrapping the excess ends with thread on top.

On a strip of fray-resistant fabric, such as fleece or felt, make cross cuts.

Glue the resulting fringe onto the bead-head of the parsley nursery rhyme, imitating hair.

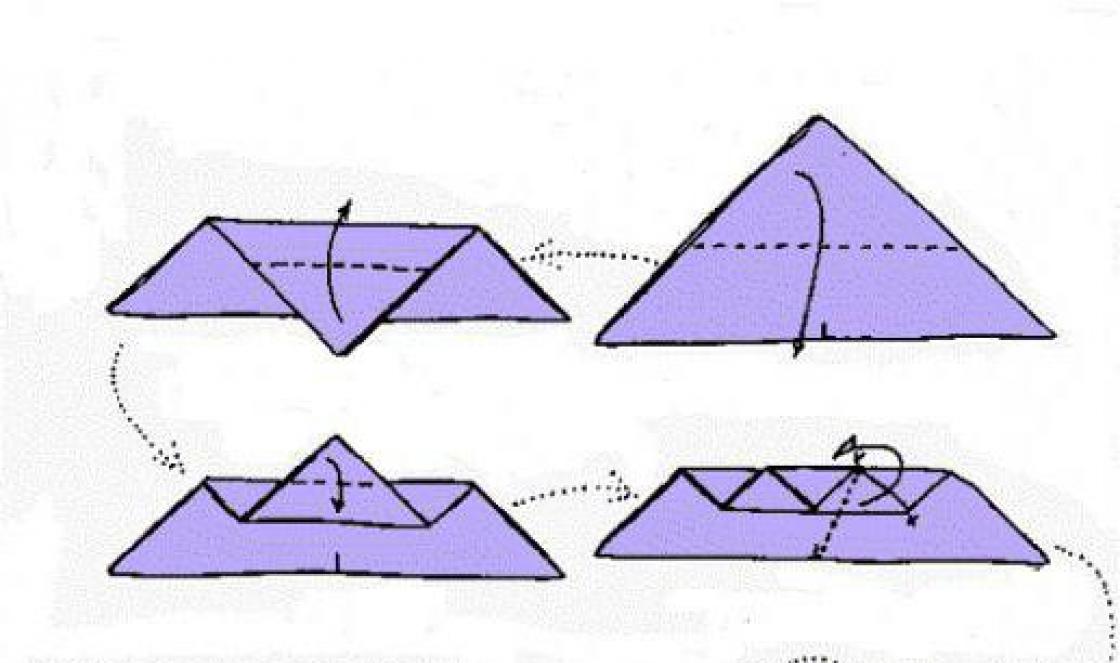
Make a cap from a piece of fabric and glue it on top of the resulting hair. The actor's head is ready!

Secure two plastic clamps just below the head; these will be the arms. Instead of clamps, you can use any flexible material that returns to its shape. For example, cut the tape from a plastic bottle.

The papier mache workpiece should dry well.

Make a hole in the bottom of the workpiece with a diameter equal to the diameter of the stick.

Pass the stick through the mold and measure the required length of the handles. When hidden in the shape of the heads, the handles should not be visible.

Glue pieces of fabric onto the palms of the plastic handles so that the sharp ends do not tear the fabric. Sew a rectangle from a piece of bright fabric and put it on the nursery rhyme. Reinforce in the neck area with glue and thread.

Straighten out Parsley's nursery rhyme clothes. In the area of the palms, tie it with a thread, indicating the hands.

Place the parsley robe over the top edge of the pan. Before doing this, pour beads, small buttons or dry peas into the mold itself, which will create a rattle effect.

Glue the homemade rattle clothes around the entire circumference of the mold.

To decorate papier-mâché, take a rectangular piece of fabric and wrap it around the mold, securing it with glue. 
Sew the bottom edge of the fabric with sparse stitches.

Pull the fabric together to form the bottom. The stick should move freely up and down.

Nursery rhyme - parsley is ready. Don't stop at just one!
If you are interested in homemade toys, pay attention to, and. Such toys do not harm children and emit special warmth!