The best gift is, of course, a gift made with your own hands. Your child will remember for the rest of his life that there are toys that mommy made for him herself. Or maybe this will be a pleasant reason to do some handicrafts with older children? Perhaps this will be the first thing you created with your own hands or you will give this opportunity as a gift eldest daughter. In any case, these toys are wonderful.
After reading this article, you will be able to knit or sew a pyramid yourself. When you are a creator, nothing limits you in choosing the color, size and fillings for your masterpiece.
Crocheted baby pyramid
If you want to knit such a toy, use.
You can decorate the rings in different ways, just be careful with small parts that a child can tear off. You can fill every ring different materials: rustle wrappers, beans, balls, insert rattle elements inside the rings.

Rainbow pyramid
To knit such a pyramid, use.

Pyramid “Fruit salad”
What kid doesn't love fruit? Do you want to learn their names in the game? Then we bring to your attention the knitted pyramid “Fruit Salad” and its.

You can also sew a pyramid. After all, if you sew, then you have a lot of bright scraps at home!
So, to sew a fabric pyramid with your own hands, you will need:
- fabric of different (preferably contrasting) colors. Please note that if the fabric is very soft and stretches a lot (for example, knitwear), then in this case you need a lining made of thick fabric(non-woven fabric), which is glued to the part with a hot iron.
- filler (for example, synthetic winterizer);
- scissors;
- threads;
- sewing machine.
The size and number of rings is at your discretion. Cut out the details, not forgetting the seam allowances. Each ring will require two circles + one inner (short) facing + one outer (long) facing. Cut out a core inside each ring.
Stitch the outer (long) facing to both halves of the ring, stitching the ends of the facing. Next, stitch the inner (short) facing to one of the halves of the ring. You only need to grind it from the inside out on one side (one circle), because... otherwise, you won't be able to unscrew the ring. You need to sew the inner facing to the second circle after turning the ring inside out, manually using a blind seam. Fill with padding polyester.
Sew all the other rings of the pyramid in the same way.
Depending on the size of the rings of your pyramid, cut out a stick for it. Stitch the side edges of the piece, leaving a hole for turning it inside out. Turn the stick blank inside out, fill it with padding polyester, and sew up the left hole. For convenience, you can attach a loop on top (manually or on sewing machine- when sewing a part of a stick).

The pyramid is ready! Surely this toy will give a lot positive emotions To your baby!
If a mother on maternity leave has a desire, then there is usually little time to sew educational toys.
We all want it to be quick and easy, but at the same time bright and interesting, and preferably from scrap materials.
A soft pyramid just meets these criteria; sewing it with your own hands will not be difficult.
At the same time, your own pyramid compares favorably with a store-bought one - it is more interesting and useful for a child.
Firstly, it is soft and pleasant to the touch. Each part can be made from materials of different textures for development tactile perception. Yes, and you can fill it with different fillers for the same purpose.
Secondly, it will be bright, safe, and you can also add educational elements to it. A felt pyramid with Velcro is used in the system early development children of Maria Montessori. And of course, such a thing is much more sincere, children feel it subtly.
If it seems to you that it turns out imperfect, ugly, crooked, then this means nothing for the child. This will not make the toy less interesting and useful for him. And he may love the most “ugly” toys made by your hands the most.
We suggest you make two versions of the pyramid with your own hands - a soft pyramid made of felt with Velcro and a pyramid made of soft rings. Let's start with felt, as it is easier to make, but it is very useful for the development of the baby.
Pyramid with Velcro
Traditionally, it is made from felt of different colors, but you can also use fleece or other dense material, just different scraps of different textures. You will also need Velcro - a tape 2 cm wide and about 10 cm long. Filling - padding polyester, holofiber or polystyrene balls ("anti-stress").
Cut the fabric into equal squares with a width of 4, 5, 6, 7, 8 and 9 cm. Cut the Velcro tape into pieces 2 cm long. You need to sew a piece of Velcro to each square so that the parts are then fastened together. That is, for example, so that at the bottom of each part there is a soft part of the Velcro, and at the top there is a hard sticky part.
Now sew P two squares per piece, leaving a hole for stuffing, stuff with stuffing and sew up the hole. The lower part can be stuffed with buckwheat so that our pyramid stands up well.
Here's what happens:
 The squares can be alternated in this order, then it will be easier for the child to assemble, focusing on color:

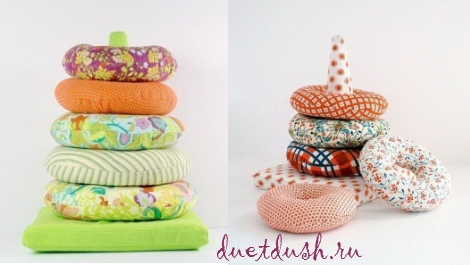
Pyramid with rings
Here you can show your imagination and make the rod straight (which is much easier, since the size of the hole in the rings will be the same for all) or in the form of a cone. To make the rod, you can use scrap materials and cardboard, and then cover it with fabric or paste it with colored paper.
Cut out two pieces from each type of material for the rings. Sew them together, leaving an opening for stuffing, turn them inside out and stuff them with filling, then sew the hole closed with a blind stitch. If you wish, add developing elements - ribbons, buttons, petals (see photo below).
The base can also be filled with buckwheat. Or, as in the photo, make a square base, covering it with fabric.
This is how you can make a pyramid with your own hands:
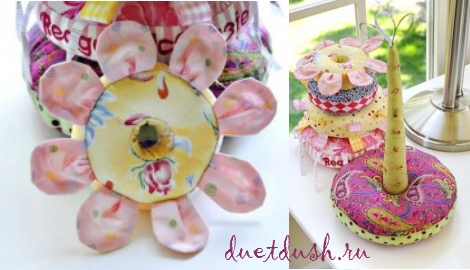
 This is how you can make ribbon loops on rings:

And even such beautiful petals:
 We hope we managed to inspire you to sew a soft pyramid with your own hands for your baby! May this bring him a lot of joy and benefit!
OPTION #1
This toy will help in learning the colors of the spectrum, large - small, counting, and promotes the development of fine motor skills. To make a pyramid you will need: sheets of felt 2-3 mm thick or fleece scraps of different colors; Velcro tape 2 cm wide - a piece of 10 cm; padding polyester or holofiber for stuffing; threads in color; ruler; scissors; chalk or fabric marker; pins.
Open the pyramids:
From each color of felt you need to cut 2 identical squares with a side length of 4, 5, 6.7, 8, 9 cm. Cut the Velcro tape into squares 2x2 cm.
Sew a piece of Velcro with hooks into the center of the red square, and sew the other half of the Velcro with loops into the center of the purple square. Sew pieces of Velcro in pairs onto all other parts. It is advisable to sew the soft part of the Velcro onto all the upper parts of the squares, and the hard part of the Velcro onto all the lower parts of the squares.
Fold squares of felt of the same color with Velcro outwards and sew them with a straight stitch, retreating 2 mm from the edge, leaving an unsewn area for stuffing with padding polyester.
Stuff the workpiece with padding polyester through the open area in the seam and sew up the hole in the resulting pad.
The largest pad can be filled (it is red in the photo) with peas or cereal - for greater stability of the finished toy.
Sew all 6 pads in a similar manner and connect them with Velcro.
The pyramid is ready, you can play!
These are 9 figures - 3 circles, 3 squares and 3 triangles, sewn from fabrics of 3 primary colors of the spectrum. All parts can be sorted and collected into 3 pyramids according to different criteria:
- In shape - square, triangular and round (and each pyramid contains all 3 colors),
- By color - yellow, blue and red (each pyramid contains all 3 shapes geometric shapes),
- In size - large, medium, small (each pyramid has 3 geometric shapes of different colors).


1 square - there is a zippered pocket for storing removable figures, and a pocket in which the ladybug is hidden.
2 square - removable felt parts, fastened with buttons of different colors. You need to select a button for each figure according to color.
3 square - rattle.
4 square - filler (rustles)
5 square - flower on a button
This multi-colored pyramid will be a good helper in learning colors. The pyramid's pads rustle and are connected to each other by buttons.
OPTION No. 2


Made of fleece, stuffed with padding polyester, the bottom ring rustles, there is a parallon inside for the form, the bottom ring is stuck to a stick. The stick contains padding polyester and 2 plastic sticks from a flag for the shape. The top cap contains padding polyester and a bag of beads, a bell is attached, sewn with decorative stitching. The cap is placed on the pyramid using a magnet. Height 35 cm
The pyramid consists of a base and 6 rings made of materials of different textures. The chicken's head is put on top. Height is 26 cm, the diameter of the lower ring is 16 cm. The rings can be used as teethers, each has either beads or ribbons.
author Ksenia
If you look into any toy basket for a baby under one year old, you will definitely catch your eye at least one pyramid. These educational toys can teach a baby a lot - they will develop fine motor skills, give a whole range of tactile sensations, and teach colors.
That's why all mothers are interested how to make a pyramid with your own hands. Moreover, note that making this educational toy for kids is not at all difficult.
So, how to make a pyramid made of fabric that recognizes colors. First, you need to redraw patterns for open rings of various diameters onto a paper sheet, and then transfer them to the wrong side of the selected natural fabric.

To cut out one ring of a pyramid, you need to take two fabric rectangles, fold them inward “face”, and then transfer the contours of the segment onto the fabric. For convenience, first connect the parts using a basting stitch. Then you can machine stitch along the contour of the figure, not forgetting to leave a small hole.
After the parts are sewn, the open ring can be cut out. Using a stick with a blunt end, turn the ring right side out. Now fill the ring with cotton wool, padding polyester or padding polyester, and then carefully sew up the hole through which you stuffed the ring.
Make four more rings of different colors and diameters in the same way.

Make the base for the pyramid from waste materials- handles without a rod and corrugated cardboard, cover the finished base with the same natural fabric. Here is a wonderful educational toy for your child!
Olga Sidorova
My new hobby, which has already become a tradition, is making educational games for preschoolers with my own hands from textiles. (felt) .
I really enjoy making games like this. This time I got this colorful one pyramid.
It is also made from felt. Filled with padding polyester, this time I processed the edges not by hand, but on a machine, by my assistant.
It consists of 5 parts that reduce evenly.

Each piece has adhesive tape sewn on it for a secure connection.


I think there is no point in writing about the goals and objectives of such a game, because everyone already knows everything. Pyramids There are a great many on store shelves, but there are only a few made by yourself, but they are easy to make, so go for it.
Publications on the topic:
A child is a little person who constantly studies and comprehends the world around him. Didactic games play an important role in our work.
I share with you great idea(borrowed from our colleague, but in my execution) is quite simple to make and an interesting game.
Material: felt, buttons, Velcro, buttons, faux fur, sequins. The manual is multifunctional. Integration of educational.
I present to your attention didactic game for children 4 - 5 years old "Pockets with a surprise". Goal: To improve children's tactile sensations.
An ecological-developmental environment is a developmental subject environment that can be used for educational and health purposes.
Children who came to kindergarten at the age of 2-3 years, very poorly developed fine motor skills hands and sensory concepts are practically not formed.
Every year at the level of the municipal Lyambirsky district a competition "Ponoroshkin's World" is held for the production methodological manuals, didactic,.