Good afternoon, today we are back to the topic of drawing the human figure and we will learn how to draw a beautiful girl. Our heroine is reclining on the ground, she leans on the ground with one hand.
In this lesson, we will not just draw a portrait of our girl, but we will talk a little about how to depict a female figure with different hairstyles, figures, dressed in different clothes. Thanks to this lesson, you can learn on your own. It doesn’t have to be sitting or lying down, everything will depend only on your imagination. Practice and you will succeed. Let's get started:
Step 1
The physique of a beautiful girl can be both thin and dense. But when drawing a figure, you need to know which clothes suit which physique. The picture shows a few examples of clothes that fit a thin girl, but do not fit a tight girl.

Step 2
The first girl in the picture is self-confident, stands in a proud posture. The second, shy, squeezed. The third girl is a mixture of the first and second. She is dazzling and flirtatious, but at the same time very mysterious.

Step 3
Look at the types of faces, this is also very important. You are a figure stylist and should know that the face and hair are her own style. For example, if she has a high forehead, then she needs bangs.

Step 4
Most scientists argue that the ideal person has a symmetrical face. It means beautiful person. As you can see in the picture, an asymmetrical face doesn't look good. It is important to understand that in a person's face everything is in the center of something. (Eyes, in the center of the top of the head. Eyebrows, between the eyes and the top of the head. Nose, between the eyes and chin. Mouth, between the chin and nose.)

Step 5
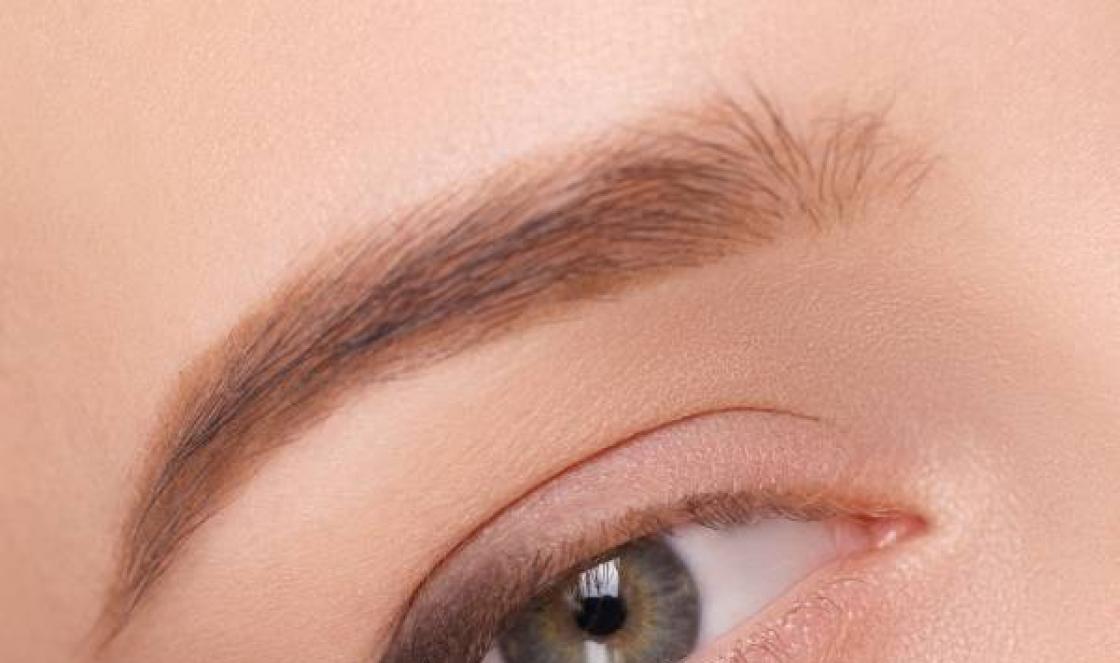
A beautiful girl has long eyelashes. The picture shows a few examples of long lashes, as well as a few examples of the look.

Step 6
Makeup is also a very important detail. Never forget that cosmetics should not be too much.

Step 7
The next important step in how to draw a beautiful girl is the hairstyle. A hairstyle can make a girl very feminine, or maybe a boy, hair can be long or short, the only thing you need to do is to choose the right hairstyle for your character so that it matches both the face and the figure.

Step 8
One more detail before we start drawing the girl. Of course, these are not all options, but you can see several names of the girls' images. Of course, you can change or mix characters, but in moderation.

Step 9
To begin with, how to draw a beautiful girl, let's draw auxiliary lines as shown in the figure.

Step 10
Then draw the contours of the body.

Step 11
We start drawing from the upper body, the head. 1. We draw an oval of the face and a line of hair framing the face. 2. Next eyelids, eyebrows, nose, mouth and ears. 3. Let's draw in more detail the eyes and nose. 4. Draw long eyelashes. 5. Now let's draw the main outline of the hair. 6. Draw the hair in more detail.

Step 12
Let's start drawing the body. Let's draw the neck and shoulders. In our drawing, clothes with a hood, we draw it too.

Step 13
We draw the details of the hood and the line of the collarbone.

Step 14
Now let's draw the hand on which the girl leans. This is an important detail in the pose.

Step 15
We draw a bust.

Shah 16
Let's draw the lines of the T-shirt and the belt of the trousers. The girl is sitting and folds are visible on her stomach.

Step 17
Let's draw the lines of bent legs.


Step 19
Our drawing is ready. You can color the girl to your taste.

Our lesson is over now you know . I hope that you have learned a lot from this lesson that is useful for yourself and your creativity. If you liked this lesson, then you can subscribe to new lessons that we publish every week. Good luck!
Pencil drawing of a girl, parts of her body.
The human body is unique in itself and very beautiful, especially the female body. And this is not surprising, so many professional artists try to draw exactly the female curves.
There are a huge number of methods for depicting the human body on paper. In our material, we will tell you how to draw a girl with a pencil, her arms and legs in the simplest way and in different poses.
How to beautifully draw a human figure a girl in full-length clothes step by step with a pencil for beginners and children?
In the first lesson, we will try with you to depict a girl in clothes in full growth. To do the job without errors, you first need to familiarize yourself with human anatomy, learn basic skills. Drawing a female body is not easy. Many experienced artists, oddly enough, do not always succeed.
Thanks to our lesson, you will learn what the human body consists of and try to draw it on paper on your own using an ordinary pencil. You must have all the necessary tools:
- Thick paper - 1 pc.
- A simple pencil - several pieces of different softness
- Eraser
Drawing process:
- Draw a simple sketch of a girl to begin with. It should not stand straight for you, but be natural and relaxed.
- Draw the head in the figure slightly tilted, the right leg left to the side so that the weight of the body is directed to the left leg.
- Mark the curves of the joints with dots.
- As for the spine, it should be flexible, so you should not draw it straight.
- Then mark the feet of your model.
- If you want to depict her in heels, then draw her on socks. Draw the head in the form of an oval, slightly pointed at the bottom.
- Now, with the help of smooth lines, outline the silhouette of the model. Remember also the muscle mass under the skin.
- Draw the muscles on the calves in the form of small ovals.
- Place the largest muscles in the thigh area.
- Draw one hand and hide the other behind the body.
- Define rounded knees.
- If you want the girl's figure to be more natural, sketch out her skeleton.
- Outline the hair so that it falls freely over the left shoulder.
- Carefully remove any extra strips. If you were able to build the girl's body correctly, then it will look proportional. Mark the chest on the girl's body.
- Now dress up your beauty. Remember that you still need to "build" the face.
- First, divide your face horizontally into two equal parts. The resulting line will be the tip of the nose.
- Then divide the lower part into two equal parts again and designate the lower lip. Draw the full face.
- At the next stage, you can put your model in any clothes, in our case it will be a summer T-shirt with a skirt and sandals. Draw thick strands of hair for the girl.
- Now take care of the details and volumes. Plus, add decor and jewelry to your clothes. Focus on a dark t-shirt with a pattern. With the help of light hatching, mark the folds of the skirt, sketch the shadow areas more densely at the bottom and near the belt. Using a sharp, hard pencil, draw a pattern. Then draw the decoration.
Video: Girl: pencil drawing in stages
How to draw a girl's body in clothes with a pencil?
We will draw the next girl with you with dumbbells and in a sporty style. To draw it, perform the following manipulations:
- Hold the skeleton of the model and her pose. At this stage, build correctly all the proportions of the body. To begin with, draw the head in the form of an oval, then depict the guiding lines, the face with the ears.
- After that, draw with straight lines the rest of the girl's body (neck, spine, arms with legs, hands and feet). Now with ordinary figures show the joints.

- Remove the sketched lines so that they are only slightly visible and you can proceed to the image of the face. First comes the drawing of the nose, then the eyes and eyebrows.

 Draw the eyes and nose
 - Draw the contours of the face, the shape of the lips and eyes. At the end draw strands of hair. If you are not yet able to draw the hotel parts of the face, then practice on this in advance.

- As soon as the face is ready, draw a T-shirt, hands with fingers, pants of the model, sports shoes and leggings. Draw shadows in the drawing.

How to draw the hands of a girl in clothes with a pencil?
Very often, many people, especially children, draw parts of a person, such as legs, in a simplified way. We want to teach you how to draw from an anatomical point of view. Take a simple pencil, eraser, landscape sheet and you can start learning.
- Draw the wireframe lines of the human hands.
- First, learn how to draw hands starting from the elbow and ending with the fingers, or rather their tips. Build a straight line. Mark a dot at the top. From it, draw 5 segments.
- From these segments, take 5 more segments, which you connect at an angle. On this basis you will draw a brush.

 hand in pencil
 - Along the main line, outline the line of the elbow, then the line of the forearm.
- Draw the forearm from the elbow wide, then increase it further in width and draw a brush.
- After that, draw the fingers: the little finger, then the ring finger, and so on.


- And further. You need to depict skin irregularities, all depressions and bumps, as well as skin folds on the fingers and palm.
- Erase the auxiliary lines, leaving only the outline of the hand. Color your hand. To do this, use skin tones. You can depict bright places here and darker ones that are in the shade.
- Now let's draw the girl's hand separately. Build to start the frame lines.
- Pick a dot on the paper. From this point, draw 3 lines on different sides.
- Put a dot at the end of the 3rd line. From the point, draw the lines you need to connect.
- Outline the palm itself, use smooth lines. You should get a palm bent down. Then draw the thumb.
- Show its thick part, then the phalanges of the finger, plus the lines of those places where the thumb and forefinger join. Draw the index finger, the middle one. Outline the lines.

- Draw the ring finger and little finger. In the picture, depict the folds on the skin, bumps, bulges and uneven palms.
- Remove auxiliary lines, leave only the most necessary. Color the palm, shade some places.


- You can now draw a hand, but now you have to hide it in your pocket. In the picture it will look like this.


Video: Draw a brush, hand
How to draw a girl's legs in clothes with a pencil?
So, now we will try to tell you in detail how to draw a person's legs correctly. In fact, they are drawn quite easily, but this is only if the drawing itself is simple. If you want to depict legs in a beautiful and more realistic picture, then you will have to put in a little effort.
In order to learn how to draw legs correctly, you need to remember the main rule is that the legs are never straight. Think for yourself, they will not look natural, without any bends. The picture will turn out beautiful if you convey the shape of the legs, taking into account every detail.
Now let's move on to the first step:
- Start drawing the legs from above, gradually going down. So it's easier and easier.
- Now pay attention to the knees. They must be depicted on paper correctly. There is nothing complicated or special here. However, if you make at least one small mistake or draw something incorrectly, then the whole drawing will not be beautiful.


- When you draw the legs, remember that the knees are considered the main connection point. If you draw this point incorrectly, spoil the whole picture.
- Try to draw the legs carefully, because there are subtle but important details.
- The next step is drawing muscle tissue. Think right away what muscles you want to draw a girl.
- Then pay special attention to how to correctly draw the curves of the legs.
- Do everything here very carefully, while paying attention to every detail.
- And at the very end, draw the girl's feet, with them each toe, heel.

- Highlight every moment of the feet to make them look natural.


Video: How to draw legs?
How easy is it to draw a person a girl in full-length clothes by cells?
Not everyone can draw beautiful pictures. And those who do not have the ability to draw at all can only dream about it. If you also can’t draw or you can’t do it with difficulty, then you can try to draw pictures by cells. Yes, exactly in the cells! Such drawings are practically in no way inferior to ordinary paintings drawn with a pencil. They look quite beautiful and natural.
By counting the required number of cells, and then painting them in one color or another, you will be able to depict on paper not only a portrait, but also a girl in full growth. You will only have to be patient and attentive.
If you want to draw large pictures, it is better to take graph paper for this. However, you can also use ordinary checkered sheets. Just glue them together to make one large sheet. You just have to find a special scheme and draw as the cells are indicated on it.
Video: Drawing for children: a girl in the cells
How to draw a man a girl in clothes sideways with a pencil?
We invite you to draw a girl in a 19th century outfit. Dresses that had a lot of ruffles, flounces, lace and satin ribbons were very fashionable at that time. Currently, such an outfit leaves no one indifferent, since you can look at it for a long time and admire the beauty of the dress itself.
- Draw on paper the contours of the female figure and outfit. Keep in mind that the correct proportion of a full-length figure should accommodate 8 heads.
- Now mark the folds and flounces on the skirt. Then draw the upper part of the dress, the chic sleeves of the outfit, which should end with beautiful lanterns. Then draw a headdress on the girl's head - in this case we will have a hat, and do not forget about the strands of hair. Then draw outlines of the face.
- Yes, it is quite difficult to depict an outfit of the 19th century in a picture. The dress, as a rule, is decorated with frills, pleats, laces. All these elements you must carefully guide, that is, draw. Therefore, you need to be patient.
- In order to add volume to the outfit, work out each shadow well. Decide where exactly the light source will come from. Draw immediately the shadows that are obtained from the folds.
- Under each fold and shuttlecock draw the darkest places. Add good light to the frills, every crease should be visible on them.
- The dress has no buttons, but there is a large amount of lace. Therefore, make their texture so that they are clearly visible.
- Take a soft pencil. Point them to the main lines, give the picture contrast and expressiveness.
- Well draw the face, headdress and hairstyle for your girlfriend.
- Draw the hands that are holding the fan.


Video: Drawing a girl with a pencil
How to draw a man a girl in clothes in motion with a pencil?
The human body in motion is not an easy job. But we will help you avoid difficulties if you only follow our recommendations correctly.
- Stock up on all the necessary supplies for drawing. Using a pencil and invisible lines outline the silhouette of a girl. Draw the head in the form of an oval, then draw the line of the ridge, the contours of the hips, legs and arms.
- Mark the points where the joints will connect. Be sure to mark them so that you can see the places where the arms and legs are bent. Draw the head slightly raised, the chin slightly in front.
- Your girlfriend should stand on her fingertips with her whole body stretched out. Draw the toe of the second leg so that the leg is pulled back.
- Draw carefully the figure of the girl, take into account every little thing and all proportions, you can study the anatomical proportions of the human body in advance. Remember the main thing, the length of the human foot should be approximately equal to the middle of the thighs. Outline the knees and leg muscles. Draw a ribbon that twists as you move.
- At this stage, delete the extra lines that you used in the construction. Draw the profile of the model and her hair.
- Draw the girl's clothes. Draw shadows, highlight every detail so that they are clearly visible.


Drawings of a man, a girl in clothes for children for sketching: photo

 Photo for drawing


Video: We draw a girl with a pencil, the main nuances
The Japanese style of drawing - anime - is very popular among adults and children. Many would like to master this technique.
A lot of manuals and tutorials have been released on this topic, aimed at achieving a single goal - to gradually teach a person to correctly draw, first with a pencil, then with paints.
Anime art originated in Japan in the late sixties of the last century and was originally used exclusively in animation.
With the introduction of modern technology, it has become possible to quickly and easily create a computer graphic image, but there are still fans of the man-made genre.
Consider how to learn how to draw this or that drawing in anime style from scratch.
How to learn to draw in anime style from scratch?
A heavy and intricate drawing with a detailed analysis turns out to be quite simple.
To master the technique of Japanese drawing, you should be patient, show perseverance and, following the methodology in the manual, gradually master the implementation of anime from scratch.

First you need to prepare and familiarize yourself with some of the requirements given in the table below:

- His applied with a sharpened pencil, correctly shading.
- First stage- drawing a contour. To do this, you can initially use a ruler or a student's notebook, making sketches in the cells.
- Selected the details of the picture are depicted close to each other, otherwise there will be no integrity.
- Hatching is performed at a minimum distance of lines, avoiding deviations from parallelism.
- Shadows Apply by rubbing the crumbled lead with toilet paper or a dry finger.
- Carefully work with an eraser, using only a soft one. It should be remembered that it is impossible to draw a beautiful pattern on a damaged paper surface.
- To remove extra strokes or reduce the shadows of the picture, use a special erasing mass that looks like plasticine.
She can easily cope with the task. If you don't have one, you can use breadcrumbs.
Having familiarized ourselves with the main rules of anime technique, we proceed to the drawing itself. You should not immediately take on the implementation of a complex composition. You should always start with the simplest.
The main thing is to place your hand correctly and learn how to perform simple figures.
Gradually, an understanding of the drawing technique will come, a hand will fill up and it will be possible to try more complicated elements: fairy-tale characters (in full face or profile), nature, cars.
Lastly, having honed their skills, they begin to depict portraits of people. This is a very difficult task, especially if you want to express human emotions with a kiss, anger, joy and other feelings and states.
How to draw an anime face beautifully?
Beautifully depicting a person's face is not an easy task, but strictly adhering to the guide below, it will become simple and enjoyable.

Step-by-step instructions for drawing a human face:
- compass draw a circle - this will be the head.
- Received the circle is divided vertically in half.
- Located center and a vertical marking center line is drawn.
- Every the resulting vertical section is also divided by segments.
- Total: three vertical lines. They are necessary to correctly draw the eyes, hair and forehead.
- Let's get started to face painting.
To do this, we need to extend our circle two-thirds down, drawing vertical lines on the lower segment on both sides to a height equal to the declared length.
The middle vertical line should be extended to the end of the segment.
- Received we divide the segments vertically: the first is the final lower point of the circle, the second is the end of the declared markup, in the middle is the axial one.
- On these areas will be the nose and lips of a person.
- Getting Started to face shapes. The type of character depends on how we display them.
To do this, starting from the bottom horizontal line of the circle, we lay two vertical lines at an angle, converging at the bottom point of the middle vertical line, depicting the letter V.
- Before, As you begin to draw the eyes, you need to make sure that they are evenly spaced on the face.
The eyes may be wide open, or depicted as a curved line. There are countless options for depicting eyes, exactly as well as ways to perform.
- In the bottom branch of the circle draw the nose. Its shape depends on which character we will portray. The main thing is to do it symmetrically to the central vertical axis.
- Mouth and lips are applied strictly under the nose, without getting out of the resulting letter V.
- Next cheeks are depicted in stages. It depends on how they are drawn whether the character will be thin or fat.
They are performed symmetrically to the center line from the bottom corner to the beginning of the lines adjacent to the circle.
- Ears character are located in the upper parts of the rectangle adjacent to the circle. They should be at eye level.
- Let's get started to the hair. They should start from the intersection of the upper horizontal line with the middle vertical (axial).
The hairstyle configuration is set depending on the type of character.
- Necessary pay attention to the eyes by drawing the iris, pupils and highlights, if the drawing requires it.
Anime is the creation of the soul. How you place the lines relative to each other, which bend you prefer, depends on the type of the resulting face and character in general.
How to draw an anime girl in full growth in stages?
If you decide to draw an anime girl in full growth, it should be borne in mind that the drawing should have a resemblance to a living person.

Therefore, the following sequence must be followed:
- First draw the collar line along with the spine, shoulders and legs. Here you can immediately decide whether the picture will be in dynamics, and decide on the pose.
- Further the skeleton is sketched in thin lines - this is a schematic image with circles at the locations of the joints and other parts of the body.
- Head. We draw it, as mentioned above. But you need to remember that the facial features in the figure should be expressive, the eyes should be large.
- Hair. Any hairstyle is chosen and performed according to the previously specified rules.
- schematic the image is outlined with real forms, but do not forget that girls have more grace than guys, so a slender waist and lush hips are displayed.
Particular attention is paid to the chest - it should look as natural as possible.
- Selected clothes - it can be a beautiful dress or a slim suit, the choice is yours.
- limbs Girls are always thinner than men. It should be remembered that arms and legs cannot be perfectly even - bends must be made.
- Image stop and hands. Don't forget to highlight the elbow and wrist joints.
- Auxiliary the lines are erased - this is the completion of the work.
How to draw anime animals with a pencil?
Anime is a universal drawing technique. Having learned to depict one thing and having mastered the technique, you can draw anything.

It is especially interesting to teach children this technique using the example of drawing various fairy-tale characters and animals:
- wolf.
- Dogs.
- Pony.
- Angel.
- Foxes, etc.
Let's analyze this drawing technique with a simple pencil for beginners using the example of a cat:
- First you need to draw a large oval - this will be the head of the animal. It is marked according to the same principle as for a person, with auxiliary lines, with ears, eyes, nose, mouth.
- Next, a smaller oval is drawn, directly intersecting with a large one in the neck area - this is the body. Legs and tail come out.
- It must be remembered that the cat's eyes are large and are located symmetrically to the center line; in the middle of it, a little lower, a round nose is drawn, the ears are made beyond the upper border of the oval and have a pointed shape.
- It remains to decorate the resulting kitten with a luxurious mustache, fluffy hair, complementing the drawing with bright colors.
Any drawing, and especially anime, is an exciting pastime not only for children, but also for adults. Learn, draw and have fun.
Useful video
Hi all! Today we will tell you about how to draw a girl! This lesson will not be the first about girls on our site, but, apparently, our artists just liked doing a lesson dedicated to these beautiful creatures. Today, by the way, we have a girl drawn in a comic style on our agenda.
Older artists will surely remember the grotesquely luxurious wife of Roger, about whom a whole feature film was shot. By the way, this was the first film in which animated, drawn characters coexisted side by side with live actors. But, we digress. Let's start the lesson and find out!
Step 1
In our last lesson on that, you can read about all the features of the proportions of the female body. Now we will draw a stickman - a little man from sticks and circles, so they will come in handy for us. The main purpose of the stickman is to indicate the position of the character on , his posture and proportions.
So, about proportions. From super-duper important, we note that the height of a girl, like , is equal to the sum of the lengths of seven heads, only the girls are proportionally lower on average. A feature of the female figure is also approximately the same width of the shoulders and hips (in men, the shoulders are much wider). By the way, in men the shoulders are so wide that three head widths fit into their width, in women the ratio of shoulders and head width is completely different - this is very clearly shown on our stickman.
Of the features of the posture, we note the spine, which bends to one side, the head, which leans in the opposite direction, and the slightly sloping line of the hips.

Step 2
In this step, we have to give the stickman the necessary volume, but first we will mark out the face, because all the drawing lessons of people on our site are drawn and detailed in the direction from head to toe, from top to bottom.
So face. Let's mark it with a vertical line of facial symmetry, as well as several horizontal lines. The main and longest of the horizontal lines will be the eye line (it is slightly curved down due to the tilt of the head), below it will be the lines of the nose and mouth, and high above it will be the hair line.
Let's get to the body.
The torso of the girl has the shape of an hourglass, which expands from above and below (chest and hips, respectively) and narrows in the middle, at the waist. Pay attention to the slight turn of the body - it is indicated by external contours and also by the fact that the chest on the right side of us slightly covers the arm. Another point - the legs, connecting with the body, form obtuse angles from the inside.
The arms should be graceful and thin, the only extension is present at the beginning of the forearm, at the elbow, but it is also insignificant. The arms in this step can be conditionally divided into three parts - the shoulder, forearm and hands.
In general, the main recommendation for this stage is to try to make all the curves of the body as smooth and feminine as possible, there should not be rough, voluminous forms or sharp corners. 
Step 3
We continue our drawing lesson. Let's outline the girl's hairline. Conventionally, we can divide it into two parts - the one in front of the face, closer to us, and the one behind the face, it is located in the back of the head.
Pay attention to how these two parts differ in size: the one in front of us is larger than not only the second, back part, but even the head itself a little. At the top right, we outline a couple of small ornamental balls located on the rim.
The second action in our step will be sketching out the lines of the upper part of our girl's clothes. In terms of the location of this piece of clothing, be guided by the previously outlined lines of the arms, torso and hips. By the way, clothing lines should be drawn from bottom to top.

Step 4
Using the markup of the face, draw one eye, eyebrow and plump lips. Pay special attention to the shape of the eyebrows, eyes and their location - it is with the help of these factors that the effect of a slight forward tilt is given.
Another point - the lower lip should be noticeably thicker than the upper. The lower lip is almost straight, while the lower lip curves considerably.

Step 5
Erase the extra guide lines from the previous steps from the face and draw in the eye, eyebrow, and lips. Pay attention to the eyelid, the position of the pupil and the eyelashes - all these details form the look.

Step 6
Let's draw a part of the bangs that hides the girl's eye. Do not forget to work on the lapel, which is located approximately in the middle. Hair should be drawn in the direction from the roots to the tips.

Step 7
The rest of the hairstyle should be drawn in the same direction - from the roots of the hair to the tips. Do not forget about the slightly twisted ends of the strands, the rim and the decorations on it in the form of three skulls. By the way, the same jewelry is on the earrings, the heroine of the Monster High series.

Step 8
We wrap around our left shoulder, chest and neck. Pay attention to the lines that indicate the collarbone - they are not very large and noticeable, but they must be marked. When drawing the shoulder and chest, use smooth lines - the contours of the body should be feminine and smoothly curved.

Step 9
Erase extra guide lines from both arms and torso. The torso and arms should be edged with dense, confident contours, and the lines of folds on the fabric should be lighter. Again, do not forget that the body should have graceful feminine curves, there should not be voluminous muscles or rough contours.

Step 10
We circle the lower part of the girl's body and legs. Pay attention to the hem and folds located on the linen. With a couple of lines, outline the visible contours of the abdominals.
If you just liked this girl, you can always get acquainted with the same one, or with the one that will be even more beautiful. When meeting, try to surprise a girl, for example, by drawing for her - this act is very effective and memorable.
And this drawing lesson was drawn and painted for you by the artists of the site Drawingforall. Don't forget to check out our VK page, we regularly post cool art there and review fresh lessons. Stay with us and learn to draw even cooler, see you soon!
How to draw an anime cat girl with a pencil step by step
Already drawn +99 I want to draw +99 Thank you +104
In this tutorial, I will show you how to draw a full-length anime cat girl, as well as how to color the resulting drawing using a simple technique - from light to dark.
For work you will need: a simple pencil (HB), an eraser or a nag, a gel pen, colored pencils, and also white gouache.
We outline the frame of the girl's figure with a simple pencil. We draw a circle for the head, which will divide the face and determine the angle. Then we outline the lower part of the face.

We draw the body with basic geometric shapes. We show the depth of the waist with ellipses, in the future it will help to draw a belt. The girl's hands go behind her back, there will be no particular problems with them. Let's prepare the basis for drawing the face. Also do not forget to draw the ears and tail.

At this stage, it is necessary to clean the drawing a little from the production lines, so that it would be more convenient to work with it in the future.

We outline the hair of the tyanka with a total mass, and also draw facial features.

Now, based on the sketch of the hair, you can draw them. We draw individual strands of hair.

We outline some clothes.

We detail the drawing. If necessary, we compare the proportions with the original. This is what the drawing looks like in detail.

The contour has a different color scheme, with dark areas and lighter areas. So with a pen we circle only the darkest places of the contour. Like this. Also at this stage, you can circle the shirt of the shirt and the zipper on the jacket.

Outline the skin, ears and tail with some well-sharpened pencils of such colors: brown, dark brown, chestnut. They must be sharply sharpened.

Now we circle the girl's clothes, and specifically shorts - blue, stockings - purple, as well as hairpins on a strand of hair. Now I noticed that I didn’t completely outline the skin and ears of the chan, so I’m doing it now.

We start to paint. We do not put pressure on the pencils, now we only need to lay a solid color foundation. We paint the hair with chestnut with the addition of red, the ears and tail with them, the jacket with black, the jeans with grayish blue, the shirt and zipper with gray, the skin with beige, the eyes with dark brown and orange. We paint the hairpins yellow and blue.

Now go over the entire drawing with light brown, but only slightly.

Add gray to the whole drawing.

Working with dark brown and black, we are gaining tone. Repeat Step 11 with more pressure on the pencils. Now, working with just black, give the drawing some depth. Enhance the shadows. To top it off, use white gouache to highlight the eyes. That's all, the drawing is ready.

- HB pencil
- eraser
- gel black pen
- colored watercolor pencils Koh-I-Noor Hardmunth Mondelus 32 colors.
First, draw a circle. This is the basis for drawing the head of a neko.

We outline the auxiliary lines for further correct construction of the character's face.

I start sketching out the body. Approximately I draw shoulders, a neck, and also a breast. on the markup (auxiliary lines) I select the area for future eyes.

I determine the waist and the approximate position of the hands relative to it.

We finish the body - sketch out the hips and legs. Do not forget to outline the ears on the hood and the tail of the tow.

Relying on auxiliary lines. draw the eyes, nose, mouth, as well as the eyebrows of the character.

We wipe a clear dark contour of the base of the body and draw the girl's body on top of it - so in the future we will correctly draw a blouse. We do hands without brushes - they will not be visible due to the long sleeves of the sweater.

With barely noticeable lines, we determine the growth of the girl's hair.

We draw the hair of the tyanka with a total mass, relying on the hairline. Note - in the anime, the hairline is located above the line of the head.

Now, based on the sketches of the hair, you can draw them. We outline individual strands.

Now we wipe the contour of the body and draw a jacket on top of it (the suit has its own thickness, so you need to deviate a little from the original lines.) It will be easy if you corrected the mistakes that you noticed in the previous steps.

At this stage, we draw a hood, focusing on the height of the ears. The hood line is located above the head line, because, as I said, the suit has its own thickness.

And this is what the finished drawing looks like, circled with a pen / felt-tip pen / liner. I used a pen.

We start to paint. Shown here are the simple colors (beige, yellow, blue, pink, cyan, grey, brown) that I used to paint over the entire drawing. This, so to speak, is the basis, rely on it.

Here black and brown are used, paint the darkest places with them, and transitions from light to dark. Deepening the tones: repeat Step 14. I stroke the background with a sea wave color. The drawing is ready. Good luck!

Face. This girl has a normal face shape. The face can be drawn the same as in the manga. Start with the eyes, add the nose and finish with the hair. Choose the structure, length and shape of the hair according to your taste.

Draw the body. Main elements. Build your body well. Remember that the length of the arms should be below the hips. Your cat girl needs to be flexible and slender in order to perform smooth movements. Also consider the width of the shoulders, the shoulders of athletes are elongated and wide.

Give your girl some cat ears. Do not make them too short, remember that in cats they are pointed. Also draw the cat's tail. You can make it simple or in motion.

Dress up your character. Since she is a comic book girl, the clothes should be appropriate. Color your drawing with paints or felt-tip pens. Ready!

In this detailed step-by-step lesson, you will learn how to draw and color a cat girl in anime style with pencils. The lesson consists of 7 photo stages.
We draw the head and neck of the cat girl.


Draw a face along the auxiliary lines: eyes, eyebrows, nose, mouth

We draw a girl's bangs and hair on the sides of the head. Now the collar and continue to draw the dress and left shoulder

We draw sleeves. The dress is finished, now you need to draw hands (gloves on the hands)

We draw the crown and finish the hair. Do not forget to draw the girl's ears and a rim on her head

Now we circle the entire drawing with a black gel pen or whatever is more convenient for you.

We paint and draw. That's it, the anime cat girl is ready!

- paper
- pencil
- eraser
- liner/black gel pen/etc
- markers
- colour pencils
First, I outline the curve of the girl's figure, then I draw circles denoting the areas of the hips and chest


I edit the size of the head, draw the hands

I draw feet immediately in shoes

I draw the legs to the end, and then I outline the lines of clothing

I changed the position of the left (on our side) leg, so I'm working on the girl's shoes again

I draw the folds of clothes
Then I trace the drawing with a liner and erase the sketch


Then I work on the skin and the eye. Outcome:

purmix.ru
How to easily and beautifully draw a girl in full growth in stages with a pencil for beginners
Today you will learn how to draw a girl in full growth with a pencil in stages. Our lessons are suitable for all levels of preparation. We have collected several examples of lessons for you, you just have to choose the lesson you like and start drawing a girl in full growth. As a result, you will have an easily and beautifully drawn full-length girl with a pencil step by step easily and simply. Get started right now. Write comments under the article, share with friends.
Click on the option you want to go to.
1 option | Option 2 - Video | 3 option |
4 option | 5th option - Video | 6 option |
Option 1 - How to draw a simple girl in full growth in stages
source
RESULT
Option 3 - How to draw a super woman in full growth in stages
source
RESULT
Option 4 - How to draw a light and beautiful girl in full growth in stages
source

RESULT
Option 6 - How to draw an Egyptian in full growth in stages
source
RESULT
www.trend-city.ru
How to draw in anime style a face, a girl in full growth and animals in stages
The Japanese style of drawing - anime - is very popular among adults and children. Many would like to master this technique.
A lot of manuals and tutorials have been released on this topic, aimed at achieving a single goal - to gradually teach a person to correctly draw, first with a pencil, then with paints.

Anime art originated in Japan in the late sixties of the last century and was originally used exclusively in animation.
With the introduction of modern technology, it has become possible to quickly and easily create a computer graphic image, but there are still fans of the man-made genre.
Consider how to learn how to draw this or that drawing in anime style from scratch.
How to learn to draw in anime style from scratch?
A heavy and intricate drawing with a detailed analysis turns out to be quite simple.
To master the technique of Japanese drawing, you should be patient, show perseverance and, following the methodology in the manual, gradually master the implementation of anime from scratch.

First you need to prepare and familiarize yourself with some of the requirements given in the table below:

- His applied with a sharpened pencil, correctly shading.
- First stage- drawing a contour. To do this, you can initially use a ruler or a student's notebook, making sketches in the cells.
- Selected the details of the picture are depicted close to each other, otherwise there will be no integrity.
- Hatching is performed at a minimum distance of lines, avoiding deviations from parallelism.
- Shadows Apply by rubbing the crumbled lead with toilet paper or a dry finger.
- Carefully work with an eraser, using only a soft one. It should be remembered that it is impossible to draw a beautiful pattern on a damaged paper surface.
- To remove extra strokes or reduce the shadows of the picture, use a special erasing mass that looks like plasticine.
She can easily cope with the task. If you don't have one, you can use breadcrumbs.
Having familiarized ourselves with the main rules of anime technique, we proceed to the drawing itself. You should not immediately take on the implementation of a complex composition. You should always start with the simplest.
The main thing is to place your hand correctly and learn how to perform simple figures.
Gradually, an understanding of the drawing technique will come, a hand will fill up and it will be possible to try more complicated elements: fairy-tale characters (in full face or profile), nature, cars.
Lastly, having honed their skills, they begin to depict portraits of people. This is a very difficult task, especially if you want to express human emotions with a kiss, anger, joy and other feelings and states.
How to draw an anime face beautifully?
Beautifully depicting a person's face is not an easy task, but strictly adhering to the guide below, it will become simple and enjoyable.

Step-by-step instructions for drawing a human face:
- compass draw a circle - this will be the head.
- Received the circle is divided vertically in half.
- Located center and a vertical marking center line is drawn.
- Every the resulting vertical section is also divided by segments.
- Total: three vertical lines. They are necessary to correctly draw the eyes, hair and forehead.
- Let's get started to face painting.
To do this, we need to extend our circle two-thirds down, drawing vertical lines on the lower segment on both sides to a height equal to the declared length.
The middle vertical line should be extended to the end of the segment.
- Received we divide the segments vertically: the first is the final lower point of the circle, the second is the end of the declared markup, in the middle is the axial one.
- On these areas will be the nose and lips of a person.
- Getting Started to face shapes. The type of character depends on how we display them.
To do this, starting from the bottom horizontal line of the circle, we lay two vertical lines at an angle, converging at the bottom point of the middle vertical line, depicting the letter V.
- Before, As you begin to draw the eyes, you need to make sure that they are evenly spaced on the face.
The eyes may be wide open, or depicted as a curved line. There are countless options for depicting eyes, exactly as well as ways to perform.
- In the bottom branch of the circle draw the nose. Its shape depends on which character we will portray. The main thing is to do it symmetrically to the central vertical axis.
- Mouth and lips are applied strictly under the nose, without getting out of the resulting letter V.
- Next cheeks are depicted in stages. It depends on how they are drawn whether the character will be thin or fat.
They are performed symmetrically to the center line from the bottom corner to the beginning of the lines adjacent to the circle.
- Ears character are located in the upper parts of the rectangle adjacent to the circle. They should be at eye level.
- Let's get started to the hair. They should start from the intersection of the upper horizontal line with the middle vertical (axial).
The hairstyle configuration is set depending on the type of character.
- Necessary pay attention to the eyes by drawing the iris, pupils and highlights, if the drawing requires it.
Anime is the creation of the soul. How you place the lines relative to each other, which bend you prefer, depends on the type of the resulting face and character in general.
How to draw an anime girl in full growth in stages?
If you decide to draw an anime girl in full growth, it should be borne in mind that the drawing should have a resemblance to a living person.

Therefore, the following sequence must be followed:
- First draw the collar line along with the spine, shoulders and legs. Here you can immediately decide whether the picture will be in dynamics, and decide on the pose.
- Further the skeleton is sketched in thin lines - this is a schematic image with circles at the locations of the joints and other parts of the body.
- Head. We draw it, as mentioned above. But you need to remember that the facial features in the figure should be expressive, the eyes should be large.
- Hair. Any hairstyle is chosen and performed according to the previously specified rules.
- schematic the image is outlined with real forms, but do not forget that girls have more grace than guys, so a slender waist and lush hips are displayed.
Particular attention is paid to the chest - it should look as natural as possible.
- Selected clothes - it can be a beautiful dress or a slim suit, the choice is yours.
- limbs Girls are always thinner than men. It should be remembered that arms and legs cannot be perfectly even - bends must be made.
- Image stop and hands. Don't forget to highlight the elbow and wrist joints.
- Auxiliary the lines are erased - this is the completion of the work.
How to draw anime animals with a pencil?
Anime is a universal drawing technique. Having learned to depict one thing and having mastered the technique, you can draw anything.

It is especially interesting to teach children this technique using the example of drawing various fairy-tale characters and animals:
- wolf.
- Dogs.
- Pony.
- Angel.
- Foxes, etc.
Let's analyze this drawing technique with a simple pencil for beginners using the example of a cat:
- First you need to draw a large oval - this will be the head of the animal. It is marked according to the same principle as for a person, with auxiliary lines, with ears, eyes, nose, mouth.
- Next, a smaller oval is drawn, directly intersecting with a large one in the neck area - this is the body. Legs and tail come out.
- It must be remembered that the cat's eyes are large and are located symmetrically to the center line; in the middle of it, a little lower, a round nose is drawn, the ears are made beyond the upper border of the oval and have a pointed shape.
- It remains to decorate the resulting kitten with a luxurious mustache, fluffy hair, complementing the drawing with bright colors.
Any drawing, and especially anime, is an exciting pastime not only for children, but also for adults. Learn, draw and have fun.
Useful video
zheleznaya-lady.ru
How to draw a girl in full growth, respecting the proportions
For some reason, everyone who is suddenly flooded with a thirst for drawing begins to make a wish specifically from the image of the girl. The sketch is often far from perfect, and all because a person is slightly familiar not only with anatomy, but also with the principles of building a human body and face. Meanwhile, this knowledge is very important, especially for a novice artist.  But in this article, I will not go into anatomical details, but will talk about the most basic techniques for building a proportional figure of a girl. Drawn ladies can excite the imagination no less than live ones, so at this step you only need a clean sheet of paper, an ordinary hard pencil and a soft eraser.
Before you draw a lady, you need to schematically outline her proportions. For ease of understanding, let's take an exactly standing figure as an example. So, for starters, we draw such a “skeleton” or “framework”: having drawn the head in the form of an ellipse, we draw a vertical line from the center of its “chin”. It will serve as a guide for building. In order for the figure to come out proportional, you should know that the head of an adult person “fits” seven times in the body. Therefore, before you draw a lady in full growth, you must first note the height of the head. This is done simply: attach a pencil to the drawing so that the edge of its lead is at the same level with the dome, and your fingers are at the level with the future chin.  Having fixed the height of the head in this way, divide the line going down into seven segments equal to it. Now more carefully about the resulting “scale”: at the level of the first segment should be the chest, at the level of the second - the waist, the 3rd - the lower part of the thighs, the 4th and 5th - legs to the knees, the 6th and seventh - legs below the knees to the bone at the ankle. An additional segment is needed for the image of the foot, two times shorter than the main one.
Having received such a scheme, we proceed to the next step in solving the problem, how to draw a lady. At the moment we need to outline the limbs. To do this, stepping slightly down from the head, we outline the shoulder girdle using a horizontal strip. We mark the waist and the line of the hips with exactly the same segments. Since we are drawing a lady, it will be completely natural if the line of the shoulders is wider than the waist band, but narrower than the hip band. From the schematic shoulder girdle, we draw the stripes of future hands: the elbows should be at the level between the third and fourth segments, the fingertips - at the level between the fourth and fifth. The beginning of the legs should fall specifically on the 4th segment.
 When the "frame" is ready, you can start "building meat", in other words, drawing a real body. The "skeleton" will serve as a guide so that both halves of the body are similar in width. Naturally, when drawing, it is necessary to take into account that both the arms and legs, and the body completely have a certain shape, and the face and head also require a separate construction. But that's a topic for another article. I hope the above description of how to draw a lady, along with the pictures given for the best perception, will help you quickly orient yourself, and in the future you can create more complex images of people. Having “stuffed” your hand and developed your eye, you will become more confident in your own abilities, which will allow you to depict the human body without the need to draw a preparatory “wireframe” drawing.
tipsboard.ru
Step by step drawing of a girl. How to draw a girl in full growth
Drawing people is much more difficult than drawing objects or landscapes. You will need to reliably convey the structure of the body and facial features, capture the mood and facial expressions, and choose a natural pose. Right away, you are unlikely to get everything right, but after a couple of workouts, you will achieve the desired result.
Next, we will tell you how to draw a girl in full growth. Clothing, physique, posture can be anything at your discretion. Our task is to complete the drawing as correctly as possible, with exact observance of the anatomical features and proportions of the body.
How to draw a girl in full growth?
Let's look at the stages of how to draw a girl in full growth:

Have you drawn a girl in full growth? Now you need to work on the face - ears, you already have the main guides, but you need eyes, eyebrows, hair. It remains to add shadows - and the drawing is ready.

One of the most difficult is the first stage - drawing the "skeleton" with the exact observance of proportions. You can make it easier to complete if you take a sheet of paper and divide it with a ruler and a pencil into small rectangles (in the end you should get 9 horizontal lines). Then divide the lower and upper parts of the sheet into three identical segments and draw two straight vertical lines. Start drawing the girl's head in the central part of the sheet on the second horizontal - first an oval, then a neck, a smooth line of the chin, cheeks, a hairstyle. When the head is ready, you can detail the face (or do it at the end of the work). From the neck down the canvas, draw the shoulders and the beginning of the arms, then make the waist and hips. Do not go beyond the column - otherwise the figure will turn out to be disproportionate and ugly. Legs are drawn from the hips to the knee, then the kneecaps are carefully made, and the rest of the legs are drawn. Working with lined paper is a great option for beginners, then you will practice and see the proportions anyway.
Draw a picture in the style of "anime" by the strength of an adult and a child. To do this, you need to understand the basic basics of depicting facial features and figures of anime characters. This article provides a variety of templates for sketching popular comic book characters in the Catwoman style.
How to draw an anime cat girl in full growth and a head with a pencil in stages?
Anime- special Japanese drawing technique, characterized by detailed drawing of facial features, backgrounds. Often, girls drawn in the "anime" style have unusual abilities or are somewhat similar to animals. Eg, Catwoman.
Such a character is very popular in modern cartoons and series"anime". As a rule, such girls have long legs, a graceful slender figure, long lush hair and big eyes. In addition, they have cat ears and a tail at the back.
Drawing a cat girl, portrait:

Tip #1 in Drawing an Anime Cat Girl
Tip #1: Sketch the head. It should be round, with a sharp chin. The nose of the anime girl is miniature, and the eyes occupy most of the face.

Tip #2: How to draw anime eyes?
Tip #2: Anime style eyes are very large. They must have a bright color: blue, green, purple, blue.

Patterns: anime eyes

Tip number 3 in drawing a cat girl
Tip #3: Think over the style and appearance of your "kitty" yourself. You can draw her any hairstyle, short or long hair, pointy small or big cat ears. Interestingly, such a character can only have animalistic, or animal and human ears at the same time.
Step by step drawing of a cat girl in full growth:

The first stage: drawing the figure of a girl

The second stage: drawing the head of a cat girl

The third stage: drawing the features of the head of a cat girl

Fourth stage: drawing the details of the girl's cat

Fifth stage: drawing detail
How to draw an anime cat woman in full growth and a head with a pencil in stages?
Catwoman is a popular character in Japanese comics. It is not difficult to draw it, it is enough to think over the image and features of the hero in detail.

Drawing "catwoman", option number 1

Drawing "catwoman", option number 2
Step-by-step drawing of a catwoman in full growth:

Stage number 1: Draw the figure of the girl: head and torso. Add realism to the image, give the figure features.
Step #2: Draw the lower torso of the catwoman.


Step #3: Draw the face: big eyes, miniature nose and mouth.

Stage number 4: Draw the hair, detail the drawing.

Stage number 5: Draw the animalistic features of the character: ears and tail.

Stage number 6: Erase the extra sketch lines, add details to it. Draw clothes and small features of the image.

Stage number 7: final
How to draw an anime cat girl in full growth and a head with a pencil in stages?
Little cat girls are very attractive and cute. Drawing it is very simple, focusing on the finished image:

Option number 1: drawing a cat girl

Option number 2: drawing a cat girl
Cat girl in the style of "anime" in stages:

Stage #1: draw a sketch of the character's figure. Clearly depict the head, torso, arms and legs.

Stage #2: Detail the drawing, add individual features to your character.

Stage #3: Depict facial features, draw a hairstyle.

Stage #4: Draw clothes for your character.

Stage #6: Detail the image of a cat girl.

Stage #6: Color your character with bright colors.
Drawings of a cat person for sketching
Templates for drawing a cat girl will help significantly in depicting a character.
Templates:

Template #1

Template #2

Template #3
Today we will learn how to draw a girl step by step with a pencil.
The picture is not easy, beginners will need to make every effort. But, following this master class step by step, there should not be any problems with the image.
We will do the drawing with a pencil, which will allow us to correct any flaws without any problems. It is important, before you draw a girl in full growth, to remember the perspective and centerlines.
Stages of creating a drawing of a girl in full growth
For convenience, the master class is divided into understandable steps. Following the tips, you will get a great drawing.
Step 1 Construction lines
When drawing construction lines, you can rely on people standing nearby, or, as in our example, decor elements.
In classical art theory there is a rule of "seven heads". It means that the body is related to the head in a ratio of 7:1 and consists, with an ideal structure, of 7 dimensions of its head.
You need to know how to draw a person, a girl in our case. Consider the design features of the female body and its differences from the male:
the width of the hip joint;
the structure of the shoulder girdle and sternum;
graceful lines of arms and legs;
thin wrists and ankles;
arch of the back, especially in the lumbar region.
Today we are drawing a girl from the back. This affects the depth and direction of the curvature of the spine. Hands can be used as an additional supporting element.
With a pencil, easily and accurately, we begin to draw:
figure parameters;
head tilt;
body proportions.
We draw with light, fuzzy lines. So far, our picture is similar to a nursery rhyme: "stick, stick, cucumber - it turned out to be a little man."
Step 2. Create volume
Now we will endow our frame with volume. It is worth dividing this step into small steps:
on the places of the bends of the arms and legs, on the joints, draw circles. They will help create proportional limbs. The circles should not be large, as we depict an elegant and beautiful girl. If we go too far at this stage, we can get not a dancer, but a bodybuilder;
we outline the line of the neck and collarbones;
now, on the yet invisible supporting part, draw the outlines of the palm;
the outlines of the chest should only peek out a little just below the right shoulder;
the girl's legs are crossed. With smooth lines, outline the outlines of the muscles of the legs. We look at the girl from below, so we lengthen her legs a little;
the final stage of the second step is the feet.
Don't worry if it doesn't work the first time. The beauty of the pencil is that all mistakes can be carefully corrected.

Step 3 Railing - fulcrum
The easiest but most important step. We draw the railing on which she leans in the dance. All lines on the legs, hands and palms that the railing crosses must be removed.

Step 4. Draw a hairstyle
Now a very important detail - hair. The model has her hair in a loose bun. Her hair was disheveled and fell around her neck. Drawing a hairstyle is a very painstaking task, but with due diligence, it can be done perfectly. To make it easier for you, below is an enlarged image of the model's hair. In the hair, we indicate the shape of the ear.

Step 5. Dressing the top of the model
The hardest part of the work is over. The girl's hair and body are ready. Now we critically evaluate the result. Where necessary we wipe or finish.
Drawing a T-shirt on thin straps, we direct the lines of the shoulders, the interscapular region and the spine. On the T-shirt, do not forget about the folds of the fabric. They will give a more realistic look.

Step 6. Draw visible lines
We direct with a clear line all visible parts of the body and railings. Here are the little things in order:
draw the wrist and hand of the right hand, draw a line of knuckles and fingers;
we direct the line of the left hand and the outline of the elbow;
make the shirt more embossed. We outline all the folds and bends of clothing.

Step 7: Draw the Bottom of the Clothes
The shorts on the girl are short and follow the shape of her body. Drawing them is not difficult. We apply folds on the clothes, which should be on the lower back, between the buttocks and on the sides of the thighs. We supplement the shorts with a belt, they should not fit snugly to the legs. Thus, we will show the structure of their material. We complete the line of the spine.

Step 8 Draw the Feet and Leggings
We create clear lines of the legs. Let's move on to training socks. Leggings are much bulkier than the lower leg and have large horizontal pleats.

Step 9 Finishing touches
Our work is coming to an end. Putting the finishing touches on. Create the texture of the gaiter material and the shape of the railing.
The final look of the drawing should be similar to the picture below.

You can learn in more detail how to draw a girl in full growth by watching the video master class.
Those who have always dreamed of capturing the beautiful half of humanity on paper faced ignorance of anatomy and a lack of practice in drawing. It turns out that it is not at all necessary to know how the human body works, just the ability to count and the desire to complete the creation of a drawing is enough. Today we will learn how to draw a girl in full growth.
The first thing to start drawing is preparing a sheet of thick paper, a pencil and an eraser to remove all unnecessary. The light should fall on the right so that the eyes are less tired. Now that everything is ready, you can start drawing. First you need to take into account the features of the female body structure. Despite the differences in women's bodies, according to textbooks, the figure of a lady is always inferior in height to a man by a head or so. The width of the shoulders, limbs, especially the hands, wrists, ankles, as well as the biceps and calf muscles and other muscle mass in a man is much more pronounced than in women. In the latter, the pelvis and hips are more clearly marked. The ratio of the pelvic region to the shoulders in girls is approximately the same, while the male shoulders are much wider than the pelvis. When choosing height when drawing, it should be remembered that it is equal to the sum of the lengths of 7 heads. Now that everything is clear with proportions, you can sketch a little man from circles and sticks to indicate the pose. Before you give the sketch of the girl volume, you need to mark the head. If she looks away from us, then the vertical line necessary for facial symmetry should be strongly shifted towards her gaze. If the head is tilted to the right or left, it is worth slightly bending the horizontal line of facial symmetry in this direction. Now let's draw a graceful neck and draw connecting lines from it to the shoulders. With elongated cylinders we mark the forearms and shoulders, we denote with light strokes of the hands. If a girl is holding something in her hands, it is necessary to outline the contours of this object. At this stage, we are not thinking about detailed drawing yet. It remains to outline the body with smooth lines, giving it the shape of an hourglass. Let us designate the thighs of the future girl as tapering to the kneecaps, and the inguinal region will be given the shape of a triangle. The shins should come out narrow, the ankles should be small and graceful.

Let's move on to the details. We outline the expansion of the eyebrows, the contours of the eyes, the snub nose, the ear and the contour of the lips. When completed, you need to designate the eyelashes on both eyes. They will appear as curved lines from the outline of the eyes. You should also draw the nose and nostrils. Draw thin lines of the collarbones below and mark the line of the neck muscles above them. Then we outline the general contours of the chest, folds of clothing, straps, if any. On the stomach - the navel, as well as the contours of the press and the line of underwear or trousers. Before moving on to the legs, you need to remember to erase the sketch lines and outline the outlines. Make sure the lines are thin and smooth. If a mistake was made while drawing, it can always be eliminated with an eraser.

To complete the drawing, you need to outline the contours of the girl's legs, erase the guiding strokes of the sketch and draw the feet in detail. If they are wearing socks, then do not forget to draw their folds and edging the soles.

When drawing, it is important to remember that the freer the hand moves, the lighter the pressure of the pencil on the paper, the thinner and more accurate the outline of the drawing will come out. Be patient, and you can easily capture any girl on paper.
In order for the drawn girl to look like a person enough and have proportional parts of the body, it is necessary to get at least a little familiar with the elementary human anatomy. in full growth? First you need to decide on the pose of the drawn lady. Will she stand straight or bent slightly, in what position will her arms and legs be, will she be in clothes or without it? When a clear idea of \u200b\u200bthe future drawing has developed, you can begin to be creative. So, let's consider how to draw a girl beautifully in stages.
We schematically mark on paper the proportions of the future body. We draw the head in the form of an oval, then from the center of the proposed chin we draw a straight vertical line down. In order for everything to look proportional, it must be taken into account that the length of a person’s body fits seven heads. That is, you need to measure the height of the already drawn oval and mark seven more equal segments on the vertical line. Now let's distribute each marked part. The first part is the chest, the second is the waist, the third is the hips. The fourth and fifth are legs above the knees, the sixth and seventh are legs to the ankle. For the image of the feet, one more segment will be required, half as long as the previous ones. 
Stage two
When the body frame is schematically drawn, we proceed to the image of the limbs. Using a horizontal line, mark a segment - the line of the shoulder. In the same way, we mark the line of the waist and hips. To be beautiful and graceful, the shoulder segment should be wider than the waist, but narrower than the hips. From the schematic shoulder, draw the arms with vertical lines. In this case, the elbows are located between the third and fourth parts, and the fingers - between the fourth and fifth. The legs start from the fourth part.
Stage three
We draw roundness. The head is probably the most basic and difficult part in how to draw a girl in full growth. The face requires special attention, now the girl takes on the appearance. And whether she will be beautiful or not, directly depends on the talent of the artist. At this stage, we draw eyes, eyebrows, nose, lips and everything that you would like to see on the face of the drawn lady. Next, we go down and draw the shoulders, arms, fingers and everything else according to the already depicted frame. Do not forget that these are primarily rounded shapes. Try to depict all parts of the body as believable as possible.

Fourth stage
Fifth stage
Using full-length tips and steps, you can easily transfer the image from your head to paper. It all depends on the imagination and your talent for drawing. A little technique, imagination, the ability to draw, and now a drawn lady smiles at you from the paper.
womanrad.ru
Arts and Entertainment January 27, 2014In order for the drawn girl to look like a person enough and have proportional parts of the body, it is necessary to get at least a little familiar with the elementary human anatomy. How to draw a girl in full growth? First you need to decide on the pose of the drawn lady.  Will she stand straight or bent slightly, in what position will her arms and legs be, will she be in clothes or without it? When a clear idea of \u200b\u200bthe future drawing has developed, you can begin to be creative. So, let's consider how to draw a girl beautifully in stages.
Draw a lady step by step. Stage one
We schematically mark on paper the proportions of the future body. We draw the head in the form of an oval, then from the center of the proposed chin we draw a straight vertical line down. In order for everything to look proportional, it must be taken into account that the length of a person’s body fits seven heads. That is, you need to measure the height of the already drawn oval and mark seven more equal segments on the vertical line. Now let's distribute each marked part. The first part is the chest, the second is the waist, the third is the hips. The fourth and fifth are legs above the knees, the sixth and seventh are legs to the ankle. For the image of the feet, one more segment will be required, half as long as the previous ones. 
How to draw a girl in full growth. Stage two
When the body frame is schematically drawn, we proceed to the image of the limbs. Using a horizontal line, we mark a segment - the line of the shoulder. In the same way, we mark the line of the waist and hips. In order for the girl's figure to be beautiful and graceful, the shoulder segment should be wider than the waist, but narrower than the hips. From the schematic shoulder, draw the arms with vertical lines. In this case, the elbows are located between the third and fourth parts, and the fingers - between the fourth and fifth. The legs start from the fourth part.
Related videos
Stage three
We draw roundness. The head is probably the most basic and difficult part in how to draw a girl in full growth. The face requires special attention, now the girl takes on the appearance. And whether she will be beautiful or not, directly depends on the talent of the artist. At this stage, we draw eyes, eyebrows, nose, lips and everything that you would like to see on the face of the drawn lady. Next, we go down and draw the shoulders, arms, fingers and everything else according to the already depicted frame. Do not forget that the figure of a girl is primarily rounded shapes. Try to depict all parts of the body as believable as possible. 
Fourth stage
Time to dress the painted lady. It all depends on the imagination of the artist. You can dress the drawn girl in anything, be it a toe-length dress or a mini skirt, trousers with a blouse or even a swimsuit, clothes can be varied. The most important thing is that she be beautiful and combined with the image of the depicted lady.
Fifth stage
Final drawing completion. Drawn full-length girls can have lush curly curls, a strict hairstyle, or maybe a short haircut, these features again depend only on the artist. We draw hair. At the same stage, shoes and other accessories are drawn, if they are provided.
Using the tips and steps on how to draw a girl in full growth, you can easily transfer the image from your head to paper. It all depends on the imagination and your talent for drawing. A little technique, imagination, the ability to draw, and now a drawn lady smiles at you from the paper.