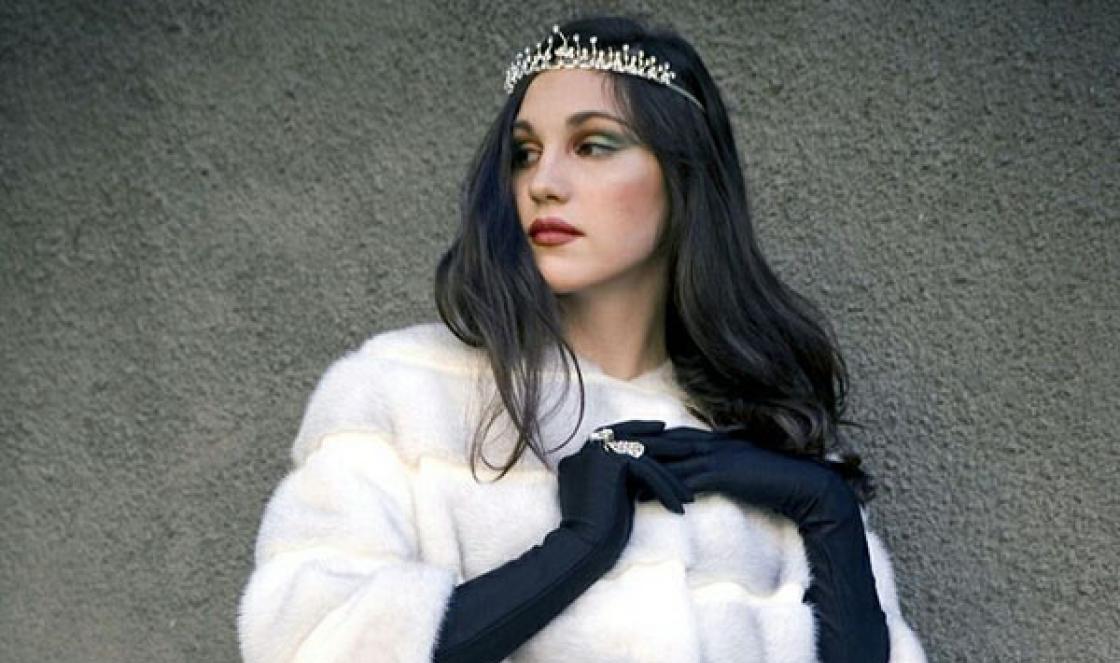
This type of hairstyle, like a braid, has been considered the standard of beauty for a long time. It is worth noting that it is not always convenient to braid your own hair. And another person is unlikely to be able to do a braided hairstyle the first time without the so-called roosters. But if you practice a little, you can learn, especially since there are detailed master classes on how to braid your hair.
Step-by-step instructions can help all beginners learn how to weave different hairstyles. It is best to study the diagram before starting work, if there is one. There are a number of rules and recommendations to ensure a successful result:
- Comb your hair well. This is necessary so that it is easy to separate them into strands.
- Under no circumstances should the strands be pulled too tightly, as this will put pressure on the head. It will be difficult to spend the whole day in tension.
- During braiding, all hairs that differ in length from the rest and stick out should be hidden inside the hairstyle. Your hair will look much neater.
- If there is little time left to complete the work, then it is better to choose an easy hairstyle option.
All braiding techniques are largely similar to each other. There is a difference in where the strands come from to weave into the main braid.
Types of braids for long hair
Of course, braiding long hair will be much easier than braiding short hair. But nevertheless, there are many other additional nuances. On long hair you can weave such braids as:
Braid around the head
This braiding lesson will most likely appeal to many owners of beautiful long hair. When braiding, a satin ribbon is often used as an additional accessory; it makes the hairstyle look even more elegant and festive. Looks very neat on both long and short hair.
Algorithm for performing the work:
- Before starting work, gather half of the strands into a bun at the top of your head.
- You can start work from any point where it is more convenient. It is recommended to start from the side, weaving is done in three strands.
- Snatch one strand from the tail, the other from the circumference of the head.
- It is woven in a circle and ends at the beginning of weaving.
- The entire structure is secured with hairpins or other types of hairpins. If the ribbon is woven, then the ends are hidden inside.
Weaving a tourniquet
If you need to make a beautiful hairstyle for yourself, this option is perfect. A braid is probably the simplest type of hairstyle. Weaving is quick and easy. Step-by-step instructions on how to braid a pigtail:
- Comb your hair well.
- Pull it into a very tight high ponytail almost at the top of your head.
- Divide in half and twist each strand to form a rope. This can be done in any direction.
- Twist the resulting bundles together. The result should be a spiral.
- Tighten the ends with a small elastic band.
French braid
Not many people know how to make a braid in French. But this hairstyle is very popular and is perfect for any hair thickness.
Algorithm for performing the work in stages:
You can also have a French braid on the side; there are also inverted hairstyles.
Reverse French braid option
If your hair is thin, then this type of hairstyle can visually enlarge it. A detailed master class will tell you in detail how to beautifully braid hair that is not very thick.
- Select a small section of hair near your face and divide it into three strands.
- Place the hair on the right under the strand in the middle. Pass the other one under the right one. Thus, it should be in the center.
- After the strand on the left side, bring it under the middle curl and add hair from the left edge to it.
- Then pass the strand on the right under the central curl. And also add strands on the right side.
- Repeat the entire weaving algorithm to the end.
- After collecting all the hairs, finish the job.
- Secure the ends with an elastic band.
- Stretch the loops slightly in different directions to give more volume to the hairstyle.
Hairstyle: spikelet
A very simple, but nevertheless effective type of braiding is a spikelet. In another way, this hairstyle is called a “fishtail”. To perform this technique, you will need to divide your hair into two buns. Unlike other weaving techniques, this usually takes a little longer, but the results are worth it.
Step-by-step algorithm for performing the work:
- Wash and dry your hair first.
- Divide your hair into two equal strands.
- Holding both bundles in your hands, carefully pick up a small curl from the outer edge of the left half of the hair and move it to the right half.
- Perform the same manipulation with the other half of the hair, and continue until the end of the ponytail.
- When finished, secure the curls with a small elastic band.
French braid of two strands
The technique of weaving this hairstyle is easy.
Operating procedure:
- Separate the strand directly with your forehead and divide it into two equal parts.
- Place the curls on the left side on top of the right and lay them diagonally.
- Secure the resulting fork with a braid; to do this, take a little hair from the forehead below the previously braided hair and connect it to the left twisted half.
- Next, place the hair on the right over the left strands. And also weave in the underlay there.
- Perform all manipulations until the end of the hair.
- Absolutely all strands must be woven into a braid.
- Reinforce the bottom with an elastic band; ordinary transparent silicone accessories are best suited for such purposes.
4 strand braid
A more complicated version of braiding. The finished work looks very impressive and is perfect for creating a festive look. Pay attention to the diagram; it will be easier to navigate when starting work for the first time.
Work progress:
- The hair should be washed with shampoo and combed.
- Divide all hair into four strands. You should get two thin and two thick.
- First the thick one will go, then the thin one and then alternate in the same way.
- Please note that the outermost thin strand will be the main working one. Apply it to a thick strand of hair and then place it under a second thin strand. Then pass it over the thickest strand.
- A thin strand goes around a thick curl from the back side and lies on it.
- Then pass it over the second thin strand and move it in the opposite direction from the first thick strand. Don't forget to add underlay. To do this, weave a small bunch of hair from the side and wrap it around the braid.
- Curl the outside of the strand with the main working curl and secure it on top. Then take it under the second small strand. Wrap it over a thick second curl and add a fixing braid. Wrap it all with a thin working strand on both sides.
Repeat all steps until the very end of your hair. The result is a chic braid with a pattern very similar to lace. Don't forget to fix your hair with hairspray.
Creating a beam
Using already braided braids, you can create many interesting hairstyles. It’s very easy to create them, the main thing is to follow all the step-by-step instructions correctly.
This type of hairstyle is very common; there are several options for weaving it. It is the bun made from braids that looks very elegant and impressive. All novice stylists will be able to cope with this beauty.
Weaving algorithm:
- You need to wash your hair with shampoo and dry it well.
- Comb along the entire length of the hair.
- Gather a high ponytail at the front of the head.
- Divide it into two equal parts.
- Weave a regular classic braid from each half.
- Secure the ends of the braids with thin silicone rubber bands.
- Twist both braids into a bun and secure with hairpins.
The finished hairstyle is decorated with a bow or ribbon.
Greek braid
This hairstyle is braided to the side. It has a very romantic look.
Creation algorithm:

Thus, you should get a chic headband of braids on both sides, which will go into a carelessly collected bun.
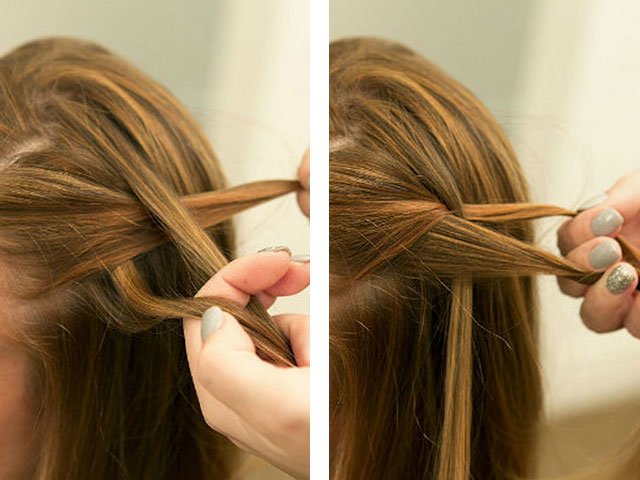
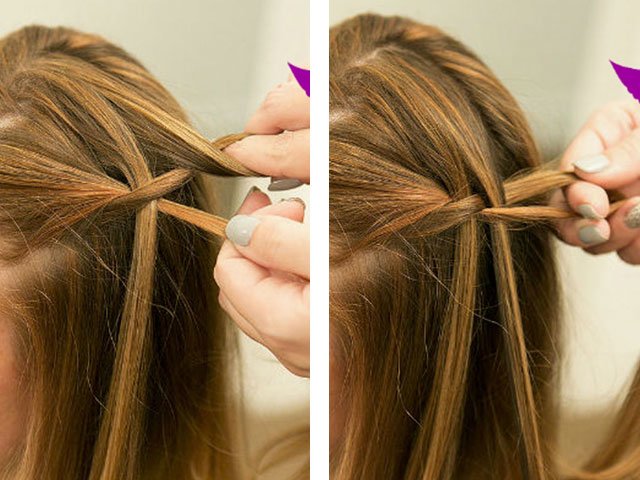
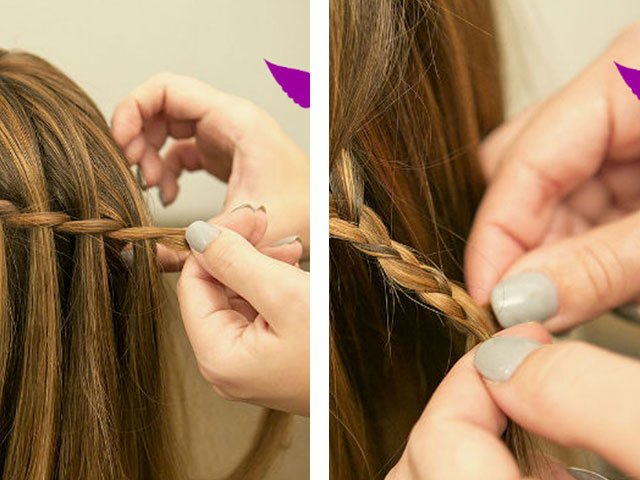
Hairstyle waterfall
If you have chic long hair and you like to let it down, then this type of braided hairstyle is best suited. The strands will flow down and look unusual and beautiful. It’s easy to create such a hairstyle based on a step-by-step master class.
Weaving algorithm:
- On the front side of the head, separate a small strand and divide it into three equal parts.
- Then weave a simple braid, but do it not as usual, but release each lower strand from your hands and weave in a new one. It needs to be separated from the top.
- Weave the braid diagonally, moving from the crown to the opposite ear.
- After the braid reaches the ear on the other side, it needs to be secured with a small clip or elastic band.
Curl the hair from below using curlers or curling irons. When finished, spray your hair with strong hold hairspray. The look will be gentle and romantic for special evenings.
Many girls limit themselves to a banal ponytail, believing that braids on long hair are very long and difficult to braid. However, this is not entirely true. If you get the hang of it and practice a few times, you can create an amazing hairstyle yourself even from several types of braids. Otherwise, why take care of your hair, grow it, if you don’t show off a variety of beautiful styles?
If you are about to learn how to weave braids and have not encountered them before, you need to master the techniques of weaving classic braids. They are used as a basis for various hairstyles. Therefore, if you quickly get the hang of braiding a fishtail, waterfall, French, three- and four-strand braid on your own, the path to the world of excellent hairstyles is open to you.
Let's learn together how to braid simple classic braids and make hairstyles out of them.
So, let's go!


 If you get the hang of quickly braiding a fishtail, waterfall, French, three- and four-strand braid on your own, the path to the world of excellent hairstyles is open to you
 Spikelet or fish tail


Advice! Messy hairstyles are in fashion in 2017, so after finishing braiding, slightly undo the links using your fingers.
Spit "waterfall"
The waterfall braid looks original and elegant. The weaving technique is similar to the French braid, but there are flowing strands that visually look like a waterfall. This hairstyle can be done multi-stage if you repeat the braiding after a certain segment. Now we will look at the classic version.


- Comb your hair thoroughly to remove any knots, otherwise your braid will look messy.
- To keep your hairstyle in its original form for a long time, evenly treat the strands with mousse or gel using your fingers.
- Separate a small strand in the temple area and begin to braid a classic three-strand braid horizontally, towards the second temple. The first weave begins with a curl that is at the level of the eyebrow line. Place this curl in the middle of the braid.
- Forget about the top strand that ended up underneath. This is the beginning of our waterfall. To keep it out of the way, move it closer to your face. You can even fix it there.
- Instead of the bottom strand, select a new one from the remaining flowing hair and weave it into our braid.
- Continue weaving according to the previous pattern. When the curl falls down after manipulation, leave it untouched and move on to another part of the hair.
- The weaving ends at the temple opposite from the beginning. The braid can be moved down, then the oblique hairstyle will look more romantic. You can also stop wherever you want. You may want to only weave halfway through. The decision is yours.
- You can secure the braid with a hairpin or an elastic band. Continuing the braid to the end of its length with classic braiding looks original.


When creating a waterfall braid, don't be afraid to experiment. If you add strands only from above or only from below, you will get a slightly different pattern. This way you can transform yourself every day.
Advice!If you have split ends, this is especially noticeable in a braid. Therefore, do not tighten the links too tightly. It’s better to visit a hairdresser first to eliminate this problem.


French braid
The French braid is often confused with a spikelet. But we learned how to weave it earlier. Now let's look at the step-by-step instructions for this beautiful weaving (photos attached).


- In the area where hair begins to grow, form a wide strand and divide it into three identical curls. Please note that the thicker the strand, the thicker the final braid will be.
- Start braiding like a classic three-strand braid. To do this, intertwine the first strand with the second so that it is located in the center. Then perform the same manipulations with the left one. The beginning of the French braid is the usual braiding at the top of the head.
- Hold the middle and left strands of the resulting link and grab a new one on the right just below and pull it towards the previous right one. It will be the biggest.
- Intertwine the resulting right strand with the middle one and again take all three resulting parts of the hair into different buns.
- Now braid a new strand on the left side to make it longer and intertwine it with the middle one.
- Gradually repeat the previous movements until you reach the end of the hair growth level.
- Then you can continue with classic braiding to the end of the length or pin the ponytail. In any case, your French braid is already ready.


Please note that the French braid can be woven in any part of the head, as long as it can be supplemented with new strands.
Advice! To make your hair look voluminous and not fall under the weight of the braid on long hair, first backcomb it in the root zone.
Four-strand braid
If you're tired of the classic three-strand braid and want to add volume to your hair, try a braided look using four or even five strands. It is a little more difficult to do at home on your own, but after watching a training video or studying step-by-step photos, you will learn how to fix the strands correctly and in a timely manner so that they do not get tangled or interfere.


Now we will look at the technique of weaving a four-strand braid.
- First, decide what role the braid plays in your hairstyle. We will take as a basis a bun that needs to be wrapped with weaving to complete the beautiful styling.
- Create a high ponytail. For the upcoming weaving, separate the longest strand and fix it separately so that it does not interfere. Comb your tail and gather it into a bun.
- Divide our separate strand into four curls of the same size.
- Place the first strand under the second, and the fourth under the third. The resulting medium curls need to be crossed with each other.
- Continue manipulations according to the previous scheme and continue this way until the end of the length.
- You now have a four-strand braid. But in order for it to beautifully decorate our bun, stylists recommend turning it into a Celtic bun by simply stretching it. Grasp the central strand of the finished braid, pull it up and down so that gaps are created.
- Wrap the bun with an oblique and secure the hairstyle at the back with bobby pins.
We suggested styling yours with a four-strand braided bun, but it can be used for other stylish hairstyles as well.


Advice! Tight braids are only suitable for girls with the correct head shape. Others are advised to relax their braids a little so as not to expose any imperfections.
Openwork beauty
An openwork braid looks incredibly impressive on long hair. It will decorate any hairstyle and also become a bright separate element. By the way, they are quite easy to braid. Let's make sure of this together.


- Comb your hair and treat it with styling products. Hair foam, gel, mousse are suitable.
- The hair should be divided into three equal-sized parts. We begin to weave a classic three-strand braid.
- After 2-3 standard twists, begin to pull out the curls from the side strands so that you get small thin loops. They are the ones who give the braid an openwork look.
- Continue braiding in this pattern until the end of your hair length.
To add originality to an openwork braid or to fit it harmoniously into the overall composition of your hairstyle, remove the strands from only one side. You can also add a ribbon to the weave (it replaces one of the strands).


Advice! If you are braiding the entire length of your hair, lay it on one side, exposing one side of your neck and ear. This is the trend of 2017.
Options for fashionable hairstyles with braids
So, we have studied ways to weave the simplest and most beautiful braids, which form the basis of all hairstyles. Since the length of the hair allows us to build structures from weaves, we will take advantage of this and get acquainted with interesting ideas for hairstyles in 2017.
- A braid with a ponytail looks interesting and is divided into several options. This can be a braid that starts at the end of the hair growth and ends at the ponytail. You can braid a braid on top of a voluminous ponytail. Or a side braid that smoothly turns into a long ponytail also looks original. A braid that goes around the ponytail diagonally looks very romantic.


- A braid with a bun is an option in which the braiding can also be located on either side. It can envelop the bun or smoothly transition into it - the choice is yours.


- A braid with loose hair always looks gentle and playful. Curl the flowing strands into curls and leave them untouched.


- Circular braids allow you to gather long hair completely into a hairstyle. Do multi-layer styling as long as your hair health allows.
- Braid with
A huge number of people consider beautifully braided long hair to be a feminine and attractive hairstyle.
Plus, this method of styling curls is rightfully considered not only one of the most elegant and neat, but also the most uncomplicated and practical.
In fact, no matter what tricks the fair sex comes up with when coming up with complex hairstyles, braids for long hair will in any case remain one of the most popular ways of styling luxurious curls in a beautiful and neat hairstyle.
If many years ago it was customary to braid long hair into one large braid in the simplest way, now there are many magnificent images with different braiding techniques.
Braids for long strands are appropriate almost anywhere. With one of these you can go to work, to friends, to the beach, to a party and even to a gala reception.
It is also worth noting that braids are perfect for any outfit, from formal office suits to evening dresses. And what’s even more pleasing is that learning how to braid long hair on your own requires not only patience and perseverance, but most importantly, desire.
How to learn to braid hair
It is recommended to start with simpler options. First, you need to choose the easiest way to model styling using braids, learn how to do it perfectly, and then you can proceed to more complex options.
For example, if you manage to master the technique of weaving voluminous or tight braids for everyday styling, you can easily turn them into a beautiful evening hairstyle by adding some additional accessories and elements to it.

This technique offers many benefits.
Firstly, you can be absolutely sure that you can make yourself a real masterpiece in the shortest possible time, without having any available tools.
Secondly, in order to make a simple weave, you do not need to learn it for too long.

In order to learn how to make such braids yourself, you can purchase special video tutorials. The most important thing is not to stop at what you started. Make every effort and be patient, and then the resulting result will be able to exceed all expectations.
Braiding long hair
A beautiful braid on long hair can be styled in a variety of ways, and it is not at all necessary to leave it “as is.” Nowadays, stylists have come up with many styles with which you can create your own unique image.
Here are some weaving options:

Ukrainian braid
The “basket” or braid in the Ukrainian style has long been at the peak of popularity. The “blame” for this is not only Yulia Tymoshenko, but also the natural beauty and aesthetics of this hairstyle. Moreover, braiding your curls in Ukrainian is a very practical move when you don’t have a styler or varnish on hand to fix the strands.

Braiding it is very simple: make a regular braid, and then wrap it around your head, securing it with invisible pins. To get the hairstyle right, you need to have enough hair length to wrap the braid around, maintaining proportions and shape.

Spit waterfall
This amazing hairstyle reminds us of the ancient Slavs. In fact, there is nothing simpler and more natural than such a braid, and the image itself turns out to be gentle and feminine.
This braid can be a little tricky to make: separate three strands at your temple and start making a regular braid. However, in order for its direction to be horizontal, you need to constantly add new strands one at a time, weave them in, and then lower them down.
Another version of the “waterfall”: start weaving the curls from the temple on one side, weaving horizontally. At the same time, make a second braid from the remaining strands, then connect them at the end.

This type of hairstyle is also called a French braid. The point is to weave a thick, tight braid from thin strands.
You need to start weaving such a braid from the forehead. Continue weaving it along the entire length of the curls, constantly grabbing new strands and moving them down the weave. The effect of this hairstyle is amazing: the braid seems to lie separately from the hair, on top of your styling.

The beauty of this braiding is that the braid can be made not only in the middle of the head, but also on the side, and even braided around the head. Here everything depends only on your imagination.
Scythe dragon
It is woven in a similar way to, with the only difference being that new strands are grabbed and laid on top of the main weave. You also need to weave it from the forehead, gradually moving to the top of the head and further down along the entire length of the curls.
Depending on your preferences, you can grab not all the strands, but only in the middle, leaving the hair on the sides of your head loose. You will get a sort of “Malvina” hairstyle with a braid.
This styling is very easy to do, and you can experiment with different variations.
For example, you can weave a thick braid starting from the forehead, and then bend it and secure it at the back of the head with several hairpins.
Second method: braid the braid French style on the side, leaving some of the strands loose. Twist loose curls into a bun and secure with hairpins along with the braid.

Thick braids

Typically, this hairstyle means weaving several braids at the same time, which creates the effect of a very thick braid.

Braid one side of your head. When you reach the middle, start weaving another braid from the main strands, weaving strands of both braids into each other.
Braid hairstyle: what to combine with
Various ways to create masterpieces for long hair, as well as decorating them to express your imagination, provide enormous scope. Braiding can be complemented with bright beads, ribbons, beautiful hairpins, headbands and even fresh flowers.

The only rule when creating a harmonious hairstyle is the correct selection of accessories. This means that the styling style you choose should match the style of your clothing, and the jewelry and hairstyle itself should be combined with makeup.
If you prefer a sporty style in clothes, then braid a spikelet or, for example, a tight braid, and already under an evening dress you can create an elegant hairstyle from a French braid. A classic hairstyle with a tight braid is perfect for a business office style.

And most importantly, even if you masterfully know how to braid beautiful braids on long hair, you don’t need to stop there, you should always strive for perfection.
Try to experiment, search for new models of hairstyles with braids for long hair on the Internet, create new styles, follow fashion trends.

So, gradually step by step and unnoticed by yourself, you will become a real master and expert in creating hairstyles of completely different shapes. You can always perfectly highlight the beauty of luxurious hair and your individuality and unique style.
The main rule in performing any such installation is that it be done as carefully as possible. In this case, admiring glances will always and everywhere accompany you.
For a triangular face, a good solution would be hairstyles that create volume in the lower part. These can be various braids combined with long bangs.
Basic rules for braiding
In order for the braid to turn out neat and keep its shape for a long time, the hair must be properly prepared. Braiding is done only on washed curls, preferably slightly damp (this makes them easier to work with). For durability, a special mousse is first applied to them, and the finished braid is sprayed with varnish.

Braiding is not complete without auxiliary means - bobby pins, hairpins, hair clips and a set of elastic bands. They are necessary for separating and fixing strands during intermediate work. It is better to take a comb with a sharp handle; it is convenient to add volume to lush braids.
Advice!If you choose braids as your daily hairstyle, try not to wear them continuously for more than 8 hours at a time. Constant tension weakens the hair roots.

How to make a voluminous braid?
If the hair itself is not too thick, you can visually add volume to the braid by pulling out a few strands. But it is important to do this carefully so as not to damage the weaving. It will be easier to maintain a neat appearance of the braid if you first apply varnish to it.

They begin to pull out the strands from the end, gradually moving upward. In this case, the braid is held with one hand, ensuring that symmetry is maintained relative to the center. It is not recommended to pull too hard right away. It is better to fluff your hair slightly first, and then, if necessary, repeat the procedure.


Braids: step by step
The essence of braiding is to divide the hair into separate neat strands of equal size, which are then crossed with each other in a certain sequence. Typically, three to five strands are used, although in complex techniques there may be more. Let's look at the step-by-step creation of classic types of braids that serve as the basis for other hairstyles.
Simple Russian braid
Hair should be thoroughly combed and divided into three equal parts. Then they are intertwined as follows: the right strand is placed between the left and middle, and the left is placed between the middle and right. Alternation continues until the desired length is achieved. Having finished weaving, the end of the braid is tied with a tight elastic band.

Pay attention!To keep the braid in shape and not fray, it is important to hold the strands with slight tension when braiding.

Pigtail-harness
This original braid is braided very simply. The curls are gathered into a ponytail at the top of the head and divided into two equal strands. Each of them is twisted clockwise until a strong rope is formed. The twisted strands are connected so that they wrap around one another, and the ends are secured with a hairpin or elastic band.


The hairstyle looks better on straight hair of the same length. When cutting a cascade, the ends, coming out of the strands, will ruin the whole picture.


French style braid
The hairstyle is similar to a classic braid, but it starts from the forehead rather than from the bun. The sequence of actions is as follows:
- Comb your hair well.
- Take the top of your curls and divide them into three equal strands.
- Braid your hair according to the principle of a Russian braid, adding after each crossing new, equal-sized strands on the sides.
- When the desired length is reached, the braiding is finished with a regular braid or ponytail. If you need a lush braid, take the strands thicker and not pull them too tight.


"Fishtail"
This braid uses four parts of hair, which makes it wider and denser than other types of braiding. The small strands in it resemble scales in appearance, which is why the hairstyle got its name.


To braid a fishtail, the hair is gathered into a bun at the back of the head and then divided into two equal halves. From the outer part of the hair in the left hand, take a thin strand and add it to the curls in the right hand, the same steps are performed for the second side. The braid will turn out symmetrical and neat if all the strands are the same size. You can add a French touch to your hairstyle by starting the braiding not from the back of the head, but from the top or side of the head.


Braid for long hair with bangs
Bangs can complement a stylish look and smooth an irregular face shape, but in our case it seriously complicates the job. It is not easy to weave it into a standard braid, because individual short hairs constantly get out of the braid. Therefore, for connoisseurs of braids, hairdressers have invented several ways to harmoniously combine bangs with other hairstyle elements.

French version with bangs
The weaving technique is the same as a regular French braid (spikelet). The washed curls are slightly moisturized and three strands are isolated on the top of the head at the temple - one from the bangs, the second from the bangs and the main mass of hair in half, and the third only from long hair.


As we weave, new strands are gradually added to the braid until the bangs are complete. Next, they move to the main part of the hair or leave the bangs in the form of a hoop, and secure its end with a hairpin or bobby pin. When finished, it is advisable to fix the hairstyle with hairspray.
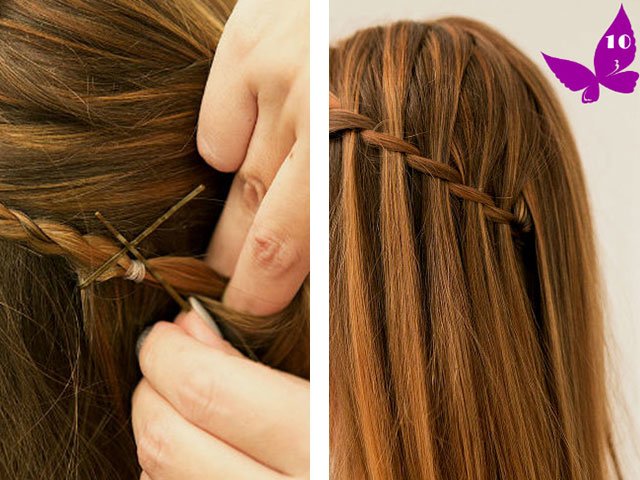
Waterfall
The “waterfall” braid is also based on French braiding, but the result is different, due to the release of some of the strands downwards. To make this hairstyle, the hair is parted sideways and three identical strands are isolated at the base of the bangs.

The first 2-3 spans are performed in the same way as a “spikelet”. Then each lower strand is released, replacing it with a new one from the top of the head. They finish the hairstyle by braiding the braid in a circle and pinning it at the temple with bobby pins. But you can even let it diagonally down your hair.
Advice!“French waterfall” looks more romantic and elegant if you curl the lower part of your hair a little with a curling iron.


There is also a simpler version of braiding a waterfall braid based on a tourniquet

Step-by-step master class:
- We separate a strand of hair from the temple, divide it in two and throw one strand over the other:

- From the top of the head we grab the next strand, throw it between two crossed strands and leave it hanging freely:
- We pull up the front and middle strands and cross them. We pick up the next portion from the top of the head, also throw it between the two and leave it hanging freely:
- So we continue braiding to the desired length, braiding the remaining tail into a regular thin braid.
- We secure it with an elastic band and a bobby pin under the hair.
You can not braid the braid, but secure it with an elastic band and pin the free ponytail to the rest of the hair in the right place with a beautiful hairpin.
Hairstyles with braids
Hairstyles in which braids are not the only element, but complement the overall picture, deserve special attention. Here are some interesting options.
Bun of braids
Hair pulled into a bun is a convenient everyday hairstyle, but boring and boring for a long time. You can freshen it up by replacing the ponytail with beautifully styled braids.

What to do:
- Comb your hair to make it fuller and tie it into a ponytail high at the back of your head.
- Divide the bun into two halves and weave each into a classic braid.
- Tie the ends with discreet elastic bands.
- Gently fluff out your braids.
- Wrap the braids around the base of the bun, covering the elastic band. Tuck the ends in.
- Strengthen the finished hairstyle with hairpins.
If your hair becomes a little disheveled during styling, straighten the stray strands using bobby pins. Finally, spray the structure with a strong hold varnish.


Hair flowers
An option for a special occasion is long hair braided in braids in the form of a flower arrangement. When creating such a hairstyle, your imagination is not limited in any way, the only drawback is that it is difficult to do it without outside help and you will need an assistant.


The basis is usually a French braid, starting from the temple and weaving around the entire surface of the head with smooth curves. Closer to the back of the head, the hair remaining free turns into a classic three-strand braid. The end of the braid is tied with an elastic band, and the braid itself is rolled up in the shape of a flower in a spiral so that the tip is in the middle and wrapped inward. The hairstyle is secured with hairpins, preferably decorative ones.

Braid hairstyle “Heart”
Need a hairstyle for a romantic date? A woven heart made from braids is an interesting solution that will not take much time. Comb your hair back and divide it into two parts horizontally. Then, divide the top half in two with a vertical parting going from the forehead to the back of the head. Make simple braids from the top of the hair on both sides and leave the bottom free. Temporarily tie the ends of the braids with rubber bands to prevent them from unraveling.
 Heart made of braids. Step 1-2 Heart made of braids. Step 5-6
 Wrap each braid around its base counterclockwise and secure in this position with hairpins. All that remains is to connect the ends of the braids into a single whole with a hairpin. The loose hair is combed, the surface of the braids is sprayed with hairspray and the heart-shaped hairstyle is ready.
 Hairstyle heart made of hair. Step 1-2
  Hairstyle heart made of hair. Step 5-6 Reverse French braid-headband for a little fashionista
 Twisted tail
This hairstyle is suitable for girls of primary school age. It is done in literally 5–10 minutes. The child's hair is lightly sprayed with water from a spray bottle, combed and tied with an elastic band at the back of the head. The resulting tail is divided into three equal parts.
Each of the three strands is divided in two. The halves are twisted and braided around each other. As a result, three braids are formed. They are joined together into one large braid and secured with an elastic band.
Advice!If you decorate this hairstyle with a bow on top, it will take on an elegant, festive look.
Half-spikelet
This is a simplified and adapted to a child's head improvisation from a French braid. Weaving begins from the left temple, dividing the hair in this place with a parting. The lower part of the hair is divided into three parts and a braid is made from it. New strands are grabbed only from below.
Having reached the opposite side of the head, the remaining hair is gathered into a ponytail and secured with a hairpin. Another option is to braid the braid to the right temple and finish it by twisting the end into a bun or in the shape of a flower.
Crown
For a matinee or other holiday, a braid with French braiding, covering the head like a crown, is suitable. The braid starts from the back of the head and moves until the circle is closed. Strands for this hairstyle are grabbed only from the outer edge of the hair. The finished braid will be successfully complemented by 3-4 small hairpins in the shape of flowers.
One of the very beautiful and at the same time simplest variations of the “crown” of braids, which also has the more prosaic name of a basket or wreath, is weaving around the head from strands.
As you can see, you can make a lot of original hairstyles for girls from braids. You just have to use your imagination and be patient. And remember that although it’s a pity to unravel such beauty, for the sake of hair health, you shouldn’t wear braids for more than 12 hours.
Each girl is unique and inimitable. Creating a new look for every day is easy if you know simple secrets on the path to perfection. From time immemorial, braids have been considered one of the standards of femininity and beauty.
The ideal opportunity to learn how to weave braids is to look at the photos of their creation step by step, and then practice and practice until the step-by-step instructions become familiar to you, and braiding your favorite hairstyle becomes automatic.
We present to your attention the most charming options. Our top 6:
- Waterfall.
- "Fishtail"
- "Snake"
- Crown styling
- Greek chic
- Elven braid.
Partial braid with falling strands (“Waterfall”)
The hairstyle got its unusual name by changing the classic French braid. With the latter method, the entire hair is collected in one braid, and the waterfall is a more gentle option, in which individual strands flow down like waves. This looks very subtle and elegant, and is not so difficult to achieve, as you can see by looking at the photo demonstrating Weaving an incomplete braid with your own hands.

Light and elegant styling in its simplicity is not inferior to salon cascades, suitable for both a special event and an everyday trip to the store. The released voluminous curls can be performed in several variations, for example, going down to the side, but no matter which one you choose, you are guaranteed a romantic look.
Step-by-step instructions:
- Hair should be smooth and well separated from each other. Use a fine-toothed comb for this. To keep your hair looking great all day long, use a hair styling product such as mousse.
- Your hair is ready. Next, we take hold of one side of the head - we take a strand of hair from here and begin to weave a standard braid: a) the braid begins with a strand that goes higher and goes into the middle; b) then we take it from the back of the head and take it to the center;
- After the first weave, leave the resulting strand lying freely, this will be one of the many streams of your waterfall. For convenience, you can pin it up near your face so that it does not interfere with the further process of creating a hairstyle with braids for long hair.
- We take a new bunch of loose hair on the side of the head and repeat the procedure.
You can continue to weave with such repetitions until the middle or bring the waves to the temple. Beautiful, gentle - your image will not leave anyone indifferent. This is also a great choice of hairstyles for girls for September 1st.
Fishtail braid
Beautiful braids for long hair have become available to any modern girl these days. With all the variety of hairpins, barrettes, bobby pins, elastic bands, bows, it’s so easy to create a unique look with your own hands.

Such a simple braid has already won the hearts of many young ladies. In the photos of glossy magazines, stars and models shine with radiant smiles, confirming this. And what girl doesn’t want to be like the heroine of her favorite movie, for example? This hairstyle is simple and versatile. It takes very little time, and when getting ready for work in the morning, you don’t have to worry about where to put your luxurious long hair. Everyone is already bored with a banal ponytail, but a fishtail is bold and done in a moment, and is suitable for both girls and stylish ladies with a well-groomed head of hair.
Step-by-step photo of doing the hairstyle:

Snake all over my head
Glamorous and bright format of non-standard weaving of a standard French braid. The whole secret is that you move your braid away, first one side of the head “works”, then the other. The resulting figure resembles a snake in appearance, which seems to slide through your hair. Very fresh and original, like a kindergarten matinee for little girls , and for an adult girl for a job interview.
One of the great advantages that this type of weaving has is its accessibility for every girl. To achieve the goal with your own hands, you will only need a mirror, a good mood and exactly follow the instructions for its implementation (for convenience, a photo is attached to each step):
- We start braiding the braid from the side near the temporal lobe, dividing the curl into three strands;

- start making a French braid inside out;

- While we are carrying out our weaving, we select new hair exclusively from the top level;

- we continue working until we bring the braid to the opposite side ,
and begin to capture new curls from the side of the face;

- We begin to change the direction of the braid when we reach the area below the ear, we also take new strands only from above;


- we reach the edge and change the trajectory again;

- wrap the remaining ends into a ring;

- If you pull out fragments of the braid along the entire perimeter, you will get a lush and voluminous .

Braid-crown
This hairstyle of average difficulty level will take you no more than 10 minutes of free time, if only you spend time on thorough analysis and practice. And in terms of its versatility, it is not inferior to any of the previous options. Suitable for both little girls and young stylish girls and respectable adult ladies.
To create this hairstyle with your own hands you will need:
- water;
- elastic bands;
- pointed comb;
- hairspray.

Secure a round section of hair to the top of your head with a thin elastic band after separating it. From a small curl near your temple, begin to weave a French braid, taking hair from the ponytail on one side and from the main mass of curls on the other side. Continue braiding in a circular pattern, reaching the end, hide the free braid under your hair, secure with bobby pins. Fix the result with varnish.
See the photo lesson below and you will easily learn this technique.
Greek style hairstyle
Since ancient times, Greece has been associated with grace, harmony and ambition. The goddesses of Olympus are still considered the standard of beauty, glorified and immortalized in art and music. To be perfect like Aphrodite in our time is not a luxury or a tribute to fashion, it is available to girls of all ages.
Greek hairstyle with braids will help you create an amazing look. You will be delightful and easily recognizable. Let's see how to weave in the photo , and we begin to bring this simple weaving to life.

Braids of large curls or small African braids woven into carelessly loose strands of hair will give you lightness and zest. To ensure that the hairstyle stays in place all day long, the braids should be secured at the back with bobby pins or hairpins in the form of a beautiful pattern. Alternatively, all the curls can be pulled to the side, secured with a hairpin.
"Elf"
Do you want to feel like a charming elf princess? To be transported into the atmosphere of a fairy tale and miracle? Unique and extravagant, this braid is definitely for you.

Weaving it is extremely simple, we consider it step by step and follow the photo:
- We divide the hair into three sections - one at the back of the head and two at the sides. We begin work with the first part, having previously assembled it into a tail.
- Pull the elastic down a little so that you can throw the tail into the resulting hole, and pull it back.
- We release the left temporal zone and begin to weave a regular three-row braid with a left fence.
- We bring the braid to the beginning of the ponytail and temporarily secure it. We divide the back of the hair into two parts, release the left part and braid it to the very end.
- We proceed similarly with respect to the right side.
We decorate as desired with whatever your imagination allows. The charming hairstyle is ready!
It has become so easy to be unique that these days it is more difficult to solve the problem 2+2 = 4. And remember, there is no limit to perfection!