Hi all. Continuing the Spider-Man theme, I present to your attention an article on how you can do very realistic costume their hands.
The production of any costume begins with a sketch (high-resolution digital drawing).

The drawing should be scaled according to the size of your body. Then print it on Lycra using a special printer.

To better implement the project, I turned to a professional seamstress. She cut and sewed the costume. In addition, I added hidden zippers, which made it easy to put on and take off the suit.

The suit looked as if it consisted of a single piece of lycra (the quality of the seams was very poor) high level). The fit was perfect.

The zippers run along the sides (from the armpit to the waistband) and then along the back along the waistband. The back of the costume opens up like a valve, which is put on/taken off using a complex dance :-).

Thanks to the folds of the fabric, the zippers are almost completely hidden when fastening the zipper.

A zipper located along the back of the neck allows the mask to be folded forward, like a “reverse hood,” for a break or taking food/water.


The eye frames were formed from black onyx (a hard plastic that, once heated, can be molded into any shape). The lenses were made of flexible mirror plastic with white vinyl overlays.

Let's start making frames by working out the template. Then we will cast the frames in black onyx and select plastic glasses with one-way mirrors, like mirrored sunglasses. Before putting everything together, let's adjust the shapes of the frames using heat (without lenses).

Let's trace the frames on paper, creating a template so that we can position the eyes and correct the curves.

Glue the paper templates for the eyes to the front lining. Such pads are typically used to create structure under the mask and provide a base for attaching various facial features.

Using a flat sieve as a diffuser, heat each of the frames over very low heat for 10-20 seconds until they are pliable, then adjust the curves and position them to match the position of the templates on the face lining. We hold them until they cool down and retain their new uniform. As soon as they have cooled down, glue in the “glasses”.

Using paper template, we will determine the excess space in the frontal part, which will need to be removed in order for the mask to fit more tightly to the face.

Let's cut it out new template for the forehead and fold it in half to find the axial one. Then, based on the resulting template, we align the eyes using the center line.

Then we glue thin strips of soft packaging foam to the surface of the mask where the eyes will be located. They will act as an additional mounting surface.

Let's make a blank “head” from several empty bottles, a plate and adhesive tape, to which we attach a mask (alternatively, a mannequin’s head is perfect).

Glue the frames to the foam with cyanoacrylate glue.

We cut holes in the lycra for the eyes so that you can see through the lenses without obstruction.

I wanted to make the web lines on the suit more noticeable. Due to the nature of printing on stretch fabrics, the fibers on the surface are well saturated with dyes, but as the fabric is stretched, the weaves expand slightly and the colorless fibers underneath become more visible and the stretched area becomes lighter. This effect emphasizes relief areas well. But there are certain places where the lines should be clearly visible, regardless of the position of the body.

An example where a tissue sample is overstretched. The edges of the lines become less distinct and the black color loses its depth.

In order to correct the situation, we will use Pigma Micron capillary pens, which use ultra-modern “archival” ink. Let's draw each individual line manually. For this operation I needed six/seven Pigma Micron 08 pens.

Let's do a practice test. Let's draw one line with a pen.

When stretched, the line remains deep black because the ink has stained several of the lower layers of fiber.

You can see that by carefully drawing the lines, the ink will bleed onto the back of the suit, ensuring that the lines will not lose pigment as they are stretched and moved.

From the outside it looks pretty fast. However, there are a lot of lines in the costume, so it took more than 10 hours to draw them. But it was worth it.

Let's move on to shoes! To do this, take a pair of moccasins. They have no laces, a low profile design and the sock type I was looking for.


First, we'll remove the soles from the shoes. Then we'll remove the heels from the soles.


We put the moccasins into the “legs” of the suit, so that we can then glue the soles to the outside of the fabric.

For this task, I advise you to use heavy-duty glue (in my case, E6000).

To protect the legs from glue during gluing, wrap them in plastic bags.

Let's put on a suit. Apply glue to the cut soles and soles of the suit. Let's wait until the glue becomes sticky, then step on the soles.

We take off the suit and put rubber bands on the moccasins, and then put them under the weight. Let's leave them there for a few hours.

The last thing to deal with is fog on the lenses. Since the eyes of the suit are a continuous film, they may become foggy. A couple of drops of Clarity Defog on a microfiber cloth will disperse the fog.

That's all) Thank you for your attention!


For several decades, Spider-Man continues to be one of the main characters for boys of any age. Young representatives of the stronger sex will be delighted with the opportunity to dress in the costume of their favorite hero, especially since it is quite easy to make. How to create a Spider-Man costume with your own hands and what is required for this? There are several in various ways.
Method 1: Classic Spider-Man
To create such an outfit you will need a suitable base - you should buy a suitable suit in a specialized store. In the future it will be supplemented with original parts.
You will need:

The actual process of creating a costume consists of several stages. To sew a Spider-Man costume with your own hands, you will need:

An excellent look is guaranteed if the fabric fits tightly to the body - it is worth adjusting it in accordance with the characteristics of the figure. It is advisable to choose products from dense material, then the selected will definitely be the center of everyone's attention.
Method 2: The Most Popular Spider-Man Costume

In this case, you also cannot do without purchasing a suitable foundation - an excellent option would be black fancy dress . In addition to this you will need:

After this, you must perform the following procedure:

The process of creating a costume will not take much time, but its owner will rightfully be the center of attention at any party.
Method 3: The Amazing Spider-Man

The very first step is to purchase a fancy dress that matches the style of the future outfit. Even if it is not an exact copy, it is easy to transform it yourself using improvised means.
Materials:

The algorithm of actions is quite simple and repeats the previous variations of costumes. Namely:

A simple method will greatly simplify the process of creating drawings. One half of the spider or web is drawn, after which the fabric is folded in half - and the sketch is printed on the other side. All that remains is to color it.
Method 4: The Amazing Spider-Man - Option #2

As a base, you should buy a red fancy dress costume from a party dress store. Small additions will help transform this universal option.
For this you will need:
Thick marker and thin felt-tip pen in black
Blue fabric
Sneakers.
It’s very easy to make a stylish and unusual Spider-Man costume for a boy with your own hands. A simple procedure will help you carefully prepare the basis for creating the finished image. You will need:

Ready Spiderman costume finished. All that remains is to adjust it to your figure - a perfectly tight, dense fabric will be an excellent choice for the base.

Method 5: Doctor Octavius

To look stylish at the party as Spider-Man, you can buy a red suit and connect it with black fabric. This is exactly what Doctor Octavius has become - and achieving this result is not at all difficult.
All you need is:

This completes the creation of the Spider-Man costume - you can go to a holiday or party. AND positive emotions will be guaranteed - such an outfit will not go unnoticed.

Method 6: Ben Riley
A fairly common question is how to make a Spider-Man costume with your own hands among those who want to try on the role of Ben Riley. Moreover, it is very easy to make. You just need to follow a few simple steps:

After this, you just need to try on the finished product - and you can go to the holiday. This is a great option that is suitable for both adults and children.

Method 7: Black Spider-Man
It's spectacular and original version for those who are looking for how to make a Spider-Man costume without special effort. It's enough just:


This costume is very easy to make with your own hands, spending just a couple of hours on it. Moreover, no sewing skills are required - you just need to glue the necessary elements.
Method 8: Spider-Man from The Amazing Spider-Man - Vigilante
This outfit differs from most analogues in that it should be loose and not tight, making it much easier to “tailor” it to your figure.
Materials needed:

The procedure is as follows:

All that remains is to put on your outfit and go to the holiday.

Method 9: Miguel O'Hara - Spider-Man 2099
This is a great option to make a children's Spider-Man costume with your own hands - the procedure is more than simple. In addition, adults will also like this outfit, and therefore such a choice will be good decision for a superhero of any age.

Try on the suit, making sure it is the right size and fits well. At this point, the process of creating an outfit is ready - it looks quite stylish and allows you to completely transform yourself.

Looking like a super hero is very simple - you just need to choose the right holiday outfit. Moreover, it is easy to make it yourself - making a Spider-Man costume pattern with your own hands is quick and easy. And if you buy a suitable base, the process is greatly simplified.
Fortunately, cliches affecting the form of clothing, including festive costumes, have disappeared, unable to withstand the pressure of style and the onslaught of fantasy. Now, in addition to bunnie boys and children, you can try on many outfits from holiday uniforms. If you are puzzled by the selection of clothes for a matinee, then look how interesting it looks children's costume spider. A variety of masquerade accessories can decorate themed holidays- for example, for Halloween, costumes of spiders and vampires will come in handy.
Spider Showman
A blinding light rushes onto the stage. Intriguing fluctuations in the musical accompaniment tickle your nerves. From the opposite side, opening the curtain, a charming boy in a children's spider costume jumps out.
 He greets the audience cordially, clapping three pairs of hands. Mittens made of satin fabric. They are made according to the principle of oven mitts. The spider legs, located on one side, are tied using thick twisted rope without unnecessary tension. It becomes possible to observe the amazing synchronicity of limb movements.
The basis of a children's spider costume consists of black trousers and a sweater (shirt). Starting from the middle of the sweater, a blank bag made of black plush material is sewn on. To give the spider's belly volume, cotton wool or pieces of foam rubber are stuffed inside the bag. A vest is attached to the front of the sweater. The material of the vest should be bright with a cobweb pattern applied. You can sew a large button made of cardboard and covered with soft material to the vest.
A bow tie is tied to the collar. It's easy to make. It is enough to attach two rectangular pieces of colorful fabric to each other and stitch around the perimeter. Using the same method, a jumper is made that pulls the tie in the center.
The only complication of the children's spider costume is the top hat. This accessory can be purchased at a shop selling carnival paraphernalia. And to preserve the overall style, tie a ribbon on the hat from the same fabric from which the vest is made.
The spider can be executed differently. Such a suit may lack a colorful vest and snow-white mittens. But the hat must have crazy eyes (made in the same way as buttons) with funny eyelashes (for example, made from tinsel).
 Little spider
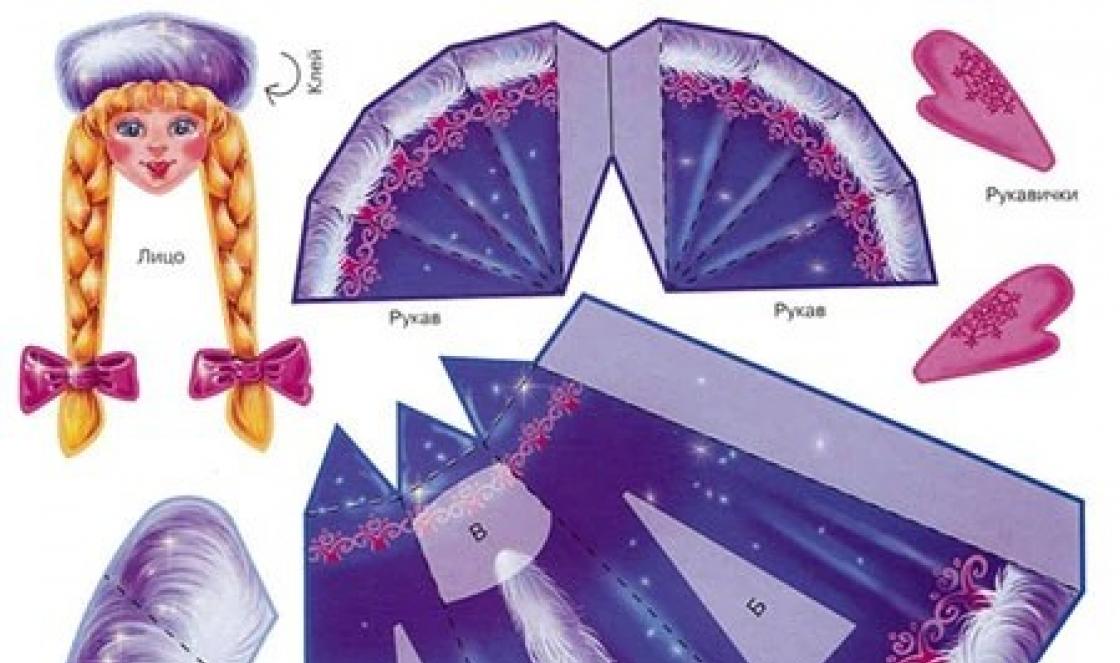
Guys younger age children's spider costume turns into cute and funny toys. Black tights or panties are worn underneath, and a warm black blouse is worn on top. A plump cape with a stitched cobweb pattern is pulled on. Several pairs of legs filled with synthetic padding are sewn on the back side, and wire frames are inserted for flexibility.
You can place a soft toy spider on the web. A cap with perky antennae-antennas with suction cups is placed on the baby's head. You can depict a mischievous face with eyes and a smiling mouth on the hat.
Second wind
Mothers of small children represent a whole team producing crafts, drawings, even clothes. While the child is in kindergarten, his mother discovers her artistic talents. With the passion of a fashion designer, she cuts out fragments of the costume at night so that her child will be the best, the most unusual at the children's party.
If you have the desire and free time, you can amaze others with masterpiece delights. But will the labor costs and night vigils pay off? That’s why mother costume designers rarely “conjure” clothes for months.
The financial side of the matter plays an important role. Understanding that the child will appear in this outfit only once forces you to save on materials. It’s gratifying that a children’s spider costume can be constructed from clothes available in the baby’s wardrobe. Everyday clothes, turning into a part of a festive costume, are gaining a second wind. Parents can rejoice in the money and time they save.
Yulia Denisova especially for the site I am a young mother
2011, . All rights reserved. In case of full or partial use of site materials, an active link to the source is required.
A masquerade look that parents sew themselves is always more valuable for a child. It will turn out unique, not like others! The kid will know for sure that there is no other spider like this at the party.
In this article you will learn how to make a spider costume with your own hands. Photos will inspire you with ideas, and detailed instructions and patterns will help in creativity.
Making a Spider Suit
The spider can look different. Be sure to include recognizable details: 8 legs, large “eyes”, of which there can be either 2 or 6. The color of the main set does not have to be black, use other colors. For example, add white or orange stripes.

We offer do-it-yourself instructions for the boy whose photo you see below. This classic look, it will look great on Halloween or at a masquerade party at school and kindergarten. Its main advantage is that the process is simple and does not take much time.
And most importantly, the result will be very similar to a spider and no one will confuse it with another insect.

Here's what you'll need:
- black hat,
- white and dark material for the eyes, it can be felt or even paper,
- black long sleeve T-shirt,
- 3 pairs of men's socks (for older children you can use women's socks),
- black fabric, about half a meter (or old tights will do),
- elastic band at least 1.5 cm wide,
- cardboard,
- wire,
- material for filling the “legs”: foam rubber, old fabric, newspapers or other available materials,
- glue, needle and thread, tape, scissors.
Tip: If you don't have wire, use old wire hangers.
First of all, make the eyes: cut out white circles and glue the pupils downwards. Don't make too many eyes, 5-6 will be enough.

Glue the finished eyes to the hat with glue. Location doesn't matter, group as you see fit.
Idea: buy ready-made eyes with “moving” pupils.

Now make the paws. Cut out two oval bases from cardboard, measure the desired size along the child’s back, the ovals should not be too large and interfere with movements.
Place three wires between them (or straighten three wire hangers and place them inside the workpiece), wrap tightly with tape. Don't worry about the straightness of the delays.

Then wrap the legs with foam rubber or your filling. Make sure they hold their shape when you lift the workpiece. If necessary, secure them at the base.
Put socks or knee socks on your paws, bend the top two up, and the rest will lie down. Place it taking into account that between the top pair and the two bottom pairs there will be the child’s hands in the sleeves.

The legs will be worn like a backpack, so you will need elastic straps. Measure the length of the elastic bands and attach them to the cardboard base. Wrap the base itself with black cloth. If the elastic bands are white, trim them dark cloth so as not to stand out.

The final touch: sew the base of the socks to the fabric so that the filling does not show through. Add color accents if desired. Attach them to the legs and pant legs.

Using the same principle, it’s very easy to sew a spider costume from the cartoon about the Tinkling Fly with your own hands, just add a web of thick white threads.

The image is ready! Pair it with black pants or jeans.
Vary the number of legs. If the wire does not hold the upper legs well, lower everything down. Socks made from soft fluffy fabrics look great.
If you don’t have suitable socks, use two-piece “bags” instead. Decorate your paws with fluff.
Get creative and create your own versions!
We complement the suit with accessories
A spectacular addition to a DIY spider costume will be. If the hat is too hot, she will replace it.
There are many mask options, from simple to the most complex and requiring even more attention than the suit itself.
First version: simple mask on an elastic band. The materials you need are cardboard, rubber band and paints.

Draw the outline of the mask on the cardboard and carefully cut it out. Make two holes on the side for the elastic and thread it through, measure the length for the child in advance. Make sure it's not too tight.
Then draw 6-8 eyes on the mask different sizes. You need to cut out the pupils of two of them.
Color the mask. Ready!
Second version: spider with legs. The materials are the same; instead of cardboard, you can use paper or black felt.

Cut out the paws carefully, do not remember. Make the eye holes larger to make the child comfortable.
A few more design options for the same mask that will help you create your own unique accessory.

A more complicated version: make a spider hat with eyes and legs.

To create it, use the wire technique. Sew the printed 3D eyes close together for a realistic look.
We complete the image of the spider - apply makeup
It will become the final detail of the spider image. Children love face painting and feel more confident in their new role. It's no secret that the image of a spider can be terrifying, and you can paint your face to match your suit.

If your child doesn’t want to paint his entire face or you have little experience in applying face painting, stop at drawing a spider on the cheek and forehead.

You will need two colors of paint: black and white. They are easy to find in a set so you don't have to buy them separately. Start with dark and move to light, tracing the contours when the first layer dries a little.

For effect, add highlights or shadow to make it seem like the spider is real.
Simple instructions on how to make spider face painting yourself for beginners. All you need is black paint and a thin brush.

- Draw a web. Start with lines around the eyes towards the cheeks, temples, and forehead. In total, draw 8-10 lines on each side.
- Draw the web. Connect the guides with arcuate lines.
- The body of the spider will be located between the eyebrows. Draw an oval outline and color it in. Make the paws with dashes (each of two strokes, pointed at the ends). Draw the head at the top or bottom, depending on where the insect is crawling.
To complicate the design, add white accents and place a red dot with a light highlight on the body.
The look is complete, it's time to celebrate!