From time immemorial, the border has been considered the element of knitting that gives any product true tenderness and sophistication. It can be used to decorate any crocheted items - from clothing to kitchen accessories (napkins, tablecloths, towels, curtains and much more). Moreover, not only finished knitted items are tied with a decorative border. Openwork lace, knitted along the free edge of the fabric, can breathe new life into an old, long-forgotten item from a women's or children's wardrobe.

There are many ways to knit a border. It is knitted lengthwise and crosswise, in one layer and layered, using fillet, openwork, ribbon techniques, as well as in the form of a border or fringe. Each option for knitting a border has its own subtleties, therefore, if the craftswoman has just begun to master the basics of crocheting, we recommend choosing the simplest tying patterns, then gradually complicating the knitting tasks. 
Today we will talk about how to crochet a border. We offer needlewomen a large collection of patterns and step-by-step instructions for crocheting the edges of knitted items - from simple “picots” to extremely complex crocheted “butterflies”. 
Abbreviations in the text:
- VP – air. loop;
- Runway - air. lifting loop;
- Art. s/n – double crochet;
- Art. b/n – single crochet;
- Art. s/2n – double crochet stitch;
- pet. – loop;
- flail - chain;
- RN – working thread;
- PR – previous row;
- SS – connecting column.
The simplest picot-based border for beginners
With the help of such a border you can tie whatever you want: knitted napkins or ordinary fabric handkerchiefs. The binding is absolutely simple to perform, it consists of four rows, so even a new knitter can master it. 

Knitting progress:
We tie the fabric in a circular manner with a row of non-woven columns. SS.
Next in a row we knit 6 VP (1 VP + 5 VP), 1 tbsp. b/n in the 5th art. b/n PR, then knit with rapports to the end of the row: “5 VP, 1 tbsp. b/n in the 5th art. b/n PR". SS.
We knit the third row in the same way, only the b/n column should fall on the central loop of the arch of 5 VP PR.
We tie the fourth row around the trace. repeating knitted combination: “1 tbsp. b/n to central. pet. arches from VP PR + 3 VP + 2 tbsp. s/n to the center. pet. track. arches of 5 VP PR, above them and between them - in picot (3 VP + 1 SS in the first VP), between picot - 3 VP, we complete the rapport with three VP and st. b/n to the center. pet. track. arches made of 5 VP PR.” SS. The border is ready!
Narrow openwork border


The most beautiful airy border can decorate women's blouses and children's tops; framed by it, a wide variety of clothing items and all kinds of knitted accessories look equally good.
Work steps:
The border is knitted transversely, using openwork motifs.
We collect the flail. from 11 VPs (7 VPs + 3 VPs + 1 VPs).
Row No. 1: 1 tbsp. s/n in the 7th VP chain. from the hook, 2 VP, 2 tbsp. s/n in the 4th VP of the base from the hook, between the posts - chain. from 3 VP.
Row No. 2: 5 runways, 3 tbsp. s/n to the center. pet. arches made of 3 VP PR, 1 VP, 3 tbsp. s/n in the same pet. arches, 2 VP, 1 tbsp. s/n in next Art. s/n PR, 1 VP., 1 tbsp. s/n in the 3rd runway PR.
Next, we continue the work according to the knitting pattern until the border reaches the desired length. Semicircular motifs are knitted during knitting. b/n with pico.
Treat the finished border with a starch solution and iron it to give it the ideal shape.
Heart border in fillet knitting technique
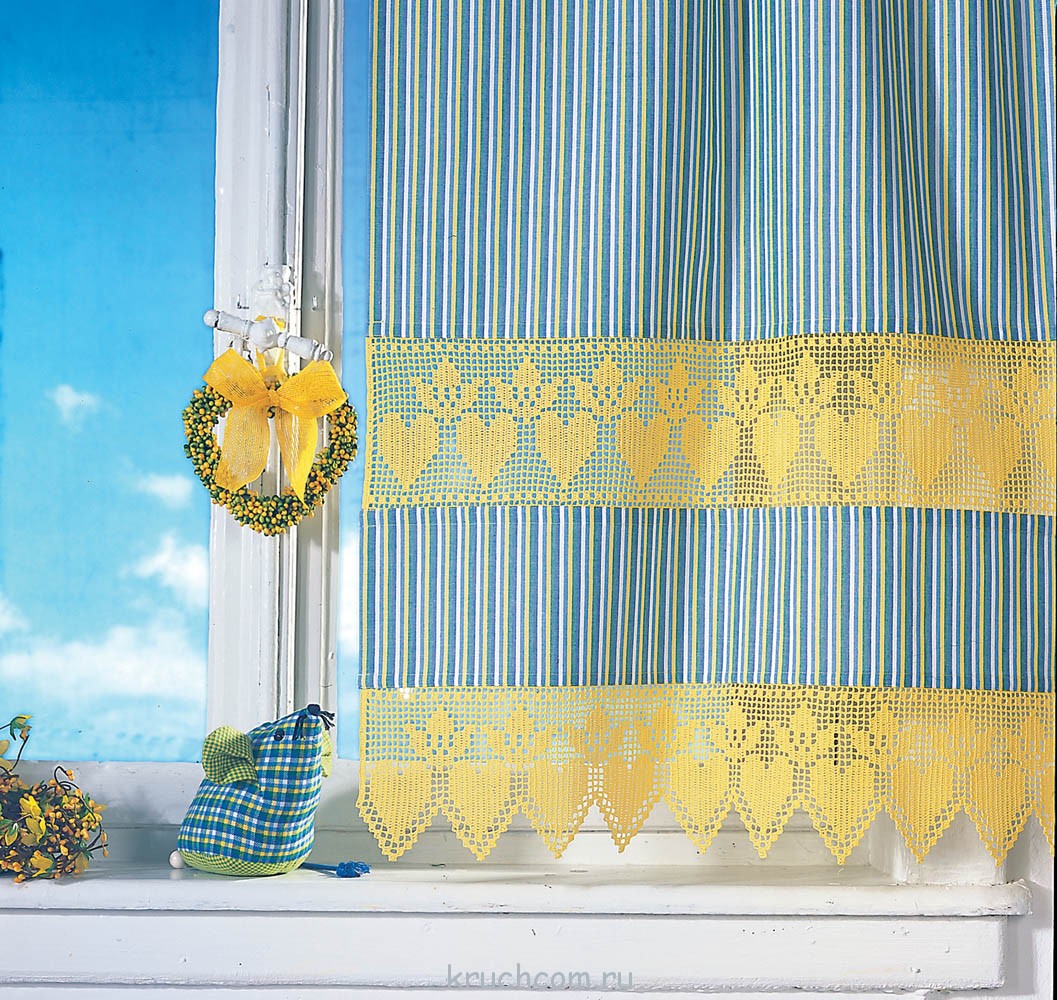
A border made using the fillet technique is one of the most popular types of crochet bindings. The fillet border is used to decorate towels, napkins and tablecloths; in addition, it can be used to decorate kitchen curtains and other home interior elements in an original way.
A heart-shaped border with scalloped edges can be a bright accent to many knitted and fabric items, take, for example, kitchen curtains, where you want to add a little variety.
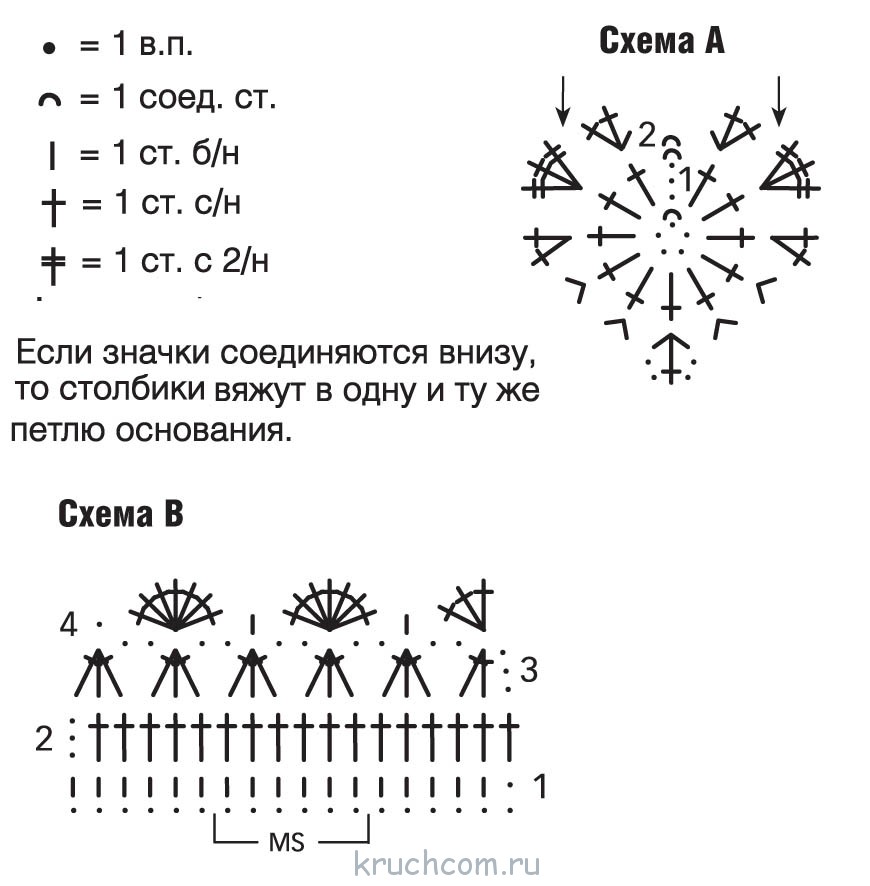
Fillet pattern diagram:

The process of knitting a fillet border is incredibly simple and similar to embroidery technology. It must be remembered that each cell of the pattern consists of three loops, the empty one is knitted “1 tbsp. s/n + 2 VP”, filled in – “3 tbsp. s/n.”
For the “heart” border we use a flail. on 55 VP + 3 VP, and knit with empty and filled fillet cells according to the above pattern.
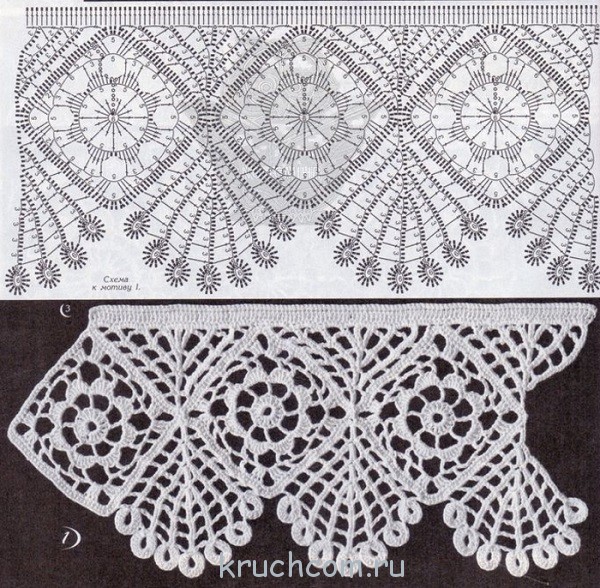
Complex openwork border
An openwork border is the leader among the methods of crocheting the free edges of a product. Openwork binding patterns are in high demand among craftswomen, so there are plenty of options: scallops, “pineapples”, shells, floral motifs, etc.
The openwork border can be narrow or wide. The latter is ideal for framing towels and tablecloths. We invite needlewomen to pay attention to the beautiful pattern of the wide openwork border, perfect for adding elegance to the tablecloth.
The process of crocheting such a border is not easy, but the results of the work will be appreciated, see for yourself! 
Knitting pattern:

Knitting order:
We knit the beginning and end of the border according to the pattern of the first motif, then alternately according to the patterns of the second and first motifs until the border reaches the desired length.
First motive: we start with a chain closed in a ring. for 5 VP.
Row No. 1: 4 runways, 6 st. from 2/n to next. 2 VP rings.
Row No. 2: 4 runways, 1 st. from 2/n to next. Art. with 2/n PR, 2 tbsp. from 2/n to next. Art. with 2/n PR, 3 VP, 2 unfinished. Art. with 2/n with one vertex, in the first VP chain. out of 3 VPs, 3 unfinished. Art. with 2/n with one vertex, in the next. Art. with 2/n PR, 3 VP, 2 unfinished. Art. with 2/n with one vertex, in the 1st VP chain. from 3 VP, 2 tbsp. from 2/n to next. Art. with 2/n PR, 2 tbsp. from 2/n to next. Art. with 2/n PR.
Rows No. 3-4: knit according to the pattern of the first motif.
Second motive: we collect the flail. for 13 VP (7 VP, 4 VP, 2 VP).
Row No. 1: 4 VP, 1 SS between the fourth and third row of the first motif, 2 VP, 8 sts. with 2/n in the ninth VP chain, 3 VP, 1 SS between the fourth and third row of the first motif on the opposite side of the chain.
Rows No. 2-4: knit according to the pattern.
Warp: knit straight and back according to the warp knitting pattern (rows No. 1-8).
Tying: we tie the border in a circular manner according to the tying pattern. Ready!
Dense border "funny hearts"
A bright decoration made of contrasting threads will appeal not only to adults, but also to children. With the help of such a border you can decorate shelves for toys in a child’s bedroom, as well as decorate clothes and accessories. 
Knitting pattern:
Knitting stages:
We knit seven hearts from 5 VPs with pink yarn, closing them in a circle with one SS. We knit two circular rows according to pattern A.
Then we make a flail using light green yarn. on 120 VP + 1 VP and knit the next one. way:
Rows No. 1-2: st. b/n;
Row No. 3: 6 tbsp. b/n, 6 rapports: “next. pet. we knit the bases 1 tbsp. b/n, 2 VP, 1 tbsp. s/2n, 2 VP and 1 tbsp. b/n, in parallel, using a column s/2n, we grab the first half of the heart (marked with arrows in the diagram), in the next. 4 pet. We knit the bases according to the 1st tbsp. b/n, next warp loop - 1 tbsp. b/n, 2 VP, 1 tbsp. s/2n, 2 VP and 1 tbsp. b/n, at the same time grabbing the second half of the heart, 11 tbsp. b/n". After last we knit 6 regular stitches for the heart. b/n. The border is ready!
Original border with pompoms

Step-by-step knitting:
- We collect the flail. for 6 VP.
- We dial 3 tbsp. s/n in the 3rd VP from the hook. Total - 4 pets. on a hook.
- We make a RN yarnover and pull it through all the loops on the hook.
- Again we collect 3 VP.
- Lastly pet. the previous group of 3 tbsp. s/n again knit 3 tbsp. s/n and repeat all steps. We get another “cluster”.
- We knit a SS in the stitch from which the first “cluster” began. We do this so that 1 tbsp. s/n remained behind, and two - in front. This order also applies to the first cluster.
- Again we collect 3 VP. We attach them with SS to the place of attachment to the main canvas.
- Repeat steps 1-7 the required number of times until the entire fabric is tied with a border of miniature pompoms.

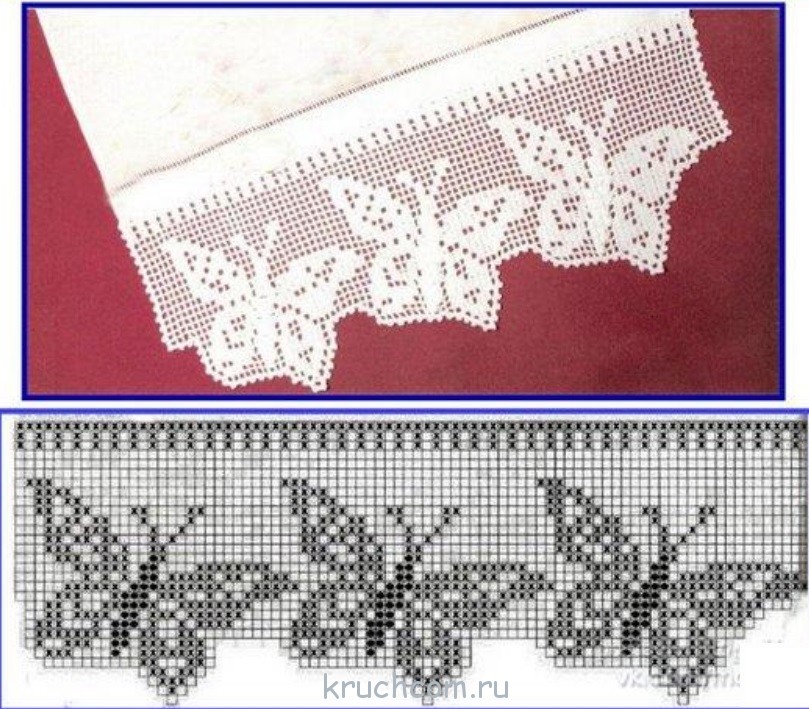
Exclusive border with butterflies
The amazingly beautiful border with butterflies as if fluttering across it captivates many needlewomen. By the way, its knitting is not extra-heavy, so not only professional craftswomen, but also beginners in crocheting can practice knitting such an openwork border.
The knitted border is knitted in cross stitch. Openwork butterflies are knitted along the edge of the fillet mesh. After the main part of the border is ready, you need to knit laces from VP, which subsequently tie the chains of air loops inside the butterflies, thereby forming a clearly defined body and antennae of the butterfly.
To knit such a border, it is best to use the finest cotton threads, then the work will look extremely delicate and airy.


Knitting pattern:

Knitting progress:
- We collect the flail. at 33 VP. From the 9th ch from the hook we begin to knit with a fillet net (st. s/n + 2 ch), skip 2 stitches between the stitches. In total you need to knit 5 tbsp. s/n.
- After the fifth st. s/n we dial 2 VP, skip two pets. on a chain and knit st. b/n.
- We cast on 2 more VPs, skip two pets. on a chain, knit st. s/n.
- Cast on 2 ch, skip 2 stitches. Until the end of the row we knit according to st. s/n in each pet.
- We knit according to Art. s/n in next 3 tbsp. s/n PR.
- We dial 2 VP, knit st. s/n in next Art. s/n PR.
- We cast on 5 VP, knit st. s/n in next Art. s/n and then 4 more cells with fillet knitting.
- In the last loin cage PR - knit 3 tbsp. s/n.
- We cast on 4 VPs and unroll the knitting.
- We knit 3 tbsp into an empty fillet cage (after the cage with PR posts). s/n.
- Next we knit with fillet cells until an arch of five VPs (i.e. 3 fillet cells).
- We dial 2 VP, knit st. b/n in the third pet. on an arch of five VPs.
- We collect 2 more VPs, finishing the row: 1 tbsp. s/n + 2 VP + 4 tbsp. s/n.
- We start all rows on this side with the same knitted combination: 3 tbsp. s/n, 2 VP, art. s/n. Then - an arch of 5 VPs.
- We knit 2 fillet cells: st. s/n + 2 VP + st. s/n + 2 VP + st. s/n.
- Above the trail with the fillet cell PR we knit 3 tbsp. s/n. We cast on 4 VPs and unroll the knitting.
- We knit 3 tbsp. s/n in the first empty fillet cell PR + 1 tbsp. s/n in next Art. s/n PR.
- We cast on 2 VP, knit st. s/n in next Art. We finish all rows on this side of knitting with a trace. knitted combination: 2 VP, st. b/n in the arch, 2 VP, art. s/n in a column, 2 VP, 4 tbsp. s/n.
- We cast on 3 VPs and unroll the knitting.
- We knit according to the pattern (st. s/n, fillet cell, arch of 5 VP, st. s/n in st. PR), then cast on 2 VP, knit st. s/n in next Art. PR.
- We cast on 2 more VPs, in the corner knitting arch - 3 tbsp. s/n, 2 VP, 3 tbsp. s/n.
- We cast on 8 VP, knit 3 tbsp. s/n, 2 VP, 3 tbsp. s/n in the lower one is another arch from VP. We cast on 3 VPs and unroll the knitting.
- We knit 3 tbsp. s/n, 2 VP, 3 tbsp. s/n into the central loop of the arch from two loops of the previous step.
- We cast on 10 VP, knit 3 tbsp. s/n, 2 VP, 3 tbsp. s/n in the arch of 2 VP step No. 23.
- We dial 2 VP, knit st. s/n in after. Art. filled cell. We finish the row according to the pattern (loin cells, an arch of 5 VPs, 4 treble s/n).
- We cast on 3 VPs, unfold the knitting, and knit a row according to a familiar pattern.
- After 3 connected fillet cells, we cast on 2 VP, knit 3 tbsp. s/n + 2 VP + 3 tbsp. s/n into the nearby corner arch of 2 VPs (this will be the right wing of the butterfly).
- We cast on 12 VP, knit 3 tbsp. s/n + 2 VP + 3 tbsp. s / n into the underlying arch of 2 VP (left wing of the butterfly).
- We cast on 3 VP, knitting turn.
- We knit the last. row of butterflies: shells - into shells, between them - a flail. at 14 VP.
- Next we knit the row according to the known pattern. We cast on 3 VPs and unroll the knitting again.
- We knit 3 tbsp. s/n, 2 VP, art. s/n, arch for 5 VP, 5 fillet cells. Raise 3 VP, knit as the very first row. Repeat the pattern until the border reaches the required length.
- Let's start with the antennae of the butterfly. We collect the flail. at 25-30 VP, carefully hide the tails of the threads inside. We tie all 4 arches from VP with a chain (you can use a regular knot). We get a clearly defined butterfly. To decorate a butterfly, its larger wing can be tied with a picot. Ready!
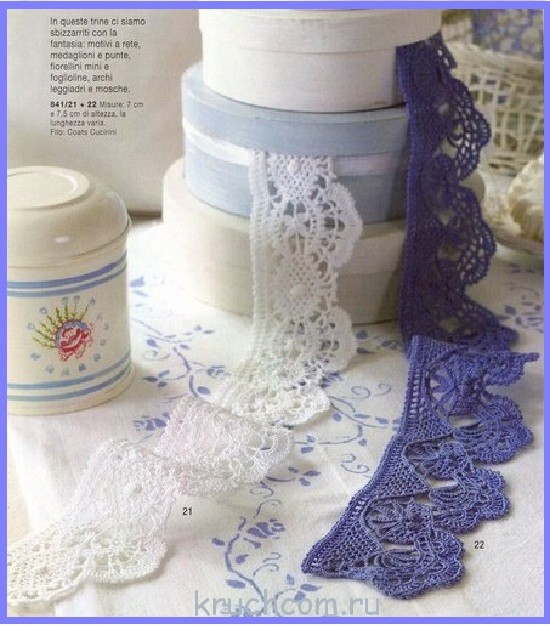
A selection of border knitting patterns for your creative inspiration


Video master classes on the topic “Crocheting borders”
For those who find it more convenient to work with video tutorials, we provide detailed master classes on knitting all kinds of borders:
To give a newly knitted item a finished look, you need to carefully tie its edge. At the same time, the knitted fabric will stop curling, since its edges will become rigid, and the old item will take on a completely new look. This fairly simple job can be done in various ways.
We bring to your attention video tutorials that tell you how to properly tie the edges of knitted items in various ways. They are not difficult to master, and soon you will be able to give your work the beautiful look that it acquires after binding.
Very simple edge binding, quite understandable for beginners. The first row is knitted with single crochets, in the second and third rows a French mesh is formed, and on the fourth row fans are made, consisting of eight double crochets. This row turns out to be the most beautiful. The result is an edging with a pattern made up of semicircular elements, the basis of which is connected fans.
For any fabric, it is enough to knit the first initial row, and then you can form the pattern. It makes a good edging for robe collars. It is simply sewn to the base material.
Video lesson:

The edge tied in this way becomes smooth and dense, reminiscent of a pigtail. This method is used to tie the armholes and necklines, the edges of the sides of knitted clothes created by knitting or crocheting. This seam is used to strengthen the edges of pockets and scarves. The method got its name because it is formed not in the usual direction from right to left, but on the contrary, as if moving backwards.
You can use the same thread for tying that was used to knit the item itself, but this thread can be taken in a different color: colored edging looks neat on any knitted item, decorating its overall design with an unexpected frame.
Video lesson:

This beautiful trim consists of small pom poms, each of which is attached to the edge of the material with two posts. The result is a zigzag pattern, with a neat pompom at the top of each zigzag. The pattern looks very beautiful and formal. It can be used to decorate large items such as knitted blankets, shawls or pillows.
The use of pompoms creates a design that complements and highlights the knitted pattern that was used on the base item. Despite all the apparent complexity of the pattern, it is created very simply and is quite accessible even to beginners.
Video lesson:

This method of tying the edges of knitted items is extremely simple, but looks impressive. From four single crochets a small bead is formed, dense and neat. A whole series of such beads, located close to one another, can decorate tightly knitted items, but they can also be suitable for patterned blankets or shawls.
The binding is not necessarily done along a straight edge; you can also tie patterned surfaces and even wavy edges. The resulting voluminous edge binding looks very beautiful if it is made in a different color, contrasting to the color of the main knitting thread.
Video lesson:

If you want to not only strengthen the edges of a knitted item with a binding, but also decorate them with an interesting pattern, try this knitting option. Simple columns are used to form their interweaving, resulting in a pattern with arches and openings repeated in two tiers.
Despite the complexity of the pattern, it is quite simple to obtain it - you just need not to get confused in the alternation of loops and in the arrangement of repeating columns. The pattern can be based on a completely arbitrary type of knitted loops; you can edge any knitted item with it, regardless of whether it was crocheted or knitted. It will still turn out beautiful.
Video lesson:

Five single crochets crocheted in the same stitch form a neat little shell, with the loops making up the edge and the stitches making fan-shaped waves, just like on a real shell. This is a simple and interesting way to crochet the edge of a product, giving the edge of any knitted item an interesting look.
It is especially impressive if the shells are knitted from a thread of a different color than the main product; the resulting contrasting pattern perfectly frames any knitting. Even if the product is obtained by the simplest knitting method, its edging in a similar way gives it an interesting and unusual look.
Video lesson:

Crochet edges for napkins or handkerchiefs are offered in several options. Napkins can be any kind, linen or silk; depending on the thickness of the fabric, the thickness of the thread used for edging is also selected. It is quite possible to use spool thread number 20-30 to match the napkin or in a contrasting color.
The scarf is cut from fabric strictly in the direction of the threads. One thread is pulled out one centimeter from each edge, and using the resulting grooves we begin to make a binding. A chain of loops is created along the edge of the napkin, which become the basis of the pattern created from threads.
Video lesson:

By periodically turning the knitting over and using the instructions for creating the pattern, we get a fairly thick cord along the edge of the knitted item, resembling a caterpillar in appearance. A method is also proposed for knitting such a pattern without turning over the entire work, with intercepting the hook, which is convenient if you are knitting an oversized shawl or blanket that is inconvenient to turn over.
It describes in detail how to get a “caterpillar” on indirect, rounded knitting edges, both convex and concave. Sleeves, collars, the bottom edge of the product and even the edges of hats are tied in this way. The result is a very decorative pattern.
Video lesson:

A small pattern is knitted from half-stitches, fastened on every third stitch of the row, and two loops are skipped. The result is an edging of repeating small semicircles, following one after another. This border can also be knitted in the round; detailed instructions are also given for this.
A large border will not come in handy for every item, but I still want to somehow improve the appearance. In this case, a small border is ideal, which can be knitted from the same thread as the item itself, or from yarn of a contrasting color. It is quite possible to decorate even a patterned knitted item with such a border.
Video lesson:

We offer a master class on knitting borders. In every third loop of the item being tied, a set of stitches is made, which forms small neat semicircles. The result is a simple, but very pretty edging with a pattern of small semicircles.
This pattern can border both continuous and patterned knitting, and organize the edges of blankets and shawls, sweaters and cardigans. It will add elegance and airiness to any pattern of the main fabric, harmonizing perfectly with any basic knitting pattern. The border has a wave width of three loops, is not too conspicuous and serves as a modest decoration.
Video lesson:
Crocheting is such a broad art that even crocheting the edges of a wide variety of products allows you to choose from a variety of possible options. Moreover, such a detail as a crocheted border can give a simple thing, like the most ordinary dress or blouse, an elegant, sophisticated look, or, conversely, turn it into a ridiculous-looking item that you don’t want to wear, even if it turns out to be the only one in your wardrobe. Therefore, it is so important to learn how to combine crochet styles and successfully apply them to the details that play a role in shaping the style - the edges of the product, crocheted.
Tablecloths, handkerchiefs, napkins, towels, curtains, sleeves and the neck of any wardrobe component will look completely new if you choose the right pattern for crocheting the edges. By the way, this technique is also used if there is a need to “hide” the mistakes of the craftswoman, which can be easily seen with the naked eye on the edges of the products. And also finishing the edges with different knitted patterns can give a second life to any old thing that you don’t want to part with.
Crocheting the edge of a product - diagrams and description
Choosing the right pattern on the border is already half the success. This issue has its own subtleties that are important to consider when choosing a pattern for the edge of the product:
- Narrow border (up to 1.5 cm) - suitable for light knitted items with openwork motifs, and also ideal for children's clothing;
- Border extending into the collar (5-8 cm or 15-20 cm) - goes with most knitted items.
- Wide trim pattern (1.5 - 4.5 cm) - looks good on products made from medium-thick yarn, namely on the edges of the sleeves and neck of jumpers and pullovers.
A beautiful pattern along the edge can be knitted directly when creating the whole thing - then you won’t have to worry about adjusting the openwork ribbon to the product, but you can sew on a finished border by knitting it in advance. The choice here is quite simple.
But the options for patterns for tying the edges provide much more space. So, what are the possible options for finishing and decorating the edge of a crocheted product for needlewomen?
- Rachy step

Popular articles:
The most favorite option for crocheting edges among beginning knitters is the crochet step, consisting of single crochets, which are knitted from left to right: starting to the right of the working loop. This pattern allows you to maintain the original shape of the canvas, preventing the edge from stretching. This method of tying edges also has its own variations.
Walking step from left to right
The hook is inserted into the first loop on the right and a single crochet is knitted. Insert the hook into the next loop on the right and knit a single crochet again. And so on until the end of the row.
Walking step from right to left
This option for tying the edges is considered more complex, but also more familiar. With the working loop on the hook, insert the hook into the loop on the left and grab the working thread. Pull the yarn through and with both loops on the hook, turn the hook nose counterclockwise (see diagram above). After twisting the loops on the hook, make a yarn over and pull it through both loops on the hook. With one working loop on the hook, insert the hook into the loop on the left (moving away from you) and grab the working thread. Pull out the loop. Twist the loops on the hook again, yarn over and pull it through both loops on the hook. Continue in the same manner. The resulting rad should look something like this.
- Pico
 Pico crochet patterns.
 Picot binding consists of chains of several air loops closed in a circle - from three or more. These loops are ideal for tying cuffs and sleeves.
A row of picots is made on the front side of the product. Make 1 chain stitch, skip the first single crochet, work 1 single crochet into the next single crochet. Work a chain of 4 chain stitches, then do a half double crochet in the first stitch of the chain to make a picot. Work 1 single crochet into each of the next 2 single crochets. Continue knitting a picot and 2 single crochets around the edge of the piece in the same way. There are also several other picot knitting options (see diagram above).
- Arched frame or Shell

The pattern is created by knitting loops of different heights with the highest loop in the center. The shell can be made in a row, connected with single crochets, half double crochets and double crochets. The binding is performed on the front side of the product. Make 1 chain stitch, work 1 single crochet into the next stitch. Skip 1 stitch, do 1 half double crochet, 3 double crochets and 1 half double crochet, all in the next stitch. Skip 1 stitch and work 1 single crochet into the next stitch to secure the edge of the shell. Continue tying the edge of the piece with shells in the same way.
- Border of decorative openwork patterns
Here the shape and all kinds of patterns are not limited by anything except the imagination and capabilities of the knitter. There are many options for crocheting an openwork border, from simpler ones to incredibly complex ones. Often they are crocheted separately from the entire product and then sewn to the desired edges. Let's look at several schemes and ways to use them on different things.
Neck strap
Very often, needlewomen are looking for ways to crochet the neck of a sweater or cardigan so as to hide the open sections of the product, and at the same time the item takes on a more interesting and special look. There are many ways to do this; you just need to choose from dozens of schemes the most suitable harness in style. Let's look at a few examples of how to beautifully crochet a neckline to improve the look of a knitted item and not ignore the principle of completeness.
- Quick neck tie

This step-by-step design option is suitable for beginners and those needlewomen who do not have time to perform more complex neck processing. It turns out beautiful and simple.
The knitted product can be decorated with a neck made in a circle, or the ends of the neck can be connected with a seam.
We take the finished fabric and, using a crochet hook from the wrong side of the working thread, pull out a loop to the front side.
In this way we put several loops on the hook. Important: the loops should not be cast on loosely.

Then these loops are transferred to the knitting needle, after which we continue to pick up loops using a hook. We pull out a loop with a crochet hook, throw it onto a knitting needle, etc.

The loops are cast on. Now we knit the first row in such a way that there are facial loops on the wrong side, and purl stitches on the front row. If we knit the neckline in a circle, we knit the purl loops. If with a seam - facial ones.

If you want to achieve a “factory effect” of connecting the collar to the product, we knit the first row with knitting needles like this: on the wrong side of the product, the first row is knitted with knit stitches (on the front side the loops will be purl), and then the first row on the front side looks as if the collar is knitted with a needle.
According to the first option of knitting the first row, the following result is obtained:

Then we knit a neckline of the required length. If this is a loop lapel, we close it with knitting needles or crochet, as desired. If it is a stand-up collar, it is better to close the loops with a needle.
- Beautiful neck finish

This is also a simple version of crocheting a beautiful edge, in which the most difficult and important thing is to correctly calculate the pattern repeat.
The height of the rapport is the width of the bar. The width of the repeat is the number of loops by which the number of loops of the entire length of the neck is divided without remainder. For example: the height of the bar is 16 rows. 16/2=8. Rapport cannot be less than 8 loops. On 8 loops we will have an openwork decker.
In this case, the neckline is 180 stitches. The selection method was used to determine the repeat of 12 loops 180:12=15. 15 repetitions of rapport.
It is better to have 2 additional loops for sewing the strip. In my case this is not the case, but the difference in the neckline pattern at the shoulder line is not noticeable.
You need to knit according to the following pattern, which shows only odd rows:

- Floral pattern

The pattern for tying is a bush made from a chain of three air loops and two double crochets. It is knitted from one point - the base of the chain. The bushes are secured with a half-column at a certain distance from each other (for example, in two loops of the securing row of the neck). At the beginning of the row, you should make one air loop for lifting. Follow the pattern.

Beautiful sleeve treatment
Often, crocheting a sleeve is done in the same pattern as the neckline - this way the item is designed in the same style, which means it looks harmonious. Let's try to knit several easy-to-make patterns.
- Scallops for sleeves

First of all, cast on a chain of 5 chain stitches.
Insert the hook under the cast-on chain, grab the working thread and pull out the loop.
Grab the working thread again and knit the elongated loop. This is how the first single crochet is obtained, connected from under the chain, and there are 2 loops left on the hook.
Knit the elongated loop, adding another loop to the hook.
When there are 11 loops on the hook, grab the working thread and knit all the loops from the hook.
Now secure the scallop by knitting a single crochet, leaving 3 stitches from the beginning of the scallop. Knit scallops to the end of the row, following the step-by-step photo.

It is necessary to work according to the following scheme:

- Large lace border

At the beginning of the row, tie a chain stitch. Insert the hook under the nearest braid of the edge to be tied. Knit a single crochet. Knit the air loop again.

Insert the hook into the front loop of the top braid of the single crochet stitch knitted earlier and then insert the hook into the left side loop of the same single crochet. Insert the hook under the nearest braid of the edge to be tied. Pull out the loop. Pick up the thread and knit a single crochet. You need to repeat from points 4 to 8. The result is a binding around the edge that, due to its elasticity, will not tighten the bottom of the product.

Bottom of the product
You can crochet the bottom of a product in a variety of ways, but we will consider one of the easiest options, and a more complex and beautiful method of crocheting, suitable not only for knitted items, but also for towels, tablecloths and other products made of material.
- Trimming the bottom of a Pico item

Along the edge of the product, start knitting with two single crochets.
Next, make 3 air loops and point the hook at the base of the single crochet stitch as shown in the photo. Then again perform two single crochets and 3 chain stitches after them.

- Floral border

The row with the floral motif is knitted as follows: 3 ch. lifting, 3 dc in the first arch from vp, 1 dc in the next arch. We begin to knit a flower: 3 ch, 3 unfinished dc on one base loop, knit all the loops on the hook = 1st petal. 4 ch, remove the hook from the knitting, insert it into the upper part of the knitted group of stitches from right to left, grab the last loop of the chain and pull it through all the loops = ring.
Next petal: *3 ch, 2 dc in a ring, 3 ch, sc in a ring* (= 2nd petal), repeat from * to * 2 more times. Last petal: ch 3, 3 unfinished dc, knit all loops on hook (= 5th petal). The flower is ready.
3 DC through one arch of the previous row, 1 DC into the next arch, and begin to knit the next flower.

Video lesson
Decorating the edges of crocheted items is not an easy task, because first you need to choose a beautiful pattern, then knit it correctly and without unnecessary broaches, and then sew it so that it looks perfect, and most importantly, in its place. It may be difficult for novice craftswomen to cope with this task at first, but do not despair. You can always “peep” the secrets of this craft from more experienced craftswomen.
Crocheting the edge of a product video:
The final stage of knitting many products is tying its open edges. This measure is necessary to give knitted items neatness and completeness.
Areas of application for borders
According to the dictionary, a border is a strip along the edge of the canvas, differing from it in color, texture or pattern. Often, the border serves decorative purposes. It emphasizes the festive purpose of clothing or knitted interior items. The most convenient way to make a crocheted border. Schemes for implementing any ornament can be easily found online.
Most often, borders are used on items of clothing or interior decoration, but there are frequent cases of using this element in techniques such as scrapbooking, decoupage, sewing dolls, making jewelry and other crafts.
Using borders to decorate clothes
The lace of some ornaments are presented below) greatly decorates the clothes. It is used to decorate the bottom edge of the product, sleeves and necklines. Quite often, the product itself is knitted with a simple, uncomplicated pattern, and the main emphasis is placed on the lace border. This is true for skirts, dresses, sweaters and pullovers.

Speaking about the use of borders when knitting skirts, one cannot fail to mention the excellent opportunity to turn the border into a series of openwork ruffles. The crochet border (it is better to choose wider patterns for such models) has an uneven edge, which gives the ruffles additional volume, lightness and airiness. To create ruffles, the border is tied or sewn onto the main fabric in tiers. In this case, the free edge of each tier slightly overlaps the first rows of the next one.
The practical idea of adjusting the length of children's clothing is also very popular. When skirts, pants and shorts become short, but are still suitable for the child in other sizes, it makes sense to extend their service life. For this purpose, a border is crocheted to the bottom edge. The patterns for this kind of canvas are chosen to be simple, and the width varies by the number of rows.
Border for decorating tablecloths and napkins
The border owes its extreme popularity to the efforts of previous generations of knitters, among whom pillowcases, tablecloths, curtains, towels and other textile items decorated with knitted stripes were considered the height of fashion. Many of these traditions have carried over to the present day.
The openwork border must be consistent with the style and ornament of the main fabric of the tablecloth) can be knitted in a circle or using right angles, just like the border for processing the edges of napkins.

When tying towels, only the end edges are bordered, so there is no need to knit the corners.
Certain aspects of knitting borders
Based on the characteristics of the manufacturing process and appearance, the border can be:
- Rovnoy.
- Circular.
- Angular.
- Transverse.
As for the first type, everything is elementary here. The length of the border corresponds to the length of the edge, there are no corners. The edges remain free or are sewn together.

The circular method of knitting a border is similar to the process. It is important to follow the principle of correct expansion of the fabric. An excessive number of stitches will result in a “skirt” and the outer edge of the border being too wide. At the same time, insufficient addition prevents the formation of a round border shape. Its outer edge will be drawn out, and the canvas will be disproportionate.
Corner and transverse border
The photo below shows an option for decorating the corner of a textile product with a border.

An important feature of such patterns is the expansion of the canvas in a certain place, and not along the entire row, as in circular canvases. Successive additions create a 90-degree angle and ensure the correct appearance of the border. These crochet border patterns (corner formation patterns can be developed independently) are suitable for processing the edges of any products. When calculating the knitting pattern for the edge corner, you should carefully check the number of repeats in each edge between the corners. Mistakes are fraught with incomplete and “truncated” rapports. Correct calculation is only possible with preliminary knitting and measurement of the control sample. This is especially true for knitting this type of blanket (patterns are often not very complex).

A border knitted across is one of the classic types of such decor. Its specificity is in the direction of knitting. In the photographs below you can see that the width of the canvas is the width of the border, and the height of the canvas is the length of the border.

The main pattern is a fillet grid with empty or filled cells. The formation of the openwork edge of such canvases occurs by reducing or adding the number of outer cells.
Non-standard use of border
The development of new types of hobbies and varieties of handicrafts has led to a certain merger of many branches of applied crafts. Therefore, it is not surprising that crochet borders (completely different patterns can be used here) are used to decorate postcards, notebooks, albums, chests and caskets.
More common and, one might say, traditional is the use of borders for sewing dolls or soft toys and decorating their clothes.
On the Internet you can find many photographs of costume jewelry and accessories, which are based on border patterns. Knitting narrow long ribbons makes it easier for craftswomen to create belts, scarves, bracelets and necklaces. This shape is very suitable for making gift potholders, aprons or bookmarks.
To give rigidity to the border, it is impregnated with specific solutions. Usually this is PVA glue, gelatin or starch.
There are many uses for crochet borders. A huge plus for such an element as a crochet border is its versatility. The border will serve as the finishing touch for a tablecloth, an embroidered towel in an ethnic style, or a fashionable stole. Even if you tie the most boring rectangular piece of plain fabric with a border, it will instantly turn into a designer tablecloth. An angular lace border, crocheted from a thin thread, can give the product a simply fabulous look. And for a knitted skirt or dress, a border connected at the corners will create an interesting silhouette. Fortunately, crocheting lace is relatively easy - even for beginners, there are many different patterns on the Internet.
The final point for some items of clothing, tablecloths, shawls is the crocheted border. This element allows you to give a knitted item a finished look, as well as airiness and lightness. This is due to the fact that crocheting allows you to create beautiful, lush and expressive loops and arrange them in interesting patterns.
The final point for some items of clothing, tablecloths, shawls is the crocheted border
Most needlewomen decorate tablecloths with borders. This element adds solemnity to the tablecloth. A wide border knitted using the fillet method looks very impressive.
During the work you will need:
- hook No. 2;
- cotton yarn suitable for hook number 2.
Step by step description:
- The first step is to assemble an air-loop chain of 183 elements, of which the last 3 are used as lifting elements.
- Then the first row is knitted. A slip stitch is made into each loop.
- Rows 2-53 are knitted based on the presented pattern: in filled cells, 3 double stitches are made, and in empty cells, one and an air-loop pair.
- Each row should begin with 3 lifting loops and end with a double crochet.
- Knitting ends with 5 single crochet stitches in every second cell.

Most needlewomen decorate tablecloths with borders
Knitting a wide border requires some experience and knowledge of certain features.
Loin cloth requires the following important rules to be followed. Otherwise, the connected pattern will differ from what was intended.
- When crocheting the fillet, the hook should be inserted into the middle of the column. Under no circumstances should the instrument be placed in the 2 half-loops located at the bottom. If you ignore this rule, the columns will shift.
- The French mesh is knitted only in an air-loop arch. As a result of this technique, the cells will resemble a chess field.
- The fillet border can be knitted with absolutely any thread.
- You can use French mesh patterns to knit a pattern lengthwise or crosswise. The direction will depend only on the location of the patterned elements.
If the described rules are followed, you get a beautiful wide edging for the tablecloth, which can be used to decorate knitted and fabric fabrics.
Openwork edging for a crochet skirt
Such edging can be a wonderful addition not only to skirts, but also to women's dresses. Interestingly, a wide openwork edging can act not only as a decoration for a piece of clothing, but also to increase its length. In the knitting process, you will need any yarn and a suitable hook for it.
Knitting edging for a skirt or dress should be carried out according to the following instructions:
- The first step is to assemble an air-loop chain, the number of elements is a multiple of 11 with the addition of 3 lifting loops.
- The first row is knitted with a fan: in 4, and then in every 6 loops, 5 double crochets are made, and an air loop is knitted between them.
- The second row begins with 3 lifting loops, 2 yarn over columns, which are tied into one loop. Then a single-crochet stitch is made 1 row high, 1 chain stitch, chain stitch, chain-loop pair, 2 chain stitches, chain-loop pair.
- Rapport must be repeated until the end of rows 2 and 3.
- The fourth row is formed only by single columns.
- The fifth row is made according to the scheme of the first.
The knitted border should be sewn to a knitted product using the same thread, and to a linen product - with a needle. Stitching is done from the inside out.
Simple narrow border for a crocheted blanket
One of the simplest ways to create a border for a blanket is to tie its edge. Most often, shell canvas is used for this.
It is knitted according to the following instructions:
- Air loops are assembled along the edge of the finished product.
- Then 5 cap posts are pulled into one air loop. The columns are knitted in every 5 loops, and between the shells a gap is made from an air-loop pair.
- In the next row, the shells are knitted into air loops, and a gap of 2 connecting loops is made between them.
- Using this alternation, a shell pattern is obtained, arranged in a checkerboard pattern.

One of the simplest ways to create a border for a blanket is to tie its edge
In this way, not only a simple narrow edging can be knitted, but also a wide one. The width of the product depends only on the number of rows assembled.
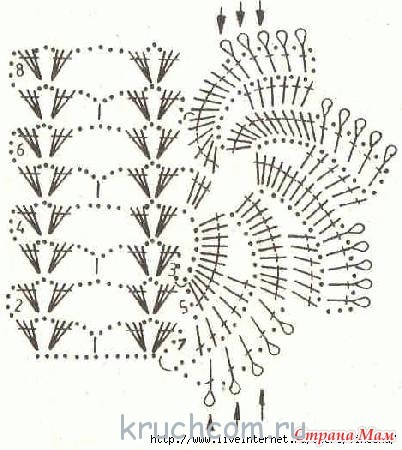
Crochet shawl border: diagram and description
A crocheted fringe border is suitable as a border for a shawl. This detail will add lightness and softness to the product.
How to link:
- An air-loop chain of 23 elements is assembled.
- The first row is made according to the following scheme: 3 double stitches with the 7th loop, 3 chain stitches, 3 double stitches in the same 7th loop. Then 1 double crochet is made into the 11th loop, and then in the interval from 12 to 19 loops 8 double crochets are knitted, 3 double crochets in the first loop, 1 chain loop and 3 more double crochets.
- The second row is formed from 6 lifting stitches, 3 double crochets with the first chain crochet, 1 chain crochet and 3 more double crochets. Then an air-loop arch is made from 15 elements and 3 cap columns, an air-loop arch is made from 3 elements.
- The third row is made from 6 lifting loops, 3 columns with 1 double crochet, 3 chain loops and 3 chain stitches (main pattern), then an air-loop arch is made from 3 elements, 9 chain stitches, 6 lifting chain loops. Then comes the main pattern and an arch of 3 air loops.
- The fourth row begins with 6 lifting loops, the main pattern, an air-loop arch of 15 elements and 3 slip columns. Then an arch is made from 3 air loops.
- Then knitting occurs according to the pattern: even ones repeat the report of the 3rd point, and odd ones - the 4th.

A crocheted fringe edging is suitable as a border for a shawl.
After making the main pattern, you can move on to processing the edges and creating fringe.
How to tie fringe?
Knitting fringe begins with preparing the edge for it.
This is done according to the following instructions:
- All teeth are connected along the edge. To do this, 5 air loops are knitted between each of them.
- The second row is built from 5 lifting loops, 1 slip column in 3 air loops, arches from 5 air loops. Then you should repeat the following rapport: 2 chain stitches, 1 chain stitch, 2 chain stitches.
- The third row is formed by 5 chain stitches, 1 double crochet. Then the rapport is repeated: an air-loop pair, 1 double crochet and another air-loop pair.
- In the final row, each loop is tied with a single crochet column.

Knitting fringe begins with preparing the edge for it
Then the fringe is made:
- The first row of fringe is made according to the instructions: 1 chain stitch, 1 single stitch.
- Then the repeat is repeated: 1 single crochet column, an air-loop chain of 15 elements, a connecting column made in the same loop of the row as the previous single crochet column.
- The completed fringe is secured with a neat knot.
Small crochet border (video)
Simple edge binding (video)
The finishing border is one of the most important decorative elements of knitted clothing and interior items. It is this element, when used in clothing, that allows you to emphasize your feminine nature, giving it elegance and chic. And in interior objects, these openwork elements have a decorative meaning, adding solemnity and sophistication to the objects they cover.