It won’t be surprising if a master class on what to give to friends and family for the New Year will soon be in demand. When you run out of ideas, you really want instructions to miraculously appear, and it becomes clear what to give, so that the gift is liked and remembered. Handmade gifts are good taste and an excellent sign of attention. And one of these gifts could be a New Year’s topiary.
Topiary is a decorative tree in a pot, usually with a round crown, a beautiful souvenir, the materials for which can be any objects. These include natural materials, handicrafts, and the most unexpected things.

New Year's topiaries can be a variant of a Christmas tree, decorated in an interesting way. But another bright topiary that will decorate your home or work area on the eve of 2018 is ball topiary.
Step-by-step instructions - how to make a New Year's topiary with Christmas balls:
- The materials you will need are the following: a foam cone, small Christmas tree balls, a fairly large candlestick, wide ribbon, hot glue.
- The candlestick in this MK is used instead of a pot. The more refined and elegant it is, the better it will emphasize the festive nature of such a topiary. Apply hot glue to the top of the candle holder. The foam cone must be firmly pressed to the place where the glue is applied. You need to hold the cone for some time so that it “takes” well.
- While the glue dries, you can work with the balls. The first thing you will do with your own hands is remove the metal fasteners. For such a Christmas tree topiary, it is important that the balls are well fixed and do not cling to anything.
- It's great if you prepare the cone for gluing the balls. Still, there can be, and probably will be, gaps, so the cone needs to be spray painted. For example, golden or silver, or maybe green with gold. Sometimes the cone is simply wrapped with thick golden threads with your own hands. There is no single method, one master class suggests painting, another – winding, a third – pasting with napkins.
- Grease the top of the ball with hot glue. The ball must be literally pressed into the cone, very carefully, but so that it has a good grip. Many MKs indicate that it is better to pour the glue somewhere so as not to take the gun every time. An unnecessary frying pan will do. The ball is simply dipped in glue in the frying pan, and this way the process goes faster.
- Slowly the entire surface is filled with balls, creating a Christmas tree. You can tie a ribbon with the numbers “2018” on the candlestick or just an elegant, beautiful one.

Ready! This master class is extremely simple, the main thing is not to put too much pressure on the balls, remembering their fragility. In the photo you can see the color combinations of this Christmas tree ball topiary.
New Year's topiary: ideas and MK (video)
New Year's topiary: master class
To create another interesting Christmas tree in a pot you will need yarn. By the way, this MK is suitable even for children; it does not use hot glue, which is dangerous for them.
You will need:
- Foam or cardboard cone;
- Skein;
- Scissors;
- Sewing needles;
- Very small Christmas balls;
- Round nose pliers;
- Pot;
- Small rod-trunk;
- Ribbon.
It is fair to say that such a tree is often not planted in a pot at all, but while observing a certain tradition, it is still worth doing everything more conservatively.
So, if you look at photos of such topiaries, you will see that it is better to take thick yarn, maybe embossed, or heterogeneous. But some Christmas tree colors should be visible in it - green, blue, white, light blue, silver, etc.

A DIY yarn Christmas tree is made like this:
- Secure a skein of yarn with sewing needles at the base of the cone. Attention, the cone must not be hollow! Please worry about this in advance.
- Gradually wrap the cone with yarn with your own hands, the turns should be tight, no gaps.
- The threads can be secured in place during the process with the same sewing needles.
- Having reached the very top of the Christmas tree cone, the thread is cut and fixed with a needle.
- Half the work is done. You can place the cone on the trunk. At the Christmas tree it should be very small, almost invisible. A piece of pencil, any small cylindrical object. Think about how to secure it in a foam cone. At this point, it is still better to use glue, but if the child is making the Christmas tree with his own hands, fix it with glue yourself.
- Now the tree needs to be inserted into the pot. In fact, you can use any flower pot, small and elegant. So the decor still awaits him; initially, color and texture are not so important.
- Usually the master class suggests using plaster or alabaster. And this is the most reliable option. Be sure to decorate the top plaster layer with either New Year's tinsel, or sparkles and other decorative things associated with the New Year.
- When the tree is in its pot, you can start decorating. Hang miniature balls on the yarn. An alternative to them is to make berries on needles, which are used in making jewelry. The top of the tree can be a star, also made by hand, for example, from twine or designer cardboard.

The pot can be decorated with the inscription “2018”, wrapped with beautiful ribbons with gilding or silver threads.
Christmas tree made of threads: New Year's topiary (video instructions)
New Year's topiary Christmas trees: step-by-step instructions
Good ideas on the eve of 2018 - soft Christmas trees. They are quite easy to make with your own hands, especially if you have already dealt with wool for felting.

And yet, what nuances may this master class have:
- If a foam cone is not found, make a cone with your own hands from cardboard. Paint it the same color as the fur to prevent any gaps.
- You need to stretch it to the very top of the cone a thick wire that will make such a “squiggle” at the top of the tree, with which the Christmas tree will be cute and cute.
- The trunk for the tree can be wooden skewers. The base of the cone needs to be glued onto skewers, after which they are painted brown so that they resemble a trunk.
- The result is a Christmas tree that needs to be planted in a pot.. Look at the examples in the photo; they use both beautiful expensive pots and ordinary plastic glasses that are decorated with fabric.
- A thin piece of wool needs to be separated from the total mass, and glue it to the squiggle wire. And from there the winding is carried out, so that there are no gaps.
A pot in the form of an unsightly container can be wrapped in beautiful corrugated paper or foil and tied with ribbon or tinsel.
Topiary for the New Year: master class with coffee
Coffee, or rather coffee beans, is such a universal material that it is perfect for the 2018 New Year’s topiary.

A master class using coffee will be similar to other instructions.
Master class - topiary for the New Year 2018 with coffee:
- For a change, you can stick to the idea of a round tree. The basis, therefore, will be any spherical blank. If you don't have a foam ball or a small rubber ball, a wad of newspaper tied with thread will do.
- The ball must be perfect, therefore, if it is not hard enough, it is covered with napkins according to the papier-mâché principle.
- Next, the ball needs to be painted with brown acrylic paint.. And after drying, you can start pasting with coffee beans. There are craftsmen who then specially paint over some of the grains with golden paint to make it look “2018”. It is better to glue coffee beans with a glue gun.
- The blank ball leaves space for fixing the barrel. The trunk for such a coffee tree can be made from a drumstick or a thick pencil tightly tied with twine.
- The trunk is fixed in plaster, which is poured into a pot. This must be done quickly and carefully.
Well, then directly what will make an ordinary coffee tree look like a New Year’s tree. Numerous examples in the photo offer several options at once. First, the pine cones lying in the pot. Ideally, you can paint them with a gold spray.

In some photos you can see beautiful ribbons with the inscription “2018” and Christmas tree prints. The Christmas tree can also show off like a picture on a pot. By the way, you can make a Christmas tree out of coffee beans on the facade of the pot.
The aroma of coffee and beautiful decor are a great gift for a coffee lover in 2018. Often such trees are used as an idea for a photo; photo sessions with such an accessory turn out to be very interesting.
New Year's topiary made from coffee beans in the form of a Christmas tree (video master-cash)
You can make your own photo or video master class, because many ideas come to mind while viewing someone’s work. One inspiring photo and you are ready to make your own Christmas tree topiary. Creative inspiration and interesting finds!
New Year's topiary (photo)


Almost everyone wants to make something with their own hands for the holiday. And if you haven’t practiced making topiary yet, it’s time to start. The New Year tree is traditionally made in the form of a Christmas tree. But the master class (MK) will tell you what the Christmas tree itself will be made of.
Lovers of such aromatic drink as coffee will definitely like this gift. But just a coffee topiary is too banal, let it be a coffee... Christmas tree!

To make it yourself, you will need:
- Coffee beans (about 200 grams);
- Cardboard cone and cardboard circle;
- Stick (pencil or skewer);
- Glue moment;
- Double-sided tape;
- Gypsum;
- Plastic cup for stand;
- Jute twine;
- Sackcloth;
- Ribbons and beads.
The first thing you will do with your own hands according to this MK is prepare the barrel. Take either a pencil or a skewer and wrap it with twine. After this, you put the finished cardboard cone on this trunk. This master class also offers such a solution - you can weave braids from twine, tie a thread in the middle to the braid, thread it through the top into a cone and secure it on a skewer.

Then fill the inside of the cone with napkins so that it is not hollow. This master class suggests taking napkins as a simple option, but it can be anything - cotton wool, fabric, etc.
Tape the cardboard circle underneath with tape. The base for the coffee Christmas tree is ready. Make sure it is strong enough, because the next step is to form the crown.
Coffee Christmas tree topiary: decorating master class
Glue the grains one by one, tightly to each other.
The master class continues as follows:
- The first layer of coffee beans dries in about half an hour, and only after this time can the second layer be applied.
- The crown is ready, now it, or rather the tree, needs to be planted somewhere, in some kind of pot. You can also do it yourself. Take a simple plastic cup, pour plaster into it, and place the Christmas tree in it. Make sure it is firmly in the pot.
- Now, following MK, the pot needs to be decorated, it should also be in an elegant form. You can do this like this: wrap the glass in burlap, use twine to weave another braid with your own hands and wrap it around the pot.
- You can also easily make a bow from twine, in the middle of which you can decorate with a coffee bead. Such bows can also be at the ends of a braid that you pulled out through a cone, like a Christmas tree decoration.

The main part is ready, and now you can improve this universal master class. For example, put fir cones in the top layer of the pot to cover the plaster. Or paint the same coffee beans with gold acrylic paint. This Christmas tree in the shape of a coffee tree will definitely surprise your friends and family.
Coffee Christmas tree topiary (video master class)
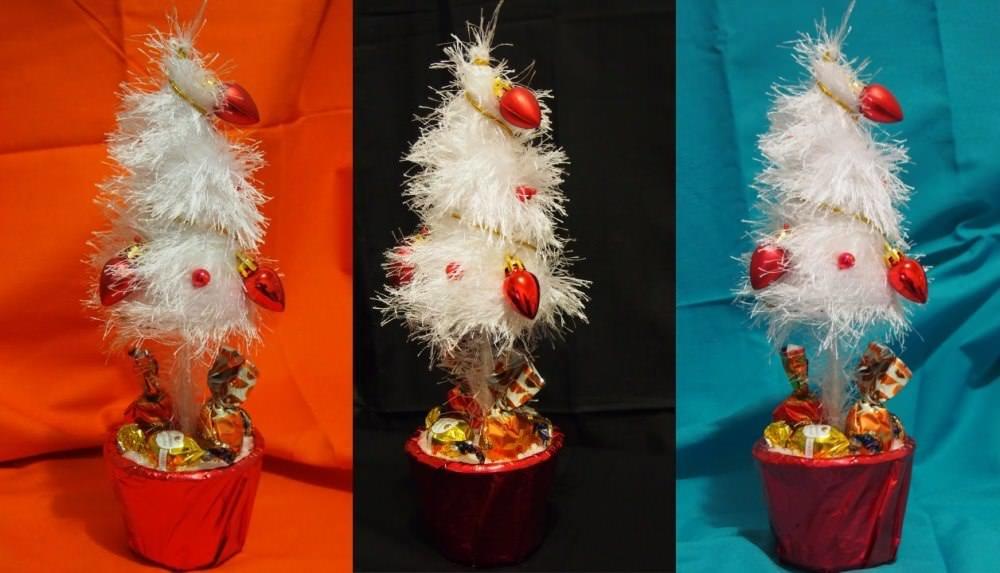
Topiary Christmas tree made of threads: original DIY decor
A Christmas tree made of threads is also, in its own way, a classic of the genre. There are many MKs that describe the process of creating such a tree. This may not be the most traditional topiary, since there is no traditionally high trunk, the pot can simply serve as a stand, etc.

Master class - Christmas tree made of threads:
- Ideal if you have a foam cone. It will be a better base and you won't have to worry about whether the topiary is durable or not. But if there is no such blank, you can make something similar with your own hands.
- Make a simple cone from cardboard or any other dense material. A papier-mâché blank will also work, although you will have to tinker with these.
- Almost no MK “undertakes” to paint a foam plastic cone, but another cone, the same cardboard one, needs to be painted to match the color of the threads (so that everything is uniform).
- The cone needs to be wrapped with thread. Which threads to take, decide for yourself - it’s better to be heterogeneous, for example, white-green, fluffy.
- Secure the ends of the threads with glue. To prevent them from “running away” during the work process, they can be secured to the base with pins. The winding goes in the “bottom-up” direction.
- When the entire cone is wrapped, secure the threads again with pins. To keep the spruce fluffy and nothing showing through from under the threads, wrap the threads in another layer.

Now the spruce topiary can be decorated. Decorative berries, beads, rhinestones, buttons - in the process of work it will become clear what will be useful.
Topiary Christmas tree made of threads (video master class)
DIY herringbone topiary: final design
It's time to make this New Year's tree look like a traditional topiary. This means it must have a trunk and a pot.
Use a wine cork as a stem. There are MKs that offer to simply paint the cork; you can wrap it with thread or twine. In a word, transform the cork with your own hands so that it looks like a trunk.
Next, the master class suggests gluing the stem plug to the cone. A heat gun will come in handy. Well, all that remains is to choose a pot. You can do this: wrap a regular plastic cup with sisal. Sisal has a pleasant texture, and you can choose any color. And then the master class is up to you: ribbons, lace, twine, mini Christmas tree balls, tinsel... You can decorate the pot with your own hands in a way that suits your spruce tree, which should blend harmoniously into your interior.

Here are a few more ideas from different MKs:
- Such a spruce also requires gifts at its foot! A small case with elegant decoration is the best master class for giving gifts for the New Year.
- Some MKs suggest combining the same threads and candies, or threads and coins as the top layer of a pot, so that financial success does not pass you by in the new year;
MK with spruce, the top of which is slightly twisted, is also popular; an aluminum cable will help create such a bend.
Decorating a Christmas tree topiary (video master class)
Such a tree will not only decorate your home. You can create something similar as a craft for kindergarten, the child will definitely be happy! And it will take only one evening to complete not the most difficult task.
Topiary Christmas tree for the New Year - design


New Year's holidays are a great reason to take a break from current affairs, meet loved ones and have a great time. Of course, a holiday cannot be complete without gifts, so we spare no effort and time to find the most unusual gifts and make decorations that fill homes with an atmosphere of fairy tales and magic. An excellent gift option or one that decorates a home can be the main symbol of wealth and well-being.
Yes, yes, we are talking about New Year's topiary, also known as the “tree of happiness”! Originally, the art of topiary was a landscape design concept, with the first mentions of it surviving in sources dating back to the heyday of the Roman Empire. Topiary (from the Latin “topiarius”) was then called a special craftsman who gave trees and shrubs a precise decorative shape - a square, a ball, a triangle, various animals, birds or fantasy characters.
New Year's classics - topiary made from pine cones, Christmas tree decorations or felt
Gradually, the baton was picked up by residents of European countries, and these days, topiaries have firmly settled in interior design and began to look like small trees made from a wide variety of components - dried or artificial flowers, beads, cones, grains, ribbons, parchment, buttons and much more. They are able to enliven any interior and give it a zest.
Moreover, topiaries are an excellent gift for those who are not too fond of caring for indoor plants. This tree does not need watering, and the dust from it can be easily blown away with a cold stream of air from a hairdryer. The main thing is to keep the topiary out of direct sunlight so that it does not fade over time. Let's look at several master classes on creating the most unusual topiaries that you can make and present to colleagues, friends or family for the New Year 2018.
Idea No. 1: Classic New Year's topiary
 This topiary is a Christmas classic for traditionalists.
 Classic New Year's topiary is an unusual alternative to a Christmas tree, made from twigs, cones, balls and beads! Place such a decoration on the table in the office - and you will immediately feel the holiday atmosphere; install it at home - and every time you look at the mini-Christmas tree, you will have the feeling that the most long-awaited night of the year is just around the corner. Making topiary is not at all difficult if you have prepared in advance:
- decorative acrylic paints in white and brown;
- glitter for applying contour patterns on fabric, ceramics, metal and wood;
- gold-colored pearl acrylic paint;
- artificial spruce branches;
- beads;
- small diameter New Year's balls;
- candlestick made of plastic or wood;
- wrapping paper;
- roll of tape;
- glue gun;
- a piece of household sponge;
- spruce or pine cones;
- sandpaper;
- tassels;
- spatula-palette knife;
- a ball of rope;
- scissors.
 To make a topiary you will need a basic handmade kit
 Step 1. Create a trunk. First, you need to give the candlestick a good sanding so that the acrylic paints adhere well to its surface. Using a sponge, apply a layer of brown acrylic and let it dry thoroughly. If the paint does not apply evenly, repeat the operation again. After this, put some gold acrylic on your brush and apply careless strokes to the protruding elements of the candlestick. After this, apply strokes of white acrylic in the same way.
 Creation of basic elements - “trunk” and “crown” of topiary
 Step 2: Making the crown. For the crown you will need several sheets of wrapping paper. It must be crumpled into a ball shape and secured with masking tape. After this, a rope is wound around the ball. You should not make a tight ball - the ball should be voluminous and have gaps between the threads.
 Christmas decorations for crafts should be decorated with glue and glitter
 Step 3. Decorate the decorations. We will decorate one part of the balls with snow, and the second with glitter. To imitate snow on Christmas tree balls, a little white paint is applied to the surface. It is better to do this with a foam sponge. Then take any chopstick (for example, a Chinese chopstick), string the balls and hang them to dry, placing the ends of the stick on glasses or the sides of a cardboard box. To cover the balls with glitter, you need to randomly wrap them with masking tape, and then apply glitter into the remaining gaps. We cover the pine cones and beads with a layer of white acrylic. This should be done by lightly patting the surface with a sponge.
 Decorating a topiary crown using decorative elements
 Step 4. Assembling the topiary. Using a glue gun, attach balls and pine cones to the crown of the topiary. Decorate the remaining gaps with spruce branches. When thinking through the decor, try to maintain the original shape of the ball. Now divide the beads into separate balls and glue them onto spruce branches, imitating berries covered with frost.
 Fixing the basic elements and final assembly of the topiary
 Step 5. Attach the trunk to the crown. Apply a layer of mass from a glue gun to the crown and top of the candlestick and lightly press the elements together. Your craft is ready! If desired, the trunk can be additionally decorated with a bright ribbon and a label with wishes and the name of the person to whom the gift is intended can be attached.
Idea No. 2: Topiary made of blue cord and candies
 Assembling a topiary crown from a cord and a foam base
 The New Year is associated not only with tangerines and Christmas trees, but also with sweets, so such a gift will definitely create the “sweetest” mood in the recipient. Of course, the candies in such a tree serve an exclusively aesthetic function, but it looks truly unusual and festive, and the blue and white tones are perfect for winter decor. To make topiary you will need:
- candies in a beautiful blue or dark blue wrapper;
- piece of cable;
- blue lace;
- a piece of foam;
- glue;
- scissors;
- stationery knife;
- corrugated paper;
- glue gun;
- cup;
- beads;
- awl;
- decorative braid or ribbon;
- sequins;
- small silver bell;
- wire.
 Step-by-step instructions for assembling a candy topiary
 The process of making topiary consists of the following steps:
- Step 1. Lubricate the flexible electrical cable with glue and decorate it with satin or paper tape, winding it in a spiral.
- Step 2. Attach a bell to a piece of wire, making a loop at the tip. Decorate the joint with ribbon, coat the wire with glue and wrap it with ribbon.
- Step 3. Use a utility knife to shape a piece of foam into a cone. Place a dot at the bottom of the cone with a glue gun, secure the end of the cord and wind it, pressing each new skein tightly. Periodically apply a mixture of glue gun to the cone so that the lace holds firmly to the cone.
- Step 4. Make a hole in the top of the cone with an awl, insert the wire with the bell, wind the lace to the end and secure with a glue gun.
- Step 5. Insert a cable decorated with ribbon into the lower part of the cone. Decorate the unfilled part of the foam with candies.
- Step 6. For the stand, you can use a small glass, which you need to cover with corrugated paper, attach decorative tape, rhinestones, beads and sequins. To make the topiary more stable, place a piece of foam plastic in a glass, make a hole in it and glue a wire leg.
Idea #3: Shell Topiary
 Making and decorating a topiary crown from shells
 Such a decorative topiary will certainly create the mood of a hot summer day, reminding you of the upcoming vacation and evoking dreams of warm sea waters, the sound of waves, yellow sand and juicy tropical fruits. To work on this craft you will need the following items:
- newspaper or wrapping paper;
- shells;
- pieces of coral;
- small pebbles;
- beads;
- glue;
- plastic glass;
- a small glass cup or vase;
- foam;
- Chinese chopstick;
- rope;
- gypsum.
 Making the stand and final assembly of the “sea” topiary
 - Step 1. Making the barrel. For this you will need a Chinese stick or just a branch from a tree. You need to apply a layer of glue to the stick or coat it with a mixture from a glue gun and wind the twine in a spiral.
- Step 2. Decorate the crown. Cut a ball out of a piece of foam plastic, which then needs to be covered with pieces of coral and shells. Next, cut the twine into small pieces, tie them into bows and fill the voids to cover the foam. Bows can be decorated with rhinestones or mother-of-pearl beads that look like pearls. You need to make a hole in the lower part of the crown, coat it with glue and place the crown on the prepared stick.
- Step 3. Making the base. For the base, you will need to dilute the plaster with a small volume of water, fill a plastic cup with the mixture and insert the trunk of a tree into it. Place the glass with plaster in a glass vase, first filling the bottom with an even layer of pebbles. Decorate the remaining voids on the sides and the top of the glass with shells, pebbles and beads. Your sea topiary is ready!
Idea #4: Coin Topiary
 Assembling the crown of a money tree from coins of the same denomination
 Small denomination coins are used less and less in circulation, because inflation leads to the fact that we almost always use paper bills for payments. Coins received for change in a store or public transport gradually settle in side pockets and at the bottom of bags, in the pockets of coats, jackets and jackets, and then are simply poured into some kind of box or vase, where they lie, useless to anyone.
However, they can be used as a decorative element when making topiary. Moreover, topiary made from coins is a real money talisman, because it will definitely attract prosperity to your home and direct a constant financial flow.” To make a craft, you will need to stock up on the following materials and tools:
- small coins. It is advisable to have money of the same denomination, so the topiary will look consistent and stylish;
- foam ball;
- foam;
- thick wire;
- golden satin ribbons;
- PVC glue;
- scissors, roll of tape;
- rhinestones;
- glue gun;
- cup;
- golden acrylic paint;
- plastic leaves.
 Assembling and decorating a New Year's topiary from coins
 When making crafts, follow these instructions:
- Step 1. Prepare the crown. Cover the foam ball tightly with masking tape. Attach the coins by applying the paste to the ball using a glue gun. It’s better to start from the top, placing coins in the manner of fish scales, that is, so that the next one overlaps the previous one a little. Leave a small piece of empty space at the bottom of the ball - the trunk of the money topiary will be attached here.
- Step 2. Making the trunk. Take a piece of thick wire and wrap it with gold tape, securing it with a glue gun.
- Step 3. Connecting the elements. Use a sharp awl to make a hole in the ball, widen it to the diameter of the wire-trunk. Apply glue and attach the trunk to the crown of the tree.
- Step 4. Decorate the crown. Glue gold rhinestones onto some coins. For this, it is best to use PVC glue.
- Step 5. Install the tree. Take a plastic cup and fill it with a piece of foam (you can use plaster of Paris for greater stability). The glass can be decorated with layers of gold-colored satin ribbon and decorated with petals or pasted over with several banknotes, covering them with a layer of glitter and sparkles. Attach a couple of petals to the tree trunk.
- Step 6. Decorate the crown. Cut satin or organza ribbon into small pieces and roll them into loops. Attach to the bottom of the topiary crown. Ribbons and leaves can be additionally decorated with small beads. Your home amulet to attract wealth is ready!
Idea No. 5: Walnut Topiary
 Materials needed to make the stand and barrel
 An unusually sophisticated composition that looks like a truly designer item, and is created from the simplest and most inexpensive materials. Any aesthete will be happy to receive such a topiary as a gift, so get creative by preparing the following items:
- foam ball;
- glue gun;
- white acrylic paint;
- twigs;
- foam sponge;
- artificial moss;
- flower pot or small vase;
- flat wooden stick;
- gypsum;
- walnuts;
- several thin hair ties.
 Stylish topiary made of walnuts painted with white acrylic
 Step-by-step instructions for making topiary:
- Step 1. Decorate the nuts. Using a foam sponge coated with paint, paint the nuts white. You need to press the sponge lightly to give the composition a slightly careless look.
- Step 2. Prepare the crown. Apply a glue gun to the foam ball and glue on a thin layer of artificial moss. After this, attach the colored nuts to the ball, trying to arrange them as tightly as possible. A small space should be left only at the bottom of the ball.
- Step 3. Making the trunk. Attach several branches to a flat wooden stick, securing them with hair bands.
- Step 4. Assembling the topiary. Make a small hole in the lower part of the crown, apply the mixture with a glue gun and insert the tree trunk there. Dilute the gypsum with a small amount of water, place the gypsum in a pot and lower the lower part of the trunk into it. Leave to dry. In order to hide the layer of plaster in a pot, glue some artificial moss on it, decorate it with white ribbons, add rhinestones or beads.
Idea #6: Vintage topiary
 Step-by-step instructions for making a stylish vintage Christmas tree
 If you have a friend who loves boho style or is crazy about vintage things, then this master class will become a direct guide to making a gift. Gilded lace and unusual decorations will help you create an unusual and stylish New Year-themed topiary, which can easily replace a festive Christmas tree. For this craft you will need:
- cardboard cone;
- glue or glue gun;
- a can of gold paint;
- textured lace;
- wooden stick;
- decorative lace;
- beads, buttons, unusual accessories;
- small pot;
- scissors;
- golden organza ribbons;
- gypsum.
 Decorating a vintage topiary with lace and fittings
 Making a topiary will not take much time. Follow the instructions:
- Step 1. Making the crown. For the topiary crown, use a cardboard cone. You need to apply a little glue to its top, and then wind the lace in a spiral, tightly fixing each layer. Make sure there are no gaps between the rows. When the crown is ready, apply a little gold spray paint to the lace - in our case, dense coloring is not necessary, even if the topiary has a somewhat careless appearance.
- Step 2. Prepare the decor. Lay out the fittings on a sheet of paper and paint well with gold paint. Set aside to allow items to dry completely. Cut organza ribbon into pieces and tie a few bows. Glue decorative elements in a chaotic manner onto the cone. Add some beads or beads.
- Step 3. Making the barrel. As a topiary trunk, use a wooden stick on which you need to wrap a decorative cord. Don't forget to fix it with glue. Apply glue to the inside of the cone where the top fits and attach the trunk to the crown.
- Step 4. Secure the craft. Dilute the plaster with water and place the mixture in a flowerpot, insert the topiary trunk and let the plaster dry. Decorate the flowerpot with a layer of lace, sprinkle a little gold paint and glue on a few decorative elements. The plaster can be covered with a layer of wood shavings or small beads. Vintage topiary is ready!
Idea No. 7: Topiary made from pine cones
 Christmas topiary made from pine cone scales
 Fir and pine cones look great as a decorative element when decorating your home for the New Year. We propose to make one of the most non-standard New Year's topiaries from them, which will instantly bring a festive mood to your home. For this craft you will need:
- cardboard cone;
- glue or glue gun;
- a can of gold or silver paint;
- glitter or sparkles;
- scissors;
- bumps.
 Step-by-step instructions for making a decorative Christmas tree
 New Year is a wonderful time when we remember everything that happened last year, set goals that we want to achieve next year, congratulate our family and friends, and give gifts. But what to give to your loved ones? After all, you want something unusual and original, so that the gift stands and evokes pleasant memories of the giver. One of the original gifts can be topiary - the “tree of happiness,” as it is sometimes called.


But how to make a gift topiary for the New Year? In this article we will make a New Year's topiary with our own hands using a master class.
Photos will be attached to the work to make it easier for you to work and the manufacturing process more visual.
Materials for creating a New Year's topiary
- tangerines.
- a skein of linen rope (can be bought at any gardening and flower shop).
- a flower pot from which our tree will actually grow (you can also use any container, decorating it to your liking).
- a beautiful branch or snag, strong enough to withstand the weight of tangerines. Treated, varnished twigs can be found in a florist shop.
- scissors and a paper knife.
- a piece of foam plastic or floral oasis.
- spruce branches and mistletoe leaves for decoration.
- pieces of wire to strengthen the tangerines on the tree (a set of small hairpins will do).
- artificial snow (this can be crushed polystyrene foam or any other material, the main thing is that it looks like snow).
- brush for PVA glue.
Work progress
1. Take tangerines and wrap them with rope crosswise. Be careful, wrap it tightly so that your tangerines do not fall out of the ropes. But don’t overdo it, otherwise you risk splashing the entire workspace with juice and damaging the product.

2. Coat the twig with PVA glue and dip it in “snow”, this is done so that the needles do not stick together.

3. Cut out a cone from polystyrene foam or oasis that will fit in the pot. To make the structure heavier, you can put a stone or a piece of lead at the bottom of the pot.
4. Please note that the pot must match the size of the entire composition, that is, be proportional.

5. Let's get to the most difficult and important part. We strengthen the branch in the oasis so that it does not dangle. We begin tying the tangerines one to the other, starting from the bottom. There will be fewer tangerines at the bottom, a little more in the middle, and the same number at the top as at the bottom. Then we decorate all this beauty with leaves and twigs.

New Year's topiary is ready. It will wonderfully decorate your table or become a wonderful gift for family and friends. And the New Year's mood that your craft will create either in your home or in the home of the people you love will more than pay off your efforts and perseverance. Be inspired by photo examples and have fun creating little “trees of happiness”!


Video on this topic
Step-by-step video master classes will help you decorate your home and create the mood for an upcoming miracle and holiday, in which you will see other incredibly beautiful and attractive crafts that will retain the warmth of your hands and be able to transfer it to those who are dear to you.
Despite the fact that the New Year is still far away, you can already think of interesting and original ideas for gifts and decorations. The familiar Christmas tree, garlands and pom-poms are, of course, a good thing, but sometimes the soul desires something new and original. Recently, topiaries (fancy trees made from a variety of materials) have become very popular.
This decorative element can be placed on a holiday table, on a fireplace, window, or used as a gift. So you can do DIY New Year's topiary 2017, which will immensely surprise and delight your guests.
On the Internet you will find many different variations for creating this amazing item. In this article we have included the most interesting and accessible ideas that anyone can do.
Topiary made of Christmas balls
To make this New Year's decor you will need:
- Christmas tree balls of small sizes, matching in color;
- Base for topiary (it can be made from papier-mâché or take a foam ball);
- Palua-trunk;
- Flower pot;
- Floristic oasis (sold in flower shops);
- Details for decoration (tinsel, sparkles, bows, etc.);
- Glue gun.
Step 1. If you purchased a pot that does not fit the New Year's theme, then you can decorate it using bright satin fabric, for example, red.
Step 2. After this, a floral oasis should be placed inside the container. If you don’t have one at hand, you can replace it with polystyrene foam.

Step 3. The trunk of the future topiary needs to be secured in the center of the pot. An ordinary strong branch or cardboard tube is perfect for such a stick. Decorate it with beautiful ribbons and it will look wonderful. You can put shiny tinsel at the base.
Step 4. Now you need to attach the same floral oasis or papier-mâché ball to the trunk. Let's say you use oasis, then before inserting the balls into the base, you need to attach toothpicks to them.
Step 5. If large gaps are visible between large balls, cover them with small balls, cones, bows or other decorative details.
Step 6. To make the toys stick better, it is advisable to glue them together with glue at the end of the work.
Topiary of tangerines

You can make this craft from any other edible materials. Let's focus on tangerines this time, because they are a mandatory attribute at the New Year's holiday.
To make topiary from tangerines you will need:
- Tangerines;
- Twine or any other decorative rope;
- Flower pot;
- A branch or snag on which the ball will be held;
- Scissors;
- Polystyrene foam or floral oasis;
- Christmas tree or mistletoe branches for decoration;
- Hairpins for strengthening tangerines;
- Artificial snow;
- PVA glue.
Step 1. First of all, you need to wrap the tangerines with twine or that decorative rope that you have saved.
Step 2. Coat the ends of the pine branch with PVA glue and lightly dip in artificial snow.


Step 3. Make a cone out of the floral oasis so that it sits easily but tightly in the pot.
Step 4. This part of creating a tree is the most difficult and responsible, so be careful. Insert the branch into the oasis to prevent it from dangling. Attach the second piece of the oasis at the top, giving it the shape of a ball. Thread the pins through the tangerines and stick them into the oasis. Decorate the gap between the fruits with leaves.
Step 5. At this stage, the making of topiary ends!
Candy Topiary

A topiary made from candy canes would be a great holiday decoration. It will be great if you can find red and white candies, but others will work too. The main thing is that they are bright.
To make candy topiary you will need:
- Styrofoam ball;
- A beautifully curved stick for the trunk (you can take an ordinary cardboard tube);
- Satin ribbon for decoration;
- Foam cube;
- Flower pot;
- Multi-colored pebbles;
- Adhesive tape to match the candies;
- 300 grams of candy.
Step 1. Place a foam cube in the pot and insert a stick into it to hold the candy ball.
Step 2. Cover the base with cardboard, as shown in the photo.
Step 3. Take a foam ball and cover it with adhesive tape, onto which you can later attach lollipops. Of course, you can do without the tape and glue the candies using hot glue, but then you will have to decorate the gaps with additional details.
Festive topiary

This master class shows how you can make candy topiary, just in a slightly different style.
To make topiary you will need:
- Foam;
- Candies;
- Wire;
- Cable;
- Decorative details: buttons, balls, ribbons, flowers.
Step 1. Wrap the cable with decorative tape and make a bundle.
Step 2. Take the wire and attach a small bell to it, then you can also wrap it with decorative tape and secure the end firmly.
Step 3. You need to make a cone out of foam plastic (it will be the base of our Christmas tree). Glue the sisal thread at the bottom and start wrapping the product. Note that their sisal topiaries always look attractive.
Step 4. Try to wrap the cone tightly, occasionally coating the base with glue.
Step 5. At the top you should attach a wire with a bell. Just insert it inside the cone. Bend the end slightly.
Step 6. You need to insert the cable into the lower part and only after that start decorating the product with candies.
Step 7 Take a small glass, fill it with a floral oasis and insert a New Year's product into it.
Step 8 For decoration, use your existing beads, rhinestones, tinsel, and bows.
Topiary “Cockerel”

As you know, 2017 will be the year of the Fire Rooster. For those who want to truly surprise their guests, we suggest paying attention to this one. It tells how you can make a New Year's cockerel with your own hands. Topiary is easy to make and will not take much of your time.
To make the “Cockerel” topiary you will need:
- Fabric of different colors and textures;
- Satin ribbons;
- Scissors;
- Cockerel pattern;
- Pot;
- Two thick wooden skewers;
- Artificial grass;
- Product filler.
Step 1. Print out the pattern below. You can use different designs, the main thing is that the cockerel looks beautiful and festive. Place the pattern on the fabric and mark the boundaries of the product. The photo shows that the top of our cockerel will be made of one fabric, and the “pants” will be made of another. Having finished cutting out parts of the product, you must stitch them from the wrong side.
Step 2. Each of the sticks on which the rooster will sit should be wrapped with the remaining fabric and stuck into the toy. Carefully stitch the holes.
Step 3. Attach the wings. Draw the eyes, a slight blush. You can make a tail from bright satin ribbons.
Step 4. Sew on the beak, and at the top you can attach a crown or comb.
Step 5. You can pour some soil into the pot and add gravel on top. Decorate it all with artificial grass. Hang a soft egg on one of the wings. New Year's tipiary is ready! You can get creative with this product and add new details - it will still turn out to be cute and festive.