First, let's go through the most original ways to decorate tea bags.
Top ideas for gifting tea bags with kind words:
1
Tea with hearts as a sign of love and tenderness. Such a gift will delight not only the first 15 minutes of possession, but every day!
How to make tea bags yourself (it’s better to put good tea in them) and decorate them with hearts -
2 Tea with photographs- a very cool gift - how to make (and saved)
No matter how you implement it, it will be your personal author’s style and this gift is good as an addition to monetary gifts, for example for a wedding.

Source photojojo.com
3 Tea with flowers as a sign of love and tenderness. If the flowers are fresh, then this is a great idea for a party or a large family gathering.
But you can also use artificial flowers!

Source boredpanda.com
* * *
Tea with butterflies - here it is in the photo - and here is a link on how it is made

Source boredpanda.com
How else to use tea bags as a gift -
And be sure to look at the selection of design ideas for playing with tea bags - you can reproduce some of them yourself

And actually here are the options for inscriptions on tea bags:
I wonder how many gifts this day will bring you?
Always believe in the best!
You are a ray of sunshine!
Everything is possible! The main thing is to believe in this opportunity!
You are the whole universe!
Gratitude turns what we have into WEALTH
Everything is going as it should
Call the one you love
What is the most important thing you want to do today?
Thank you for being you
Magic is everywhere
Who if not YOU?
You are full of charm as always
When you are ready, the star itself will fall into your palms
All the best things happen when you are in harmony with the world and with yourself.
Who will you please today?
What stars will light up from a spark in your heart?
How will you make yourself happy today?
Light a candle and the darkness will dissipate by itself
Smile! life is good!
What do I want to bring to the world today?
How can I be happy today?
What good can I do for myself?
Who else will I bring joy to today?
What do I like to do?
What do I want now?
What will I do differently today?
What do other people like about me?
What are you choosing to put into the world today?
How can I become a better person today?
I wonder how many miracles I can notice today?
What is the most important promise I can make to myself?
How can I make life a living stream of pleasure?
How can I activate love, joy and a sense of freedom?
Where does my inner genie hide, makes my dreams possible?
Where am I going? And where do I really want to go?
How can I bring creativity into this day?
Where do my dreams take me?
How can I start a warm flow of gratitude and love?
Why am I reborn after falling?
What gives me strength? To whom do I give power?
How can I discover an endless source of joy?
What makes me unique?
What new can I create today?
How am I choosing to live today?
What can I celebrate on this day?
Who do I love? What kind of people give me love and warmth?
Where am I heading? Where do I want to go?
What do I want to learn today?
How can I make myself happy in this current moment?
We get more of what we focus on. What can I start noticing more of?
What do I want to remember for a long time?
What can I stop worrying about and let go of right now (not forever, but for the next 5 minutes)?
What values do I want to feel every day? (Love, freedom, beauty, joy, development, etc.)
Who do I want to forgive today? Who do I want to ask for forgiveness from?
How can I please myself today?
How can I pursue my dreams no matter what?
How can I feel my power?
How can I be myself and realize my uniqueness?
How can I believe in the best even if I find myself in a bad patch of life?
What if the joy of getting up in the morning and starting a new day became a habit?
What if I could enjoy life more fully every day?
What if I brought more creativity into my life? How can I do this?
If I knew that I could live the life I dream of, what would be possible for me now?
Wondering what you can simplify in your life today?
What new thing do you want to say “yes” today?
What is it important for you to say no to today?
What to write on tea bags? We have more ideas!
How can you design a card for such a gift? Use unconventional ideas
Somehow this whole idea reminds me of this marketing ploy with the sale of designer firewood "Beaver Firewood")))

And yet, bringing Beaver Good to the world in the form of small gifts, smiles, warm little things from the heart is a path available to each of us.
And now, when you are going to visit, you know what you can bring instead of the standard cake, cookies and other sweets,
All the best to you!
Tea bags with good wishes – effective way improve your mood and bring a little positivity into ordinary days. There are many master classes on this topic, but in reality it turns out that not all advice is working and there are quite a lot of mistakes that you can step on. Now a little more detail on how to make tea bags with your own hands.
What's the salt?
www.evermine.com, www.celebrations.com
The principle of making a gift is quite simple - we make tea bags that will charge you with positivity and cheerfulness. To do this, you need to take a pack of bags of your favorite tea and attach to each of them good wishes or just a compliment. It will take from 1 to 2-3 hours of free time to complete all stages. It will take an hour if we make it from ready-made bags, 2-3 hours if we roll them ourselves.
Easy way
To work you will need:
1. beautiful paper(for example, for scrap) – 1 sheet
2. thread and needle or stapler
3. ready-made tea bags
Manufacturing procedure
1. Take the tea bags and cut off their tags, leaving the thread.
2. We print out or write by hand on cardboard all our wishes or compliments. If you want to fit into the dimensions of a standard label, then each rectangle should be 2x3 cm. You can print the wishes on plain paper and glue them to scrap paper to make the label thick and beautiful.
3. We sew each label to the thread from the bag or attach it to it with a stapler.
4. We return everything back to the box or put it in a special house or box.
Everything is ready! Fast, simple and very effective! Here's how to design the box itself:
Creative way
In a more complex version, you will have to make not only the labels yourself, but also the bags themselves. There are two advantages:
— you can mix whatever you want inside, for example, buy dried currants or thyme, take any type of tea, and the main thing is that the tea itself can be of high quality, without dyes or other unnecessary stuff in the composition;
— the bag itself can be given any shape, for example, a heart. And although further I will show how to do classic shape, this does not prevent you from using any simple origami pattern if you wish, or simply cutting out 2 hearts and sewing them together with threads, filling them with any tea of your choice. 
There is only one minus - it will take a little more time and materials to work. Here's what you'll need:
1. tea, herbs, berries for filling;
2. filter bags for brewing tea (like those in the photo);
3. scissors and stapler,
4. needle and thread,
5. glue stick,
6. beautiful paper and pen (for labels).
Some people use coffee filters instead of tea filter bags, but in fact, brewing passes through them very poorly, so it’s better not to take them. Now about how to do it.
1. Fill the filter bags with tea leaves.
2. Fold the corners of the bag towards each other, bend the edge and fasten with a stapler.

3. Take a thread, cut off 10 cm, tie a knot and use a needle to thread it under the stapler bracket so that the knot is hidden inside.
4. We print wishes on a printer or write them by hand, cut them into separate labels. For the back of the tag, cut the scrap paper into rectangles.
5. Using a glue stick, we glue the tag with the wish, and between it and the scrap paper backdrop we insert the tip of our thread. The bag is ready, all that remains is to make 24 more to the size of a standard box.
At the end of the work, we again put them in a regular box, either in a box, or in a special house. The gift is ready! 
You can complement this gift with a box for storing tea bags. You will get a full-fledged gift that is suitable for Valentine's Day, February 23 or March 8, and just for good mood for every day! Enjoy your tea!
Sometimes I'm itching to "reinvent the wheel." Don’t go on the Internet and use the ready-made fruits of human thought, but disassemble/figure it out yourself, with your own hands...
This is what happened with paper bags. After all, there are diagrams on the Internet! But no, I picked up the paper and began to twirl it, remembering how it looked when “from the store,” and how it can be done. It’s possible! Moreover, you can do it “by eye”, without a ruler or marking the sheet - just fold it carefully so that the edges of the paper are parallel to each other.
I made these New Year’s bags from “designer paper” made using the hot decoupage method (I will give the “recipe” in the next post):
.jpg)
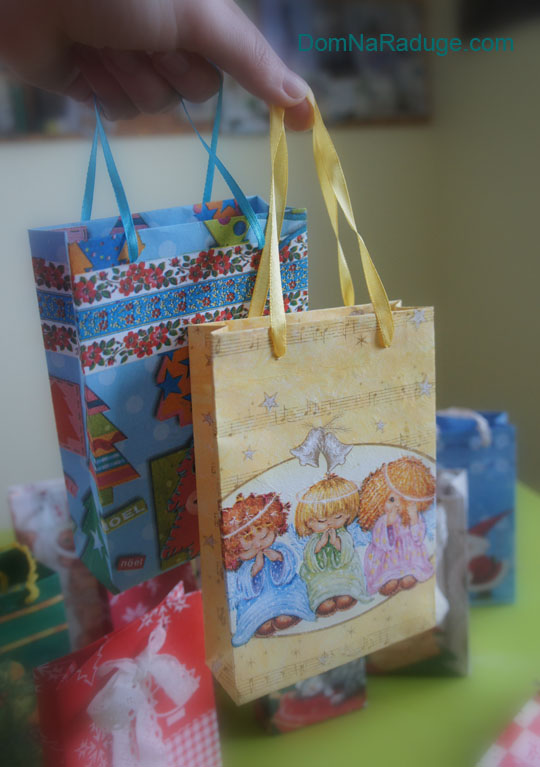
So, a master class on paper bags is for those who are interested in making not only gifts, but also packaging with their own hands.
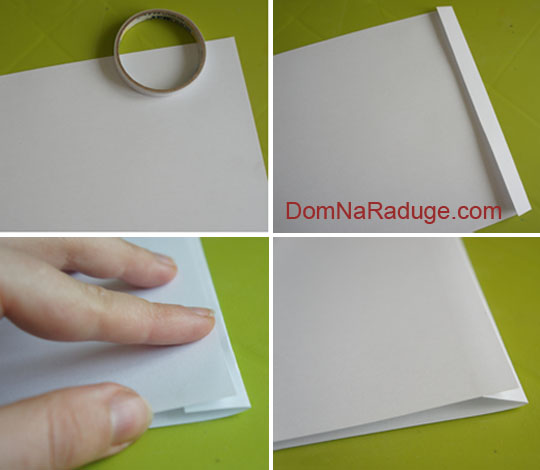
1. Take a sheet of paper. I took a regular, white, A4 size. We also need narrow double-sided tape or glue.
We wrap the edge of the sheet, slightly wider than the strip of tape. We fold the other edge towards it so that it slightly overlaps the first fold (approximately 1-2 mm)
2. Glue the edge using double-sided tape. You can also use glue, but make sure that it does not leak over the edges and wait until it dries.
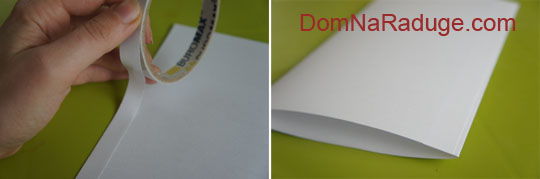
3. Decide how thick your package will be - we determine it by eye. And carefully bend our paper “tube”, keeping the edges parallel. This is how we get smooth edges of our “parallelepiped”.
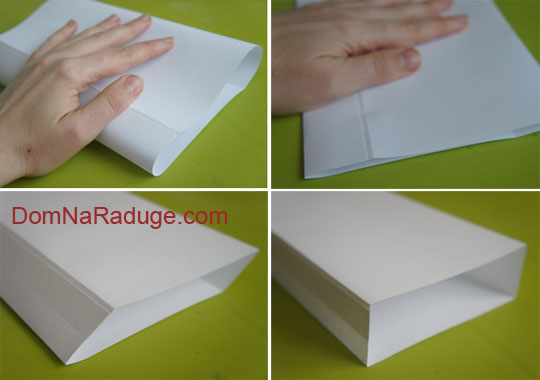
4. Make an inward fold on the sides of the bag. We align the edge to the edge so that it is parallel.
.jpg)
5. Now we make the bottom of the bag. We look at the side part and measure from below a distance approximately equal to the width of the side. We bend the bottom of the bag first in one direction, then in the opposite direction.
.jpg)
6. We make the bottom like an envelope - as if we were packing a box in paper: we wrap the corners inward at 45 0.
We glue the “ears” with double-sided tape or regular glue.
.jpg)
7. To make the top of the paper bag look neater, fold the edge inward. In addition, if we want to make a bag with handles, then it will be stronger.
We make handles from tape - using a needle or through holes (if you have a hole punch).
.jpg)
Homemade paper bags Another good thing is that you don’t have to make ordinary pens, but show your imagination - for example, stretch a ribbon through one or two pairs of holes and tie a bow:
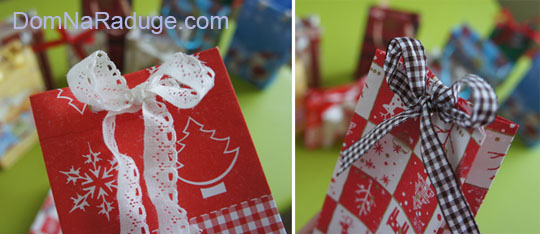
Or wrap the top of the bag a couple of times and secure it with tape (loose tea is often packaged in a similar way, only instead of tape there is a flexible strip with wire).

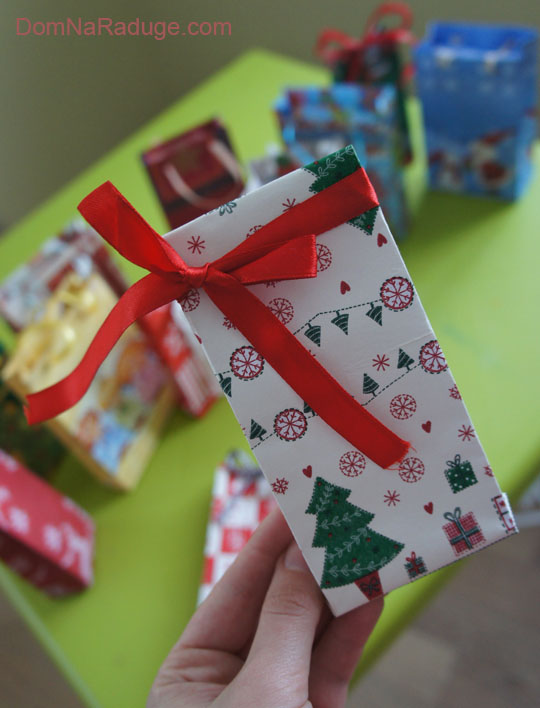
For herbal tea, I made these bags from colored office paper. Kraft bags look good (in combination with red ribbons or white lace). You can make bags from magazines or last year's calendars... And my friend makes them from ebru paper: .

Have a nice pre-holiday effort!
Oksana Shapkarina
Today we will tell you how to learn how to make tea with your own hands. A kind of training, if you like. This project will not only give you an inner sense of creativity, it will also open you up to some very healthy teas that will help you in your health and will not coincidentally excite your taste buds. 
Don't know what it is? This is absolutely new tradition! And we hope it inspires you to do something good. Now let's make tea!
Materials
- multi-colored cards;
- empty tea bags;
- tea components according to the recipes below.
Tools

Licorice root + mint

Licorice root has many benefits: it will relieve stress, cure a sore throat, and it’s simply delicious. The best part is that it's sweet and you won't want to add more sugar if you're used to pouring a spoonful into your tea. For those who don't like licorice, fear not. The aroma of this root differs from the strong and specific smell of black licorice. 
Add about a tablespoon of licorice root to your empty tea bag. Fill the rest with mint and pull the string to close the bag.
Lemon verbena + mint + ginger + green tea

Green tea is full of antioxidants and has many health benefits, helping to reduce the risk of cancer and keep cholesterol levels in check. Add a little more ginger, lemon, mint, and you will give a real gift to your health. 
Divide the tea bag into four parts: first add green tea, then mint, fill the third part with ginger and add lightly crushed lemon verbena on top. 
Rose buds + lavender + licorice root + white tea

This flavor blend is for all flower lovers. If some, having only smelled the smell of this tea, would immediately want to go to the SPA, then those who have already tasted herbal tea with a slight hint of sweetness, sipping it slowly, would dream of luxuriating in their garden of lush roses. 
Add some white tea to a tea bag. Then put 2-3 pieces of licorice root in there for that touch of sweetness. Add 3-5 rosebuds depending on their size and add lavender to the rest. 
Parsley + lemon verbena

Parsley tea?! Yes. Don't leave yet. We know that it sounds strange, but parsley tea is very healthy. Among its known benefits, it also helps with food digestion and cardiovascular health. Let's talk about the aroma. Tip: When you drink this tea, think of it as if you are drinking broth. If you succeed and get the taste, you will definitely enjoy this loose leaf herbal tea. 
Place parsley leaves in a tea bag, then add about a tablespoon of lemon verbena.
DIY tea bag labels

Using a shaped hole punch, cut out pieces from paper. You need two pieces of paper for each bag. Place them together and cut a thin line in the center so the tag will hold onto the edge of your cup. 
Place a little hot glue on the tag to attach the tea bag string. Then make sure that both pieces of the tag are well glued to each other. 
DIY tea can be an extraordinary gift! 
The “Teabag” position is a type of oral sex. The name is directly related to the process - bringing a man to a “boil” by stimulating the testicles, which are associated with the bags.
Sex position "Tea bag"
This position is exclusively for the man as the woman must do her best to give pleasure to her partner. Distinctive feature– stimulation of the testicles is carried out not only with the hands and mouth, they can also touch the face and hair.
Possible variations of the “Tea Bag” pose:
- The girl lies down on the bed, and the man turns his back to her and sits on his knees over her face. As a result, the testicles should be above the lady's tongue.
- The girl kneels and the man stands in front of her. She should “play” with the testicles with her lips and tongue. You can additionally stimulate the penis with your hands or stroke the man’s thighs.
- The partner lies on his back, and the girl kneels at his feet, facing him. In this position it passes.
- During regular sex, while the girl is on top, she can stimulate the testicles with her hands. Such manipulations are also considered a variation of the “Tea Bag” pose.
The “tea ceremony” technique involves stimulating the testicles using your hands, for example, you can put them in your hands and rub them against each other. Give your consent to the man running his testicles over his face and hair, this will allow him to experience incredible bliss. To turn a guy on, you can tickle him under the testicles with your tongue. Gentle biting and pinching of the scrotum is allowed, but it is important not to overdo it and not cause pain. Prohibited actions also include strong squeezing, twisting and various sudden movements.
Remember that the most sensitive place in a man is the scrotum, so any gentle manipulation in this area will give pleasure to the chosen one.