The benefits of drawing for the all-round development of a child today are not in doubt - experts believe that earlier child starts, the more developed he will grow, even if drawing is not his path at all.
Many parents, in an effort to provide their child with all the necessary opportunities, rush to buy drawing supplies as early as possible, however, both pencils and classic drawing brushes have one big drawback - the child must have sufficiently developed finger motor skills to confidently hold them in his hands.

In addition, both options do not always guarantee complete safety of the composition and the ability to easily remove objects not intended for drawing from the surface, and pencils sometimes turn out to be too faded to interest the child. Therefore, in recent decades, experts have increasingly recommended purchasing finger paints for children.


What is it?
Finger paints are a rather unusual means of creativity, designed to satisfy a child’s craving for the bright and beautiful. Even the smallest child wants to draw with something bright, and if he is not yet able to hold a brush or pencil in his hands, it doesn’t matter: you can use your hands directly!
Naturally, with such a level of motor development, it makes no sense to expect a child to create any masterpieces. However, for the children themselves of the age for which this product is intended (and these are babies from 1 year old) What is important is a vivid abstraction, not an aesthetic subject.


Given the age of such young artists and their way of painting, manufacturers must be especially careful in selecting the composition. First of all, the recipe should not contain any harmful substances that can penetrate the body through the skin, since the child’s hands are not protected.
Options for finger paints for the little ones should even assume theoretical edibility, although there should be a place for bitterness among the ingredients so that the baby does not use the product for other purposes.

Since this type of paint is created specifically for painting with your own body, it is not at all surprising that there is no question of observing any purity of the process. In such conditions It is fundamentally important that the dyes used are easily washed off from both skin and clothing. It should be noted that some manufacturers of budget products still do not adhere to this rule, dictated by logic, so the choice of a set should be approached with due care.
Finally, for a child to be really interested, such colors simply need to be as bright as possible - fading threatens the loss of child interest. High mixing of different colors without the formation of dirt is also considered good form.


Benefits and harms
The benefits of using finger paints are obvious - we will list just some of the child’s skills and abilities, who will receive an additional stimulus in their development thanks to this drawing:
- Artistic taste. Constant observation of bright colors is necessary for a child to learn the most correct perception of the world around him.
The artist, deprived of such an opportunity in early childhood, will probably be limited exclusively to black and white graphics and, although there is nothing wrong with the latter, it is better to provide the child with all the possibilities - suddenly he will become a master of artistic rendering of color.
- Color perception. Modern bright life somewhat limits the possibilities of those people who do not see much difference between shades. Thanks to early work with the brightest tones, the baby gets the opportunity to quickly learn to distinguish colors and their smallest shades. As a result, brain activity also improves.
- Motor skills. Although painting with finger paints, due to its increased simplicity, does not seem to be a suitable way to develop motor activity, even such finger gymnastics can bear fruit. In the process of drawing, the child has to move his fingers more actively, thanks to which he will quickly learn to hold the same brush in his hands.
- Psyche. At the end of the day, drawing is just a healthy, calming and entertaining activity. Thanks to him, the emotional background of both the baby and his parents is leveled, but calm and good mood- two important qualities for ensuring good health.


If the paints are made in compliance with all quality standards, then there will definitely be no harm from them. Problems are possible only if parents, in pursuit of savings, have chosen a low-quality product that may contain toxic or harmful components, as well as leave persistent stains on various surfaces.

Types and composition
Classic finger paints consist of traditional ingredients:
- pigments that give the mass the desired color;
- water base;
- binders used to bind all the ingredients together and make the mixture thicker.
The composition is balanced in such a way that the mass always remains soft, but at the same time does not become fluid. Ideally, good finger paints consist exclusively of natural ingredients, not harmful to the baby’s health - they are even edible, so manufacturers have to use special bitter flavoring additives.


However, in varieties for children aged 3 years and older, some ingredients can be replaced with those that are undesirable for consumption. The use of natural ingredients also makes cleaning easier– for example, dyes based on aloe vera juice are usually very easy to remove from the surface of clothing.
It should be noted that some finger paints can be labeled as gouache or watercolor.


If it is written on the box that this set allows you to draw directly with your hands, then you can give preference to it, but this does not mean at all that any gouache or watercolor is suitable for such purposes.
Modern manufacturers are doing their best to diversify their product range, why they create new types of paint with unusual properties:
- Gel varieties do not dry out the skin, making them better suited for little ones.
- Sensory finger paints are supplemented with special particles that give dried flowers a different roughness, which further develops the child's understanding of the world around him.
- Fluorescent paints can make any child happy, because drawings made with this material glow in the dark.


Since fingerprint products are rarely intended for professional artists, they are sold exclusively in sets. For the smallest ones, a minimum set of 4 colors will be enough, but it would be appropriate to choose a set with stamps that allow you to quickly depict this or that picture.
For a child over 3 years old, you can purchase 12 colors that more fully convey the picture of the world.


At what age can it be used?
Different manufacturers indicate different minimum ages on their products for using such creative materials, and parents on the forums only confuse beginners even more with their mixed comments.

In general, the earliest age at which finger paints are appropriate, at least theoretically, is 6 months. However, the benefits of such a parental idea are somewhat questionable, since the motor activity of a child at this age is extremely limited. Not a single conscious manufacturer would recommend paints for such tiny babies on their products - unless in pursuit of sales.
Usually it is written on the boxes that the product is intended for children from 1 year - this means that use is possible at an earlier age, but experts do not see the point in this.


It should be noted that Not all finger paints are completely safe. Products for children that indicate “from 3 years” most likely contain components that are undesirable to put in the mouth.
On the one hand, at this age children are no longer so curious as to try everything, on the other hand, parents should be on their guard.


How to use?
Unlike any others, finger paints do not require instructions on how to draw pictures correctly - flowers or a tree can be depicted in any available way.
Theoretically, parents should play a big role in such a drawing process, helping to bring the child’s vague idea to a certain logical conclusion, while simultaneously showing him how to create a meaningful masterpiece. There are several finger painting techniques available to everyone.

Body parts
First of all, this is drawing with palms and fingers. For a baby in the first years of life, the end result is not so interesting as the process itself - he will gladly get dirty himself and stain everything around him. However, there is also an element of development in this, so you shouldn’t forbid your child to draw even on his own.


Sponge or sponge
Finger paints are perfectly absorbed into the porous structure of the sponge, and are also easily squeezed out from there, so you can offer your child such a somewhat unusual tool.


Prints and stencils
Many kits include special tools designed to make it easier for your child to create various artistic forms. These include various stamps and rollers, as well as stencil boards with slots cut in the shape of something.


"Passepartout"
The artistic concept in the work can be placed entirely on the shoulders of the parents. In this case, the child paints the paper base at his own discretion, while mom and dad must cut out some figures (suns, flowers, butterflies) from colored paper and simply put them on the base prepared by the child.


How to do it yourself?
Many parents believe that it is better to make their own finger paints at home rather than rely on little-known recipes from manufacturers.
This process is not complicated, but it can interest the child, it allows you to easily and inexpensively make an unlimited number of paints, and most importantly, it guarantees the baby’s safety one hundred percent. Difficulties may arise due to the lack of sufficiently bright dyes or storage containers, but in general these issues can be solved.

On the World Wide Web you can find quite a few different recipes for homemade finger paints, but in general the ingredients are the same - only the proportions differ.
You need to mix a couple of glasses of flour with a few tablespoons of salt (to taste, but the colors should taste disgusting - 5-7 tablespoons should be enough) and a couple of tablespoons vegetable oil.
Then a couple of glasses of water are added little by little. The final consistency should resemble sour cream in its thickness; in case of deviations from the norm, more flour is added for thickening, and water for thinning.


After the mass is divided into parts for coloring in different tones, dyes are added to them. The latter can be natural juices from vegetables and fruits, as well as various seasonings or even brilliant greens, although many prefer to use purchased food coloring. This homemade product should be stored in the refrigerator, in hermetically sealed jars.

There is an even simpler recipe that involves adding pigments to ordinary yogurt, but such colors will naturally remain edible, which is why they can provoke a child to eat them. Parents often don't see this as a problem, but a developed habit can lead to the child licking brushes and other painting supplies in the future.


If you liked this recipe the most and plan to use it, it is worth considering that the resulting paints should be used as quickly as possible, since they do not have a long shelf life.
Brand rating
Many parents still prefer to rely on the experience of manufacturers - they are confident that if they trust a trusted company, it will not let them down. In many ways, this is true - world-famous companies really have gained such popularity for a reason, but to purchase safe paints for your own child, you need to understand the brands.
European and American-made products that reach domestic markets are traditionally distinguished by their high prices and corresponding quality. American paints Crayola are considered the optimal balanced option - they are safe, bright, and easy to wash off.
In this article I will tell you how we got acquainted with finger paints, what you can paint with paints, and at what age you can use them.
Let's start with why we bought finger paints. I am constantly looking for ways to develop a baby, especially now when the first speech skills are being formed. Finger painting develops hand motor skills, and the development fine motor skills, is directly related to speech, it’s not for nothing that they say that kids need to do gymnastics thumb, make circular, rotational movements - this affects the development of speech. Also, painting with finger paints gives a clearer perception of specific colors. And finally, the way in which such paints are used has a positive effect on emotional state the child and his overall development.
At what age can you use finger paints?
The paints are completely harmless and therefore can be used by children under three years of age. Some mothers begin to use them as early as three months of age in order to rush to develop their baby. Honestly, it seems to me a comfortable age to start using paints, when the child is at least sitting on his own, sit him next to him and talk calmly, show him the world of colors. Regarding “calmly”, I, of course, got excited, because small children are very fidgety and simply cannot sit still calmly, so in the process of drawing it is impossible to avoid traces of paint everywhere.
A few tips before you start drawing: Prepare a large Whatman paper and create more space around the child. Remove the carpets, position yourself away from the sofa so as not to get dirty, dress your child and yourself in something you don’t mind getting dirty. I'm glad that the paints wash off well.
What can you paint with finger paints? ANDhow to use?
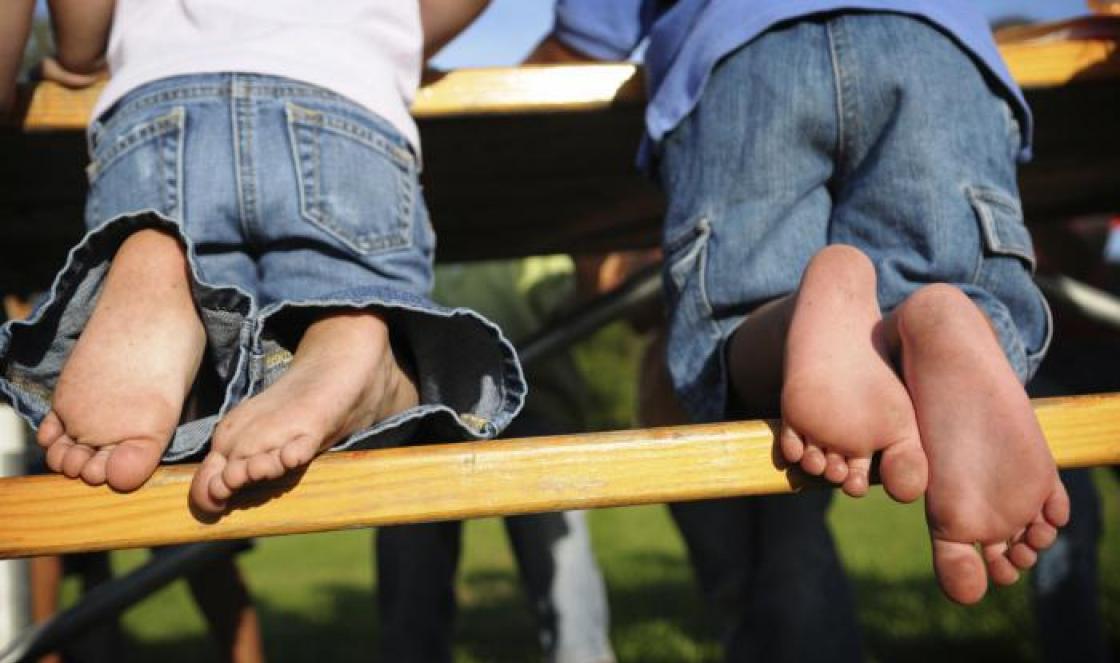
The most common thing is to make prints of the baby’s hands and feet.
We prepared the paints, no water is required, we added a drop of each paint, commented on the process, this is red paint, this is yellow, blue, etc. Then you take the child’s pen and smear the whole thing on the paper, the baby likes it. Then you make handprints in two or three copies and after that you give it to your beloved grandmother, sign it and put it in a photo album and everyone is happy.
In addition, you can make stencils, for example, print or draw a flower, leaf or Christmas tree and cut out the middle, then put the stencil on the place where the child smeared the paint and comment with delight “Oh, what a wonderful Christmas tree we have!” After all, the main thing is to create the mood in your creation :) (example attached)
At an older age, when the child begins to speak, after you pretend to be holding hands with him or simply smearing a piece of paper, ask the child the question, what did we do? who did we draw? Let the child imagine, maybe he will see a bird, a house, a mother)
And when you get acquainted with paints, you can ask your child, what paint do you like best or what color are you in the mood for today?
And here is our creativity))

Do you want your child to be fully developed? Look for harmless materials for children's creativity? Finger paints for babies aged 1 year and older will be an excellent choice.
Pros of finger paints
- Safety- this is the main advantage of finger painting. The natural composition of pigments and binders is the most important criterion for choosing materials for drawing, because small children love to taste everything.
- Harmonious development baby. Small children experience the world by touch. Finger painting perfectly develops fine motor skills, promotes the formation of a healthy nervous system, and helps the child constantly learn new and unknown things. Everything in the human brain is interconnected; by developing the motor center, you stimulate the speech center, because they are nearby. The speech center is responsible for the thought process and further along an endless chain.
- Finger paints easily washed off with water, do not spread. They can be used to draw on different materials. Paper, cardboard, glass, plastic, fabric, even bathroom tiles will do. A young artist’s own body can become a canvas. The baby will be happy to try to draw something on his tummy.
- For this simple drawing method not required additional materials , so finger paints are suitable for babies under one year old, and for older children this is an even more indispensable development tool creativity. Children are not yet physically able to pick up a brush, felt-tip pen or pencil, but drawing with their palms and fingers is a simple and fun activity.
- Finger drawing technique is simple, and every mother can teach it to her child, even one who cannot draw at all. All you need to do is show in which part of the drawing to leave a palm or fingerprint, and then help the young artist fill in the missing details to get the finished image.
At what age can you start painting with finger paints?
Many mothers buy finger paints for children under one year old. Of course, it is best to wait until the child begins to sit independently and confidently. This happens at 8-9 months. But, if you really want to, you can practice finger painting from 6-7 months. At this age, the fingers “obey” their little owners very poorly and, of course, the baby will not yet be able to draw with a brush or felt-tip pen, but using finger paints, he will definitely make his parents happy with his first creative masterpieces.

What are the benefits of finger painting?
You shouldn’t assume that finger painting for kids is a useless activity, thinking that the child doesn’t understand anything yet. little child paints not for the sake of the result, but for the sake of the process. He does not yet put his feelings into thoughts and words, and especially does not understand what exactly he is doing and why. The baby enjoys new sensations: tactile, visual and even taste. This is how new neural connections are created in his head, and the more there are, the faster he develops.
Adults expect results from children's drawings too early. It is important for mom and dad that the object depicted by the child is recognizable, but beautiful picture does not indicate creativity. Creativity is a process. Your baby's blots reflect the world as he feels it. Finger painting is pure self-expression that is possible at any age.
Vivid childhood experiences affect the child’s psychological health. When a child is doing something pleasant with an important adult, it creates a positive outlook on the world and reduces the risk of developing psychological disorders in the future.
Drawing lessons should not be long and tedious for your child. A few minutes is enough. During the drawing process, be sure to praise the child and tell him about this or that color (what it is, what color it comes in).

Where to buy children's paints for hand painting
Buy paints for finger painting Available at most craft stores. Please note that these should be special paints for children over 1 year old if you are planning creative activities with very young artists. As a rule, manufacturers offer finger paints for children aged 3 years and older.
An excellent choice would be children's finger paints from JOVI or Kalyaka-Malyaka, which have a safe composition. They are easy to wash off clothes and can be easily washed off from different surfaces. They don't have unpleasant odor. And at the same time they allow you to create bright and colorful finger drawings. They will delight you and your child, giving a lot of joy and positive moments.

DIY finger paints for kids
Of course, today you can buy finger paints at any children's goods store. But, unfortunately, store-bought finger paints cannot be eaten. However, we can offer you a delicious recipe. You can try to make them yourself from simple products available in every home. Here's not just one recipe for finger paints for kids, but two.
How to make finger paints at homeRecipe No. 1 Thoroughly mix flour (0.5 kg), salt (3 tablespoons), water and vegetable oil in a blender or mixer. The result should be a mass reminiscent of sour cream. Adjust thickness and liquidity by adding a small amount of flour or water accordingly. Pour the resulting mass into small jars and add vegetable dye: carrot juice, red beet juice, etc. You can also use food coloring and Easter egg paint. Recipe No. 2 Take some fine-grained porridge (preferably instant porridge), pour beetroot or carrot juice into it. And that's it, the paints are ready. |

Finger painting - first acquaintance
Preparation for the process
- Select a surface to draw on. More the better. A sheet of Whatman paper works well, ideally if you have a piece of old wallpaper. The prints will be more interesting thanks to its texture, and the lessons will be more fruitful. You can draw in the bathroom. Another interesting option is an oilcloth tablecloth.
- Dress your child in things that you don’t mind ruining. The paint will be everywhere. You can wash it, but do you really want to spend extra effort on removing stains? It is better to select a set of clothes specifically for drawing classes.
- Place yourself away from soft sofas, armchairs and other pieces of furniture and decor that are difficult to wash.

How to paint with finger paints
Finger paints for kids provide wide scope for creativity. Imprints are made from the child's fingers, palms, and legs. For children under 3 years old, drawing will be spontaneous. Let your baby create without thinking about the shape and name. Show your child how he can leave fingerprints on a piece of paper, how he can draw lines or mix colors. Start learning with one can of paint, gradually increasing the number of colors to paint.
Gradually make the task more difficult, for example, paint your palm and lean it against a sheet of paper. Show your child what kind of print will be left from an open palm and from a palm with clenched fingers.
If your child remains indifferent to the process, do not be upset. This means that he is not ready yet. You can help him, show him, but don't insist.
You can also use stencils and stamps for drawing. Typically, stamps are sold in one set with finger paints. You can complete the creative set yourself: cut out the stencil from cardboard and cut off a small piece of sponge. Place the stencil on a piece of paper and give your child a sponge after dipping it in the paint.
You can also cut out shaped stamps from a sponge. Typically, painting with a sponge brings children complete delight.
Different prints are obtained from crumpled paper, fabric, or a plastic bag. Playing with texture will make drawing even more fun.

Templates for finger painting for kids will help you navigate on a sheet of paper.


Another option is special pictures for finger paints.


Thinking about how to teach a child to paint real objects with finger paints on their own: flowers, the sun, a house, animals, mom, dad, should not be earlier than 3 years. Don't get attached to templates. In the imagination of children, a flower may look completely different than in the imagination of adults. Your task is to teach how to observe real world, but not to remake the inner vision.
Drawing with finger paints consciously
If your baby already knows well how to use finger paints, that is, he understands that in order to get a certain image, you need to dip your fingers in a jar of paint and then run them over a sheet of paper, it’s time to teach him to create meaningful drawings with his hands, using basic finger drawing techniques.
Finger painting
So – what to paint with finger paints? The first finger drawings can be quite simple: ask the baby to leave fingerprints in a chaotic order. When the paint is dry, use your imagination and have a fun activity with your child, turning the blots into finished images. This can be done by drawing in the missing details with a pencil or felt-tip pen. When the baby gets older, he himself will be able to turn ordinary dots and circles into balloons, flowers, animals or people.


Drawing with palms
Since it is difficult to restrain a child from the desire to apply paint to the entire surface of the palm, and not just to the tips of the fingers, you can master palm painting in parallel with the finger painting technique. Drawings with palms are usually larger, brighter and more colorful. You can finish drawing them not only with pencils and felt-tip pens, but also with the same finger paints.


Making drawings from palms
Leaving several handprints so that you get the intended complete composition is quite a difficult task.


So it's obvious what to start creative development The best way for a child is to offer him finger paints. They are non-toxic and completely harmless to the health of the child, even if he tastes them. Finger paints for kids are made at water based, have a jelly-like consistency, so they do not drip or spread if the jar accidentally turns over. Finger paints dry slowly and are easily washed off your hands. You can remove paint that gets on clothes with any detergent.
And, most importantly, finger paints are an excellent means of child development. early age. They contribute to the development of not only the creative, but also the intellectual abilities of the child. Finger painting helps develop the baby's fine motor skills, and it activates the activity of the area of the brain adjacent to the speech area of the brain. Thus, with the development of fine motor skills of the hands, the child’s speech abilities also develop. In addition, it is developing tactile sensitivity(feelings from contact with objects and materials).
Drawing for the little ones. Kalyaka-Malyaka finger paints - video
Every parent understands how important it is to develop creativity in a child. Most affordable way- get him interested in drawing. In the process of creativity, the baby develops imagination, imaginative thinking and taste.
You can arrange a colorful adventure for your little one, and at the same time great pleasure, with the help of drawing. Best option for the first acquaintance - finger paints for hand painting. Moreover, you can even make them yourself.
It is often not easy for young children to learn to draw and color with pencils, therefore, first it is better to try drawing with their fingers, because it is much easier to control your fingers easier than a pencil or a felt-tip pen. In addition, painting with finger paints is very useful for the development of fine motor skills and will prepare the child’s hand for “real” drawing with a brush or pencil.
Painting with finger paints is very entertaining because it makes it possible to mix colors, thereby allowing the child to invent shades himself. By coloring with your fingers, the child will quickly learn to feel the boundaries of the image. This process has a positive effect on children’s mood and behavior, heightens sensations and stimulates actions.
The first experience in drawing will influence the child's future, so parents better prepare for this event. First, let's choose colors. The paints that you buy in the store are ready to use, they do not drip, and are easy to wash off. Finger paints: at what age can you paint with your hands?
For example, Nerchau finger paints comply with the European standard EN 71 on toy safety, are marked with the CE mark and therefore can be given to children from the age of three without any doubt. They contain preservatives used in perfumes and the food industry. Finger paints are edible, but contain a harmless bitter substance to discourage children from wanting to eat them. The paints are water-based and can be easily washed off with water. Don't worry if your baby puts his finger in his mouth while drawing - finger paints are non-toxic.
Homemade finger paints
An alternative to store-bought finger paints is homemade ones. In order to make finger paints yourself you will need: 0.5 kg of flour, 5 tablespoons of salt, 2 tablespoons of vegetable oil and water (until the consistency of thick sour cream). Mix all this with a mixer, then pour the resulting mass into separate jars, add food coloring(turmeric, beetroot or carrot juice, or use Easter kits for this), mix again until smooth.
For the first experiment, you can also take regular yogurt different shades, for example strawberry, blueberry, banana. You can paint with these pastel shades even from a year old.

How to paint with finger paints?
Well, let's get started? We dress the child in clothes that we don’t mind getting dirty, take a large sheet of whatman paper (you can take a roll of unnecessary wallpaper), lay it on the floor and off we go. We pour paints into a palette or saucers and begin to draw ourselves, showing the baby our actions.
Let your first drawings be a juicy piece of watermelon with seeds or a bunch of grapes. You can simply leave handprints. Believe me, there is only one drawback in this process - it is a “multi-colored child”, but there are a lot of advantages. You can also draw right in the bathroom, painting the sides, and you can wash your hands right away.
The finger that I dipped in the paint leaves marks on the paper! – the baby experiences bright and creative emotions. The main thing for him now is not the result, but creative process. When the baby “plays” on his own, having thoroughly enjoyed his “scribbles”, show him new ways of depicting: vertical, horizontal and inclined lines, spiral shapes, circles.
But if a child refuses to draw, does not want to get his fingers dirty, and is in a hurry to wash his hands, this indicates that he is internally constrained, perhaps there are problems in mental development (fears, anxiety) or the parents are too protective of the baby, or, conversely, he lacks affection, communication. In any case, you should pay attention to the child’s attitude towards finger paints.
You may ask, at what age can you start painting with finger paints? Of course, you can draw with your fingers at 3 months with the help of your mother, but as practice shows best time– from about 8 months. But many boxes of paints say “from 3 years old.”
By drawing with your toddler, you develop a new personality, because this fascinating process promotes the development of fine motor skills, imagination, creativity, artistic abilities, and develops a sense of color, size and shape. Don't miss this exciting activity!
You can use finger paints not only on paper, but also on cardboard and glass. They do not drip, do not form blots, are easily washed off glass and hands, and can be easily washed from clothes. By the way, finger painting helps develop fine motor skills.
List of lessons:
How to paint with finger paints? It’s not difficult to guess what it is, the name speaks for itself paints for painting exactly fingers, and not with brushes.
Why fingers, and how are they different from ordinary? It's very simple. These paints are designed for the youngest artists, our beloved toddlers, who do not yet know how to properly hold brushes in their hands and paint with them, due to the fact that the muscles of the hands of children under 3 years of age are not sufficiently developed.
These paints do not need to be diluted with water, they have the consistency of thick sour cream, just dip your finger and paint. They don't leak or drip. And most importantly, these paints are non-toxic and completely harmless to children (at least that’s what the manufacturers promise us).
At what age do you start drawing?
I heard about these “magic” colors a long time ago, but at what age you should start painting with a child, I had no idea. When my daughter turned one year old, I decided to try to play with my princess. To my great surprise, my daughter really enjoyed the drawing process. It’s true that she doesn’t care where she draws, on paper, on a chair or on herself. I read several articles on the Internet and found out that you can paint with such paints from the age of six months, when the child begins to sit. However, my opinion on this matter is completely different.
Literally until she was one year old, my baby put almost everything into her mouth; it was useless to take it away if only Hold hands all the time. Not I imagine how to draw with a child, if he always strives to eat paints, especially since they are so bright. Although, if I have another baby, I’ll probably try it. If you suddenly invite your child to draw, but he categorically refuses, don’t be upset, try again in a week or two. After a year, babies begin to develop especially quickly; what they did not want or could not do yesterday, today they are happy to do. For example, I tried to explain to my daughter that you can draw with a felt-tip pen, but she never wanted to do it. A week passed, we tried again. Now my little sun can trace any writing object across the paper, and it gives her great pleasure.

Where to start?
I also asked myself this question when I first bought finger paints. Start by simply sitting your little one in a chair and opening a jar of paint, and then everything will go by itself. Dip your finger in the paint and draw something. The baby will like it and he will want to try it himself. If the child is inactive, help him. Take your baby's hand, dip his finger in a jar of paint and trace it across a piece of paper. Let this be the end of your first drawing lesson, don’t rush. Both the second and third lessons may be similar to the first, everything will come with time. At first, my daughter really liked to just put her index and thumb into the jar and rub the paint with them. Did she study them by touch? And then I started “drawing” little by little.
What are the benefits of finger paints?
Very big. Drawing with such colors develops fine motor skills. Gives the child an idea of color (while drawing with the baby, pronounce the colors). Teaches the child to build cause-and-effect relationships and develops thinking. What else? Yes, it simply charges the little one with positive energy.