In a week we will congratulate each other with the bright words “Christ is Risen!” At the same time, it is customary to exchange an Easter gift - a pysanka. On it, with the help of special patterns, you can wish a person love, health, prosperity, and it is believed that it will become not only an Easter table decoration, but also a real amulet.
COLOR RULES. Your paints will be the most beautiful and strong if you use a few little secrets when painting them:
To prevent the eggs from cracking during cooking, let them sit at room temperature for about an hour;
You need to add a tablespoon of salt to the water to make the shell stronger;
In order for the paint to lay evenly on the eggs, they must first be degreased: wiped with soapy water or alcohol.
NATURAL "DYES"
1. Onion skins
If you want the color of the eggs to be more saturated (not light orange, but bright red), take more onion peels and boil them for about half an hour before lowering the eggs into them. Cool and only then lower the eggs (if you put them directly into hot water, they may burst), and boil for about 10 minutes.
2. Birch leaves
To make the eggs golden yellow, color them using dry birch leaves. The technology is exactly the same as with onion peels.
3. Speckled eggs
Before you dip the eggs in the dye, wet them and roll them in rice, then place them in a gauze bag and tie them tightly.
4. Floral motifs
Collect the first leaves and flowers and, slightly wet them, glue them to the eggs, then put them in a stocking, tie it tightly and paint in the usual way.
SECRETS OF PAINTING
PREPARATION
Choose an egg that is smooth, without spots or cracks. It should be white: this way the colors will appear brighter. Wash it, dry it and blow out the contents. You can do this with a syringe by making two holes on both sides. Stir the contents with a needle to make it easier to blow out.
Then rub the shells with vinegar to remove any greasy fingerprints. In those places where they remain, the paint may not adhere well.
WAX ON WHITE

Using a “brush” (a watering can on a wooden handle into which pieces of wax are placed, you can buy it on Andreevsky Uzviz) apply from bottom to top those parts of the ornament that should remain white. Hold the “brush” motionless while swirling the egg. Periodically heat it on a candle flame to draw the desired patterns with melted wax. To avoid mistakes, first draw the ornament with a pencil.
FIRST COLOR

When you finish applying the ornament with wax, dip the egg in yellow paint (for Easter eggs a solution of aniline dye is suitable: 0.5 tsp per 300 ml of warm water) and let it dry a little. Take the egg not with your hands, but with the help of a special napkin, so as not to smear the paint and get your hands dirty.
MULTICOLOR

After removing the egg from the paint, lightly blot it with a napkin, but do not rub it. Apply the desired pattern again with wax and immediately lower it into green paint, repeat this operation with red and black paints.
WAX TEARS

After all the layers of wax and paint have been applied, bring a burning candle to the egg (this must be done from the side, but not from the bottom, otherwise the pysanka may burst or become smoky). The wax will melt and the patterns will appear. Then dry the egg with a soft cotton cloth.
LAST STAGE

Grate the finished pysanka vegetable oil: it will sparkle. Then it will remain to be consecrated in the church and given to relatives or friends so that it will delight them for a whole year.
We thank Evgenia Molyar for her help in preparing the master class. O. Head of the Department of the Museum of Ukrainian Folk Decorative Arts.
HOW TO “PRESERVE” PYSANKA
TWO HALVES

We break the finished pysanka with a dull knife blade (do not cut it under any circumstances!). Then we select the white and yolk and be sure to peel off the film on the shell.
WARP

When everything inside the egg is cleaned, grease it with regular PVA glue and glue the inside with pieces of paper. Newspaper is ideal, but not smooth, but fibrous ( toilet paper too thin). When you reach the edge of the shell, make sure that the sides peek out from each half.
REUNION

We cover the top of the paper with more PVA glue, and then carefully connect the two halves according to the pattern of our pysanka.
FINISHING TOUCH

In order for the two halves to connect well, all the air needs to come out of the egg so that there is a vacuum inside it. To do this, we simply suck the air out of the pysanka.

The finished pysanka should dry for approximately 7-10 days at room temperature. “Having been preserved”, it will not break, which means it will be a talisman for your great-grandchildren.
We thank the staff of the Pysanka Museum in Kolomyia for preparing the material.
Egg painting is truly folk ritual. Traditionally, women painted them by hand, in privacy from everyone. Water for painting was taken from seven sources or at the junction of three streams. At the time of painting, the woman had to be completely immersed in her work in order to complete the patterns with good emotions and good wishes to those who will be the owners of Easter eggs.
Most Easter eggs were created in the spring, during the solstice. There was a belief that painting eggs with red paints at this time helped the sun to gain vitality before long summer.
DIY pysanka
If desired, almost anyone can learn the craft of painting eggs. You can do this yourself, or by contacting an experienced professional.
If you decide to start painting eggs, first prepare everything you need. For work you will need: an egg, a simple pencil, a candle, a brush (a special tool for painting), wax and a napkin.
First you need to wash the egg and boil it in salted water (1 tablespoon of salt per 2 liters of water). An egg intended for long-term storage must be hollow, so if you want to preserve your work for a long time, make small punctures in the shell and carefully remove the contents of the egg, then rinse and dry it.
To create Easter eggs, it is recommended to use only natural paints. For example, green paint is obtained from the leaves of nettle and lily of the valley, or the bark of buckthorn and ash. Yellow paint is made from chamomile inflorescences and onion peels, and red paint is made from bird cherry berries or St. John's wort seeds and flowers. Black paint can be obtained from alder roots, and brown paint can be obtained from oak or apple tree bark.
To create the paint itself, you need to soak it in cold water suggested plant material for a couple of hours. After this time, the resulting solution should be boiled over low heat: water with bark for about 3 hours, with leaves for 40 minutes, and plant inflorescences should be boiled for about half an hour.
The broth should be filtered and 1 teaspoon of potassium alum should be added to it. This vegetable paint can be stored for no more than fourteen hours, so you should not stock it up for future use.
You can buy a brush (scribbler) at a specialized craft store. If you can't find the right tool, you can try using a thin brush for manicure painting.
Apply the desired design to the shell, first with a pencil and then with heated wax, trying not to go beyond the lines of the pattern. After this, dip the egg into the lightest paint you have prepared.
The next step is to reapply the wax and dip the egg into the darker paint. Such procedures are performed until the selected pattern is obtained. At the end of the painting, the pysanka is placed in the oven or held briefly over a candle. Remaining wax should be carefully removed with a napkin. In order for the finished pysanka to acquire a beautiful shine, it is rubbed with sunflower oil.


PYSANKA is a unique work of folk art, it is a symbol of the Universe. The making of Easter eggs is associated with pre-Christian folk custom to welcome spring, with the awakening of the earth, the beginning of agricultural work, and later - Easter.
Pisankarism is present among many Slavic peoples, but it became widespread only in Ukraine, turning into a bright, original phenomenon.
The “grandmother” of pysanka can be considered “krashenka” - an egg painted in one color: yellow, red, green, blue, purple and even black. It was eaten and used in Easter fun. It was replaced by “speckled”, covered with specks and droplets applied with wax. Next was “malevanka” - a boiled egg painted with a brush. There were also “rags” - one-color, with scratched patterns. And the final version is, of course, pysanka, in which wax is applied to the surface of the egg with a thin tube - a “pisachka” (hence the name).
Pysanka is considered a symbol of life, sun, immortality, love and beauty, spring rebirth, goodness, happiness and contains deep meaning. It is given as a sign of truce, wishes for health, beauty and strength, and is used as a talisman against disaster and the elements, for the treatment of various ailments, against fear and slander. Pysanka is also given to a girl as a testament of love, and is buried in the ground for a good harvest. It is presented at Easter as a sign of honor, friendship and joy, with the words “Christ is Risen!”
The patterns and colors of Easter eggs are also not random. There are more than 100 symbolic drawings, each of which has its own purpose. Krivulka, for example, or the infinity symbol is a symbol of life, solar movement, beginning and end. The tripod symbolizes sky, earth and air. There is another interpretation: this sign can mean fire, water and air. Regarding colors, red symbolizes the joy of life, love; yellow - moon and stars, harvest; green - wealth, wealth flora; blue - clear sky, health; bronze - mother earth; black and white - respect for deceased relatives.


I invite you to join this amazing art.
The whole family can draw Easter eggs! Even simple patterns can be handled
children (of course, under your strict guidance). And believe me, this one
They will LOVE the process.
Today I want to tell you about how I make Easter eggs
In this short lesson I will try to talk about the basic techniques and
techniques for coloring Easter eggs, understanding which you can create
your little masterpieces
For work we will need:
- prepared egg
- wax
- a simple pencil
- candle
- a pisachok or a brush (you can make it yourself by rolling a strip of a tin can into a cone)
- napkins
- food or aniline dyes
1. So, first you need to prepare the egg. Take a white egg, wash it thoroughly with soda, and dry it with a napkin.
Now we take a small clove and make it on the thicker side of the egg.
small hole (press the nail to the egg and scroll in different
directions).
Then we take a syringe, draw in air, insert a needle into the hole and VERY
Slowly begin to blow air into the egg. Hold the egg with the hole down
above the container where its contents will drain.
When all the contents of the egg have poured out, wash it thoroughly and scoop it into
syringe water and rinse the middle of the egg with it, blow out the remaining water as well
air.
This is what is called a blown egg.
Place the egg on a napkin, hole side down, to allow any remaining liquid to drain out.
I recommend cooking the eggs in advance so they have time to dry thoroughly.
2. Next we apply with a simple pencil drawing on an egg. For this you need
sit comfortably, your elbows should be supported. We hold the egg in our left hand and
rotate slowly but evenly. Those. if you need to draw a straight line -
you need to rotate the egg, and not draw with a pencil, as on paper
You choose the pattern yourself.
First, you can divide the egg into “zones” in which the pattern will form:

I ended up with this pattern:
3. Now take the scribbler and heat it over the side flame of the candle:
We put wax into it:
Warm it up again and carefully cover the hole in the egg with wax. This
You need to make sure that no paint gets into the egg when dyeing.
4. Now we begin the painting process.
First, we draw with a scribbler along those lines that should subsequently remain white:
Here is our egg ready for the first coloring.
We start painting with lighter paint and gradually move on to darker tones:
Here we painted the egg with yellow paint. Naturally, the waxed areas remained white.
Now we need to apply wax to those places that should be yellow:
The egg is ready for the next painting. This time it's red paint:
And now I will have the last coloring - blue paint:
At this stage it is not at all clear what the final result will be.
The more interesting and exciting the last stage becomes.
Now we need to remove all the wax from the egg.
To do this, gently gradually warm the egg without coming into contact with the candle flame and immediately wipe off the melted wax with a napkin:
This photo shows the difference between the erased piece and the one covered with wax:
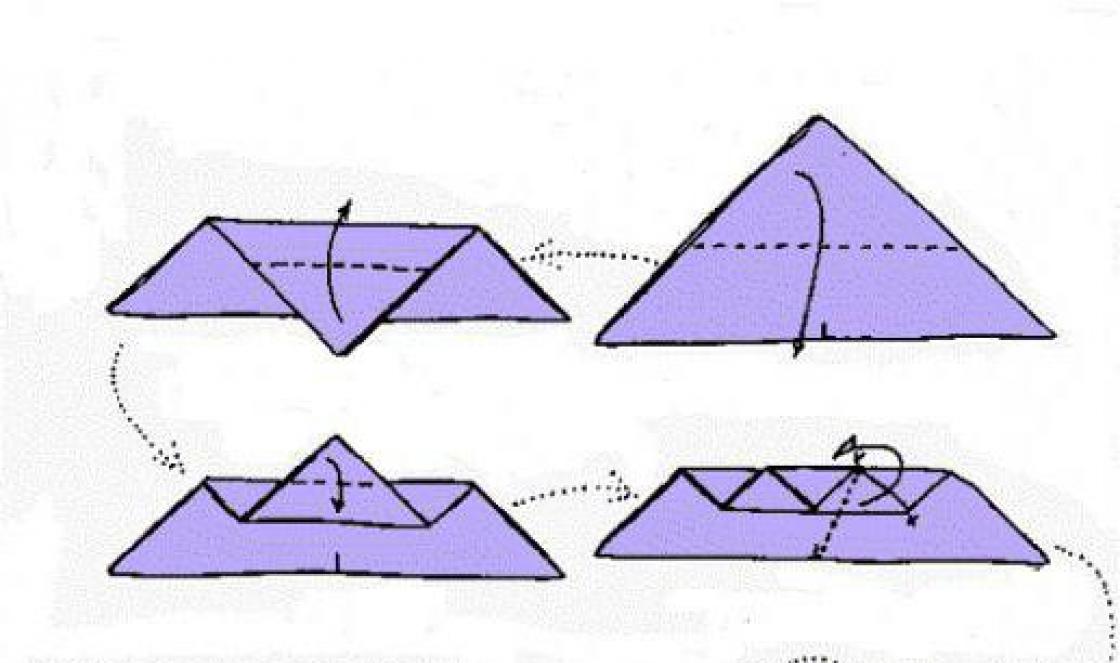
P.S. I’ll also add a few words about how to make a pisachok yourself.
You need to find a piece of thick foil or thin tin (so that it doesn’t burn on
fire) measuring about 6 cm by 6 cm, cut out a circle with a tail from it
for fastening and from this circle, having made a slot in it, twist a cone,
so that you get such a watering can with a thin spout, so that the hot wax
came out in a very thin stream. Attach the tail to a stick or pencil. Here is the diagram:
For those who live in Kyiv, I want to say that on Saturdays at the Gonchar Museum there are MKs on coloring Easter eggs. You can also buy Easter eggs there.
I wish everyone a wonderful spring mood and creative inspiration!
First of all, I would like to explain the difference between Easter eggs and Krashenka, since many people think that they are the same thing. Krashenki are boiled eggs that are painted with different paints, stickers and other decorations. Pysanka can be too boiled egg, but more often it is made from a blown egg, wood, or foam. They are painted by hand!
In Ukraine there is a real cult of Easter eggs. This is not accidental, since the tradition of hand-painting eggs appeared among our ancestors long before the advent of Christianity. Then the church adopted this tradition from paganism. This is how pysanka became a symbol of Easter.
There are many ways to paint Easter eggs. In Ukraine, different parts of it had their own drawings, ornaments, and interpretations. The eggs were painted mainly by women, although there were and are male artists. They wrote Easter eggs for different purposes. There were also gifts, and so that the harvest would be good, so that health would not fail. With such an egg, the guys approached the girls they liked and proposed. As you can see, pysanka is very multifunctional.
We have found for you several different ways to make Easter eggs. The first and most popular method requires a special tool - scribbler. There are three options for the development of events.
The first one is that you do it yourself. How? The next master class will tell you about this.
Second - you buy it.
And third, you can do without it. You will use a regular stick, periodically dipping it into melted wax. This will complicate the process somewhat, but it will allow you to make an excellent Easter egg.
To make pysanka, you will also need eggs. You can buy wooden blanks, they are almost eternal; eggs made of foam plastic will also work. But you can get by with regular chicken ones.
How to blow an egg
You will need:
Egg
. Gypsy needle
. Syringe with needle
. Plate
. Glue
. Paper white napkin
Make two holes, from the blunt end and the sharp end of the egg. Push a needle through the hole and crack the egg, mix the yolk and white. Now take a syringe, insert the needle into the hole and release air as if you were giving an injection. The contents of the egg will spill into the plate. Now fill the syringe with water and rinse the inside of the shell. Then dry it and cover both holes with a small piece of napkin.
Some tips for beginners.
It is best to take eggs with a hard shell.
Before you start making pysanka, wash the egg and wipe it with vinegar.
Take your time, let the paint, threads, and grain dry before continuing to work.
Be patient, this is not the easiest task. But the result is worth it.
Wax painting
You will need:
Pissie
. Eggs
. Wax - only wax, not paraffin
. Vinegar
. Dyes
. Napkins
. Candle
. Needle - gypsy
. Pencil
This is the most difficult and painstaking method. Don't forget that the video is from a professional. If you end up with a different pysanka, don’t be upset. You can depict your pattern, the video only shows the working technique.
Pysanka made of threads

You will need:
Eggs
. Threads - floss
. Glue
. Scissors
. Brush
. Needle or toothpicks
. Spray varnish
These Easter eggs are quite easy to make, the main thing is not to rush. Instead of floss threads, you can use any other threads. The main thing is that the colors match. Or they didn't match. Everyone has their own taste, their own understanding of beauty. Create!
Eco-pysanka

You will need:
Eggs
. Glue
. Tweezers
. Brush
. Buckwheat, rice, poppy seeds, millet, small pasta. Anything
. Spray varnish
This method only seems simple, but working with small details has always been very painstaking. Don't rush, be careful. Show your imagination, come up with your own design using what you have from cereals, legumes, and pasta.
Acrylic Easter eggs

You will need:
Eggs
. Paints
. Brush
. Beads, rhinestones
. Glue
Even children can handle this technique. Be sure to involve them in the work. Use a variety of beads, beads and even buttons. The more wonderful, the more interesting the pysanka will look.
Decoupage on Easter eggs

You will need:
Eggs
. Glue
. Scissors
. Brush
. Napkins - for decoration
. Dye
. Spray varnish
Decoupage is a simple but painstaking technique. The main thing is to be careful, not to rush and not to overdo it with details, so as not to end up with a sloppy drawing. Try playing with contrast, as shown in the video. Decorate the pysanka with small convex details, as in the photo.
On the eve of Easter we have so many worries! But the main miraculous rite is the painting easter eggs. We (and especially our children) approach it with special trembling in our hearts and generous joy! We want to make Easter eggs incredibly beautiful, original, unique! And at the same time, we want their production to be simple and fast.
All these wishes come true! We are pleased to present to you the simplest and most incredible spectacular technique decoupage, which, according to Internet users, is the most popular! Don't believe me? Read on!
How to make pysanka with your own hands?
The optimal way to make Easter eggs is decoupage. Behind this complex word lies a very interesting technology that is loved (and accessible) by both adults and children. Decoupage is the art of decorating various objects through appliqué: cutting and gluing images onto a surface.
To decorate Easter eggs we will use ordinary three-layer napkins. And instead of glue - egg white, which is an environmentally friendly and harmless material, and accessible to everyone!
DIY Easter eggs for children: easy and safe!
You won't find better technology! Its advantages are obvious and undeniable!
This is extremely easy way make Easter eggs! Even a five-year-old child can cope!
Fully used safe means! No burning wax or toxic paints!
Pysanky are not scary eat even small children! After all, natural “glue” is used for decoration: egg white.
Extraordinary showiness! The designs created by talented professional artists are miraculously transferred to the shell.
DIY pysanka: tools and materials
Before you make your own pysanka for children, you need to prepare simple tools and materials.
Colorful three-layer napkins. Choose a clear and bright design or a pattern that will fit on the area of the testicle. Flowers (or other images) that are too large will not look very attractive, since the egg has a small area for decoration. Ordinary napkins are not so “pliable” to work with. But the thin material of colorful three-layer napkins takes the shape of an egg when wet.
- Scissors(small or large) with which you are comfortable cutting.
- Brush for applying protein to pysanka.
And of course eggs, from which a masterpiece will be made. Plus a small bowl (or glass) for protein.
How to make pysanka: instructions with photos
We present clear instructions for making Easter eggs step by step. We support all stages with photographs.
1. Boil hard-boiled or soft-boiled eggs in water, depending on how you (and your kids) like them. After this, cool them in cold water, dry them or blot them with a thin towel.
2. Separate the egg yolk from the white. Place it in a separate small bowl (or glass). For work we only need protein.
3. Carefully separate the top colored layer from the napkin. This is what will be used for decoration. 

4. Select the most beautiful element of the design and cut it out with scissors. Keep in mind that you need to compare the size of the image and the area of the egg. Try on whether the drawing will fit on the Easter egg. Choose colorful napkins with clear images.  5. Apply the cut out element to the egg and spread the egg white on top of the entire surface of the image using a brush. The napkin will get wet, taking on the shape of an egg and firmly stick to the shell.

6. Let the pysanka dry for 20-30 minutes. While the napkin on the pysanka is wet, it can be accidentally damaged or dislodged by your fingers. Therefore, try to hold the egg carefully, in places where the pattern has not yet been applied. Once dry, it will hold very tightly!
All! Our masterpieces are ready! Our simple Easter eggs are extremely impressive and simply amazing! All guests will definitely like them and give everyone a feeling of a real holiday! You will be surprised how the children will be captivated by the process of decorating Easter eggs, and how pleased they will be with the result of their labors!
Easter eggs: decoupage was a success!
We have several secrets of decoupage that the masters have discovered.
Choose napkins with designs on a white or pale yellow background. If the pattern is complex, you will have a hard time cutting it out. If the base of the napkin is close to natural color eggs, then the edges of the paper will merge with the shell. The borders of the patterns will not be visible. You don’t have to be too zealous when cutting out designs and smoothing out the contours.
Some craftsmen recommend tearing off the selected elements on a thin napkin with your hands. They explain this by saying that this way the borders of the paper will be less noticeable. This rule only applies to napkins with a white or yellow base.
You can do decoupage in another way: by completely wrapping the egg with a thin napkin. Choose a beautiful pattern on a napkin, cut out a rectangle approximately the size of a pysanka, wrap it completely and cover it generously with egg white. True, in some places folds will be created on the paper, which will need to be covered again with adhesive protein. But, in general, these folds do not spoil too much general view Easter eggs, because they are very thin! Look at the photo.
If your original Pysanka egg darkens over time, how can you make it shine again? Lightly grease it with vegetable oil. The surface will become shiny! Again, we use only natural ingredients so that the egg can be eaten by children!
The site team wishes you a happy Easter, peace in your family, good luck in all your endeavors and the fulfillment of your dreams! Glad to be of service to you!