You will need
Yarn (100% cotton; 95 m/50 g) - 300 (350) g sand; knitting needles No. 5.5; circular knitting needles No. 5.Patterns and schemes
Garter stitch
Front and back rows - front loops.Facial surface
Front rows - front loops, purl rows - purl loops.Openwork strip (3 loops)
Front rows: 1 yarn over, knit 3 loops together with a pull so that the middle loop is on top (slip 2 loops together like knit stitches, knit 1 and pull it through the removed loops), 1 yarn over;purl rows: purl loops and yarn overs.
All subsequent patterns include: the diagram shows the front rows. In purl rows, purl all loops and yarn overs.
Openwork pattern A (12 loops)
Knit according to scheme 1. Constantly repeat rows 1–20.
Openwork pattern B (9 loops)
Knit according to pattern 2. Constantly repeat rows 1–12.
Openwork pattern C (27 loops)
Knit according to pattern 3. Constantly repeat rows 1–18.
Knitting density
16 p. x 25 r. = 10 x 10 cm.Attention!
Knit the skirt crosswise, starting from the right half. Arrow on pattern = knitting direction.Pattern
Getting the job done
Cast on 78 stitches and for the placket, knit 1 cm = 3 rows in garter stitch, starting with 1 purl row. Continue working as follows: edge stitch, 1 p. in stockinette stitch, 3 p. in openwork stripe, 12 p. in openwork pattern A, 3 p. in openwork pattern, 9 p. in openwork pattern B, 3 p. in openwork stripe, 12 p. in openwork pattern A, 4 stitches in stockinette stitch, 27 stitches in openwork pattern C, 3 stitches in garter stitch (= bottom placket, including edge stitch).
After 101 cm = 252 rows (108 cm = 270 rows) from the bar, purl 3 more rows for the final bar, then in the next purl row, bind off all the loops like knit stitches.
Assembly
For a short tie, cast on 42 stitches on circular needles, then on the right side edge of the skirt, cast on 158 (168) loops for the belt and for a long tie, cast on 148 loops = 348 (358) sts.Then, starting from the 1st purl row, knit in garter stitch, while in the 1st row on the skirt waist section, evenly distributed, decrease 30 sts = 318 (328) sts.
After 2.5 cm = 8 rows in the next purl row, bind off all stitches like knit stitches.
Wrap the skirt around the hips, with a long tie in the appropriate place through the top openwork strip and the ends of the ties.
Photo: magazine"Sabrina"№3/2017
Sizes: 36, 40/42, 44/46
Russian sizes: 42, 46/48, 50/52
You will need: 300 (350) 400 g wine red yarn (50% wool, 50% polyacrylic; 135 m/50 g); knitting needles and circular knitting needles No. 3 and 3.5; hook No. 3.5; 74 (82) 90 cm elastic band 3 cm wide.
Knitting technique.
Stockinette stitch, circular rows, knitting needles No. 3: knit facial loops in all rows.
Facial surface, knitting needles No. 3.5: front rows - front loops, purl rows - purl loops.
Garter stitch, knitting needles No. 3.5: knit and purl rows - knit stitches.
Basic pattern, knitting needles No. 3.5: * 2 r. persons satin stitch, 2 r. garter stitch*, repeat from * to *.
Knitting density.
Stockinette stitch with knitting needles No. 3: 24 sts and 33 r. = 10 x 10 cm;
Basic pattern, knitting needles No. 3.5: 22 sts and 40 r. = 10 x 10 cm.
DESCRIPTION OF THE WORK
On knitting needles No. 3.5, cast on 4 stitches and knit 1 row. facial and 1 p. purl. Continue the work next. sequences:
1st row (= knit row): knit 1 from the 1st stitch. and 1 persons. crossed, knit the remaining loops to the last loop, knit 1 from the last loop. and 1 persons. crossed = 2 stitches added.
2nd row (= purl row): knit stitches;
4th row: purl stitches.
Repeat in height from the 1st to the 4th row until the length of the panel is 44 (46) 48 cm.
Attention! Measured not in a diagonal direction, but from the corner of the cast-on edge vertically upward.
After reaching the desired length of the panel, continue knitting as follows (= straight part of the panel):
1st row: slip 1 st, as in knitting, knit the next loop and pull the removed loop through the knitted one, knit the remaining loops to the last loop, knit 1 from the last loop. and 1 persons. crossed = the number of loops in the row remains the same;
2nd row: facial loops;
3rd row: knit as 1st row;
4th row: purl stitches.
Repeat from the 1st to the 4th row until the girth of the product reaches 88 (96) 104 cm (it is better to try it on the figure and, depending on the result, tie or undo a certain number of rows).
Then, for the wrap allowance, knit another 11 (12) 13 cm, as described above.
When the main panel + wrap allowance is knitted, continue the work as follows (= part with decreases):
1st row: slip 1 st, as in knitting, knit the next loop and pull the removed loop through the knitted one, knit the remaining loops up to the last 2 sts on the left knitting needle, knit the remaining 2 loops together;
2nd row: facial loops;
3rd row: knit as 1st row;
4th row: purl stitches.
Repeat from the 1st to the 4th row until 4 stitches remain on the needles. Then bind off the loops.
Assembly: place a wrap allowance under the edge of the front part of the skirt panel to a width of 11 (12) 13 cm. For the belt, cast on evenly on circular needles No. 3 along the upper edge of the product 172 (192) 212 sts (on a double section through both layers) and knit in the round using stockinette stitch. After 3 cm, knit 1 p. purl = fold line and another 3 cm in stockinette stitch, then bind off the stitches. Along the fold line, turn the belt inward and sew, leaving a small area open. Thread an elastic band through it into the belt and stitch the ends, overlapping each other to a width of 2 cm. Sew up the open section of the belt. From the waist, sew layers of cloth over a section 15 cm long. Crochet 1 row along the bottom edge of the skirt. Art. b/n.
A skirt is considered one of the indispensable elements of clothing, which makes the image more feminine. There are a huge number of skirts. Mostly there are models made of fabric.
However, knitted skirts have gained immense popularity among women and have become an ideal addition to any wardrobe. Thanks to knitting, you can also make an exclusive skirt that will attract the attention of people around you.
Let's look at the most popular types of skirts together and try to knit them.
Knitted pencil skirt: diagram with description, photo
Legend:
- P – row
- P - loop
- LP - facial loop
- IP - purl loop
- KP - edge loop
- PV – garter stitch
- N – yarn over
- LH – facial surface
- IG - purl stitch
- IR - purl row
- LR - front row
A pencil skirt is considered to be a universal and classic skirt. It is knitted using circular knitting needles and will become a real lifesaver for you. We suggest you make a skirt M or 44, since this size is considered the most common.

To make this skirt you will need to stock up on:
- Yarn 50 g - 8 skeins.
- Circular knitting needles with a length from 60 cm to 80 cm - No. 4 or No. 4.5.

Execution process:
- Cast on knitting needles No. 4 140 P. Close P in a ring and knit in a circle like this: 2 LP, 2 IP.
- Continue knitting until your work is 5 cm long.
- 1 R – start knitting with needles No. 4.5: 1 IP, *2 LP, 2 IP*, repeat from one * to the other *. Complete 2 LP, 1 IP.
- Knit 2 R and all subsequent even R like this: Knit LP, and Knit IR.
- 3 R – move the elastic pattern to the left side by 1 P like this: *2 IP, 2 LP*, repeat from one * to the other * until the R ends.
- 5 R – move the pattern to the left side by 1 P like this: 1 LP, * 2 PI, 2 LP *, repeat from one * to the other *, finish with 2 PI, 1 LP.
- 7 Р – shift the pattern to the left side by 1 Р like this: * 2 LP, 2 PI*, repeat from one * to the other * until the row ends.
- These 8 R make up the main repeat of the pattern in height. Repeat them until you reach 47 cm.
- Finish with an even R.
- Start knitting with needles No. 4 and knit 8 cm (you can do a little more) with an elastic band in the form of a spiral: 2 LP, 2 PI, moving the pattern to the left.
- When you reach 55 cm, bind off the loops. Make sure that the lower P does not tighten, but is also not too loose.
Bulgarian skirt with knitting needles: diagram with description, photo
The thread consumption will depend on the length of the skirt you want to end up with. For a skirt whose length is 70 cm you need to stock up on:
- Threads - 400 g (a little more is possible).
- Circular knitting needles of different numbers, for example, No. 3, No. 3.5, No. 4 (the length of the knitting needles should also differ by 10 cm).
- Crochet - No. 3.5.

Execution process:
- Cast on 140 P. Take the smallest circular knitting needles for this.
- Mark the joint with a marker, then connect the circle.
- Knit the 1st section: 1 LP, 1 IP and so on until the end. Repeat the circle until the section is 12cm high.
- Knit the 2nd section: make an increase (1 LP, plus 1 LP, 1 PI, plus 1 PI) so that you end up with 280 P. Then knit an elastic band: 2 LP, 2 PI and so on. Knit until the section is 15 cm high.
- Knit the 3rd section: make an increase (2 LP, plus 1 LP, 2 PI, plus 1 PI) so that you end up with 420 P. Then knit an elastic band: 3 LP, 3 PI and so on. Repeat the circle until the section is 19cm high.
- Knit the 4th section: make an increase (3 LP, plus 1 LP, 3 PI, plus 1 PI) so that you end up with 560 P. Then knit an elastic band: 4 LP, 4 PI and so on. Repeat the circle until the section is 24 cm long.
- Close the P with a hook.
- In the upper part, knit an elastic band 3 cm high. Close P.


Warm knitted skirt for the winter: diagram with description, photo
If you already have some knitting skills, you can easily make a warm skirt for yourself. To make it, stock up on:
- Knitting needles - No. 4.
- Threads in 5 different shades: brown, beige, blue, yellow and white.

Execution process:
- Take yellow threads. Cast on 200 P. Knit P with IP.
- Take beige threads. Knit as indicated in the pattern. Repeat rapport 20 rubles. Knit it 4 R.
- Take blue threads, knit 2 R with them. Then take white threads. Knit 2 R with them too. Take brown threads, knit 6 R with them. Then 2 R with beige threads, 2 R with blue threads, 2 R with white threads. Then knit 4 R with beige threads, 4 R with brown thread, 4 R with white thread. Then 2 R with blue threads, 4 R with beige threads, 2 R with yellow threads. Continue knitting, repeating the entire point.
- When the height of your fabric is 39 cm, do not make H at 4 P. In subsequent repeats, reduce by 2 P. Knit 160 P in this way.
- Knit 4 R and 5 R up to 54 cm.
- Knit an elastic band. At the same time, alternate between IP and LP. Tie an elastic band 4 cm high.

Knitted skirt with zigzag pattern: description
A fairly simple skirt, which is made with a zigzag pattern. To make it, stock up on:
- Thread – 2 skeins
- Knitting needles No. 4
- Knitting needles No. 5

Execution process:
- Cast on 160 P for the front using needles number 4 (you will have to cast on the same amount for the back of the skirt).
- Knit an elastic band 18 cm high in this way: 2 LP, 2 IP, 2 LP and so on.
- Switch to needles number 5. Knit the fabric with a zigzag pattern as indicated in the pattern.
- When your canvas is 46 cm, complete the 2nd P of the diagram.
- Close P.
- Sew the front and back.

Zigzag skirt
Knitted Eiffel Tower skirt: diagrams, description
A skirt made in the shape of an Eiffel Tower looks very interesting. To make it, stock up on the following materials:
- Threads 280 m – 100 g
- Knitting needles - No. 3.5
We give you the pattern for 4 P. But you will have to knit with 3 P.

Execution process:
- Cast on the knitting needles 144 P. You will get a belt (6 IP, 6 LP and so on).
- Connect the edges between each other: knit 2 stitches together, then add enough so that you end up with 156 stitches.
- Then, while knitting, add another 12 stitches. You should have 12 stitches between each diamond.
- Knit the skirt as indicated in the pattern.

Skirt "Eiffel Tower"
Knitted openwork skirt: diagrams, description
We offer you an easy-to-make skirt that you can wear in the warm season. It is knitted using an openwork pattern of thin threads. To make it, stock up on:
- Threads – 300 g (for a skirt with a girth of up to 102 cm).
- Knitting needles number 3.
- Knitting needles No. 3.5.
- Knitting needles number 4.

Execution process:
- On knitting needles No. dial 143 p. Then transfer the work to knitting needles no. 3.5 and knit 3 p p.
- Next comes the pattern. Start knitting it from the 1st R. Knit like this: 2 P before rapport, 10 P of pattern 13 R. At the very end of P, knit 11 LP.
- Knit the pattern as indicated in the pattern. You should get 16 R (rapport).
- When your canvas is 24 cm high, decrease 1 P on both sides. Make sure that the pattern is preserved. Or you will have to shift the decrease in P by the desired number of P.
- Make this decrease 9 p every 3.5 cm. You should end up with 123 p on your knitting needles.
- Knit a skirt fabric with a height of 59 cm. Take knitting needles number 3. Knit an elastic band 3 cm high with them.
- Close P. Knit the 2nd part of the skirt.

Knitted jacquard skirt: diagram
An attractive and very comfortable skirt made with jacquard patterns. To make our version, you need to stock up on:
- Blue yarn – 250 g.
- White yarn – 100 g.
- Circular knitting needles - No. 2.
- Circular knitting needles - No. 2.5.

Pattern for knitting the main fabric of a skirt with knitting needles

Knitting pattern for skirt inserts
Execution process:
- Cast on 210 stitches on needles No. 2. Knit a belt 7 cm high using stockinette stitch. At the fold in the center of the waistband, knit a stitch.
- Switch to knitting needles number 2.5. Add 22 P evenly (you should end up with 232 P).
- Continue knitting LG and knit as indicated in the diagrams.
- Before the 1st pattern, add 18 P.
- Before the 2nd pattern, add another 16 P.
- Before the 3rd pattern, add another 19 P.
- Before the 4th pattern, add another 30 P.
- After the 5th pattern, decrease 18 P.
- After the 6th pattern, decrease 18 P.
- Finish the skirt with the last pattern and close the skirt with an elastic band using size 2 needles.

How to knit a pleated skirt?
The pleated skirt is made from even folds in the form of an accordion. The advantage of this product is that it is very easy to knit. To make it you need to stock up on:
- Knitting needles
- Threads

Execution process:
- Dial such a number of P so that it is a multiple of 10 plus 2 KP.
- Tie the 1st LR like this: KP, 9 LP, 1 IP. Repeat this sequence until the R ends. Finish R 1 CP.
- Link the 2nd IR like this: CP, 5 LP, 1 PI, 9 LP, CP, 5 LP, 1 PI, 9 LP, 1 PI. Repeat the sequence of 9 LPs and 1 IP until the end of R. Finish R 4 LPs plus 1 CP.
- Then repeat 1st R and 2nd R to the required height. When knitting, keep in mind that strips that consist of IP form the inner corner of the fold, and strips of LP form the outer corner.

Knitted pleated skirt
You can knit this skirt for your 4-year-old daughter. In order to knit it, stock up on:
- Yarn – 150 g
- Knitting needles - No. 4, length 80 cm


Execution process:
- Cast on 140 P. Knit the elastic band in a circle: 7 rows of LP, 1 R IP, 7 R LP, 1 R IP. At the end, you will need to fold the resulting strip in half. At the top you will have P from IP.
- Then knit 1 installation P for braids: 3 LP, 4 IP. Knit a pigtail on 3 P - * 1 circular P 2 P on an auxiliary needle for your work, 1 LP, P from an auxiliary needle, then 4 IP and so on until the P is finished. 2 CP, then all P according to the pattern*. Repeat P from one * to another *.
- Knit this pattern to the required height. Then start knitting the bottom of the product.
- To expand the fabric, start knitting in this way: 1 N, 3 LP, 1 N, 4 IP and so on until the R is over. Knit the next R according to the pattern. Knit the LP crossed so that the holes do not turn out too large. Next R: 1 N, 5 LP, 1 N, 4 IP - an increase occurs. Add this to the desired width of the bottom of the skirt.
- Knit with this pattern to the required height of the fabric. Knit the last 4 R's with IP. Close the work of the individual entrepreneur.
- Hem the elastic band. Insert a rubber band into it. If you wish, you can sew beads to each fold.

The size of this skirt is suitable for a waist up to 81 cm. To make it, stock up on the following accessories:
- Red yarn - 8 skeins. 50 g (or 120 m).
- Black yarn - 1 skein.
- Circular knitting needles - No. 3.5 (1 m).
- Circular knitting needles - No. 4 (1 m).
- Short circular knitting needles - No. 3.5.
- Short circular knitting needles - No. 4.
- Flat rubber band.
Execution process:
- Cast on 640 stitches with red yarn using long needles No. 3.5.
- Knit in a circle (mark each circle) like this: knit with a garter pattern (1 circular R LP, 1 circular R IP). Knit like this: 4 circular P with red threads, 4 circular P with black thread, 4 circular P with red thread.
- Take long knitting needles number 4. Knit 4 circular R's with a red LP thread. Then start knitting as indicated in the instructions.


Knitted long skirt
The next skirt model will fit size 46. In order to knit it, stock up on:
- Bur-colored acrylic threads – 300 g
- Braid – 1.5 m
- Knitting needles - No. 4.5
- Crochet - No. 4.5

Execution process:
- Fold the thread in half. Dial 201 P and knit as indicated in pattern No. 1.
- Knit 65 cm, then change the pattern to the one indicated in pattern No. 2. Please note: You need to reduce the number P by 1 pc. As a result of this, 200 P should remain on your knitting needles.
- When you knit a fabric 85 cm high, close the P according to the pattern.
- Then assemble the individual parts of the skirt: take the pieces of the product, place them on your pattern, moisten them and dry them. Then sew the dried parts together, leaving a small 35 cm slit on the side. Crochet the bottom of the product and the slit, and pull the braid into the waistband.

Knitted mohair skirt
To make this skirt you need to stock up on:
- Emerald yarn – 150 g
- Straight knitting needles - No. 3.5
- Circular knitting needles - No. 2
- Crochet - No. 3

Execution process:
- Tie 13 wedges as shown in the picture. It shows 3 wedges plus the start line of the 4th wedge. The arrows shown in the picture are where all the knitting is directed.
- Take knitting needles number 3.5. Dial 102 P. Knit R LP. You will not take this P into account in further calculations.
- 1st wedge: *1 R with IR garter pattern shortened R (set aside at the end of IR 33*3 P, turn with H and knit back LR with shortened R, then LR equal to 66th R, knit 3 P). Knit the 67th R using 102 P again (knit repeated H followed by P together with the LP). In the next P, knit the first 15 P, set aside these P for the belt. Knit 87 P. When the P runs out, cast on an additional 15 P (you will end up with 102 P). One wedge ends with this P.
- Tie subsequent wedges from *. In the 68th P of the next wedge, knit the first 15 Ps and set them aside for the belt. The other 87 P close the LP.
- Sew the cast-on edge and closed edge. 15 P will appear on your left. Take circular knitting needles, transfer 15 P to them, which you set aside from each wedge. Add 1 P in the 1st R. Knit 196 P on them in a circle with an elastic band. When your elastic band is 8 cm high, close the pattern as in the diagram.
- For the tie, use a hook to tie a chain with a double thread, using chain stitches 130 cm long. Step back 2 cm from the top of the product, pull the belt from the center, pass over 2 stitches and under 2 stitches.


Skirt knitted diagonally
A skirt made diagonally looks very unusual. To knit it, stock up on:
- Yarn – 300 g (150 g of one color, and 150 g of another color)
- Knitting needles - No. 3.5

Execution process:
- Dial 155 P.
- In every 2nd P, at the beginning of the P, add 1 P. When the P ends, subtract 1 P. You will end up with a rhombus.
- Take one color of thread. 1 R: knit LP.
- 2 R: knit IP (CPs do not count).
- Take a different color of thread. 1 R: knit LP.
- 2 R: knit IP. You will get a beautiful scar.
- At the bottom of the product (instead of decreasing), take 2 LPs together, tilted to the left side (the edge will not curl up).
- At the top of the product (instead of increasing) in the IR before the CP, make 1 N. Then knit the CP. Subsequently P (LR) change the threads. Knit the CP with new yarn, then knit the crossed H, and then all the LPs.

Skirt made of thick yarn knitted
Quite an interesting version of the skirt. To make it, stock up on:
- Melange threads – 350 g.
- Knitting needles - No. 9.
- Auxiliary knitting needle.
- Thick needle.
Execution process:
Knit the skirt as indicated in the description:


Knitted skirt with clasp pattern
From the “Lock” pattern you can knit any skirt of your choice, for example, a classic pencil skirt. But to complete the pattern itself, you will need to perform the following steps:

Dial the number of P that will be a multiple of 5 + 2 P for the symmetry of the pattern, + 2 KP.
- 1 R – knit *2 IP, 3 LP*, 2 IP.
- 2 R – 2 LP, *3 IP, 2 LP*.
- 3 R - *2 IP, 3 LP, throw the 3rd LP of your rapport to the left side through the 4th P and 5th P*, 2 LP.
- 4 R – 2 LP, *1 IP, 1 H, 1 IP, 2 LP*.
- Then repeat the pattern in the 1st R.

Skirt with "Lock" pattern
A mini skirt with an unusual pattern will please any fashionista. If you like to wear short skirts, be sure to knit this model. For this you need to stock up on:
- Circular knitting needles.
- Yarn.

Execution process:
- Dial 220 P.
- Connect the work in a circle.
- Knit an elastic band 3 cm high in this way: 1 LP, 1 IP, 1 LP, 1 IP and so on.
- At the same time, add 20 P evenly throughout the elastic band. As a result, you should get 240 P.
- Continue knitting with the pattern indicated in the diagram (the picture itself shows one repeat).
- Close P.
- Take an elastic band, preferably a wide one, and sew it to the product.

Knitted ribbon skirt
Ribbon threads are essentially different from ordinary yarn. They are similar to tape. From these threads you can knit a very interesting product, for example, a festive skirt. It is advisable to knit ordinary patterns with ribbon threads, as they are already beautiful. For example, let’s try to knit a skirt for a girl. For this you will have to stock up:
- Ribbon threads – 1 skein.
- Ordinary thread.
- Circular knitting needles.

Execution process:
- Cast on 100 P from ribbon threads, close the circle.
- Tie without cutting the thread 4 R LP with regular threads.
- In the 5th P, add ribbon threads (knit all the P threads, folding it in half).
- Repeat the 1st point and 2nd point, adding P if necessary, until the product is the length you need.
Knitted skirt with peacock tail pattern
Let's knit together a skirt for a little fashionista 5 years old. To make this skirt you will need the Peacock Tail pattern and the Star pattern. Plus 1x1 elastic band and IP fabric.
Execution process:
- Knit in the round, starting from the bottom. Knit the yoke and elastic band.
- Dial 252 P.
- 1 R: knit IP.
- 2 R: 25 LP, 17 IP.
- 3 R: 1 N, 1 IP, 2 LP, so 8 r. Then link 17 IPs.
- 4 R and 5 R repeat the repeat of the product.
- 6 R: make a decrease from IP. Then make a decrease every 4th R.
- Knit the yoke with the “Star” pattern.
- Knit the braid like this: 1 LP, 1 IP.


Knitted assol skirt with description and diagram
In terms of execution, the skirt is not considered the lightest, but it deserves to be knitted for your daughter.


Let's take the average size: length is 57 cm, waist width is almost 84 cm.
To make it, stock up on:
- Yarn 100 g - 8 skeins.
- Circular knitting needles - No. 4.5.
- Elastic band for the belt.

Execution process:
- **Dial on 105 P. Knit LG 3.5 cm. Finish knitting IR.
- In the subsequent LR, knit a wedge of 72 P. Then turn the work.
- Leave the remaining P on the working knitting needle. Do not knit them until you have knitted the entire wedge.
- 2 R: close 4 P, knit LP to the end of the row (68 P).
- 4 R: close 4 P, knit IP to the end of the row (64 P).
- 5 R: knit IP.
- Repeat the last 4 R's 2 more R's. Finish in LR (48 P).
- Start knitting with IR. Continue knitting LG, at the same time close 4 P at the beginning of the next 12 IR (in the end you will close all P). Don't cut the thread.
- From the face, lift along the edge of the product with closed P 72 P. Then knit 33 LP (105 P). You have tied a 1-in wedge.
- Repeat from one * to the other * another 11 rubles. Finish in LR. Then knit the next IR and close P.
- From the face of the product, lift 165 P. Start with IR: knit an LG of almost 8 cm, finish in IR. Close P.
- Now sew the edge you picked up and close together.
- Fold the belt from the wrong side. Sew it on and insert the elastic.

Skirt year
Knitted skirt with elastic knitting
In order to knit a size 48 elastic skirt, you need to stock up on:
- Yarn – 3 skeins.
- Knitting needles - No. 4.5

Execution process:
- Cast on 90 P. Knit 2 similar pieces for the front and back.
- Use an elastic band for knitting: 5 LP, 5 IP, 5 LP, 5 IP and so on.
- Tie the belt with the following elastic band: 2 LP, 2 IP, 2 LP, 2 IP and so on.
- Sew the details.
- All. The skirt is ready.

How to knit a flared skirt?
A warm skirt will become an indispensable thing for you in winter. So, stock up in advance:
- Melange threads – 400 g
- Knitting needles - No. 5
- Knitting needles - No. 6
Execution process:

Both the front and back of the skirt are done the same way.
- Cast on 122 sts on smaller needles. Knit a 1x1 elastic band.
- Take knitting needles number 6. Tie like this: 1 CP, * 2 LP, 10 PI, 16 (braid), 10 PI, 2 LP. Repeat from * 2 r, KP.
- At the same time, reduce P in every 8th R like this: 5 r, decrease by 6 P. Reduce in the 18th R like this: 3 r, decrease by 6 P (in every 6th strip with IG, knit 2 P together with IP, y There will be 74 P left of you).
- When you knit 98 R from the very beginning of work, knit 2 R LP. In every 1st P, remove 22 P evenly. You should have 52 P left.
- Knit another belt 7 cm high.

Knitted wrap skirt
A red wrap skirt is a great thing for the office, an evening walk, meeting with friends... If you want to knit such a fashionable skirt, stock up on:
- Yarn – 350 g
- Circular knitting needles - No. 3
- Circular knitting needles - No. 3.5

Execution process:
- Take knitting needles number 3.5. Cast on 4 P. Knit 1 LR and 1 IR.
- 1 R: (as a LR) from the 1st P, knit 1 RL and 1 RL crossed, then knit a RL, knit the last P like this: 1 RL plus 1 RL crossed (you added 2 R).
- 2 R: knit (as IR): LP.
- 3 R: knit like 1 R.
- 4 R: IP.
- Repeat all 4 R's in height so that the length of the product is 46 cm.

When you reach the required length of the product, knit like this:
- 1 R: remove 1 P, then knit the LP, pull the removed P through the knitted P, knit the remaining P (not counting the last 2) through the LP, knit the last 2 P together with the LP.
- 2 R: knit LP.
- 3 R: repeat 1st R.
- 4 R: knit IP.
Repeat these 4 P's until you have 4 P's left on your knitting needles. Then close the P's.
- Assemble the product. Continue the seam allowance you left for the scent. Knit it 12 cm.
- For the belt, cast on needles No. 3 192 P and knit along the entire circle LG. When you knit 3 cm, knit 1 R from the IP (so you get a fold line) plus 3 cm LG. Then close the loops.
- Sew the waistband inside.
- Step back 15 cm from the waistband. Sew this area.
- Process the bottom as desired.
Large size knitted skirt: pattern with description
A skirt in boho style will be a real find for women with curves. This style combines hippies, folklore, military style, a touch of gypsy clothing and ethnic motifs.

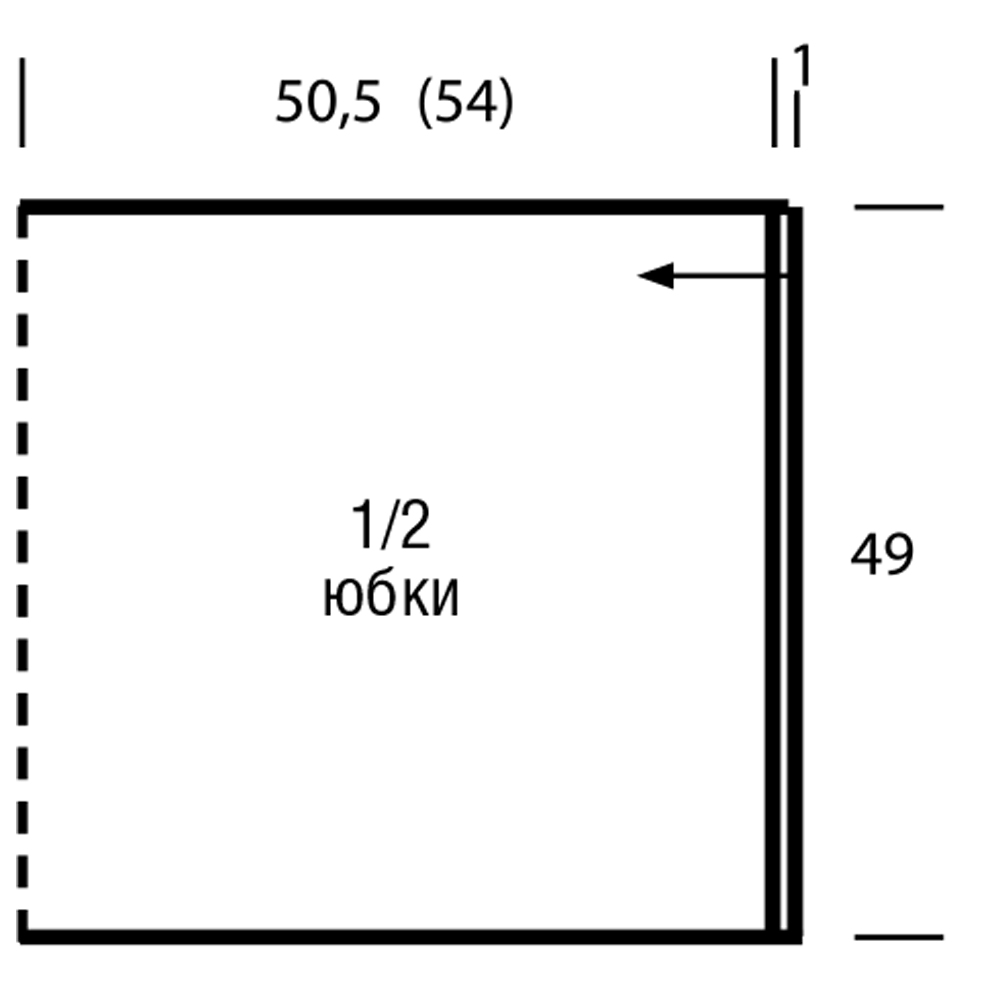
A fashionable model of a wrap skirt knitted across with beautiful openwork patterns with patterns and a free knitting description.
You will need: 300 (350) grams of sand yarn, consisting of 100% cotton; thread length 95 meters in 50 grams; knitting needles No. 5.5; circular needles No. 5.
Wrap skirt sizes: 34-36 (38-40).
Pattern 1: garter stitch = knit and purl rows – knit stitches.
Pattern 2: knit stitch = knit rows – knit stitches, purl rows – purl loops.
Pattern 3: openwork strip (3 loops).
Front rows: 1 yarn over, knit 3 loops together with a pull so that the middle loop is on top (slip 2 loops together like knit stitches, knit 1 and pull it through the removed loops), 1 yarn over. Purl rows: purl loops and yarn overs.
All subsequent patterns include: the diagram shows the front rows. In the purl rows, knit all loops and yarn overs with purl loops.
Pattern 4: openwork pattern A (for 12 loops) = knit according to pattern 1. Constantly repeat rows 1-20.
 Pattern 5: openwork pattern B (for 9 loops) = knit according to pattern 2. Constantly repeat rows 1-12.
Pattern 6: openwork pattern C (for 27 loops) = knit according to pattern 3. Constantly repeat rows 1-18.
Medium density knitting of a wrap skirt: 16 loops per 25 rows corresponds to 10 by 10 cm.
Description of knitting a wrap skirt
Attention: knit the skirt crosswise, starting from the right half. Arrow on pattern = knitting direction.
Cast on 78 stitches on the knitting needles and for the placket, knit 1 cm or 3 rows with pattern 1, starting with purl 1.
 Continue working as follows: edge loop, 1 loop with pattern 2, 3 loops with pattern 3, 12 loops with pattern 4, 3 loops with pattern 3, 9 loops with pattern 5, 3 loops with pattern 3, 12 loops with pattern 4, 4 loops with pattern 2, 27 loops with pattern 6, 3 loops in pattern 1 (= bottom bar, including edge).
After 101 cm or 252 rows (108 cm or 270 rows) from the bar, purl 3 more rows for the final bar, then in the next purl row bind off all the loops like knit stitches.
Assembly: for a short tie, cast on 42 loops on circular needles, then on the right side edge of the skirt, cast on 158 (168) loops for the belt and for a long tie, cast on 148 loops = 348 (358) loops.
Then, starting from the 1st purl row, knit with pattern 1, while in the 1st row on the section of the skirt waistband, evenly distributed, decrease 30 loops = 318 (328) loops.
After 2.5 cm or 8 rows in the next purl row, bind off all the loops as if they were knit stitches.
Wrap the skirt around the hips, with a long tie in the appropriate place through the top openwork strip and the ends of the ties.
This short crochet wrap skirt is made from bamboo fiber. However, if bamboo yarn is not available in your favorite store, then use any other yarn with a suitable thread thickness. First, individual square ones are knitted, which are then joined into a rectangular skirt fabric. The skirt is adjusted to fit by sewing on loops and buttons after fitting. Model by designer Emmy Swenson.
Knitted wrap skirt sizes: XS (S, M, L, XL, 2XL)
Finished skirt size:
Width: 109 cm (122 cm; 134.5 cm; 147 cm; 160 cm; 173 cm)
Length from waist to hem: about 45 cm
If you liked this model, then SUBSCRIBE to site updates Knitted skirts.ru
Note: the skirt is a rectangular fabric that wraps around the waist. To calculate the size that suits you, the waist size will correspond to ½ to 3/5 of the total length of the knitted panel of the skirt. For example, for size S the waist circumference will be from 60 to 70 cm, and for size M the waist circumference can be 66-80 cm. To lengthen this skirt, simply knit an additional row of motifs. Each added row will lengthen the skirt by approximately 6 cm.
And here’s another larger photo of this knitted skirt:
Knitting materials:
- grey-beige yarn (100% bamboo fibers, 125 m/50 g): 350 g (400 g, 450 g, 500 g, 550 g, 600 g)
- dark blue yarn of the same composition and with the same thread thickness: 50 g (50 g, 100 g, 100 g, 100 g, 100 g)
- hook 3.5 mm
- darning needle
- 2 buttons with a diameter of 2.5 cm
- Matching sewing thread and sewing needle
Knitting density: the size of the motif after moistening and drying is 6.4 cm by 6.4 cm
Conventions for describing knitting:
VP - air pet.
RLS - double crochets
PS - half double crochets
Dc - double crochet
Description of knitting a wrap skirt:
Before starting knitting, make a full-size skirt pattern (a rectangle with a width of 45 cm and a length according to the dimensions indicated above)
Knitting square motifs:
Knit 18 (18, 24, 28, 30, 34) motifs with dark blue yarn.
Knit 115 (129, 137, 147, 159, 169) motifs with gray-beige yarn.
The motifs are knitted in circular rows:
1 lap. row: 3 VP (= 1 SSN), 11 SSN in the first VP, PS in a chain of 3 VP.
2nd circle row: 3 VP (= 1 dc), 2 dc in 1st dc, (dc in next 2 dc, 3 dc in next dc) 3 times, dc in next. 2 SSN, PS in a chain of 3 VP.
3 circle. row: 3 VP (= 1 dc), 2 dc in 1st dc, (dc in next 4 dc, 3 dc in next dc) 3 times, dc in next. 4 SSN, PS in a chain of 3 VP.
4 circle. row: 3 VP (= 1 dc), 2 dc in 1st dc, (dc in next 6 dc, 3 dc and next dc) 3 times, dc in next. 6 SSN, PS in a chain of 3 VP.
Fasten and cut the thread.
Moisten all motifs, straighten them and let them dry.
Assembling motifs into a knitted skirt fabric:
Lay out the finished motifs on the pattern, distributing the blue motifs more or less evenly. There should be 7 motifs in height, and 19 (21, 23, 25, 27, 29) motifs in width.
Using gray-beige yarn from the wrong side, using a SC behind the back wall, connect the squares into horizontal stripes: 2 motifs in height and 19 (21. 23. 25, 27, 29) motifs in width. Add the next rows of squares one by one until the panel reaches 7 stripes in height.
With the right side of the canvas facing you, join the stripes together vertically to define vertical lines and make the motifs stand out.
Then tie the knitted panel with 2 circular rows of stitches, performing 3 stitches for each corner of the rectangle.
In the 3rd circular row from PS With on the front side in the upper right corner, knit a button loop like this: PS in a corner stitch, 5 VP, PS in the same stitch, then knit a PS to the next upper corner, tie a button loop in it in the same way, and finish tying the skirt with 1 PS . Cut and secure the thread.
Final processing: To make the squares flat, place the cloth in slightly warm water and wet it thoroughly. Squeeze out excess water. Lay the panel on a towel and stretch it thoroughly until the rectangle is the desired size. You can secure the knitted fabric with pins to a mattress or ironing board until it dries. Dry naturally. Then attach the skirt to yourself and mark the places for sewing on the buttons. Sew on 2 buttons.