In a little more than a couple of months, the magic will come to us. The wonderful one is coming family holiday - New Year! And the question immediately arises: “What should I give to my loved ones?” Everyone knows that it is better to prepare gifts in advance, and the Creative Workshop “Barabashka” invites you today to start thinking about how to give your family a holiday. In this simple master class, I will tell you how to make an evergreen Christmas tree in a minimalist mood from natural moss.
To create an evergreen Christmas tree with your own hands we will need:
- Cone-shaped base for Christmas tree
- Natural moss
- Jute twine and thick white thread
- Thin green thread
- Wire thick and thin
- Foam base for planting a Christmas tree
- Ceramic pot
- Hot glue gun

Making a Christmas tree from natural moss

Turn on the heat gun and leave it to warm up.

We prepared in advance the wire that will serve as the trunk, wrapping it with thick white thread.
We take our base for the Christmas tree and insert this wire in the center so that the edges are visible on both sides (see photo).

We take jute twine and wrap it around the base of the tree, this will help the moss to stick better.

We start from the bottom and continue across the entire area, occasionally fixing the thread pointwise with a pistol.

We insert a thin wire, pre-wrapped with twine, upward, fix it with glue and make a smooth transition of the twine from the base of the Christmas tree to its tail.

This is how your workpiece should turn out.


We apply the glue gradually so that it does not have time to dry out.
Apply glue - glue the moss, apply - glue it... and so on over the entire surface.

When the Christmas tree has become completely green, roll it up in your hands so that the moss fits more tightly.

To prevent the moss from falling off, we wrap a thin green thread around the crown.
Let's start planting the Christmas tree. Since the crown of the Christmas tree turned out to be very light, we can use a foam base with a hole in the center instead of plaster.

We insert the wire into the hole, apply glue to the bottom of the trunk and the bottom of the pot and secure it with a foam plug.

We glue the foam and cover it with moss.

This is the kind of “living” Christmas tree we got. Nothing extra, although you can always dress it up for the New Year.

Did you like it? I hope so! And this is just a photo master class.

After all, what could be better than joint classes in the evenings for 20 days online with masters of the most interesting fields? And most importantly, during the webinars we will give you hints, reveal your secrets and inspire, and you won’t spend a penny on it.
Tempting? Then become an honorary guest of the conference right now!
To do this you need to register on the site. It won't take you more than 2 minutes. Registration link
Do you like gifts? Then the conference will be doubly pleasant for you, since I, as well as other speakers, have prepared pleasant gifts for the participants. At the end of the conference, each participant will receive a personalized certificate!
I guarantee that you will get bright and unforgettable emotions!
Crafts made from natural materials look great as interior decoration. Moss compositions in combination with other materials look natural and stylish. They can be used to decorate festive table, hallway. Working with moss is very simple and in this article we will look at several decorative options for interior design.
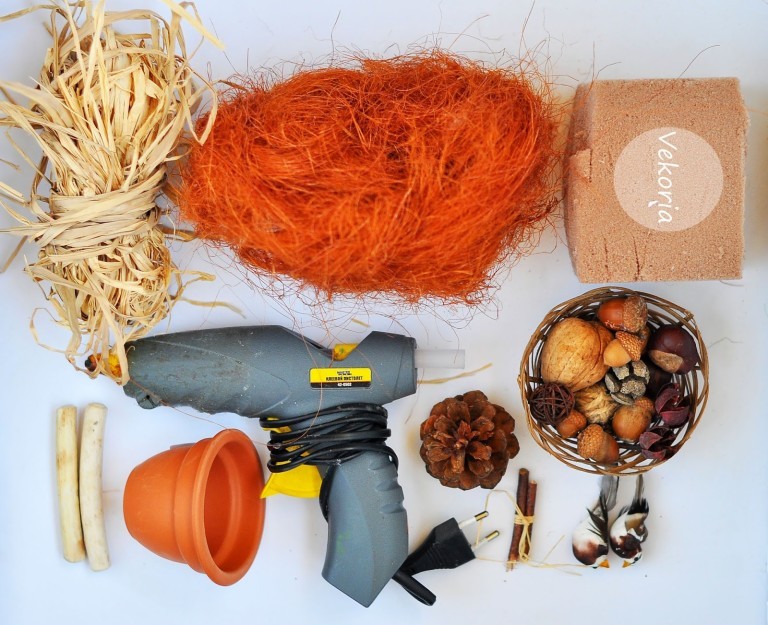
Crafts made from moss and cones
You can make a decoration for the New Year or Christmas table using simple fir cones. To work, we will need a bowl as a base, a piece of hard sponge or frozen foam, several wooden skewers, and moss.
Moss topiary
DIY moss crafts can become a full-fledged room decor. For example, topiary large size you can decorate the hallway or the place by the fireplace. A slightly smaller size will decorate a kitchen window sill or balcony.
To work, you should prepare foam plastic balls, a sheet of moss, green threads, burlap, a clay pot and thick paper such as newsprint.


Moss bonsai
The art of bonsai came to us from the East and is extremely popular. Plant miniatures take a long time to create and require constant care. Even a non-professional can decorate the soil with moss and thereby create the illusion of a carpet of thick grass under a tree.
Every year nature gives us a lot of natural materials suitable for creativity, completely free of charge. The process of creating with your own hands develops the child’s artistic taste, thinking, memory, and fosters perseverance. But the most important thing is that you can have fun and usefully spend time with friends, delighting yourself and others with crafts.
Preparation of natural materials for their further use
Nature is the best artist; she creates natural materials that, in skillful hands, turn into works of art!

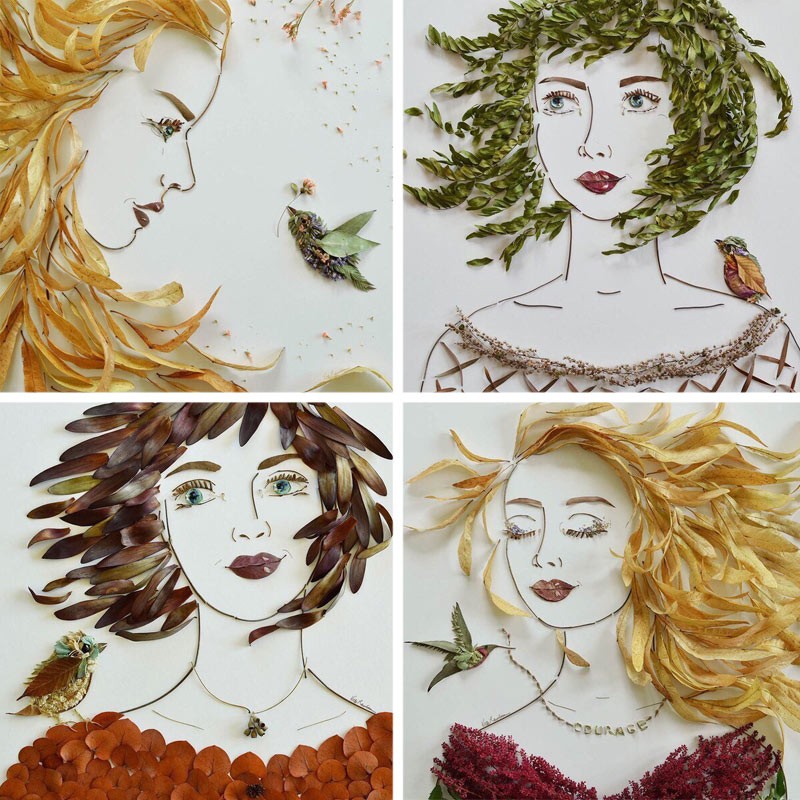
Plant materials
Chestnuts
Chestnut fruits have a bright brown color and a shiny surface, so they make excellent DIY crafts from natural materials. The shell of a fresh chestnut is thin and can be easily pierced with an awl. Chestnuts are a fertile material for working with young children themselves. You can make many different dolls.


It is better to store in a cool place in boxes.
Acorns
Oak fruits ripen in autumn, in September-October. collected in various shapes and sizes.


At the same time, their cups (pluses) on which they rest are collected. Pluski are very often used separately from acorns, as an independent natural material for various crafts.

Acorn pluses and balls felted from wool
Watch the video to see how to felt even balls of wool. Olga Skibina:

Acorn tops and Christmas bells


You can store them for a very long time, after thoroughly washing and drying them. But why just store stones when the whole family can have fun playing with them?)


For another way to apply images to river or sea stones, see the video from You Can Do It Craft. You'll be surprised how easy it is!
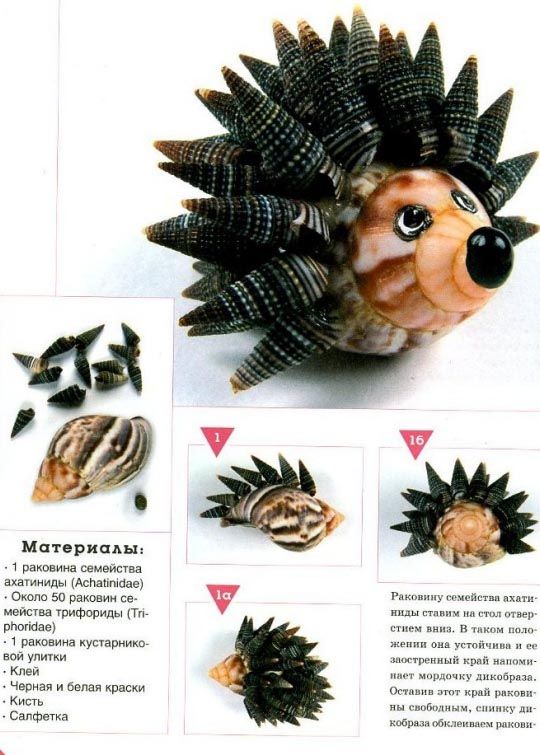
Shells
You can collect shells on the banks of rivers, seas, and lakes while relaxing with your children. Many of them are original appearance, in shape - oval, scallop-shaped, elongated, etc.
Boil them for a few minutes to free them from living organisms. The shells are washed with a small brush (or a toothbrush), after which they are dried and sorted by type and size. Stored at any temperature.
You can also clean shells in a solution of bleach and water at a ratio of 1:1. The top layer will disappear after a while, leaving the shell with a beautiful shiny top.
Animal figures are made from large shells.


Small shells make wonderful applications and garlands:

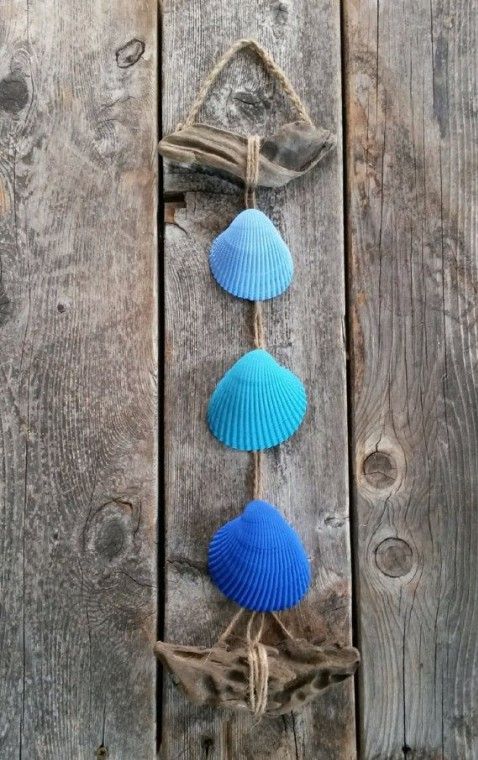
Shells can be used not only as the main material, but also as additional decoration (bird wings, dog ears, flower petals, etc.)


Sand
Very accessible material that can be collected in any sandbox. It varies in structure. Before use, it must be rinsed and dried thoroughly. And then you can use it as decoration in your works:


Rules for storing natural materials
DIY crafts made from natural materials will be flawless if, after collecting, drying, and pre-processing, you properly store these natural gifts. To do this, you must adhere to certain rules.
- A dark, cool and well-ventilated room is best place for storing natural materials.
- You can buy plastic containers for storing each type of material; use cardboard boxes from under shoes, tea, sweets; take ordinary glass jars with a screw cap. For seeds, as for beads, it is better to have a container with many compartments.
- Dried flowers are fragile and break easily, so they are placed in a tight box or container. Petals are stored separately from flowers. Flowers with stems can be stored in a vase.
- Prepared leaves are also brittle. You can store them in large books. Also, for safety, put them in labeled candy boxes, secure them with a little tape so that they don’t accidentally open.
- The shells are placed in glass jars or plastic containers with a wide mouth to prevent them from crumbling.
Additional tools for crafts made from natural materials
To create beautiful craft made from natural materials, you will need additional tools and materials.
These could be:
- colored paper;
- cardboard;
- leather scraps;
- scraps of fabric;
- bird feathers;
- foam;
- plasticine;
- wire;
- PVA glue, “Moment”;
- gouache;
- stain;
- varnish, etc.
Paper very often used as a complement to natural materials. Children, bending and gluing it, make the work much more interesting.
Plasticine fasten individual parts of simple toys at the initial stage of work. It is not very durable, but as an addition it is often used in kindergarten and elementary school.

From wire most often the frame of a toy is made, the connection of its parts. Copper wire diameter 0.29-0.35 mm - soft, flexible and durable - most comfortable. And for the frame, wire of a larger diameter is used - 1-1.5 mm.
Threads It’s better to take thick, multi-colored ones (No. 10).
Glue it is better to take white PVA, BF, etc. However, in kindergarten it is better to use PVA glue.
They also use foil, pebbles, cherry pits, and bristles.
It is better to store additional material in a small box with compartments for each type of material.
The use of additional material depends on the plan, the skill of the children, and the degree of development of imagination! Offer your options, but rely more on children's intuition and desire.

It is also additionally necessary to have certain tools for making crafts from natural materials:
- art scissors;
- awl;
- jigsaw;
- tweezers;
- pliers and wire cutters;
- sewing needles;
- brushes for glue and paints;
- a cotton rag for wiping off glue residue.
Scissors for children, they should have blunt ends, small, with rings that are comfortable for a child’s hand.
Awl must be made of durable material with a handle length of about 6 cm, a diameter of about 2 cm, the piercing part is 3.5 cm
Needle I need a large sewing machine. Be sure to store it in a pincushion with a thread threaded into it.
Attention! Only adults use pliers, pliers, and drills!
To draw the outline of the part to be cut out, a simple pencil. For example, a dress, hats for a doll, etc. It is better to take a soft pencil (2M).
Tassels(soft for drawing, harder for glue). It is better to buy squirrel tassels (No. 4 and 6). For glue, use brushes with hard bristles.
Stack- a tool necessary for processing a surface made of clay or plasticine. The length of the stack for children is about 12 cm. You can make the stack yourself from a worn-out brush: round it on one side and sharpen it on the other.
Crafts made from natural materials for kindergarten
Kids love it when in their hands chestnuts and plasticine turn into toys that they can play with. Crafts made from natural materials for kindergarten are not very complicated, so any child can do it with the help of an adult. Sometimes they are made from fruits and vegetables, but most often they are applications from leaves and animals from cones and acorns.
Crafts from leaves and maple “helicopters”
The easiest and most accessible job, even for kids, is leaf applique. If this is your first time making a composition with your child, offer him a picture that will serve as a template. Don't rush to do everything yourself. Invite your child to choose leaves as desired so that the work turns out similar to the sample. This is how they will develop creativity your child.
Material for application:
- colorful leaves;
- thick sheet A-4;
- glue brushes;
- PVA glue;
- scissors;
- sample.
To make a simple arrangement, you need even, dry leaves. Place them under a press or in a book. In two days the material is ready. Cut out the appropriate pieces with scissors and lay them out on a sheet of paper.
Now you can glue it. First the background and lower layers, and then the finer details. For example, if you want to make an elephant, then first make a body and head out of leaves, and then glue on the trunk, tail, and legs. If you don’t have enough eyes, you can add them in with a marker or make them from tree seeds.

You don't have to do everything according to a template. You can come up with a picture yourself and create an original composition from leaves.


Use as a supplement colored paper, felt-tip pens, paints, so your applications will be even more interesting.
Along with leaves, maple “helicopters” are also ideal as a basis for crafts made from natural materials for kindergarten. Just look at this miracle!

Fairy wings made from maple seeds

Dragonflies from maple "helicopters"
Now you have seen how beautiful and original leaf applications can be. Use these ideas for spending time with your children.
Simple master classes on creating children's crafts from acorns and cones
At the end of summer, acorns begin to ripen, and they make wonderful crafts from natural materials for kindergarten or school. They are well preserved, and on long autumn evenings, together with your children, you can do a pleasant and useful activity that develops fine motor skills baby's hands, imagination and perseverance.
The most common crafts made from acorns are little animals and various people. You can easily make legs, arms, horns and other small elements from toothpicks, matches, thin twigs. An adult needs to help the children poke holes in the acorns.
To attach small parts, you can use a glue gun or Super Moment glue, but only adults should do this. And the safest way for kids to fasten parts together is with plasticine.

Making fly agarics from acorns is even easier! To paint acorns, you need to remove the caps from them, and after the paint has dried, glue them in place.


Acorns are very beautiful on their own, and if you paint them too acrylic paints or nail polish, such crafts will decorate any home.

You can also make an original decoration from hats painted with silver paint. Christmas tree. The process of creating such an eco-toy is quite simple: we stick it tightly onto a foam ball (you can take an old Christmas ball) acorn caps. And it sparkled new.

We found another video for you, where Niki Junior tells what a wonderful craft can be made from leaves, cones, twigs and plastic bottle. Take a look, you will learn a lot of new things.
Categories
Quick navigation through the article
IN kindergarten or the school announced an exhibition of winter-themed crafts? Or do you just want to keep your little one busy with creativity on these cold days? In one material, we have collected for you 6 ideas for winter crafts from natural and scrap materials with step-by-step master classes, a selection of 60 photos and videos.
Idea 1. Tabletop diorama with a winter theme
A tabletop diorama will allow you and your baby to show off all your talents - from modeling to design. Moreover, using the most different materials and objects: branches, cones, toys (for example, from Kinder Surprise eggs), plasticine, salt dough, cardboard, cotton wool and much more.
First of all, you need to come up with a plot for your diorama and plan the composition. You can recreate any of your fantasies or be inspired by our selection of topics with photos and small tips on making crafts.
Topic 1. “Winter in the forest”

The craft is made of polystyrene foam and plasticine. A bear can also be made from polymer clay or salt dough

If in kindergarten or school you were given an assignment to do winter craft made from natural materials, then you can use cones. They make excellent Christmas trees, owls, deer, squirrels and hedgehogs for the winter forest. By the way, we just have several master classes on making them

Do you want to do simple craft more effective? Just light it up with an LED garland! To embed light bulbs in cardboard, you need to make cross-shaped cuts in it.

This winter forest is made entirely of felt. Animal figures can be placed on fingers

Topic 2. “Winter House”
A favorite theme at winter craft exhibitions. The house can be surrounded by a forest or a courtyard with paths, a gate, a rowan tree, a skating rink and a snowman. And the hut itself can be beautiful not only outside, but also inside.

This video tutorial shows a simple and quick way making winter crafts from natural materials, namely twigs and pine cones.
Topic 3. “Christmas in a village/town”
If you build a couple of houses and connect them with beautiful streets, you will have a whole village or town.

The easiest way to make houses is from paper, or rather from printed templates that you just need to cut out, paint and glue. The next video presents step-by-step master class for making such a craft.
Topic 4. “The North Pole and its inhabitants”
Do you want to do more original craft? We suggest making a diorama on the theme of the North Pole.

To make such a craft, download and print the templates (click on the picture to download), transfer them to cardboard, then cut, connect and paint the parts


Topic 5. “Winter fun”
Craft on the theme winter fun illustrates all the joys of winter. For example, sledding, making snowmen or playing snowballs. Lego men (pictured below), Kinder Surprise egg figurines and any small toys are well suited for recreating winter scenes. You can also make little people with your own hands from plasticine or polymer clay.

Topic 6. Winter sports
Another very original idea crafts - a diorama on the theme of skiing, figure skating, hockey, bobsleigh, snowboarding. By the way, the Olympics in Sochi can serve as inspiration and a model for modeling.


To make these ski figures, download, print, color and cut out the templates (click on the picture to download the templates), then glue a toothpick to the hands of the men, and a popsicle stick to the legs.


Topic 7. Scenes from fairy tales
Choose your favorite fairy tale and recreate one of its episodes. For example, this could be the fairy tale “12 months”, “ Snow Queen", "Morozko", "The Nutcracker", "At the behest of the pike."

Everything in this craft on the theme of the fairy tale “Po pike command» molded from plasticine and only the mill is assembled from matches

To make such a craft, you need to cut several holes in a piece of plywood and insert tree branches into them

This composition is dedicated to the theme of the ballet “The Nutcracker”. The figures in it are made of... clothespins. Unfortunately, clothespins with a round top are not sold in Russia, but you can order them on the Aliexpress website or use regular ones
From this video you will learn how to make a winter craft with your own hands based on the fairy tale “At the Order of the Pike.”
Idea 2. Skating rink with a controlled figure
The originality of this winter craft is that the skater can be smoothly “rolled on the ice” by moving a magnet along the back of the box.

What you need:
- A shallow tin can for cookies, tea, etc.
- Paper;
- Paints and brushes, pencils or markers;
- Paperclip or coin;
- Glue;
- Magnet.
How to do it:
Step 1. Decorate the tin box so that it resembles an ice skating rink: paint the bottom with blue and white paint and cover clear varnish(Fine varnish will do for nails with glitter), you can place garlands and flags on top of the box, and snow-covered trees on the sides.
Step 2. Draw a figure of a girl or boy skating on thick paper or cardboard, then cut it out and glue it to a coin or paperclip.
Step 3. Attach a magnet to the back of the box. Voila, the skating rink is ready!
Idea 3. Painting made with prints
Drawing pictures with fingerprints, handprints, and even toes is a lot of fun, especially for preschoolers. All you need is imagination, gouache and a sheet of paper! In the following selection of photos you can see examples of such drawings.


Idea 4. Mini Christmas tree made of paper
Another winter craft idea for little ones is paper Christmas trees. They are made very easily and quickly, and you can use them in any way you like: as decoration for the same diorama, applique for New Year's cards or a panel to decorate a garland or Christmas tree.

What you need:
- A sheet of green paper and some brown paper for the trunk;
- Glue stick;
- Scissors;
- Sequins, rhinestones, beads and other decorations for the Christmas tree.
Step 1. Make a square from a sheet of green paper by folding one corner of the sheet as shown in the photo and cutting out the excess.

Step 2. Cut one of the short sides of the triangle into equal narrow strips, not reaching the fold about 1 cm (see photo above).
Step 3. Now straighten your workpiece and begin gluing the ends of the strips to the center fold line one by one, moving from bottom to top.


Step 4. Once you have secured all the stripes, fold and glue the bottom corner of the tree to the top. Further in the same place, but with reverse side, glue a small rectangle (tree trunk) cut out of brown paper.


Step 5. Decorate the tree with colorful beads, sparkles, buttons and other decor. If you wish, you can make several of these trees, glue loops to them, and then assemble a garland or decorate a real tree with crafts.
Idea 5. Snow globe... or rather a jar
Now we propose to make a real souvenir with your own hands - a variation of a snow globe. True, it will be made from an ordinary glass jar. The child can give the craft to a loved one, present it at a winter crafts competition, or simply leave it on the shelf for beauty.

What you need:
- Glass jar with lid;
- A piece of foam;
- Glue (hot or “Moment”);
- Acrylic paint for decorating the lid (optional);
- Artificial snow or just sea salt, sugar, finely grated white soap or polyethylene foam;
- Figurines that will be placed in a jar;
- Foam balls or any white beads;
- Fishing line;
- Needle.
How to do it:
Step 1: Repaint the lid the desired color and leave to dry. In this project, spray paint was used to remake the lid.
Step 2. While the paint is drying, let's make a “snowfall”. To do this, you need to string several foam balls onto a fishing line threaded into a needle. Use tape to attach the snowflakes to the jar.
Step 3. Trace the bottom of the jar directly onto the foam, then use a knife to cut the resulting circle out of it. This circle will become the basis for the figures.

Step 4. Glue your figures to the foam circle, then glue the resulting composition to the bottom of the jar.
Step 5. Pour artificial or homemade snow into the jar, close it with a lid with snowflakes and enjoy the view of a winter fairy tale.

Idea 6. New Year card
There are never enough New Year cards, so we suggest making a few together with your child.

What you need:
- A sheet of white paper;
- A sheet of colored paper;
- Scissors;
- Glue stick;
- Markers.
How to do it:
Step 1. Fold a sheet of white accordion paper three times so that each top accordion layer is smaller in width than the previous one.
Step 2. Straighten your accordion, cut the sheet diagonally and slightly in waves as shown in the photo above, then assemble the accordion again. You have the slope of a snow-covered mountain.
Step 3. Now take a sheet of colored paper, glue the blank onto it and cut off the excess. Hooray! The postcard is almost ready.

Step 4. Decorate the mountain with Christmas trees, draw snowmen and skiers and finally sign the card.


Using the same principle, but using larger paper, you can make a winter craft for kindergarten.