Evgenia Smirnova
To send light into the depths of the human heart - this is the purpose of the artist
Content
Modern needlewomen make such skillful decorations that one can only be amazed. They are able to make hair jewelry that will highlight the beauty of the hairstyle using several different techniques. Satin ribbons for elastic bands are considered a convenient material because you can create from them from a flower to a decoration for a bun using simple techniques.
How to make rubber bands from satin ribbons
Craftswomen are able to make rubber bands with their own hands from ribbons using several techniques, which, upon careful examination, become quite simple. The main thing in this matter is to learn basic skills, follow diagrams and master classes and use your imagination to create a beautiful decoration that is distinguished by its individuality and spectacular appearance.
The production of elastic bands is based on the technique of weaving, folding and collecting elements into one large pattern. It is better for beginning craftswomen to take basic skills as a basis, learn them, and then begin to complicate them. Even simple elastic bands can look impressive on a girl’s hair if they are skillfully decorated. Embroidery, weaving, beads, beads, and sequins are options for decorating finished products. You can try a variety of decoration options to create beautiful decorations.
The materials used to make rubber bands are satin ribbons of different colors and shades, beads, seed beads, and decorative elements. Auxiliary tools you will need are textile glue, scissors, a glue gun, a fire source (candle lighter) and skillful hands. Sometimes craftswomen take a ready-made rubber band purchased in a regular store and decorate it in their own way. In this case, you will need a base where the elements will be attached - cardboard, metal pins, plastic crabs.

Elastic bands made from ribbons using the kanzashi technique
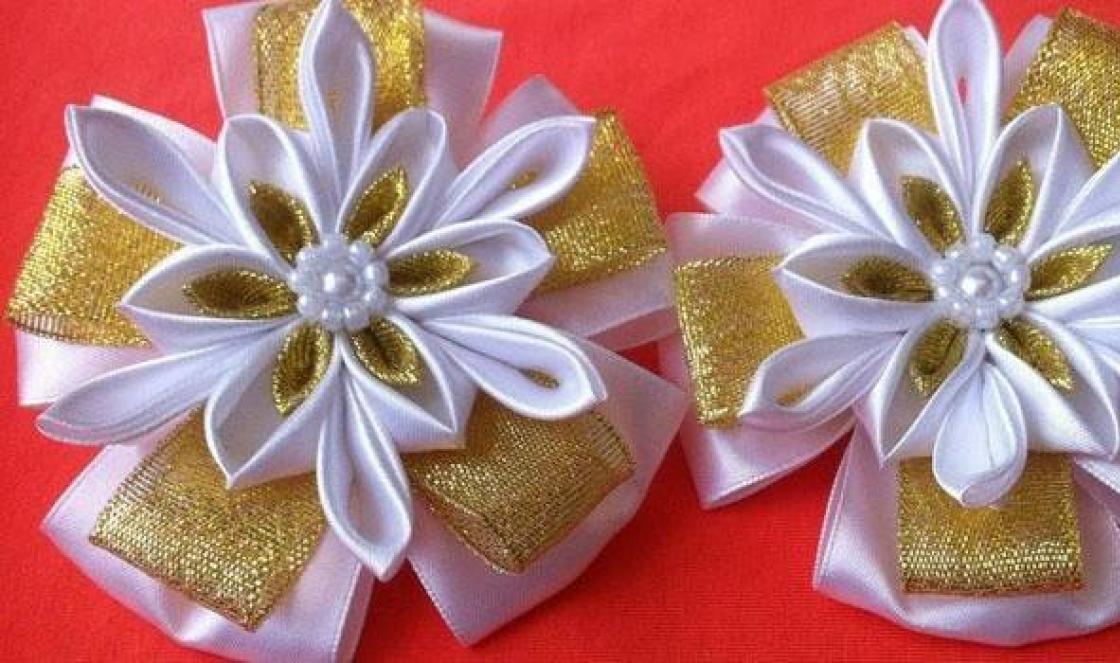
A well-known technique for creating elastic bands from satin ribbons with your own hands is the Japanese art of kanzashi. To make a beautiful children's hair accessory that resembles a dahlia or chamomile, girls need to follow the master class:
- From a satin or silk cut, make 16 square patches measuring 5*5 cm, run a lighter along the edges so that the threads do not come out. Repeat for another color (inner petals).
- For the outer row of petals, bend each square diagonally, repeat, pour fire on the corner. For the inner row of petals, the squares are folded diagonally three times.
- Fold the smaller piece inside the larger one and glue it together.
- Make 12 single-layer blanks for additional decoration.
- Cut out 2 circles with a diameter of 3.5 cm and 2.5 cm from thick cardboard and cover with cloth.
- Glue each two-layer petal to a large base in a circle. Repeat for the second tier. Glue single-layer petals to the smaller base. Glue the 2 bases together.
- Decorate with beads, glue the resulting flower to a hairpin or crab.

Hair ties made from ribbons of different widths
Do-it-yourself elastic bands made from satin ribbons made from material of different widths are effective and voluminous. There is a master class for making an accessory:
- Cut a rectangular blank 9*16 cm from cardboard, draw a horizontal line in the middle. Wrap a ribbon around it.
- Remove the skein without damaging the turns, sew through the middle, and pull until a bow is formed.
- Repeat the technology to make a bow from a different material and a narrower ribbon.
- From fabric of a contrasting color, cut out pieces of the same length and width as the resulting bow, singe the edges.
- Gather all the elements onto a string.
- Cut out a cardboard circle, cover it with fabric, and sew it to an elastic band.
- Glue a bow onto the circle with a glue gun, decorate with small beads, rhinestones, buttons or stones.

Elastic band for a bunch of satin ribbons
To make elastic bands from satin ribbons with your own hands, decorating a bun, girls will need to follow step-by-step instructions
- Cut 6 pieces of green tape 4*2.5 cm into a dome, singe on both sides to create a wave - these will be leaves. Bend the bottom edge in two places, glue in the center to obtain a concave, smooth part.
- Cut 12 pieces of white tape 4*2.5 cm and 5 pieces 3.5*2.5 cm into a semicircle, singe, and glue into a droplet.
- Glue 5 blanks together by overlapping each other, decorate with stamens.
- Repeat for 14 pink petals from 4.5*2.5 cm pieces.
- Round off the first layer of white parts, glue the remaining petals, and make the second layer around the circumference from pink elements. Glue in the leaves.
- Make 5 similar blanks.
- Bend 4 pink pieces 10*5 in half, glue the ends with the fold, and tie them with a bow. Repeat for 2 white blanks 9*5 cm.
- Fasten 2 white ribbons 8.5*5 cm and a pink one 9*5 cm with a white overlay on the pink layer, form a fold, and decorate the bottom with beads. Glue the bow, masking the middle.
- Glue felt circles with a diameter of 3.5 and 2.5 cm to the back of the bow and flowers, sew all the elements onto a sewn lace elastic band. Decorate the bun.

Rubber bands made from ribbons with bows
Decorations in the form of bows look impressive on the hair, which can be made by following the instructions:
- Take 2 ribbons 2.5 cm wide and 0.8 cm long, 1 meter long; 1 ribbon 8 mm wide and 50 cm long.
- Make 2 cardboard templates in the shape of the letter P, 6 and 8 cm in size, cut the edge of the wide ribbon on the bias, lay it along the large template so that the cut and 2 folds are on each edge.
- Fasten the ribbon in the center with pins, sew with a “forward needle” seam, gather, and fasten.
- Repeat for the second bow, sew together, attach a bead in the middle.
Check out the master classes on how to make
DIY ribbon hairpins with photo tutorialsDIY ribbon hairpins with photo tutorials
Recently, it has become popular to make hairpins from ribbons with your own hands, as well as elastic bands and braid hair with ribbons. In such needlework, the tsumami kanzashi technique made from satin ribbons helps. Our master class, as well as video lessons, will be devoted to creating hair jewelry in the Tsumami Kanzashi style. 


Making a hairpin from ribbons
We will start our master class with creating kanzashi hairpins for beginners. To do this, we need the following accessories, namely:
- pieces of satin ribbons, or grosgrain ribbons, orange and white;
- decorative material in the form of a rosette and black beads;
- scissors;
- textile glue;
- fire from a candle or lighter;
- simple hairpin.
The pattern for creating a hairpin is simple. Take the tapes and mark them with a simple pencil, measuring 5 by 5, in the amount of 16 pieces. We do the same procedure with white tape. Cut everything into squares and pour fire over candles or lighters so that the threads do not unravel, and you can make tsumami kanzashi. Look at the photo, this is what you should get. 

For such a hairpin, we will make pointed petals. This technique is very common and you can easily find it in videos on the Internet.
Let's make the pointed double petal orange, inside it will be white. Take the orange square and bend it diagonally, then once more and pour fire on the corner. Fold the white blank also diagonally, only three times. Look at the photo to see what happens. 

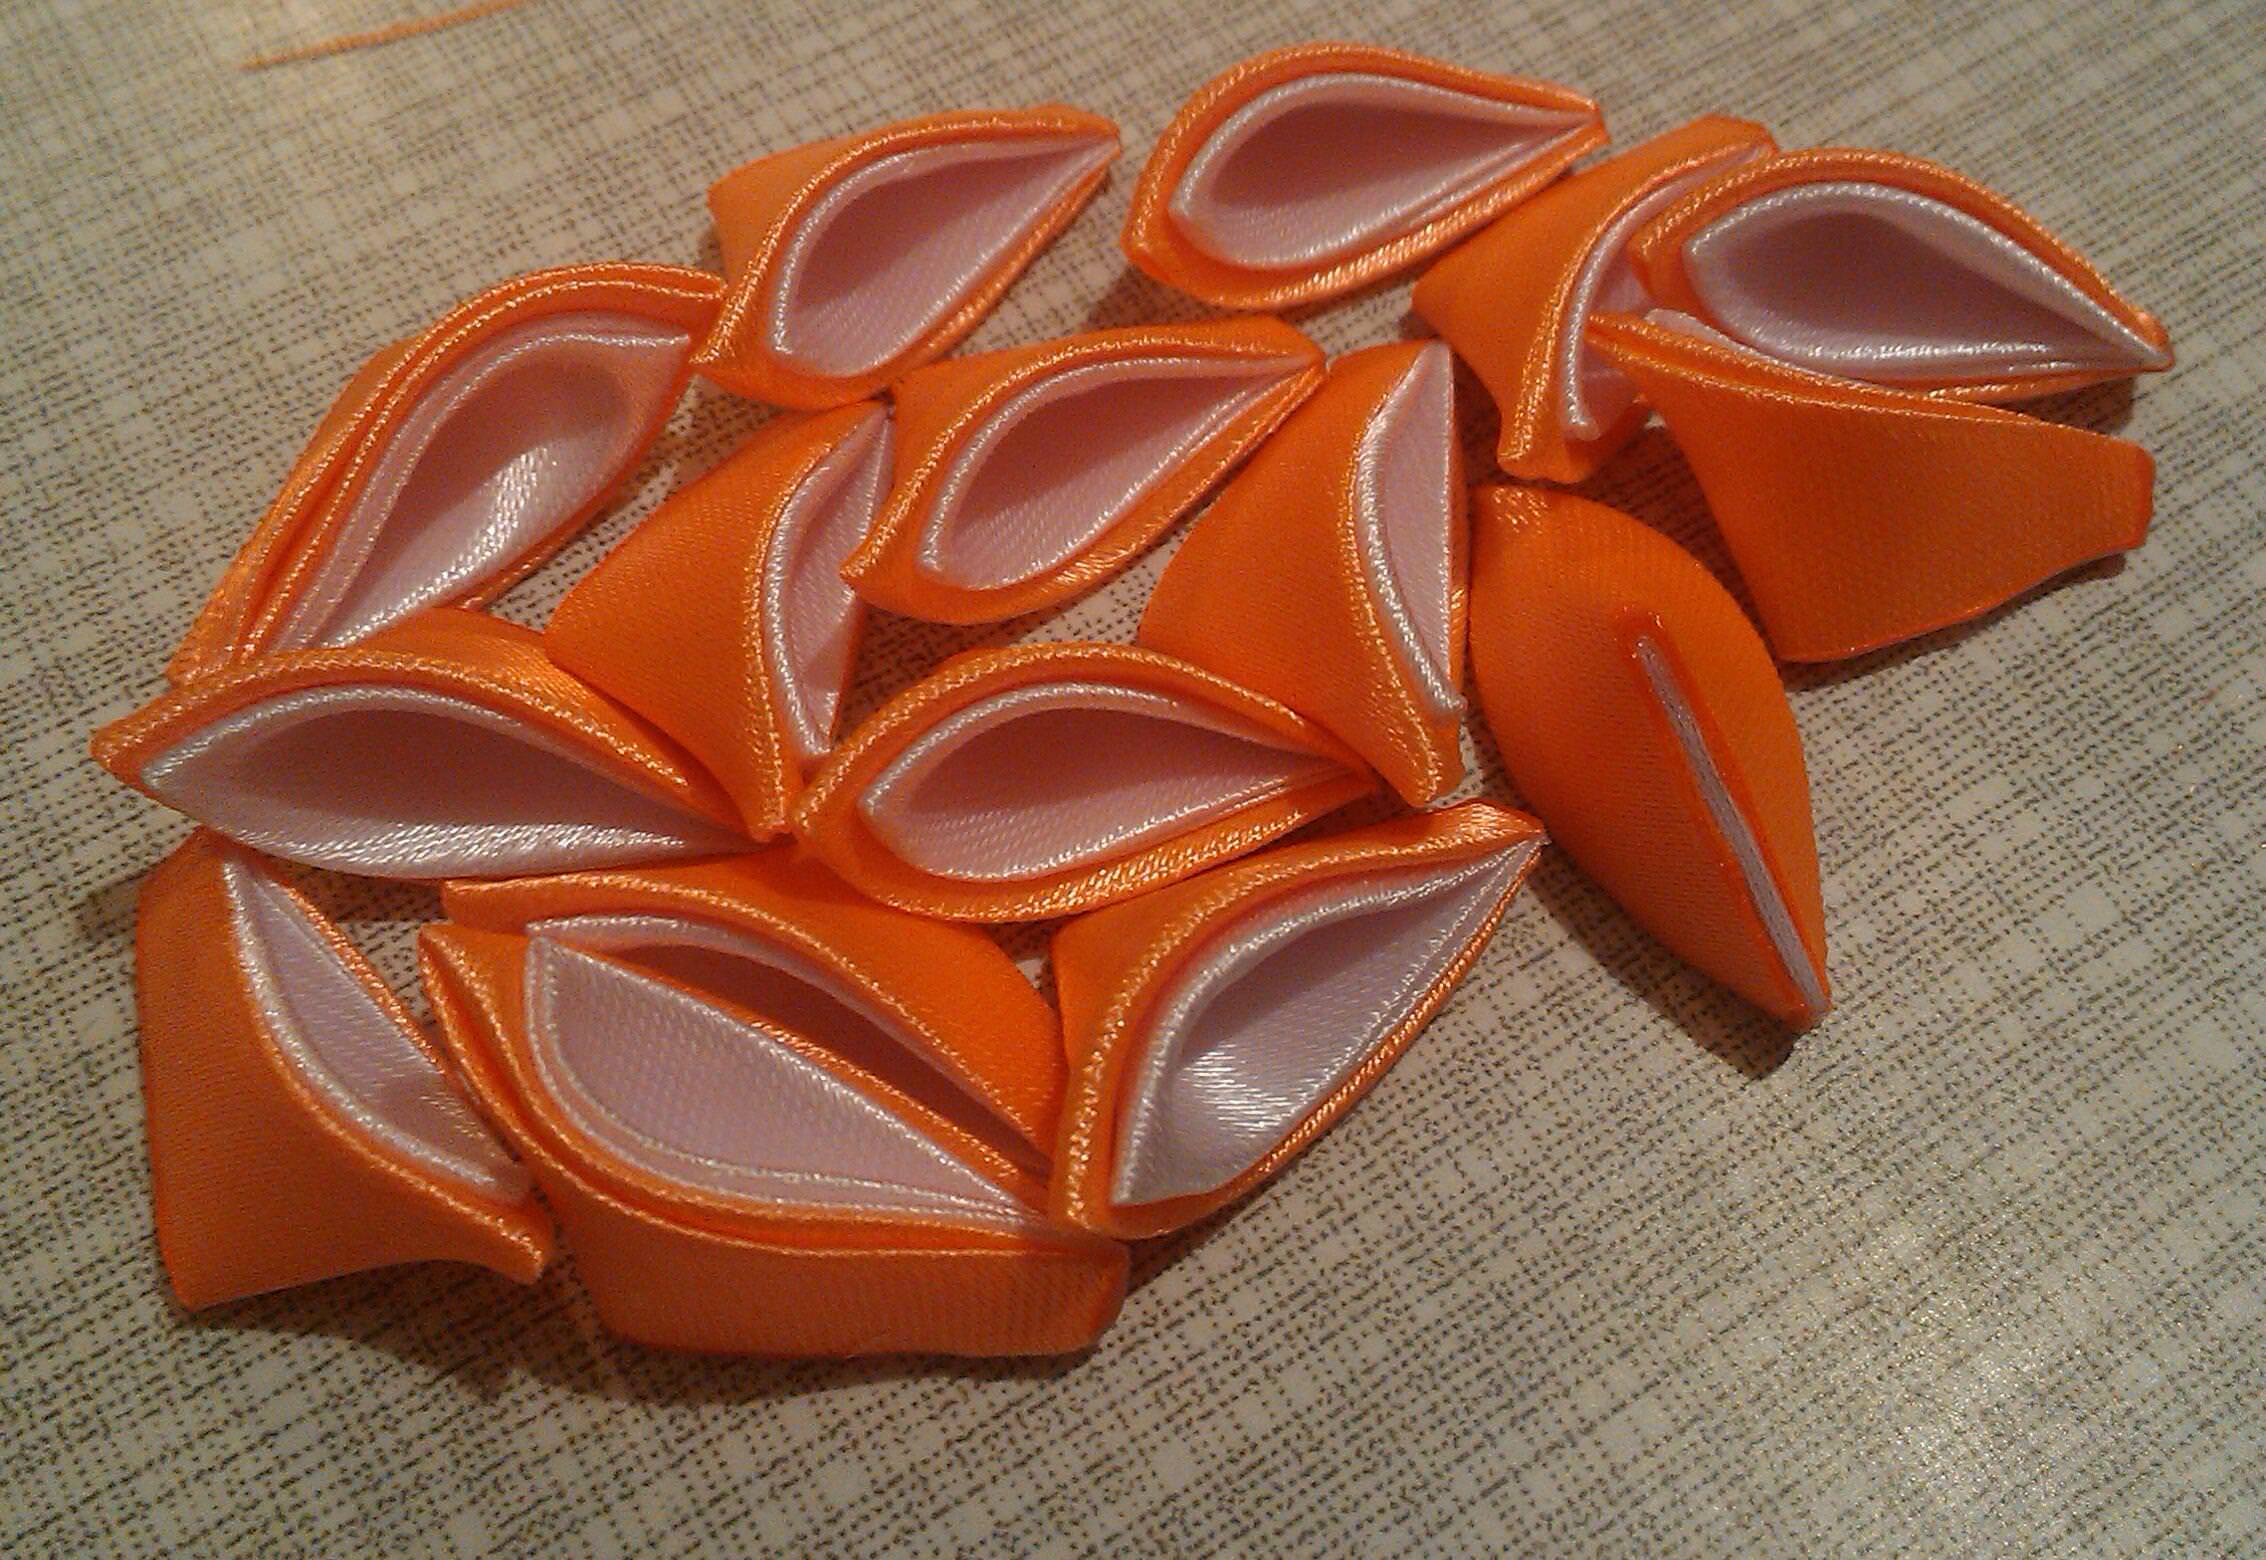
Attach the white blank to the orange one and make a petal. Remove the end and excess material and scorch with flame. We should have 16 such elements.
To decorate the hairpin, we need a few more simple single-layer blanks. From a piece of tape, do exactly the same actions that we did above in the text. 
Simple pointed petals are made in the same way as two-layer ones. Let's not repeat ourselves so as not to waste time. This process can be seen in the video or photo in the text. 
We need twelve pieces of such blanks.
Our master class continues, and we begin to make the main part of the hair clip with our own hands. Cut out a circle with a diameter of 3.5 cm from thick cardboard and stick tape on it. In the end, such an element should be formed. 
Now we move on to connecting all the elements together. Take the double pointed petals, coat them with glue and attach them to the round base. We do this in a circle. Do this technology, clearly along the edge, attaching all the petals tightly. This should be the first tier of the flower, as shown in the photo. 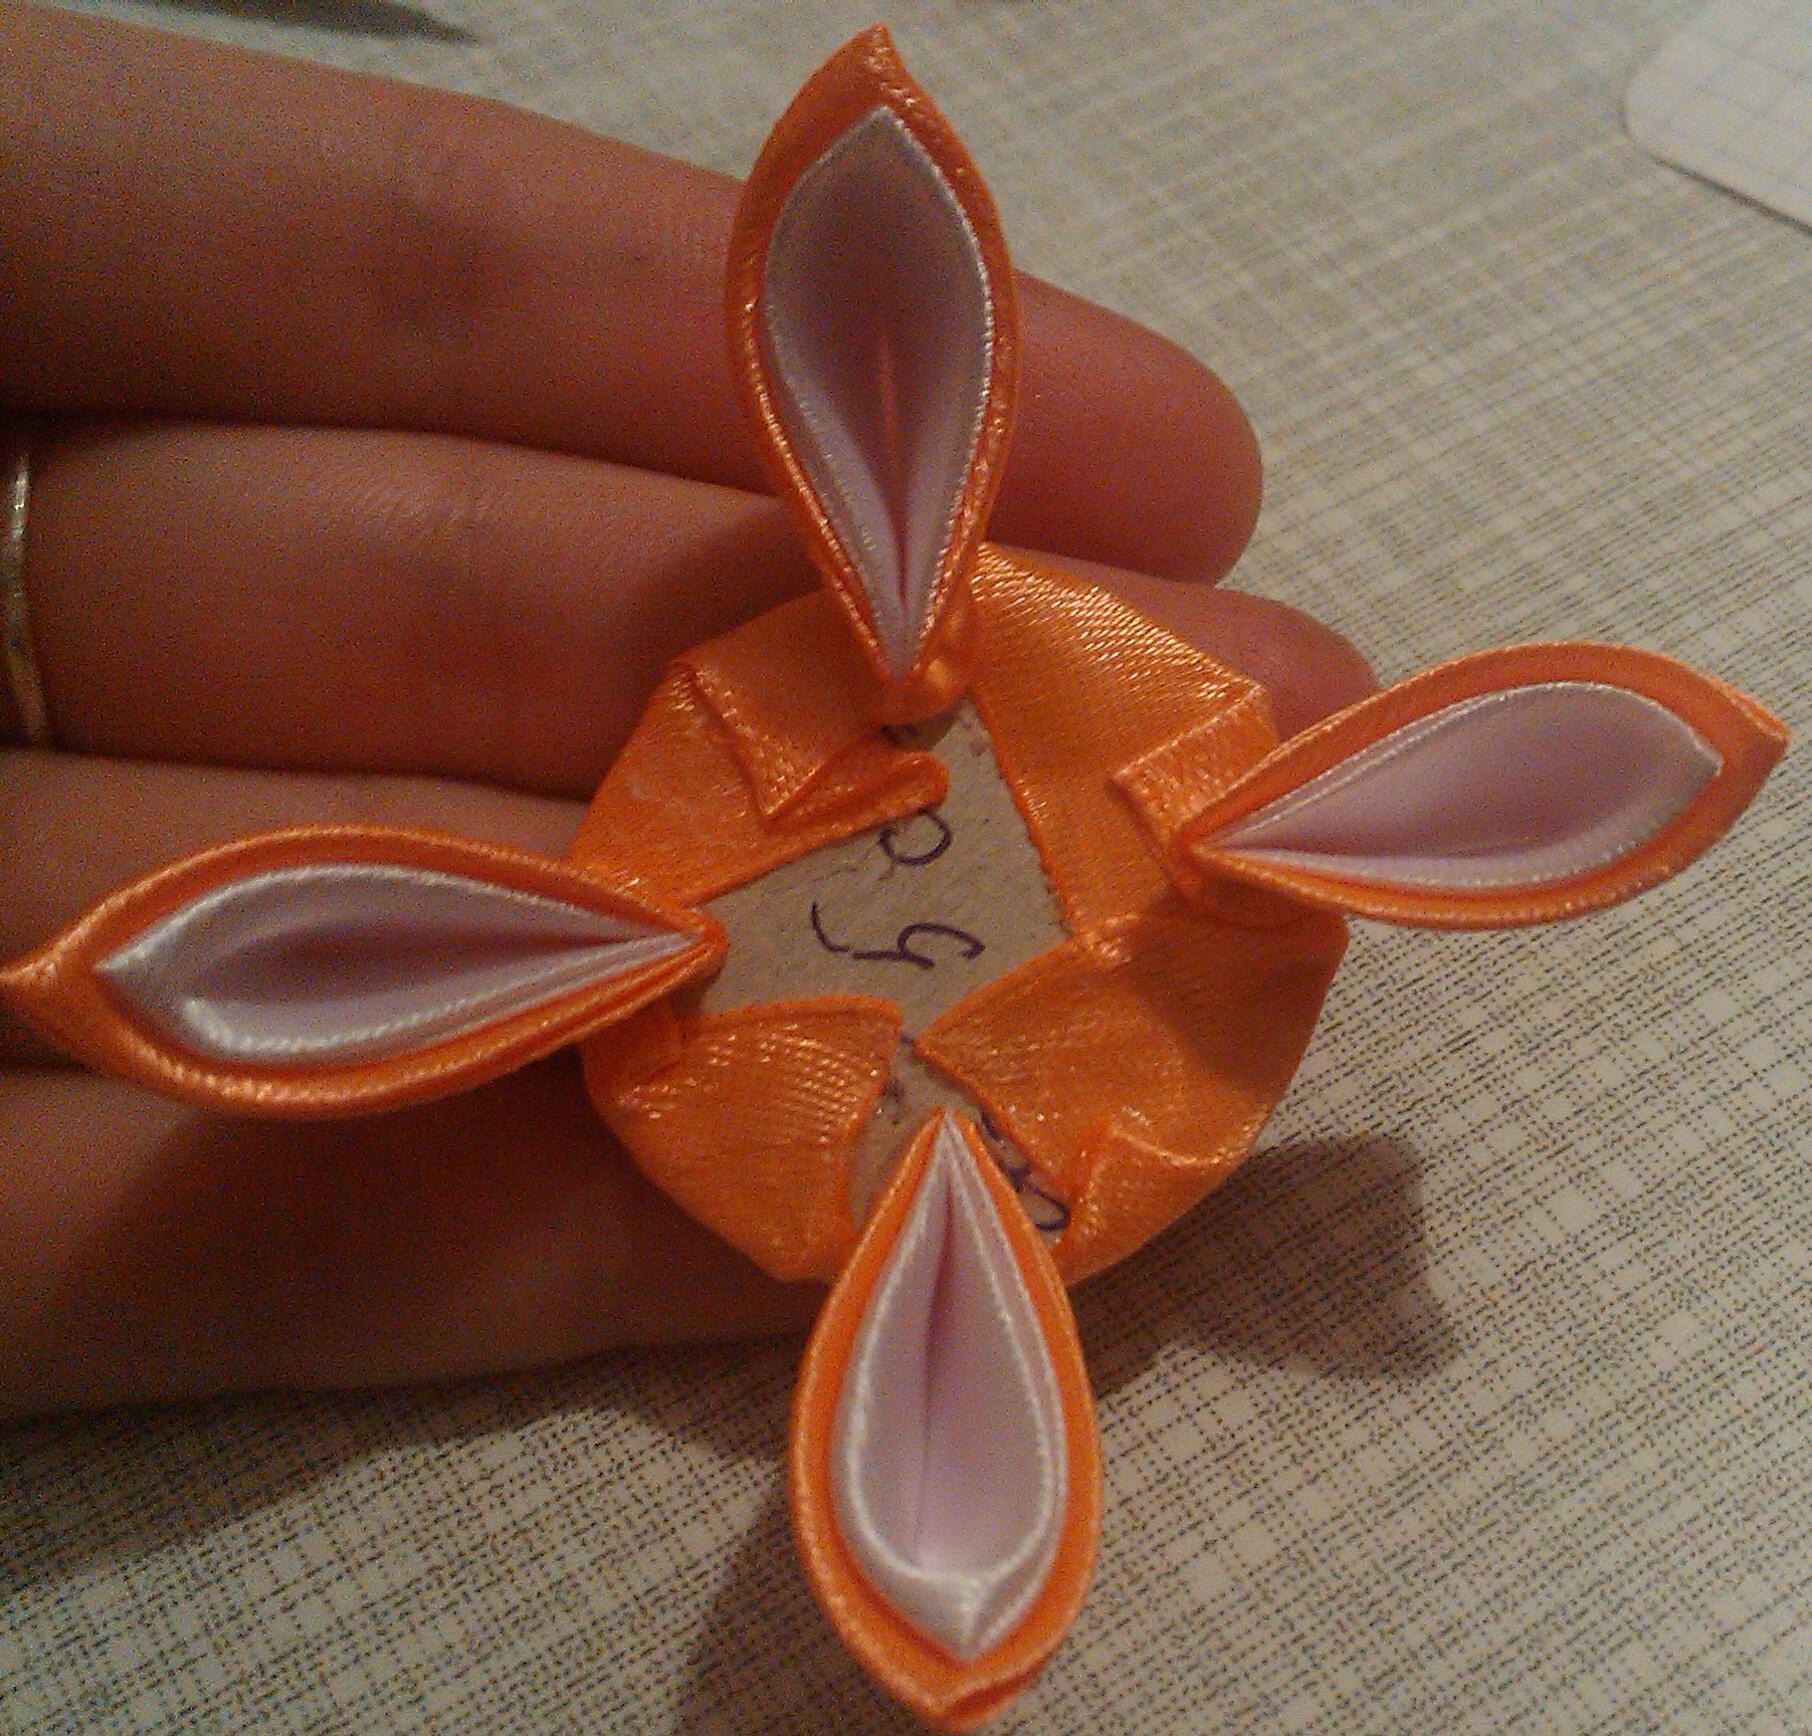


Next, you need to cut out another circle with a diameter of 2.5 cm and also cover it with satin. Then, in a circle, glue simple petals. In the end, you should end up with a do-it-yourself piece using the tsumami kanzashi technique. 


This small flower must be coated with glue on the reverse side and carefully glued to a large bud. 

Our master class is coming to an end, all that remains is to decorate the flower. For this, we need a socket with a black bead. 
Place a drop of glue on the rosette and then on the bead, glue this decor into the center of the flower and press with your finger. Look what a tsumami kanzashi we got. 
Now take a simple hairpin, crab or elastic bands, onto which we will attach a flower.
Apply glue to the hairpin or crab, and press the flower against it, holding it a little with your fingers until it hardens completely. 


Spray a little hairspray onto the finished accessory.
This master class is for beginners, completely completed. In the same way, you can decorate hairpins or elastic bands. We hope that our video tutorials will be useful to you, and you will be able to create new hair decorations with your own hands.
Kanzashi hair band
This interesting master class will be devoted to creating an elastic band for hair using the tsumami kanzashi technique. For this, we will need the following materials:
- narrow blue and blue ribbon. For use, it is better to take satin ribbons, but you can make an elastic band from grosgrain ribbons;
- scissors;
- candle or lighter;
- textile glue;
- a piece of satin fabric;
- rhinestones;
- regular elastic band or crab.
We will make these rubber bands two-color. To do this, take blue and blue ribbons. One is two meters long, and the second is one meter long. Cut the blue material into pieces of eight centimeters, and the blue material into pieces of seven centimeters. 

Fold each flap in half so that it overlaps and pour over the fire. 
From a piece of fabric, you need to cut a circle with a diameter of 2.5 cm and douse it with fire. Then, we begin to glue the blanks, symmetrically to each other. 


From the first to the third tier, the petal color will be blue. The next two tiers need to be created in a blue tint. Trim the topmost elements to make them shorter. 
In the middle of our tsumami kanzashi flower, which we made entirely with our own hands, we glue a beautiful rhinestone shaped like a heart. 
On the wrong side, we attach a simple elastic band or crab, bought in a store, for little money. Before doing this, make a small mount for it. 

Our simple master class on creating an elastic band is completed. We hope that these lessons for beginners on kanzashi techniques have impressed you. The same method is used when decorating hairpins. A detailed video can be viewed on our portal.
Master class on weaving ribbon into a braid
Since ancient times, shiny and beautiful hair has been counted as a sign of beauty in women. A braid with a ribbon was considered a symbol of chastity and wisdom. If your hair is well-groomed and shiny, then you are a wonderful housewife.
Nowadays, braids with ribbons have not lost their uniqueness. On the contrary, they gained many admirers. How to weave a ribbon into a braid is a question every representative of the fairer sex asks herself when she is going to a holiday or just to work.
Our lessons will help you master the skill of weaving braids with ribbons.
Braids with satin ribbons woven into them make a woman more mysterious and tender. The ribbon looks especially interesting on dark and long hair. If you don’t have a suitable ribbon at hand, you can create it with your own hands using a thread with beads. This accessory will turn a simple hairstyle into an evening option. 
Prepare all the necessary materials to create a beautiful hairstyle, such as:
- crest;
- satin ribbon;
- crab and studs;
- decorative material for hair, such as a tsumami kanzashi flower.
You can insert the ribbon into a simple braid. If you want to create a bow at the end, then take longer material. So let's start our lessons:
- comb your hair well and make a ponytail with an elastic band;
- Tie a ribbon around the elastic band to hide it underneath. The resulting edges of the tape should be the same length;
- Divide your hair into three buns and connect the outermost strand with a ribbon. Then, braid your hair as always;
- upon completion of this work, tie an elastic band and make a bow on top of it.
This hairstyle, like a braid with a ribbon, can be woven not only on the back of the head, but also on the sides or on the top of the head. If you have very long hair, braid the braid around your head, securing it with a hairpin.
Now, let's do a French braid for beginners, also decorated with ribbons. Let's start the lessons:
- comb your hair and make an even parting. Braid the braid from one side and then from the other;
- make three bunches of hair on top, grabbing auxiliary strands from the face and begin to weave a French braid. When your braid reaches your neck, secure it with bobby pins. On the other side, do exactly the same actions;
- connect the braids together and decorate with a ribbon. Then, start weaving a simple braid with a ribbon.
Our wonderful master class is completely finished, with the help of your imagination, you can weave beautiful braids, decorating them with ribbons at your discretion. You can watch an interesting video on how to weave braids with ribbons on our website or on the Internet.
Video: Do-it-yourself kanzashi hairpin
Comments
Related posts:
 DIY beaded hairpins in a master class (photo)
1. CHOOSE HAIR SCRIPS AND DECORATE WITH CRAFTS IN KANZASHI STYLE
Decorating women's hair accessories Every year it is gaining widespread popularity in many countries around the world. Hairpins, crabs, combs, elastic bands and other devices for shaping hairstyles are decorated elegant fabric crafts or from satin ribbons.
One of the most interesting trends in decorative and applied arts is the kanzashi technique. , which came to us from Japan. At one time, geisha loved to decorate the pins for their intricate hairstyles with original flowers, the petals of which were folded in a special way from pieces of fabric.
From this material you will learn how to make beautiful flowers with your own hands or openwork butterflies using the kanzashi technique. With the help of simple lessons with photos and visual video master classes, you will learn how to correctly fold the petals, connect them together, and fasten them with hair bands.
First, let me tell you how to choose the right rubber bands for decorating in the kanzashi style.
Important tips for choosing hair ties:
First of all, you need to pay attention to the material from which the hair tie is made. This is especially true for owners of long strands, since a low-quality accessory can damage the hair structure;
Some girls buy rubber bands to quickly solve the problem of strands getting out of their hair or interfering with their view. But it is very difficult to remove such devices without tearing out a clump of hair. Therefore, we will not use them to decorate with flowers or butterflies from ribbons in kanzashi style;
Another option for elastic bands that are unsuitable for women’s hair. On the shelves of some stores you can see examples with a rough black finish and with metal clips. Such elastic bands compress the hair shaft too much and severely damage the structure (especially dry and brittle hair). We will also ignore these accessories and will not decorate them with kanzashi decor;
A very good option for comfortable and inexpensive elastic bands for fixing curls. They are made of silicone and are easy to remove, and can be transparent or match the color of your hair. With their help you can quickly get your hair in order. and are practically invisible in the hair. These silicone rubber bands can be decorated small one-color kanzashi flowers , but such accessories are not very durable;
There are also hair ties with hooks. They can be of different sizes, wide and thin, of different colors. They hold the curls in the hair very well, their presence is not felt (they do not pull out the hair tufts). Unfortunately, these options are difficult to find on sale. But if you have such rubber bands, then be sure to use them for decorating using the kanzashi technique;
There are also very comfortable and functional hair ties. They are usually sold in packs of 3, have good stretch, and have a soft fabric shell. This is also a suitable option for us - such accessories are easily decorated with kanzashi flowers of different sizes.
2. WHAT DECORATIONS ARE MADE FROM FABRIC IN THE KANZASHI STYLE TO DECORATE HAIR SCRIPS
Using the kanzashi technique you can make a variety of hair decorations. But the main element in this type of needlework is a petal made of ribbons (fabric). From the petals you can collect not only a wide variety of flowers, but also fancy bows, graceful butterflies, and exotic birds. The finished product can be decorated with beads , beads, buttons, rhinestones (with the help of jewelry elements you can easily hide some flaws, joints and seams) and then attach it to an elastic band.
It is enough to master the simplest rules of folding petals from pieces of fabric , as well as ways to connect individual parts and you will be able to make unique crafts in the kanzashi style. Fortunately, there are more than enough step-by-step master classes and video lessons for beginners.
3. MK FOR BEGINNERS. WE MAKE CRAFTS KANZASHI FOR HAIR ELASTIC TILES
Master class 1
IF THIS IS YOUR FIRST TIME
.
Master class 2
USEFUL MK FOR BEGINNERS. DIAGRAMS AND PHOTOS DESCRIBING ALL STEPS FOR MANUFACTURING SHARP AND ROUND PETALS IN KANZASHI STYLE. LEARNING TO MAKE BEAUTIFUL FLOWERS FOR RUBBERS .
Master class 3
ANOTHER OBJECT LESSON WITH STEP-BY-STEP ILLUSTRATIONS. WE MAKE A CUTE FLOWER FOR A SOFT RUBBER WITH YOUR OWN HANDS .
Master class 4
HOW TO MAKE A LARGE FLOWER
For girls with long hair, an elastic band made of satin ribbons will be a wonderful accessory. Mothers can create many such accessories with their own hands. This is not difficult if you understand the basics of several techniques for working with fittings. From the article you will learn how to make an elastic band from satin ribbons using the kanzashi technique, and how to make a lush American bow. You will learn the intricacies of working with accessories by studying the master class. You can never have too many elastic bands made from satin ribbons! Go for it, you will succeed!
Elastic bands made from satin ribbons for beginners
In this master class we will talk about how to make 2 elastic bands with bows for young princesses. To create a product you need:
- 2 satin ribbons 2.5 cm wide and 1 m long.
- Two satin ribbons 0.8 cm wide and 1 meter long.
- A piece of satin ribbon 8 mm wide and 0.5 m long.
- Decor for the middle of the bow.
Cut two cardboard blanks in the shape of the letter U, measuring 6 by 8 cm. Cut the tip of a large ribbon so that it becomes sharp.
Wrap it around the template so that the end and two folds are at each edge of the cardboard blank.
Secure the ribbon in the center with needles and sew. Use a needle forward stitch for this.
From thinner ribbons, fold two bows, connecting them into a ring. Place one on top of the other and secure. Do the same with the second product. Wrap the middle with a thin ribbon, attaching an elastic band at the back. Glue it together.
Elastic band for a bunch of satin ribbons
In this master class you will see how an elastic band is created from satin ribbons. You can make a hair bun decoration with your own hands. This accessory is especially relevant for little girls who do rhythmic gymnastics and dancing.
A simple option for beginners
In order to understand the principle of sewing such an accessory, we recommend starting with simple decor. Prepare 5 small bows, following the recommendations of the previous master class.
Take an elastic band. It is convenient to use a workpiece with perforation. You can sew a button to it to adjust the size of the product depending on the thickness of the bundle.
Cut out 6 circles from felt. Make 2 cuts in each to thread the elastic through.
At the back we will have a large bow decorated with a cabochon and rhinestones. For this element take:
- 2 pieces of satin ribbon measuring 5 by 28 cm.
- 2 satin ribbons 2.5 cm wide and 23 cm long.
Form two bows. Place the small one on top of the large one and secure.
For the elegant ends of the bow, prepare two pieces of satin ribbon 5 by 10 cm. Cut the corners of the blanks at an angle so that the ends look symmetrical.
Gather the top of the ribbons. Sew the blanks together. Glue the ends to the back of the bow. Decorate them with rhinestones, rhinestone ribbon or lace.
Take a small piece of thin satin ribbon and wrap it around the bow, catching the elastic in the middle. This way you will attach the largest bow to the base. You can decorate the middle of the decor with a cabochon or a small flower made of fabric or foamiran.
All parts of the elastic band for the bun are movable. You can disassemble the product and use the bows separately, putting them on hairpins.
In a similar way, you can attach more complex decor to the elastic, for example, flowers with leaves created using the kanzashi technique. So we figured out how to make an elastic band from satin ribbons.
American bow made of satin ribbons for an elastic band
For work, prepare:
- Two satin ribbons 5 cm wide and 60 cm long.
- 2 ribbons 0.5 m long and 2.5 cm wide.
- Six grosgrain ribbons 12 cm long and 2.5 cm wide
- Four ribbons of grosgrain fabric, 35 cm long and 1 cm wide.
- Two rubber bands.
- 2 mugs made of felt or foamiran.
- Decor for the middle of the bows.
Tools you will need for work:
- sharp scissors;
- candle;
- needles and threads;
- glue gun or Moment Crystal glue
Scheme of work step by step
Take the two widest pieces and melt their ends over the candle. Close their edges into a ring. Make a bow from the blanks by sewing two pieces in the middle. Pull the thread and hide it. Do the same for the decoration of the second elastic band.
Melt the edges of the rep ribbons as well. Sew a bow from the blanks.
Making checkboxes
Now you need to complete the resulting bows. Take six blanks and trim the edges as shown in the photo. Treat the corners with a lighter. We fold the thinnest pieces into loops.
All parts of the bow are ready. You can proceed to assembling the product. This must be done strictly in a certain sequence. Attach flags to a large bow. Sew the workpiece with threads for reliability.

Next, place loops of thin ribbon and also stitch with a needle. Place the grosgrain ribbon bow last. Sew and glue the product for reliability. Fix the decor in the middle of the bow.

Attach an elastic band to it by dropping a little glue, and cover it with a felt base for security.
Lilac flowers using the kanzashi technique
At the end of spring, we hide our daughters' hats on the mezzanine. I want to decorate their heads with something cute. We suggest you make lilac flowers to decorate rubber bands using the kanzashi technique.
Making petals
Cut satin ribbon 4 cm wide into squares. Take one and fold it in half to form a triangle.
We bend the lower and upper parts towards the center to form a figure like a rhombus. We bend it in half and get a petal. The edge of the workpiece must be compressed and melted over a candle or processed with a soldering iron.

Everyone knows that lilacs have four petals, but you can make those flowers you were looking for for good luck - lilacs from five elements. Assemble the elements using thread and needle. Stick a rhinestone in the middle.
In order to shade the white lilac, we will make several green petals. Cut 4 cm wide satin ribbon into rectangles. Their length should be 6 cm. Fold the element in half horizontally. On one side, cut the tip with scissors and melt it. Before searing the edges, press them together. The workpiece should come out as in the photo. Fold the remaining ends in the opposite direction towards the center. Melt and pin the end.

Glue a few leaves to the back of the lilac flower. Use a hot gun or instant glue to secure the elastic to the decor. Cover it with a felt circle. This is how we came out with an elastic band made from satin ribbons. You can make headbands, hairpins, and headbands with this decor with your own hands. Flowers using the kanzashi technique are also used to decorate hats, caps, belts, dresses, and make brooches and decor for boxes, mirrors, and soft covers of wedding albums.

Small flower “Seven-flowered flower” for elastic band
For very little girls whose hair is not yet very thick, voluminous decor with elastic bands is not suitable. Moms can make accessories for their babies with small, delicate and simple flowers.
Following the name, we will make a flower with seven petals. Prepare thin ribbons in seven different shades. For each petal we need to cut pieces equal to 2, 3 and 4 cm. Melt the edges of the blanks using a lighter.
Sew the blanks
Fold each piece into a loop. Insert all three parts into each other and sew. Collect all seven colorful petals in a similar manner. Straighten the workpiece. Tighten and hide the thread.
Cut two circles from felt or foamiran. Stick one on the back of the flower. Place a drop of glue, attach an elastic band and cover it with a second piece of felt. Such flowers will also be an excellent decoration for hairpins.
Hair ties made from satin ribbons are accessories that will come in handy in any situation. Girls should have a lot of them. Now you can independently decorate such an accessory as an elastic band made of satin ribbons. Create decorations for every day with your own hands and make yourself and your daughters happy.
Spring has finally arrived, we are putting away our outerwear and hats, and it will be possible to do different hairstyles for our hair, as well as decorate it with beautiful hairpins, elastic bands, headbands, etc.
Let's try to make a chic elastic band decorated with satin ribbons and rhinestones.
How to make an elastic band from satin ribbons: master class
 Before work we need to collect the following materials:
- a simple hair tie in green or white;
- sharp scissors;
- glue gun;
- thread and needle;
- lilac and light green satin ribbons two centimeters wide;
- thin satin ribbon in a light green shade, 0.5 cm wide;
- green satin ribbon 5 centimeters wide;
- various rhinestones and beads for decoration;
- lighter;
- snow-white bias tape;
- green organza ribbon with a width of 2.5 cm.
Master class on elastic bands made from satin ribbons, description
 First, we create the main detail for decorating the elastic band - this is satin ribbon flower. Divide the lilac ribbon into sections six centimeters long. You will need ten of these pieces in total. We solder the edges a little with a lighter so that they do not crumble. Fold the piece in half lengthwise and sew all open edges together with a basting stitch (leave the fold line untouched). Let's stretch the thread, thereby collecting the material like an accordion, and secure the thread. In this way a petal is obtained.
Let's do the same with the other segments and start assembling the flower. Roll the first petal into a tube and secure it with a thread and a needle. We will glue the other parts one by one using our gun. Cut a thin light green satin ribbon into pieces six centimeters long. A total of eight pieces will be required. Fold in half and glue the edges together.
Glue all the elements to the back of the flower. From a dark green satin ribbon, cut out squares, the sides of which are equal to five centimeters (five pieces). Fold them diagonally so that at the end you get a triangle. Fold everything in half again and secure with a needle. Now we fold the side edges towards the middle on top of each other and sew them together. Glue the leaves to the flower. We divide the organza ribbon into four pieces ten centimeters long. Fold the pieces in half and sew them together two at a time.
Let's glue everything. Then take a piece of light green ribbon (two and a half centimeters wide) twenty centimeters long, and draw one of its edges along the length. Let's assemble the ribbon like an accordion and sew the two open edges together. Glue it to the workpiece. Glue a rubber band in the middle. Cut a piece five centimeters long from white bias tape. Glue the edges to the light green ribbon, passing it through the elastic band. Let's add rhinestones and beads here and there, and an excellent DIY hair elastic is ready for use!!!
Do-it-yourself ordinary elastic bands made from satin ribbons: master class
 For a pair of rubber bands we will need the following materials:
- white ribbon with black polka dots 2.5 cm wide - 1.5 m;
- black ribbon with white polka dots 2.5 cm wide - 1.1 m;
- lighter;
- silicone glue and a special gun;
- four felt mugs with a diameter of 3.5 cm and a small strip of felt;
- two hair elastic bands;
- two centers for flowers.
For the centers of our flowers you can take small beads or oval buttons. You can use rhinestones or candies.
- Master class, description
First you need to do it yourself petals for a flower. A black and white palette is always popular, although you can go with a plain ribbon or two bright colors.
For two flowers you will need 1.1 m of black polka dot ribbon and 1.5 m of white polka dot ribbon. It must be cut into 6.5 cm pieces.
For one flower, you need to create eight petals from a black ribbon with white polka dots and eleven petals from a white ribbon with polka dots. It turns out that the segments should also be the same.
 To create a petal, you need to lay out the tape in a certain way. Then bend it again to form a uniform triangle at the top. To fix the ribbon, you will need to run a lighter along the base of the petal. Since the fire will melt the ribbon, it will stick together well. Then the second one. You will get quite a large number of petals. We collect the flower on a felt circle. We make the first layer from dark petals. After this there are two layers of light parts. To tightly attach the flower to the accessories, that is, to the hair elastic, we need a felt circle.
You will need to make two small cuts on the felt and secure the rubber band using glue and a felt strip. All that remains is to glue the flower and the base. Elastic bands made from satin ribbons made with your own hands. Such cute and, most importantly, good scrunchies can be made quickly and without much loss of money. So that the products do not lose their splendor, It is recommended to spray them with hairspray. Then the flowers made by yourself will become a little tougher and, accordingly, will last much longer. So we have finished our master class on creating beautiful elastic bands. You can also make rubber bands from candy, but that's another story.
DIY hair bands