The basis of the bolero remains the same short vest with small fronts without buttons, which the Spaniards began to wear in the 18th century. Modern boleros can have sleeves and sleeves, with fasteners, ties and buttons, and some models of shortened versions have acquired a new look, retaining only one or two features from the original idea, for example, short fronts or a short back.
Recalling Spain in connection with the very concept of “bolero”, it is worth recalling another object that Spanish needlewomen introduced into fashionable views. This is Spanish lace. Therefore, the combination of the words “bolero” and “lace knitting” is quite justified. Moreover, an openwork, almost lace bolero will attract looks no less passionate than those of Spanish women.
The principle of crocheting a circular bolero was described in the article “How to crochet a circular bolero. Simple models." For those who decided to try their hand at more complex knitted items, we suggest continuing to work with openwork circular boleros.
A circular openwork bolero looks like a round napkin with a pattern that radiates out from the center. Those who have already mastered crocheting round napkins will be familiar with this work. The difference lies in the volume of knitting, the presence of holes for the arms and, in some models, the presence of sleeves.
We start knitting with a short chain of air loops from which the center of knitting is formed, and then the rows are increased in a circle, taking into account the pattern of the pattern.
Blue openwork circular bolero with an eight-pointed star and acacia branches pattern.

For this bolero model you will need gray-blue cotton with viscose yarn 500 - 600 g (depending on the size of the finished product), the thickness of the yarn is determined by the parameters 200 - 250 m per 50 g. and hook number 2.
We knit the central part of the back in accordance with pattern 1, getting an eight-pointed star. The pattern for this model has sleeve slits shifted to the upper part.
.jpg)

Then we extend the circular fabric, tying it with a pattern according to scheme 2 in the figure. By the way, if you want an even more elongated version, we’ll add a pattern around the circumference according to scheme 3. Then we’ll get not just a bolero, but a bolero-vest

Don't forget to leave slits for the arms. In principle, for crocheting such a circular bolero, the pattern of a large openwork round napkin is suitable, you just need to remember to make 4-6 dense rows of stitches when the knitting reaches shoulder level for the armholes.

Armholes cannot be too narrow, because... The bolero should fit your figure. Therefore, for these holes we knit chains of air loops, approximately 100 - 120 pcs. or a segment of 30-32 cm.
You can use an alternative pattern design for this circular bolero.

Blue openwork circular bolero with short sleeves.

This version of the bolero also looks like an openwork round napkin if it is laid out on a flat surface. The pattern is circular, with armholes shifted to the top of the product with the addition of small triangular sleeves, which are more like wings over the shoulders. However, this detail makes the bolero different; the slightly covered shoulders give a different look to the model.
We select a colorful acrylic thread, 450 - 500 g, hook No. 2 - 2.5 and knit in a circle, repeating knitting techniques similar to the previous model, performing the pattern according to the drawing.

We make the sleeves separately according to the simple pattern in the figure; they turn out to be light and mesh. Then we sew them to the armhole using a chain stitch, along the inside of the product.
.jpg)
You can also take an alternative pattern for this bolero model.

This bolero is appropriate in a summer outfit over a short-sleeved T-shirt, and in an autumn outfit, if you throw it on a turtleneck or blouse. This type of knitting cannot be called fast; it requires patience and accuracy in the execution of patterns. But the finished item will be exclusive.
Elizaveta Rumyantseva
Nothing is impossible for diligence and art.
Content
Crocheting a short bolero for a woman or girl is much easier using the patterns and descriptions that go with them, where each step of creating the fabric is discussed in detail. Initially, this item of clothing was for men; in appearance it was a short vest. In the women's wardrobe it began to change, acquiring different sleeves and collars. Today, the accessory is a good addition to any outfit in your wardrobe. You can knit it yourself using master classes.
What is a bolero
In modern fashion, this item of clothing is a shortened jacket. It looks like a tight-fitting blouse, often without any fasteners. Such a thing appeared in the 18th century, then it was worn by Italian bullfighters. Then women turned their attention to it - it became less monotonous thanks to the invention of new interesting styles and experiments with decor and colors.

Models and styles
Modern models of such short jackets are presented in a wide range. They can be made of fabric, fur, leather or crocheted from yarn. The difference from the initial version is the presence of sleeves of different lengths: long, short, three-quarters - although there are also models without them. The variety of models is achieved through collars, including those that turn into lapels, and button fastenings.
What to wear with
The high demand for such a blouse is due to its versatility. With this small accessory you can create many extraordinary and extravagant looks. You can wear a bolero with almost everything. It goes well with a knitted dress, jeans, skinny trousers and shorts. A more formal option is with a pencil skirt. High-heeled shoes such as ankle boots are preferable, although sneakers are also suitable. Unusual fur models are combined with stiletto heels and skinny trousers, and leather ones with jeans. Knitted options look good with turtlenecks and dresses.

Crochet bolero
The first stage of work will be the preparation of the necessary materials and tools indicated in the description of the master class. Their list includes the following:
- a tool of one number or another, which is selected taking into account the type and thickness of the threads;
- thin or thick yarn depending on the purpose of the clothing;
- scissors;
- if necessary, straight knitting needles;
- darning needle;
- some decorative elements are optional, for example, braid.
In order for the finished product to fit well, you must first knit a sample from which to calculate the knitting density. It depends on the thickness of the yarn and the tool number. The test sample is created as follows:
- according to the desired pattern of the product, knit a sample measuring 10 by 10 cm;
- wash, dry and iron;
- place it on cardboard measuring 10x10 cm;
- count the number of loops along the main side of the sample that fell on the cardboard - this is the knitting density;
- If the sample turns out to be smaller, then you should take a thicker tool, otherwise, on the contrary, a thinner one.

How to choose the right thread
The correct choice of yarn is equally important. For light and airy patterns, threads with the addition of synthetics are suitable. As a result, the product will hold its shape better. Loose and thick patterns look more impressive from denser yarn, which can be knitted even in 2 threads. Tips for choosing yarn:
- bamboo, viscose, cotton and silk yarn are suitable for summer models;
- mercerized cotton will give you coolness in the scorching sun, and pure high-quality wool will give you warmth in winter frosts;
- lace models look more beautiful when made from thin cotton or synthetic thread;
- a product made from stretch yarn will emphasize the curves of the body;
- models made of mohair, cashmere or merino wool combine warmth and beauty;
- evening options look elegant made from lurex yarn;
- sports models made of fine wool are suitable for girls with an active lifestyle.
This warm bolero is crocheted from merino (sheep) wool. It is hypoallergenic and soft. Popular manufacturers are Gazzal - BabyWool, Galla, Artic. For an autumn-spring wardrobe, it is better to use yarn with cotton and acrylic in the composition, sometimes with the addition of wool. The best manufacturers are Jeans from YarnArt, Cotton Gold from Alize and azzal – Baby Cotton. Linen and cotton yarn are considered summer yarns. It makes elegant openwork blouses. In this case, good yarns are Begonia, Violet and Duet (Alize), Iris, Lili and Semenovskaya - Tenderness, Ivushka, Irina and Lilia.
Knitting patterns
Beginning needlewomen should not immediately take on complex patterns. Training on simple patterns will help you cope with more complex ones in the future. Patterns can be found in knitting magazines or on the Internet. Symbols will also help to simplify the process, so that even a beginner can figure out where and what kind of loops to make. They may reflect:
- single crochets (sc);
- double crochet (dc);
- air loops (AP);
- half double crochet (PSN);
- half single crochet (PBN);
- lush column;
- relief column.
There are different knitting techniques that are used by craftswomen. The main classification includes the following methods of creating knitted fabric:
- Circular. The canvas turns out to be round, like a napkin, seamless. Knitted in one direction with each circle closed with a connecting and lifting loop.
- Direct. The fabric is knitted in rows according to the “back and forth” principle.
- Knitting motifs. In this case, several separate parts are made, which are then connected with a hook or a needle.

How to knit a bolero - step by step instructions
Almost any bolero is crocheted according to the pattern of a classic jacket, only its edges are rounded and the length is reduced. First you need to choose a model - will it be needed simply to complement the image or is it necessary for the purpose of insulation. A decorative bolero is crocheted from thinner threads and often without long sleeves. The insulated version needs them, and the yarn should be thicker.
Decorative models
Silk, cotton, viscose or synthetic yarn - these options are suitable for decorative models. Any of them can be connected according to the following scheme:
- Select the sleeve length, multiply it by 2 and add the back, measured from shoulder to shoulder. This is the width of the rectangle. Its height is equal to the circumference of the arm at its widest point plus 5-7 cm for a loose fit.
- Next, fold the rectangle lengthwise, make two seams from the edge to the center for the desired length of the sleeve. There is no need to perform its okat here.
- Along the contour, make the trim with ruffles or another pattern.
Warm knitted bolero
For insulated options, it is better to take yarn with wool, cashmere or mohair in the composition. These boleros are crocheted according to a simple pattern:
- Measure the distance from shoulder to shoulder on the back, knit a square of these dimensions (for size 42-44 they are approximately 50-52 cm).
- Fold the resulting piece in half, sew it on the sides from the edge to the center to the second mark by about 10-12 cm, leaving slits for the arms.
- Next, tie the remaining holes to the desired sleeve length.
- Make shelves. To do this, tie the edges of the stitched square in a circle for the required number of rows.

Crochet bolero - diagrams and descriptions for beginners
Knitted models of such jackets have won special love. They can be created at any time of the year. In addition, boleros are crocheted quickly, and according to the diagrams and descriptions, any craftswoman can handle them. This can be a light cape for a cool evening or an insulated winter model under a turtleneck. Several such options are presented in master classes with photos.
A long-sleeved model is more suitable for the autumn-winter period, so the yarn should be thicker. In general, for knitting you will need:
- medium thickness mohair of any color – 400 g;
- hook - No. 4, 5.
The product is knitted from two parts in the transverse direction from the sleeve. In some places, loops are simply added or, conversely, removed. The instructions include the following steps:
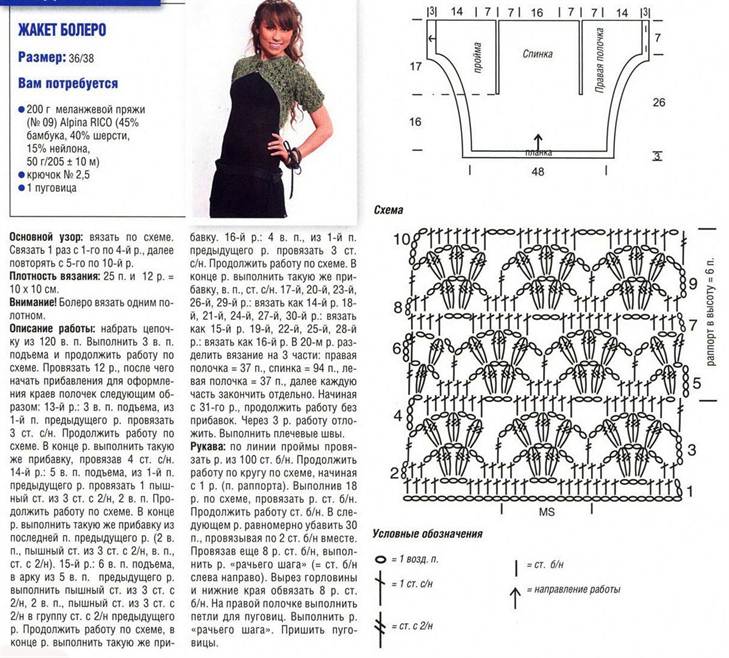
- Cast on a chain of 33 air loops, knit according to pattern 1, in every fourth row adding 2 loops (p.) 4 times. In the end there should be 49 of them.
- After 48 cm of knitting, add a chain of 4 VPs on both sides (you get 57 loops in total).
- Knit another 10.5 cm middle loop, close, continue knitting the remaining 28 stitches of the back for another 8 cm, then cut the thread at a total height of 69 cm.
- Go to the shelf, according to scheme 2, after 3 rows, bevel the neckline, cut the yarn.
- Do the second part in the same way.
- Pin them onto the pattern, moisten them, and let them dry.
- Make side and central seams, tie the edges according to pattern 3.

Simple crocheted bolero for girls
The following knitted pattern is perfect for a girl aged 5-6 years. Necessary materials and tools for the master class:
- hook - No. 3.5;
- yarn 100% cotton pink or other color – 50 g.
Crochet a bolero for a girl starts from the armhole of the first sleeve, and ends with the end of the second. The product is not completely solid. The remaining sleeve is tied from the armhole. The instructions are as follows:
- Dial so many VPs so that the width of the sleeve is the size of the child’s hand.
- Knit according to the pattern to the armhole of the sleeve - the width of the fabric is equal to the width of the back.
- Close the knitting ring. Continue knitting in circles with the same pattern until the desired length.
- Make the second sleeve from the left armhole. Tie both together with a row of single crochets and a row of crab step.
- Do the edging of the neck and back as follows: 1 row sc, 2 rows of loop *2 double crochets, knit 1 chain stitch together*. Repeat this twice more. Tie open edges like sleeves.

Bolero for summer
Options for summer models are lighter, so the yarn should not be thick. Their pattern is often openwork, which gives the product a special airiness. To make one of them you will need:
- yarn 100% cotton (250 m/g) – 300 g;
- hook - No. 2.
The finished item, knitted according to this pattern, is suitable for women with clothing sizes 38-40. The sequence of its execution is as follows:
- Back. Cast on a VP chain 52 cm long, knit according to the pattern of 43 cm. Next, leave 12 cm in the center, and finish both sides separately. For neck bevels, decrease 1 cm once. After 48 cm of fabric, finish knitting.
- Shelf. Cast on a VP chain 26 cm long, knit 24 cm of fabric according to the same pattern. Next, in each row, decrease 1 loop 7 times. When the fabric reaches 48 cm, finish knitting. Do the other half in the same way.
- Sleeves. For each, cast on a VP chain 40 cm long, knit according to a 5 cm pattern.
- Assembly. Make all the seams, tie the edges with 2 rows of dc and 1 row of such a cycle *3 VP, 3 dc in the same base, skip 3 loops, 1 sc, skip 3 loops*.
- Lace. Knit a VP chain 70 cm long, knit 1 row of sc, thread the tie into the shelves.

Openwork boleros for experienced craftswomen
If you are already familiar with knitting techniques and have completed a few simple bolero patterns, you can move on to the next level and create a more complex product. It is more difficult to make openwork patterns, but according to the diagram and description, it is easier to make them. The main thing is to follow the sequence of manufacturing all the parts, use the recommended yarn and the number of the tool for it. As for the color of the threads, you can choose it to your taste.

Crochet floral cape
The light openwork cape in this master class is knitted from round motifs. Then they are connected to each other, resulting in a finished product. Required materials and tools:
- yarn 100% silk – 230 g;
- hook – No. 2.5.
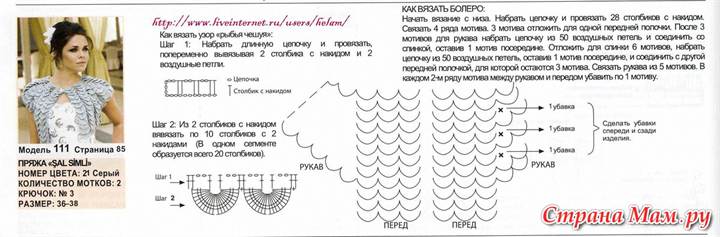
The diameter of each motif is approximately 8.5 cm. Their knitting and assembly into a finished item is carried out according to the following instructions:
- According to scheme 1, knit 32 motifs, connect them according to the drawing: when knitting the last flower, do not cut the thread, but make 1 sc from the top of the middle picot of the bottom row, then 6 ch, 1 sc, inserting a hook under the top of the middle picot of another motif. Perform chains of 6 VPs and 1 RLS, inserting the tool alternately into one and the other flower.
- Fill in the free areas of the upper edge according to pattern 2. Tie it with 1 row of single crochets.
- For the fringe, group 3 threads 25 cm long and secure them along the bottom contour.

Bright knitted bolero “Chinese fans”
Creating this model is more labor-intensive due to the difficulties of connecting individual motifs. The following materials and tools will be required:
- double mercerized cotton – 400 g;
- hook - No. 1.5.
Crocheting a bolero begins with creating 4 round motifs. Already from them they make a pattern of fans. The instructions for creating the product are as follows:
- Knit an openwork strip of 4 circles.
- Next, knit the back fans according to the pattern, starting with 5, and then alternating 3 and 4 fans. There should be 6 rows in total.
- Make each shelf separately, following the sequence of rows in the diagram.
- Sew the product on the sides, tie the sleeves with fans to the required length.

White bolero made from fragments
A very simple but beautiful bolero is crocheted from squares. You just need to complete several motives and then connect them according to a special pattern. For knitting you will need:
- cotton thread – 50 g;
- hook - No. 1.5.
The number of square fragments may vary depending on the desired length of the sleeves and the product itself. In addition, they can be positioned at an angle of 45 degrees, rather than straight, as in the standard version. The classic bolero pattern is crocheted like this:
- According to the pattern, knit 10 square motifs.
- Connect them together with connecting posts along the last row of arches.
- For the back, make a 2x3 square canvas. For the shelf, attach 2 more motifs down.
- Tie the edges of the sleeves and neck with fans according to the pattern.

A small jacket with a mesh pattern can be a great addition to an evening dress. To make it you will need the following:
- Vega yarn 65% viscose, 35% cotton – 200 grams;
- hook - No. 2.
You need to crochet a bolero according to the pattern shown in the picture. The product consists of a back, two shelves and sleeves. The sequence of knitting them is as follows:
- Back. Knit a chain of 127 VP + 3 VP for lifting. Knit 5 rows with the pattern in pattern 1. Next, move on to the main pattern. It is shown in Figure 2. After 20 cm of fabric, leave the armhole on both sides in the form of 2 repeats of the pattern. Continue knitting according to the pattern, ending at a height of 39 cm.
- Shelves. Cast on a chain of 67 VP + 3 VP for lifting. Knit 1 pattern of 16 cm, then make a cutout for the neckline, leaving 5 cm on the inside. Then, for rounding, add in each row 4 times 1 cm and 2 times 0.5 cm. Knit the right armhole in the same way as the back. Make the second shelf symmetrically.
- Sleeves. Sew side and shoulder seams, attach the yarn to the armhole, knit in the round with the main pattern until the required length.
- Assembly. Tie the edges of the shelves and the neck according to pattern 3. Make the lace in the form of a VP chain.

Beautiful crochet bolero for an evening dress
For an evening out, it is better to crochet a classic black bolero using colored motifs. it is created very simply, and the materials and tools needed are as follows.
The modern crocheted bolero owes its appearance to the Spaniards. True, men wore it there, and this detail looked like a short vest. Over time, ladies began to try it on, adding sleeves, collars, and decorating with embroidery. It became a wonderful addition to a woman's look. Today in stores there are capes made of different materials, different shapes, sizes, colors. But crocheting a bolero is not difficult even for beginners. Beginners are advised to select simple models to make it easier to understand the work, and experienced craftswomen can come up with something interesting themselves.
Bolero in one day - it's easy!
It’s not at all difficult to create such beauty with your own hands, the main thing is to show perseverance, patience and stock up on the desire to see a beautiful result. The detailed description of the work is very short and clear, and the cape itself is amazing.
Materials
In order to create a crocheted bolero you need to prepare all the necessary materials and tools. First of all, you should select the yarn and it is better to take threads of medium thickness. Select the appropriate hook size.
Job description
This method of working is convenient because you can take any pattern as a basis. You need to knit a rectangular fabric, the length of which will be 2 sleeve lengths + back. When the canvas is ready, you need to measure the place with pins armhole and sew a knitted bolero down to the pins. Now all that remains is to do the tying and the crocheted bolero is ready.
The wiring diagram looks like this:
1st row: in each arch of the product make 2 columns with yarn over (st. s/n), dial 1 air loop (v.p.) and 2 tbsp. s/n;
2-4 r.: knit 3 tbsp into air loops. s/n, make 1 ch. and 3 tbsp. s/n;
5-7 rubles: in v.p. dial 4 treble s/n, then 1 vp. and complete 4 tbsp.
There is no need for a more detailed design manual for this product, because you can create anything you want. The main thing is to understand the principle of how to make a crocheted bolero.
https://youtu.be/HGI3L8F1DA0
Openwork bolero: video master class
Beautiful cape made of motifs
Things created with your own hands have a special charm; they attract attention and are etched in the memory. This bolero is crocheted from squares (although in the finished product the shape of the motif is closer to a circle), the pattern is simple and clear, and with the help of the pattern the work will become more enjoyable.
Materials
To make such a fashionable thing with your own hands, you need to stock up on yarn (1 g/530 m), crochet hook No. 2, beads (for decoration), and elastic thread.
Job description
The cape looks elegant and impressive, and the beads will add even more shine and nobility. Each motif is knitted as a square but ends up in a circle shape. The crochet bolero tutorial begins with the main motive of this item:
1 p.: dial 6 v.p. and connect them into a ring;
2 rows: knit 2 tbsp into each loop. s/n, at the end of the circle make a loop for lifting;
3 p.: 1 tbsp. b/n, 5 vp, 1 tbsp. b/n – continue this motif in a circle until the end of the line;
4 p.: 1 st./n, and in the formed arch, dial 6 tbsp. s/n. knit according to this principle in the round until the end of the row.
If you want to liven up the bolero a little with crochet, then in the middle of the circle you can knit with yarn of a different color. The individual elements must be connected using a connecting loop. When there are a sufficient number of elements, you can proceed to the final stage. Embroider the central part of the motif with beads. All that remains is to sew on the buttons and make the loops. This kind of work may not be feasible for beginners, so it is better for them to master simpler options, which are described here.
Simple bolero: video master class
From weed
Fluffy, soft, airy, unusual cape made from grass yarn. In appearance, this is far from a knitted bolero, but an elegant fur cape. Fortunately, novice needlewomen should not be intimidated by working with weed. The diagrams will help you better understand the sequence of making the pattern with your own hands; in this case, knitting in the round is not necessary. Knitting a bolero from unusual grass yarn will definitely appeal to needlewomen.
Materials
You will need 200 g of grass, 100 g/150 m thick, a hook, a needle, and a ribbon.
Job description
1 row: cast on the first cast-on row, consisting of 122 vp;
2-8 r.: creating a crocheted bolero should now be continued with treble crochet;
9 – 15 rubles: dial st. b/n.
Continue alternating stripes of 6 lines each. There should be 5 such stripes, and on the sixth one, knit only 4 lines, and then add 15 chain stitches at both ends of the work. Continue knitting the bolero in stripes. A grass cape will be more interesting if you alternate not only the patterns, but also the colors of the yarn. As a result, you should get 15 stripes, 2 of these parts are needed. The knitted bolero takes on a more finished look, all that remains is to assemble it, which the description will help you with.
Assembly
MK for this product entered the most interesting period. Now you no longer need diagrams, but a needle will come in handy. Fold the piece in half and sew. Bottom knit st. s/n and thread the ribbon. The cape turns out to be very beautiful and delicate, you can decorate it at your discretion. It will be interesting to do all this with your own hands, because truly original things are made from grass.
An openwork crocheted bolero can be made of any size, and this is well demonstrated by each given diagram. A detailed description and clear instructions will help you create a truly amazing thing with your own hands. Almost any cape is suitable for both adult girls, women and little girls. And schoolgirls can safely be involved in this work, then they will learn to create beautiful clothes with their own hands, master knitting circles, squares and other patterns.
Video master class
From a napkin: video master class
On the Internet there are a lot of options for how to knit a bolero. There are many ways and techniques. A bolero can highlight the waist, hide imperfections and give a fresh look. Such a wardrobe item will always delight others, especially if it is made with its own sleeves. Let's look at several crocheted bolero options for women. Some of them can be completed in one day, while others require more time.
Learning the Basics
For overweight women, a shortened openwork bolero model will look good, as it will set accents and visually hide imperfections. Let's consider one of the options for how to knit such a bolero.
We will need:
- cotton yarn 350 grams (250 meters per 100 grams);
- hook No. 3.5.
Let's start the master class with diagrams and patterns. The bolero will be made using this pattern.
If necessary, the parameters can be changed. Only the number of report loops should be taken into account.
We begin work on knitting the back. The data below the pattern diagram will be used. We knit 107 air loops, add 3 air loops for lifting and then knit according to pattern No. 1.

After 7 cm, you should reduce the row by about 3 cm. This is done for the armholes. We knit 6 loops on each side with double crochets. From the beginning of the armhole we knit 21-22 cm. We fasten the thread and cut it. Let's start making the left shelf. We knit 57 air loops, plus 3 lifting loops. We knit the second row according to pattern No. 1. We make an armhole, decrease the loops as it was done on the back. For the neckline, simultaneously with the armhole, we decrease the 1st loop 18 rows in a row. Due to the decrease in stitches, the pattern may become distorted. In order to preserve it as much as possible, we knit the loose loops with double crochets. When the work reaches 21-22 cm, the thread can be secured. We knit the right front using a similar method. Everything is done exactly the same, only mirrored.
Let's start working with the sleeve. We cast on 8 g of air loops, lifting loops and knit 4 cm according to figure No. 1. To roll back the sleeves, we retreat 6 loops on each side and bind off 2 times with 3 loops, in the next row we close 9 times with 2 loops, then 2 times with the 1st loop. We knit according to the pattern 15-16 cm from the beginning of knitting the rollback. Fasten the thread. We perform the second sleeve in the same way. When all the parts are ready, you can begin assembly. The shoulder seams are done first. Next we sew in the sleeves and sew the side seams. Sew the sleeve seams.
You can start tying the bolero. We start tying the bottom from the corner according to pattern No. 2. We tie the remaining edges like this:
- a row of single crochets;
- single crochet, * skip 3 loops and in the 4th loop knit 7 double crochets, skip 3 loops, knit a single crochet *. Repeat from * to *.
Bolero for obese women is ready!

Product made from motifs
For beginner knitters, making a bolero from motifs is a good option. Let's look at making such boleros using simple diagrams.
From round motifs

For this work you will need 300 grams of cotton yarn with a density of 170 meters per 50 grams and a hook number 2.5.
Bolero elements are knitted in the round according to this pattern. The photo also shows an example of tying the finished product.

The bolero is assembled according to this pattern.

From the square


In order to knit such a bolero, you will need 10 square motifs. To increase the size, motifs can be added both in width and in length.
An example of the motif used and the binding of the finished bolero:

Assembly diagram. The squares are sewn together one by one. The least amount of breaking of the gather thread should be done.

Circle bolero
A bolero crocheted in the circle can be a festive and simple option. Knitted according to the napkin principle, its size and appearance can be very easily adapted to a woman’s individual parameters.

In this example, sizes 44-46, 360 grams of cotton yarn were used. The work was done with crochet size 1.75.
Before you begin, you should edit the proposed pattern to suit your parameters.

According to pattern 29, a circle is knitted, the diameter of which will be about 40 cm. Next, we knit a separate thread from air loops of about 17 cm and sew it to the armholes.

We continue to knit according to pattern 29a.

Pattern 296 is designed for knitting sleeves.

The bottom of the bolero should be designed according to this pattern. Moisten the finished bolero and let it dry. Ready.

From a rectangle
This type of bolero is the easiest to make. You can certainly knit it, if not in one evening, then in one day. To do this, knit a rectangle with the selected pattern. The width of the rectangle is determined by the width of the back from shoulder to shoulder plus 15 cm. The height of the triangle is equal to the circumference of the arm at the widest point + 7 cm. It is sewn in 2 places according to the diagram. A rectangular bolero can be both casual and festive.


For experienced knitters, we will offer several options for beautiful boleros. Below you will find diagrams and descriptions of the work in pictures.