Beautiful nails and a flawless manicure is every woman’s dream. This is not only a sign of grooming, but also a way to stand out from the crowd and show your individuality. Today, the nail industry market offers many original products, with the help of which any manicure acquires a special style and allows a woman to be the center of attention. One of the most spectacular attributes of an ideal nail coating are sliders. What are their features and how to apply such stickers to gel polish?
Features of the decorative element
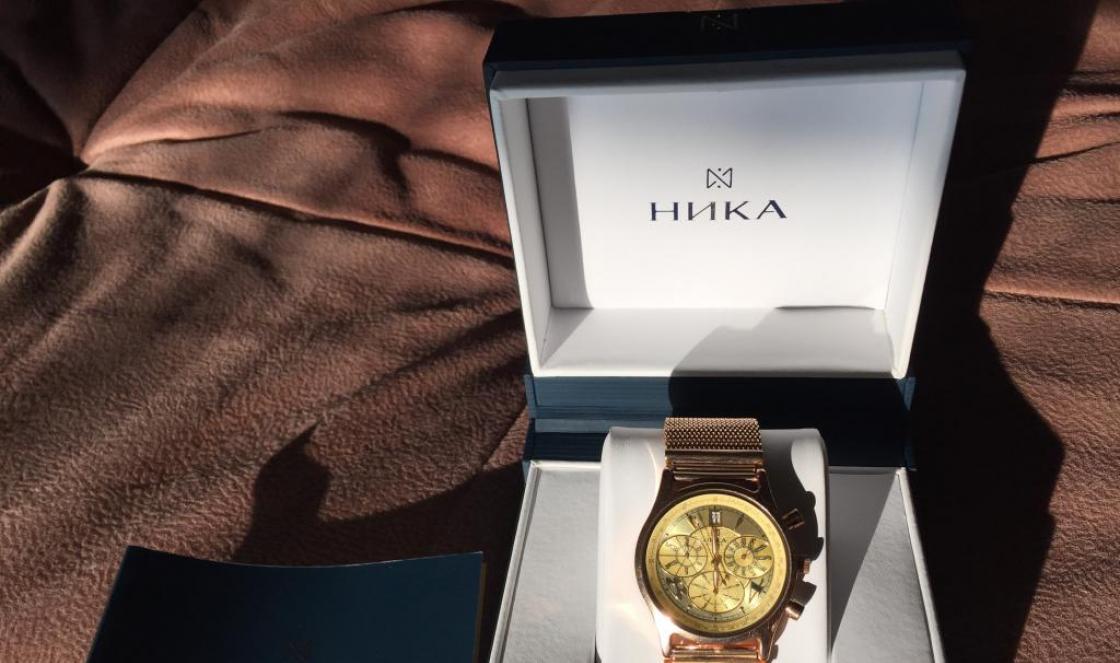
Nail sliders are one of the most popular manicure techniques. This term translated from English means “to slide.” These are special stickers, which are thin films with designs of various themes. Thanks to special staff Such films are securely fixed on the surface of the nail plate.


Slider design successfully replaces artistic painting; it looks flawless. Applied to gel polish and top coat with a fixative, it prolongs the life of the manicure without losing its color saturation and glossy shine.
The advantages of such a nail product include ease of use: you can design nails with stickers not only from professional master in a beauty salon. Such pictures can decorate all fingers or show off on only a few, which looks no less beautiful and impressive. They may be different sizes, completely cover the surface of the nail plate or only the part chosen for the design. Such pictures are also appropriate on a jacket if you stick them closer to the base of the nail.


By following certain rules of application, you can decorate your nails with a manicure with sliders yourself at home. This saves time on painting nail plates and allows you to create both a full manicure and an emphasis on one finger.
Decorative stickers are safe for nails. They do not harm their structure, are easy to apply and are rarely difficult to remove. In addition, sliders are sold freely in many specialized stores, so buying them based on your preferences will not be difficult.


Such nail decorations have a wide price range, which allows you to choose luxurious expensive ones (from 500 to 1000 rubles) and more acceptable designs (20 to 100 rubles), which are not inferior in beauty to their expensive counterparts.
Depending on the type of stickers, they have different gluing methods. Each technology has its own nuances, the violation of which will lead to the loss of a flawless manicure.
Subject of drawings
Colorful pictures can be bought at any cosmetic boutique. At the same time, their subject matter often amazes the imagination and confuses: you want to buy everything, no matter how beautiful it is. The most popular image motifs on such design elements are:
- animalistic drawings (all kinds of kittens, dogs, snakes, tigers, panthers, leopards, bears);
- birds (peacocks, seagulls, birds of paradise);


- ornaments (geometry, lace with scallops, stripes);
- prints (floral, abstract patterns, compositions with butterflies, designs for reptile skin and animal skin colors);
- lace (web, all kinds of lace patterns, made in one or several shades, imitation of textile textures);


- portraits ( famous people, women's faces, silhouettes);
- cartoon characters (relevant for young people);
- Japanese patterns (sakura, geisha, anime sketches, etc.);


- new year theme(snowmen, snowflakes, bullfinches, deer, Christmas compositions);
- fruits and berries (various patterns with one or more objects);
- rock style (skulls, crosses and similar paraphernalia);
- glamor (hearts, bows, stars, gold or silver letters).


Patterns can be colored, monochrome, flat, with slight relief. Some drawings require symmetry, others do not need it. Today, a loose theme is more often used, in which accents are glued to just a few nails.
Species
Today the choice of such products is quite wide. There are many varieties of nail design stickers.

Water
Water stickers are a thin film placed on a white paper base. A special feature of decals is that they need to be based on a translucent base, so they require careful selection of the shade of varnish. The background should be in harmony with color palette pattern and not merge with it into a single incomprehensible spot.

The disadvantages of this type of stickers include the likelihood of damage to the workpiece during the process of adjusting it to size and shape.
Self-adhesive
Such drawings are photodesigns (fragments with an adhesive surface located on a special substrate). Their feature is independence. In order to glue them, it is enough to separate the sticky layer and stick the fragment onto the surface of the nail.


The stickers themselves can represent individual items a specific drawing or be a full-fledged object. They come in a variety of sets of 10 plates designed specifically to cover the entire area of the nail. Sets created for French are made in the form of stripes.
3D
Stickers of this type differ in volume. They are slightly convex, unlike regular flat pictures. This type of slider can be a full-fledged decorative element or a nail accent.


These stickers are either water-based or adhesive-based. In general, they are not difficult to work with, although sometimes difficulties may arise (when designing a manicure over the entire area of the nail). The presence of a small relief (bulge) does not interfere with everyday life; it does not scratch or cling to clothes and other objects.
The advantages of 3D stickers include the ability to combine them with other decorative design elements (for example, with regular stickers). They are easy to use and often look more beautiful than their counterparts. The disadvantages include the difficulty of removing the sticker when removing the coating. Special liquids for removing gel polish are not intended for such procedures, so this sticker will have to be scraped off.

Application methods
There are several methods for applying nail stickers. Each technique is unique in its own way, so you can choose the most optimal option. Carrying out a slider design step by step is actually much simpler than it might seem at first glance; it won’t take much time.
Water based
The sliders are cut to the size of the nails, then lowered into water. You can use a napkin soaked in water and attach a cut fragment to it on one nail. The film with the picture will peel off easily in both cases.

On undried gel polish
One of the most reliable methods of slider design is the method when pictures are applied to an undried layer of pigment. Experienced craftsmen advise using a brush when smoothing the sticker. This way the design will not tear and will lie flat on the surface of the nail plate. The brush allows you to firmly attach the sticker to the base without air bubbles or waves.


The advantage of this method is excellent durability, since the coating layer dries along with the slider. The adhesion of the slider to the coating with this gluing option will be as strong as possible. Therefore, in this case, one layer of fixative (finish) is sufficient.
On top with a sticky layer
This method is very convenient and easiest. Sliders are applied to the topcoat layer after the pigment. Unlike the base coat, the top has a denser and thicker consistency, which simplifies the procedure for applying pictures to the surface of the nail plates.
The sticker is straightened with a brush and then fixed with a finishing coat. You should try to ensure that the size of the sticker, if possible, does not extend beyond the lateral borders of the nail plate.

For a finished manicure
This method allows you to update an already finished manicure. If your nails are painted with gel polish, but after a few days you want a change, this is the ideal solution. In this case, you do not need to remove the old coating to change your nail design.
In this case, in order not to create excess thickness of the coating and an unnatural look, it is better to stick the slider design onto ultrabond (acid-free primer). It does an excellent job of fixing stickers and will not create obstacles in your work. After completing the design, you need to fix the manicure with a top coat without a sticky layer.

Photo design for long nails
While working, you need to adjust the stickers to the shape and size that best suits each specific nail. However, it is not scary if the film protrudes beyond the edge of the end of the nail: then it can be trimmed with scissors and, after drying, processed with a file.

When straightening the slider design with an elastic brush, you need to remove all voids. If the sticker does not fit well on the surface of the nail, you can make small cuts. Some specialists use an orange stick to straighten the film with the design.
After gluing the film, it is secured with a layer of finishing coating without a sticky layer. It is better if the top is glossy: the appearance of the pattern will be more attractive. In addition, you should not stick such pictures on a dark base if the picture is faded and made in translucent muted tones.

Working with a slider design will appeal to every representative of the fair sex, no matter what method of gluing pictures is chosen. The duration of the procedure will not take more than 10-15 minutes, provided that the work is performed calmly and carefully.


Not every experienced master can draw such patterns, and in much more time. The main rule of all stages of design is accuracy at every step. Technique for gluing sliders onto water based somewhat reminiscent of decoupage.
How long should they last?
If the design is properly executed, the stickers stay on the nails for at least two to three weeks or even more. The durability of such a manicure is affected by careful handling of the coating. This is especially true for household work, during which hands come into contact with water and aggressive detergents and chemicals.

So that you don’t have to wonder why the stickers don’t stay on your nails for a long time and the beautiful coating quickly peels off, you need to follow all the rules of manicure with gel polish at every stage. It is important to perform all actions carefully, without defects. Any slight imperfection in gluing will ruin the flawless appearance of the nails and ultimately lead to the fact that the coating will have to be removed.
In addition, the durability of the colorful design with stickers is influenced by the use of high-quality components in the work. It is better to buy gel polishes from reliable companies that are time-tested and have positive reviews experienced craftsmen working with this type of coating.
The coating may shorten the durability period in the event of hormonal changes in the body during pregnancy. In addition, decals may not last as long on nails if the nail plates themselves are unhealthy and very thin. Help thin nails There may be a special strengthening gel that does not need to be subsequently removed by filing.
How to translate at home?
The technology of slider design for gel polish requires knowledge of the techniques of the masters working in the salon. To extend the life of a colorful design, you need to follow all instructions correctly and step by step, starting from the very beginning.

Before applying the base coat, be sure to pre-treat your nails and do a light manicure without soaking. In this case, you need to remove the cuticle, trim the shape of the nails, and carefully process the free edge of the nail. Not only the quality of the coating, but also its durability depends on how smooth it is.
In addition, it must be taken into account that perfect manicure implies the same length and shape of all nails. If oil or cream was used when treating nails, they should be removed.

After this, the surface of the nail plate must be sanded using a soft file. natural nails(bafa). This must be done delicately, removing only the gloss. If you press hard on the buff, you can damage the structure of the nail, removing not only its natural protective layer. Filed nails will look matte.

The next step requires a degreaser (dehydrator). It will remove residual sawdust after sanding and any remaining cream or oil if they were used at the very beginning. At this stage, it is important to pay special attention to the end of the nail, the inside of the free edge and the side ridges. If an untreated area remains, it can lead to a breakdown in the durability of the coating.
After completely removing the keratin layer, you need to use an acid-free primer. It is especially necessary in cases where the nails are thin and soft. This manicure component helps improve the adhesion of coatings to the surface of the nails, strengthening their structure.
Having prepared the nails for coating, apply a base coat. It should be thin, evenly distributed over the entire surface of the nail plate. It is important not to forget about the end of the nail and the sides. The base coating has a sticky layer that cannot be touched: it maximizes the adhesion of the nail to the pigment. When working, you need to try to do everything carefully so as not to damage the integrity of the coating.

Distinctive feature The whole manicure using gel polish is the need to dry each applied layer of gel base. Imperfections must be removed before polymerization in a UV or LED lamp. A thick layer can quickly crack, which will affect the quality and durability of subsequent stages.
Buying a special lamp can confuse unenlightened shoppers. However, this is an important tool for manicure, because it is thanks to it that the gel polish, base and top harden.

You can purchase a budget version of a compact-sized lamp. It is not necessary to buy a powerful device for drying both hands at the same time: at home, a neat device purchased at an affordable price is quite enough.
After the base coat, colored gel polish is applied. It usually has good dense pigmentation, so one or two thin coats will be enough for an even background without streaks or unpainted areas. After applying each layer, they are polymerized in a lamp. Drying time depends on the type of lamp.
The LED device is more powerful and reduces total time creating a manicure. Drying one thin layer in such a lamp takes 10-30 seconds. However, manufacturers often produce nail products that are not intended to work with it. In this case, it is better to buy an ultraviolet lamp; it is a universal device for all types of coatings. The polymerization time of one thin layer in it is 2 minutes.


Sliders are glued to the prepared surface. Their design can be very diverse, it depends on the imagination and style of the intended composition. The method of applying stickers differs from their varieties. This process is very exciting and creative. After gluing the pictures, they can be decorated with small rhinestones and microbeads.
After the slider design, you can apply the finishing layer. The top is a fixative; it is applied in a denser layer, so it takes a little longer to dry. The polymerization time for the top coating in an LED lamp is 1 minute, in ultraviolet light it is 3–4 minutes.
It is worth noting that UV lamps differ in power. Buying such a device for home use, it is better to choose a model with a power of 36 watts. This is the optimal value so as not to harm the manicure and not disturb the water balance of the skin.
In addition to following all the above rules, experienced professionals working in the nail industry recommend choosing the main shade for the stickers. thoroughly.
- If white is chosen, it is desirable that it be pure, without foreign impurities. It is better to stick bright and attractive stickers on such a background. This base is ideal for any slider design, as it can add richness to the designs.
- One of the current shades of gel polish for pictures are flesh and beige-pink tones. Thanks to light shades, the drawing will not lose its expressiveness and will be clear.

- When choosing a contrasting background for drawings, it is important to consider the color combination. The shade of the gel polish should be a harmonious basis for the pattern.
- Before starting work you need to prepare necessary tools so as not to be distracted by searching for them during a manicure.

- When designing with water-based stickers, it is better to use warm water: this will allow the film to come away from the backing faster.
- If the picture is not in the place it was intended, you should not try to move it. In this case, there are two options: do it all over again or try to correct the defect with the help of other decorative elements (rhinestones, sparkles).
- A fully finished manicure should be protected from contact with water for at least half an hour after drying the finishing layer.
- In order for the slider to be a durable and high-quality nail decoration, you need to pay special attention to sealing the free edge of the nail. We must not forget about it with each layer of coating, otherwise the stickers will begin to peel off after a few days.

Problems during operation
Sometimes following all the steps step by step, it is not possible to achieve a perfect result. The reasons for this usually lie in the following:
- If the sticker falls off along with the topcoat layer, then the reason lies in the fact that the topcoat or varnish layer has not dried well.
- The formation of wrinkles on the surface of the picture indicates that the quality of the sticker is low or its film is thick. However, the reason could also be that the slider is too wet.

- Chips in the top coating may indicate that it did not have enough minimum clearance along the side rollers.
- Peeling of the coating can be caused by insufficient sealing of the end of the nail. This is a mandatory step in manicure, which is needed to form a kind of pocket that holds the sticker.
It is traditional in salons to devote time to nail service. But the pace of life and increasing costs lead to the search for solutions on how to create a manicure yourself so that your hands look well-groomed and graceful. You can show your individuality and creativity with new nail art techniques by decorating your nail plates with special stickers.
Stickers
Film coatings have become an alternative to the usual nail polish. Ease of application and a wide choice of designs, patterns, and textures make home manicure popular.
The main rules and order of how to use nail stickers are as follows:
- Prepare the nail. To do this, you will need to remove the cuticle and polish the surface with a buff for reliable adhesion to the film coating, and then degrease.
- Remove the protective sheet from the sticker and apply the adhesive side to the nail.
- Gently and thoroughly smooth the coating with a wooden or plastic spatula to remove any air residue.
- If necessary, the edges are trimmed and processed with a ceramic or glass file.
Methods for gluing stickers on gel polish differ in the additional use of a top coat.
Types of stickers

Varieties of stickers are distinguished according to the following parameters:
- the size of the nail covering;
- design features;
- methods of application.
There are 2 types of stickers based on size: those covering the nail plate completely and partially.
Among the options with full coverage, or stickers on the entire nail, there are:
- Applique (transparent, one-color, with a sparse pattern);
- Manicure (with an image covering the entire space).
Single-color film, or “dry varnish,” allows you to do without the usual salon procedures and the need to patiently dry your nails. The choice of film prints is huge: in color, style, texture. Creating a three-dimensional surface is a separate direction - 3D stickers on nails, otherwise such a coating is called beaded.
Three-dimensional stickers are elements with a convex shape. This model is used for especially special occasions. In everyday life, three-dimensional design is less practical than flat options.
Photo mini-images occupy a special place among the varieties of stickers. Designer searches for color collages from photographs and pictures are always unique and original.
Sets of self-adhesive tapes of different widths and colors have gained popularity. The thinnest versions of strips for creating decor on different bases are more convenient to work with: varnish, gel or acrylic. Decisions on how to glue tape on nails will be determined by the shape of the plate, style matching the image and imagination.
Special ornaments have been developed for extended nails. They are large in size and are designed for combination or holistic nail design options.
Gluing method

Stickers are thin and fragile, so careful handling of the material is required. The picture should be placed strictly in the center and the image should be fixed.
Manicure with stickers applied in different ways. Among the first were water stickers on nails that looked like children's decals, and then fashionistas learned how to apply stickers on nails from Aliexpress.
Before pressing it to the nail, you need to hold the image in warm water. After carefully removing the paper part, the film with the pattern remains in place. After drying, you need to coat the nail with a fixative varnish. It is almost impossible to distinguish transfer stickers on nails from the salon work of a master.
The second method is universal. Even teenage girls know how to properly apply stickers on nails if the surface is sticky. You need to carefully apply the desired side of the film onto the base dried base varnish, and the process is completed. Additionally, it is recommended to coat the nails with a finishing varnish to strengthen the result and prevent rapid abrasion of the decorative layer.
If a mistake is made and a distortion of the pattern is observed, then the flaws can be corrected using
- beads, rhinestones, acrylic paint or shiny varnish;
- replacing the picture with a new one.
Experience in use will tell you how to peel off the sticker and re-design the nail. The decorative technique is clear and accessible.
Foil
In new and unusual design experiments, manicure foil has become an indispensable material. It differs from the usual one in that it lies flat on the surface of the nail and is attached using varnish, gel or a sticky base. Foil on nails is popular due to its unique original shades.


You can choose the desired type of foil from the various options presented in the nail service:
- transfer sheets and rolls - for manicure work you will need a gel with a sticky layer or special glue;
- sheet foil - used both for cutting out individual figures and patterns, and for creating a casting layer;
- embossed – suitable for complex structural design;
- compressed - ideal for aquarium design, resembles gold leaf in appearance;
- in stripes - simple ribbons on a sticky base with a wide color scheme give space to fantasy drawings;
- minx – thermal stickers for nails with an unusual effect.
Gluing method
Information on how to glue foil on nails can be obtained from the accompanying instructions for purchase and from consultants in store stores. There are no big secrets in this art, but it’s useful to learn the little tricks.

Before gluing the foil, you first need to remove the previous varnish coating and polish the surface of the nail plate. Then elements of the appropriate shape and size are prepared for each nail. The backing should be peeled off and the foil gently pressed onto the nail. During the process, it is recommended to straighten the layer and prevent air bubbles from entering.
The methods for applying foil to nails are approximately the same if we're talking about about the adhesive base. The blanks can be individual for each finger or consist of fragments for cutting out shapes.
You can complement the manicure with foil with beads, bouillons, rhinestones or acrylic painting. And after that, the decorative elements are covered with a protective composition.
The desire to perform a manicure yourself should be combined with the manifestation of taste and knowledge of how to glue broths on nails or achieve a casting effect. A sense of proportion is very important in such an exciting and creative process.
The transfer foil is always glued to the prepared base: after the base varnish has completely dried, apply a special glue (you can buy it along with the foil) and wait a little until the glue becomes more transparent. Then apply a piece of foil with the matte side to the nail, smooth it out and sharply tear it off. The result will be mirror nails.
Stickers
Gluing stickers is much easier than painting a small nail and spending time on the stages of drying and applying layers of painting. Design techniques retain their original appearance for a long time and delight with beauty.

Using stickers yourself and teaching others is a fun and creative activity. In order for the manicure decor to match the overall style, it is important to decide on the appropriate “clothes” for your nails.
Types of stickers
Stickers, or overlay plates, amaze with the variety and number of designs for any exit or event. It is customary to distinguish two main types:
- flat;
- volumetric.
Stickers differ in the method of application:
- aquatic;
- adhesive.
Water stickers are transferred to the nail plate after soaking. The wearing period of a manicure is increased by using a shellac coating, a special thick gel.

It is difficult to distinguish adhesive art stickers from a professional result. The carved design goes perfectly with a plain manicure. Lacy stickers are ideal for special occasions: weddings, anniversaries, corporate events. As a rule, the lateral or extreme parts of the nail are decorated artistically. Combination white lace with a contrasting varnish adds expressiveness to the entire look.
Acrylic or metal nail stickers add the necessary accents, complement the created design, and are varied in shades and type associations.
For french manicure French stickers are presented in the classic white color and its shades.
Volumetric stickers are presented in the following options:
- based on gel layers, including silicate ones;
- from polymer clay(fimo stickers);
- three-dimensional visual effect (3-D stickers).
Soft and flexible decorations convey three-dimensional images from flowers and butterflies to cartoon characters. Special clay is sold in the form of cut pieces, from which you can create a small personal manicure masterpiece.
Some tips:
- three-dimensional color drawings are suitable for romantic meetings;
- ladybugs and butterflies are appropriate for young girls;
- rhinestones will add brightness to the image in the evening at a festive event.
Gluing method
The technology of applying stickers is familiar to those who already know how to make sliders on nails, which are a transfer film.
After treating the plate with an antiseptic, you need to apply a base layer of varnish. Light shade will emphasize the brightness of the applied pattern. After soaking the pictures for 5 minutes, the film is removed and the sticker is applied to the manicure. It is recommended to consolidate the result clear varnish. Transfers on nails, as fashionistas call these stickers, will last up to two weeks.
You can glue stickers using a wet layer of base varnish or special glue. You need to apply it the first time and with pleasure, then the decoration will be placed evenly and will fit tightly to the nail plate.
It is necessary to retreat slightly from the cuticle and sides of the nail, about 1 mm.
Volumetric decorations
Working with voluminous stickers or parts requires care, but the result is worth the effort.

Species
The main details of volumetric decor are rhinestones, bouillons, crumbly glitter, beads, golden mesh or acrylic figures.

IN everyday life volumetric design is not used. On special occasions, this is an original and creative solution. The execution is done on one or two fingers, if these are large protruding decorations in the form of flowers or figures. Broths, beads or glitter can occupy the entire surface of the nail. Playing with color is used to accent or capture images.
Gluing method
Individual elements must be placed on a piece of paper before sticking. Then it will be easy to collect the remaining small beads or figures from it.
For applying volumetric parts, a special gel polish is easy to use. You can learn how to properly glue rhinestones onto gel polish from the following recommendations:
- apply rhinestones to the second or third layer of gel polish;
- use a magnetic pencil to maintain the intended order;
- dry each layer;
- Using a thin brush, secure the protruding elements with a layer of topcoat.
Broths are attached “in bulk” if a caviar manicure is planned. To do this, dip your finger with a wet layer of base polish into a jar of broth balls or simply sprinkle a handful of “caviar” on the nail.
The surface of small beads must be carefully pressed with a finger or secured with finishing varnish.
Let the result satisfy your expectations and bring joy.
Instructions for SMALL stickers!!!
Step 1. First, check the surface: it should be clean, dry, smooth. To do this, carefully wipe the surface to be glued with a dry, clean cloth. Check that there are no threads or lint remaining that could damage the adhesive surface of the sticker. Before applying the sticker, we recommend washing plastic, glass and metal surfaces with detergent, then wipe dry.
Step 2. Open the sticker. Mounting film is glued over the application. Carefully press all the elements of the sticker onto the mounting film - the mounting film is intended for transferring the sticker, but not for permanent storage, so it is permissible for the decorating film to move away from the mounting film.
Step 3. Separate the backing from the mounting film and pull it down. Be careful that all elements remain on the mounting film. If some small elements remain on the substrate, they should be immediately pressed against the mounting film. After removing every 10-15 cm of the backing, smooth the sticker to the surface with a squeegee or plastic card, using movements from top to bottom. Once the backing is completely removed, smooth the entire surface of the sticker with a squeegee or plastic card. Make sure that there are no air bubbles under the application. If the bubbles cannot be smoothed out, then they can be pierced with a thin needle and then smoothed out this place with a squeegee or plastic card.
Step 4. Carefully begin removing the mounting film. Pull it to the right or left side, and not on yourself, make sure that the application remains on the surface and not on the mounting film. If unevenness occurs on the sticker, you can press it to the surface by heating the sticker with a hairdryer.
Attention!
The stickers are intended for one-time gluing.
Instructions for BIG stickers!!!
First, you need to wash and clean the area where the sticker will be located from chemical contaminants.
1.The temperature in the place where you are going to stick the sticker (indoors or outdoors) must be at least 5 degrees Celsius. Small stickers (for example, on the hood), on flat surfaces, can be glued at lower temperatures.
2. First, decide on the place where you are going to glue vinyl sticker. Determine where the top corners of the sticker will be so that the sticker adheres evenly to the car. It is advisable to mark the points on the car and on the sticker with something waterproof so that when gluing you can align the marks and avoid uneven gluing.
3. Without peeling off any backing, place the sticker on the car and see how it lays down and fits the surface. Try everything on so that there are no overlaps later.
4. Remove the sticker. Separate the bottom protective paper layer from the image with the mounting film.
5. Pre-treat the entire surface, in the places where the sticker is glued to the car, and the sticker itself (from the adhesive side) with water from a sprayer. This will make it possible, after you attach the sticker to the car, to move it, adjusting the placement and easily expel all air bubbles from under the film. DO NOT WET THE PAPER BACKING OF THE STICKER WITH WATER, OTHERWISE THERE WILL BE PROBLEMS WITH SEPARATION OF THE STICKER FROM THE BACKING!
6. After placing the sticker on the car, roll it evenly with a rubber spatula or something with a sharp angle, from the middle to the edges. Make sure that the sticker does not bulge and there are no wrinkles.
Important! If your surface is not smooth, with transitions, do not try to roll the entire sticker at once. Roll the central part of the sticker, which runs in a flat place, leaving the edges unrolled. You will roll the rest later, from the middle of the sticker to the edges, stretching and heating the sticker with a hairdryer, preventing bubbles and folds from forming.
Important! When rolling, if a wrinkle has formed, you can carefully tear off the rolled part back and roll it again, heat the sticker with a heat gun and smooth out the wrinkle.
Attaching decals to clothing is becoming popular. This is a way not only to bring a damaged item back to life, but also to decorate an unremarkable wardrobe item.
Why do you need a thermal adhesive?
Thermal application is also called thermal patch or thermal sticker. Gluing them is quite simple, because they are covered with a special adhesive layer on the back side. Under the influence high temperature It melts and provides traction on a variety of surfaces. You can transfer any sticker at home using an iron.

When is it appropriate to install a thermal patch:
- Thermal adhesive will allow an ordinary thing turn into exclusive. Various designs in the form of animals, flowers, symbols will decorate the clothes. Children will like this, because there are applications with cartoon characters, animals and toys, and it will be appropriate on youth casual clothing.
- The sticker will hide small defects that have formed in the most visible place: holes, puffs, stains. This way you can even save a bologna jacket, which is indispensable in wet weather and on hikes.
- The thermal patch will strengthen the fabric that is about to tear.

Thermal appliques can imitate hand embroidery or photo printing. Some samples are additionally attached with decorative elements - rhinestones, beads. The fabric for thermal labels is usually flock, satin, satin or velvet. There are also neon stickers that reflect light.
How to glue a patch with an iron
How to glue a thermal adhesive onto fabric with an iron, instructions:
- The clothing on which the applique is to be applied should be placed on an ironing board.
- WITH reverse side After patching, the protective film is removed.
- The iron heats up to the maximum temperature that the fabric can withstand. If in doubt, it is better to check in an inconspicuous area to see if the clothing will be damaged.
- The steam function must be turned off.
- If necessary, cut the thermal adhesive along the contour.
- The fabric should be straightened so that no folds form under the applique.
- The place where the patch will be attached must be heated in advance with an iron.
- The sticker is placed face up and covered with a sheet of paper or tracing paper.
- A hot iron is placed on the paper and pressed firmly, then held for 10-15 seconds to melt the adhesive surface on the patch.
- If the sticker is large, then it is heated in parts.
- Small parts are pressed down with the tip of the iron.
- The lower the temperature, the longer you need to hold the iron on the fabric.
- The protective layer is removed after 5-10 minutes, it needs to cool.

Advice! It is better to glue the patch on cotton fabrics. It is not recommended to attach to synthetics, leather, silk and knitwear, so as not to deform the product.
Rules of care
These rules will help the application last longer:
- The product is washed by hand at a water temperature not exceeding +40.
- Before wet cleaning, clothes should be turned inside out.
- Don't overuse friction. It is advisable to immerse in a soap solution or stain remover solution. Leave for 0.5-1 hour, depending on the dirt, press several times, then remove to a towel and blot.
- The item should dry naturally.
- The product should also be ironed from the wrong side.

There is nothing complicated about attaching a thermal patch. The cost of the sticker will not affect the budget in any way, but this way you can save a hopelessly damaged item and even make it unique.
Notes about stickers
STICKERS: OPERATING INSTRUCTIONS
First of all, where are we going to put the vinyl sticker?
The principle is simple - the smoother the surface, the better the sticker will stick. The side of a car, glass, mirror, system unit, refrigerator, bathroom tiles, laptop surface are ideal for a sticker. Varnished wood (cabinet doors, headboard of a children's bed, door) are very good. Plaster painted once with noticeable grains of sand is unlikely. Textured surfaces such as rattan or wallpaper with a pronounced textured pattern are not worth taking. You can also glue it, but you should remember that paper wallpaper is quite suitable, but if you get tired of the vinyl sticker, you will remove it back along with the wallpaper. If you are not sure, you can do it simply - pretend that a young relative is waiting for you in the vestibule, buy some plant with a sticker in the store or just a sticker with Spider-Man and experiment at home in an inconspicuous area behind the battery. If a small sticker sticks to a given surface, a large, beautiful interior sticker will stick too. If not, then no.
As for indirect surfaces. It is quite possible and without any problems that you can fit the edge of your refrigerator, that is, flat surface. But if, after traveling around the world, you have seriously updated the world map and are going to correct the globe - that is, cover the surface with a sticker convex- it will be extremely difficult to glue the new outlines of the continents without bubbles, wrinkles or overlaps..
How to glue a sticker?
The main thing is to smooth it more carefully. Any glue has a so-called adhesion period, i.e. adhesion to the surface. If the vinyl sticker goes a little crooked, you can take it away immediately and re-stick it. But if you decide to do this in a week, it will be much more difficult to tear it off; most likely you will deform it. So if, for example, you have a rabbit at home who eats wallpaper, for the first couple of days do not let him be interested in the sticker. Well, later he will only have to admire her with you.
Since we are talking about interior stickers, i.e. about interior spaces, then just in case, we clarify that gluing should be done at a temperature of at least +10 +15. That is, in winter there is no chance of gluing it to the outside of the window glass. The glue will be hard and will not work.
How to glue a vinyl sticker to glass or transparent plastic?
The sticker is applied on the side where the viewer will be. The vinyl sticker on the car glass is glued to the outside. On the door - it's up to you (just choose the side from which the door looks better). There is an option to stick two symmetrical vinyl stickers on both sides of the glass door.
Why is this so? - yes, simply because the wrong side always looks less formal. There will almost certainly be bubbles, streaks, etc. And in the case of glass, glare of light will interfere with viewing the sticker glued from the inside.
What's wrong with a vinyl sticker?
Well, perhaps fire. Vinyl behaves decently up to 40-50 degrees. That is, if you live in equatorial Africa, you should not decorate the roof of your car with a vinyl sticker. There is no point in gluing it on the lid of the stove or on the kettle. It’s probably not worth it for the battery, even if it’s very smooth. Soon such a sticker will become like a girl after 70 - it looks like nothing, but it hangs there, it’s wrinkled here, in general, ugh. If you want to buy a sticker for a laptop, then in principle you don’t have to worry about anything, except, of course, for rough physical impact on the laptop’s body.
Is vinyl sticker afraid of water?
No, neither she herself nor her glue. Many technologists even prefer to glue with water, lightly spraying the future working surface with a spray bottle. The water is then expelled from under the vinyl sticker with a squeegee, but it helps to better level it. So, if you like to take a shower so that the water is then drained not only from the bathtub, but from the entire bathroom, you can safely decorate the tiles with stickers with scenes of shipwrecks or a sticker of Pamela Anderson in a tight swimsuit.
Unfortunately, vinyl stickers are solvent-resistant. That is, of course, in everyday life, people do not often wash walls with white spirit, but if your child has drawn a beard and mustache on the wall, it is better to wash them off with alcohol. (Vodka, if anything, is useless. It’s weak).
The vinyl sticker is also not afraid of the cold. For example, in winter vinyl must withstand -30. True, if you decorated your car, you should avoid Karcher, sooner or later he will lift the edges, and then off we go...
What should you consider when choosing a vinyl sticker?
Take into account such a purely compositional nuance as free space from the edge. For example, if you decide to decorate the refrigerator door with a sticker with Khokhloma painting, do it over the entire area. But if you depict a lonely hanging mouse on it, it is better that it be slightly smaller than the door. This way the sticker stickers will be better visually perceived, which will save you from the problem - there it started a little closer, and on the second side it is around the corner of the hole.
Regarding the color of the vinyl sticker.
Each monitor renders color slightly differently than the next. Ideally calibrated monitors are usually available from designers. And on liquid displays, color can generally “walk” from the middle to the edge. Therefore, if you are trying to choose a vinyl sticker, for example, that perfectly matches the wallpaper or cabinet, then there is a chance that you will not succeed. This kind of bullshit happens when, for example, you want to depict a hellish soton crawling out of the black, black depths of hell right in the middle of your black closet. The black-to-black border will likely be a little noticeable. The white cut of the film will still be visible, but you can paint it over with a black permanent marker (it’s best to do this while the sticker is not yet applied, so as not to accidentally mark out the cabinet).
What to do? Is color selection really not possible? - in fact, there are a number of ways. There is, for example, a series of Oracal color vinyl films with completely clear shades. In whatever city you pick up a fan of these shades, you will see the same color. That is, if the image is made from this film, the future color can be specified as accurately as possible. But if we are talking about a printed image, and not about application with color films - alas.
(where can I get this fan of shades? - in your city there is probably a company that sells wallpaper or materials for outdoor advertising. You can go there and ask the seller - show me the fan of 641 oracles, by the way, how much does it cost? - while the seller answers - 300 rub., you can choose and remember the shade you need, and then say - ah, thanks, I'll think about it - and return the fan.)
How are vinyl decals generally made?
This can be one of three ways. If you decide to order something like photo wallpaper - a full-color picture with a background, for example a map of Middle-earth - it will be a rectangular image on white film or paper. If you chose a sticker with a single silhouette image - Bart Simpson on a skateboard, a purple tree growing from behind your sofa - this will be a sticker cut exactly along the outline. If you want to buy a sticker for a laptop, it will be a full-color sticker with a rectangular outline with rounded corners, covered with a glossy laminate.
What are the stickers made of?
Photo wallpaper - made of paper. They are glued in the same way as ordinary wallpaper, overlapping or end-to-end, with wallpaper glue, smoothed with a crumpled towel or a special squeegee, after which do not open the window for a while, etc.
A full color sticker (which contains many shades) is usually printed on Orajet vinyl film. The film is initially white; a pattern of any brightness and saturation is applied to it. If necessary, the vinyl sticker is additionally covered with a glossy laminate, which protects against scratches and other damage.
A pattern with a small number of colors and a clear border is often made from Oracal, 3M, Jac and similar color films. The image is created using the appliqué principle. Laminate is used less often here due to the complexity of the contour

Vinyl films Oracal (color) and Orajet (white for printing) are essentially very similar. The glue on them is of the same composition, the so-called removable one, i.e. When you remove the sticker, it does not remain on the wall. However, sometimes, if a vinyl sticker has been hanging for several years, some part of the glue still dries to the surface of the sticker. In this case, it is easy to remove it - with a cotton swab and alcohol.
If you have your own ideas.
That is, you want to order an image not from our catalog, but, for example, decorate your laptop with a portrait of your dog or graffiti created by your talented friend - you should check the quality of the image. In general, the larger the file, the better, but, of course, the higher the quality and the heavier the file, sometimes it is difficult to send it by mail. In general, there are 3 options:
- if your picture exists as a file with the extension .cdr, .ai, .eps (vector image) - this is ideal option, you don’t have to worry about the quality at all, it will be the best at any size
- if it is .ipeg, .ipg, .tiff, .bmp, .psd (raster image) - you should check the quality. First, the file size will help you. If the picture takes up the entire wall and the file weighs 17 Kb, you can hardly expect excellent quality. You can also bring the picture in the viewer closer to its natural size and analyze: if the face of Dr. House in a bathtub with Vicodin is still a face, and not four squares of different colors, then it will delight you on the wall. How do you know what size is natural? - for example, in Photoshop there is a ruler. Apply a second, real ruler to the screen and increase that virtual centimeter to the size of this linear centimeter. The quality of the picture that you see will be true.
- if the picture is on paper. Then your task is to scan it with a resolution of about 300 dpi (dots per square inch), send it to us and discuss your idea with us in a letter or via ICQ 163-77-44-44.
Regarding improvement of initially poor quality.
Unfortunately, it is possible in a very limited way. That is, if at the time of the photo shoot a fly lands on your nose, pretending that it never existed is a matter of three minutes. But focusing on the spot in the corner of the photo so that it becomes clear that this is not a spot, but a fragment of a BMW 5 Series the color of wet asphalt, in the trunk of which lies a native of Senegal in torn blue jeans and with a tattoo under his left shoulder blade - this, to Unfortunately, this is only possible in the series The X-Files. Damn Hollywood liars have been turning people's heads for many years!