Guys, we put our soul into the site. Thank you for that
that you are discovering this beauty. Thanks for the inspiration and the goosebumps.
Join us on Facebook And VKontakte
In stores today you can find New Year's cards for every taste. But the editors website believes that homemade ones are much warmer. After all, when we make something for someone with our own hands, we put our love into it.
Below we have collected ideas that are beautiful, original and, most importantly, “fast” New Year cards, the creation of which does not require any rare materials - beautiful paper, cardboard, and colorful ribbons and buttons lying around the house.
Volumetric Christmas trees
Volumetric Christmas trees made of white and colored paper are so simple to make that you can make them at the last moment. Read more on the Bog&ide blog.
Making 3D Christmas trees even faster. All you need is a ruler, sharp scissors and cardboard. This blog shows you how to cut them.
Penguin
We really liked this penguin, well thought out. You will need black and white cardstock (or white paper), a triangle made of orange paper and 2 miniature snowflakes, which we all know how to cut out. The eyes are, of course, the highlight of the postcard, and you will have to look for them at a hobby store (or tear them off from an unnecessary children's toy, with the consent of the children, of course).
Gifts
This cute and simple card requires 2 sheets of cardstock, a ruler, scissors and glue. And also pieces wrapping paper, which you have left over from gift wrapping, ribbon and ribbon. The manufacturing principle is very simple, but for those who want more details, we recommend taking a look at this blog.
Grandfather Frost
A friendly Father Frost (or Santa Claus) can be made in just half an hour. The red hat and pink face are strips of paper pasted onto a card or gift bag. The fur of the hat and the beard are obtained like this: you need to take drawing paper and simply tear off strips of the desired shape to get uneven edges. Place on the card over the red and pink stripes. And then draw two squiggles - a mouth and a nose - and two dots - eyes.
Simple drawings
An irresistible idea in its elegance - to draw with a black gel pen Christmas balls with patterns. The main thing here is to draw the correct circles and mark the lines for the patterns. Everything else won't be difficult - stripes and squiggles that you draw when you're bored.
The same principle that underlies the postcard with black and white balloons. Simple silhouettes, painted with simple patterns, this time in color - best done with felt-tip pens. Warm and very cute.
Many, many different Christmas trees
This is where patterned paper or cardboard left over from children's crafts or wrapping paper for gifts will come in handy. The Christmas trees are sewn in the center - this is not at all necessary, you can glue them on. But if you really want to, you first need to make holes with a thick needle along a ruler, and then sew with thread in 2 rows - up and down, so that there are no gaps left. Draw a snowball with white gouache.
Laconic and stylish idea- a grove of Christmas trees, one of which is glued to foam double-sided tape (and therefore rises above the rest) and decorated with a star.
This card requires 4 or 3 layers of cardboard (you can do without the red one). You can use paper rather than cardboard as a color layer. In the top, white one, cut out a Christmas tree (a stationery knife will do this well) and glue it with double-sided tape for volume.
A round dance of Christmas trees made from various leftover cardboard, scrapbooking paper, and wrapping paper, tied with a simple ribbon and decorated with a button. Try playing with colors and textures - here you can find an incredible number of options using different colored ribbons, paper and even fabric.
Wonderful watercolor so in the spirit of New Year and Christmas! A simple watercolor sketch can be done by anyone, even those who last painted in school. First, you need to outline the patterns with a pencil, color them, and when dry, carefully erase the pencil sketches and complete the patterns with a felt-tip pen.
Winter landscape
For this postcard, it is better to use structured cardboard, but you can get by with regular, smooth cardboard - it will still turn out impressive. Using sharp scissors, cut out the snowy landscape and moon and paste it onto a black or dark blue background.
Another, white-green, option for a winter landscape that will take a little more time. If you find velvety cardboard (remember, back in school they made crafts out of this), it will be great; if not, you can simply color the Christmas trees with a felt-tip pen. Snow - polystyrene foam disassembled into peas. You can also use a hole punch to make circles out of cardboard and glue them to the card.
Hugging snowman
Snowmen peering inquisitively into the starry sky will look better if you can find a bright ribbon for a scarf.
For that postcard on the left, You need unpainted cardboard, white drawing paper and foam tape to glue the snowman with. Drifts are made simply: you need to tear off the drawing paper so that you get a ragged wavy edge. Fill it in with a blue pencil and blend it with anything, even with your finger or a piece of paper. Also tint the edges of the snowman for volume. For the second You will need buttons, a piece of fabric, eyes, glue and colored markers.
You will want to keep this card for a long time. All you need are circles made of cardboard, a nose and twigs made of colored paper. All this must be assembled using double-sided bulk tape. Draw eyes and buttons with black paint, and a snowball with white gouache or watercolor.
Balls
Balls are one of the main symbols of the New Year and Christmas. These are made from velvety colored paper and ribbon. But balls are such a win-win option that you can allow yourself to fantasize: make balls from patterned paper, wrapping paper, fabric, lace, cut out from a newspaper or a glossy magazine. And you can simply draw the strings.
Another option is to stick paper with a pattern on the inside of the card, and cut out circles on the outside with a sharp stationery knife.
Volumetric balls
For each of these balls you will need 3-4 identical circles of different colors. Fold each one in half and glue the halves to each other, and the two outer halves to the paper. Another option is colored stars or Christmas trees.
Multi-colored balls
Wonderful translucent balls are obtained using a regular eraser on a pencil. It’s worth starting with a pencil to outline the outline of the ball. Then dip the eraser into the paint and leave marks on the paper. Fun and beautiful.
Cards with buttons
Bright buttons will add volume to the cards, and will also evoke subtle associations with childhood.
The main thing is to find buttons of interesting colors, but the rest is up to you - to “hang” them on the Christmas tree, on a branch with cute owls, or on newspaper clouds.

On the eve of the celebration of someone dear to your heart, you want to give a gift that would impress and leave pleasant memories. We suggest making voluminous postcards with your own hands, they are also called pop-up postcards. What are these wonderful postcards?! At first glance, these are ordinary postcards, but when you open them, a three-dimensional figure or an entire composition suddenly appears in front of you! Such cards will not leave anyone indifferent! Especially if they are original and keep the warmth of your hands!
DIY cards with flowers inside
Even a child can make a heart-shaped card with a three-dimensional flower inside:

YOU WILL NEED IT
We make both simple and complex creation technologies.

A lush flower for the inside or outside of the card can be made from colored or even plain paper painted with watercolors or pastel crayons. You can cut flowers using this template:

Print out the flower template and color it with paints. Fold it according to the marked fold lines and glue the resulting flower onto the base of the card.

Such a lush and bright card with flowers inside, made with your own hands, will undoubtedly delight the recipient.

He explains how to make it in his master class. TheJulianaHappy:
The option with delicate, pastel colors looks very cute. Making stamens for flowers is not difficult!

Original master class on English, so for your convenience we offer a short translation of the process of creating this flower card.

Standard materials and tools: colored paper, cardboard, scissors, glue, plastic to imitate glass in a window.
Take a tight one colored paper, fold it in half. Cut out a square window in one half.

We make a frame from colored paper of a different color. The glass for the window can be made from a protective film for your phone or transparent plastic. Glue the resulting window frame to the base of the postcard. You can do without “glass” at all.


Glue it into the hole
We glue a flower pot out of cardboard and glue it in the middle of the card on the fold line. We glue the sides of the resulting pot so that when closing the postcard the pot folds.


Next, from colored paper we cut out green stems and all kinds of bright flowers: crocuses, hyacinths, daffodils and tulips. Perhaps your bouquet will not be spring, but summer, which means that cornflowers, daisies, pansies, etc. will appear.


Glue the flowers into the pot
The height of the flowers should be such that they do not stick out from the card, but are visible through the window!


The window can be decorated with a cozy curtain.

Original master class
Using the same principle, you can make a card with felt or painted flowers. cotton pads. Additionally, insert a laconic but warm congratulation along with the flowers!

In addition to the flowers from the postcard, you can also see balloons, stars, bows.

How to make a panoramic flower card along with a congratulatory envelope shows in his master class TheWorkshop:
We take thick paper - the basis for our postcard. Create a rectangle in the center of the fold line of the card. The width of the rectangle is 3 cm, length is 7 cm.

We make cuts along the pink lines with a stationery knife. Then we fold the resulting rectangle inside the postcard. We attach the base of the card to another sheet, b O larger in size than the original base.

Then we make a floral design: a flower pot, the flowers themselves, fluttering butterflies and grass. We combine all this and glue it to the front of our postcard.


Original master class.
Using the same technique, you can make an original vase postcard. You can also make flowers in such vases with your own hands from paper or other available materials.


We bring to your attention a master class on making a very delicate three-dimensional card, which will not only congratulate the recipient, but will also fit perfectly into the interior of, for example, a children's room.

First we make a box frame. To do this, take thick blue paper and cut out a template for the box from it. We fold the edges of the template 4 times, 5 mm on each side, thereby forming a frame. Glue the resulting frames together.

On top of them we glue colored or scrap paper in a color that matches your composition.

Next, we will prepare the elements of the future composition. Glue it together balloon from paper circles. We fold the circles in half and glue them together. A waxed cord is glued into the base of the basket and directly into the circles, forming a ball.

We cut out clouds from scrap paper and a sun from yellow paper. Glue the elements of the composition into a frame. We glue the balloon as follows: we glue the base of the balloon with bulk tape, and the balloon itself with glue. We glue the clouds using the same principle: one with glue, the other with bulk tape.

We make green grass from a simple napkin. First we cut it, then glue it. On the right side of the box we glue a tree made using a hole punch for Scrapbooking. The final touch is in free seats Glue on serpentine, butterflies and a congratulatory inscription! We glue a ribbon with embroidery or lace to the bottom of the box. The original three-dimensional postcard is ready!

Original master class.
3D postcards using Kirigami technique
Kirigami is the art of cutting and folding figures and cards from paper. This is the main difference between Kirigami and other paper folding techniques and is emphasized in the name: “kiru” - cut, “kami” - paper. The founder of this trend is the Japanese architect Masahiro Chatani.

For production, sheets of paper or thin cardboard are used, which are cut and folded. Unlike traditional 3D postcards, these paper models are usually cut and folded from a single sheet of paper. Most often, three-dimensional models of architectural buildings, geometric patterns and various everyday objects, etc. are developed.

It’s better to start with a simple three-dimensional DIY birthday card. For example, using thick paper of two contrasting colors, you can make a birthday cake card:

To make it, use this template:

Using various templates, you can make more complex cake cards:


He explains how to make a kirigami cake in his master class. OksanaHnativ:
Using this technique, you can cut out various congratulatory inscriptions. The cake can be decorated and colored to your liking.

To create it, take this template:

White embossed paper will also make an impressive postcard:

By combining two mirror “cake” parts cut from different sheets, you can make a whole three-dimensional cake in a postcard!


Use the following template:

There are a lot of options for creating voluminous postcards! Cut and fold your paper masterpieces!
Volumetric postcards using scrapbooking technique
Scrapbooking is the art of decorating photo albums, but its techniques are also very popular when creating cards.
Using Kirigami elements, using the Scrapbooking technique, you can also make a three-dimensional postcard with your own hands. We cut out and fold “steps” from scrap paper for the “pop-up” candles on the second half of the card. Glue the candles and glue the resulting blank onto the base of the card.

From scrap or colored paper you can make a simple but original greeting card. We cut out the candle flame and decorate it with sparkles, then glue it to 2-sided tape. We glue the second part of the candle with glue. The congratulation itself can be tied or glued to an elegant satin ribbon. Simple and original!

A postcard made from paper of a different texture will look completely different)

By placing each element of the card on top of each other, again using double-sided tape, you can create such a voluminous, bright cake!

Let's take a look at Tatyana Sadomskaya's master class on how to easily make a voluminous, delicate postcard using the Scrapbooking technique using ready-made pictures.

To create such a postcard, Tatyana used:
- scrap set ScrapBerry’s “Favorite Pet”
- scissors
- thick cardboard
It is better to use scrap paper with a large number miniatures that can be cut from a single sheet, as well as colored stamp prints and chipboards.
Before creating a postcard, you need to decide on its plot in order to choose the color of the base of the postcard and its “characters”. In this case, the basis is paper with a calm beige print, and the components of the plot are cut out of it: kittens, a puppy, flowers, a crown on a pillow.

Don’t forget to decide before starting this work what will be in the foreground and what will be behind it!
In our case, we put the larger kitten in the foreground, this will enhance the feeling that it is closer than kittens with a dog.
We make the necessary cuts. The result is a design with “steps”. We glue leaves of arbitrary size onto the resulting “steps”. These leaves imitate a wooden fence.

Next, we gradually glue our elements, starting from near to far. We start from the foreground and glue the kitten. We glue it onto beer cardboard, because it gives additional volume and casts a shadow. Using the same principle, you can glue several other elements, for example, balls and flowers. When the inside is ready, glue it to the base of the card.

We also decorate the outside of the card with an elegant floral print.

For greater elegance, decorate the elements of the card with sparkles (use glitter).
Original master class.
For inspiration, check out this masterpiece 3D cake card:

Volumetric postcards-dioramas
We present to your attention a master class on making a 3D postcard - a small three-dimensional scene. On such a stage, everyone can place various fancy figures and decorations)

To make a postcard, we take 4 sheets of thick cardboard, in this case we take cardboard in four shades of orange. You can choose colors to suit your taste.

On sheets of cardboard, draw the outline of the frames with a pencil and cut them out. Make the frame outline 1 cm wide.

From the remaining pieces of paper we cut out two strips, each measuring 10 by 4 cm. We line each into 4 parts of 1 cm each. We cut off all the corners of the resulting strips. Fold the strips along the lines to form a paper zigzag. These zigzag pieces will support the diorama fragments. Glue the zigzags to the frame on both sides.

Glue the second frame clearly along the line on the other side of the zigzag.


The top of the zigzag should cover one side of the frame. The same must be done with the opposite side. Thus, the first scene of the diorama is ready!

Using the same principle, we make the remaining frames of the diorama.
It's better to decorate each of the frames in advance (especially the last one) than to try to squeeze decor into the finished card.
The back wall does not have to be solid; you can make a transparent diorama without a back wall.

Decorate not only the “wall” of the diorama, but also each frame. Use more volumetric jewelry, such as beads, bows, feathers, ribbons, etc. This will make the card seem more voluminous and this will enhance the 3D effect!

Original master class.
You can come up with absolutely any plot! Create your own little theater!
For example, the waiting Assol!

Or a hot air balloon in fluffy clouds.

Bright meadow with lupine and butterflies!

Birdhouse with birds and flowers:

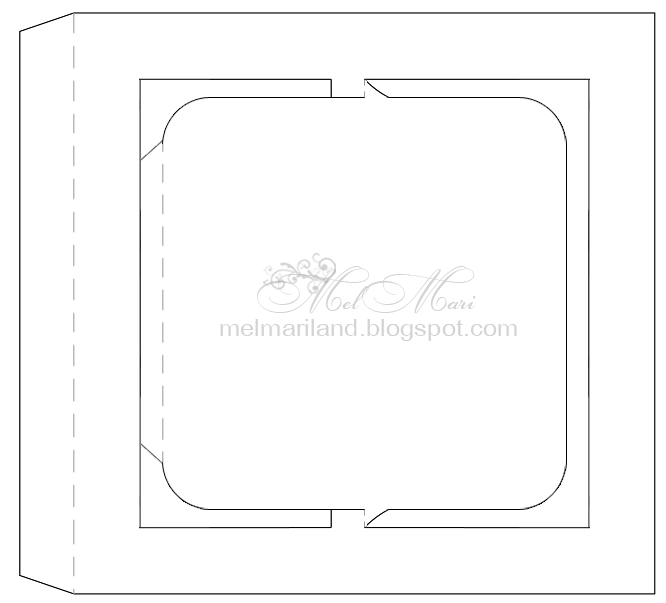
Accordion postcard (diagrams and templates)
Another type of voluminous postcard is the accordion postcard.
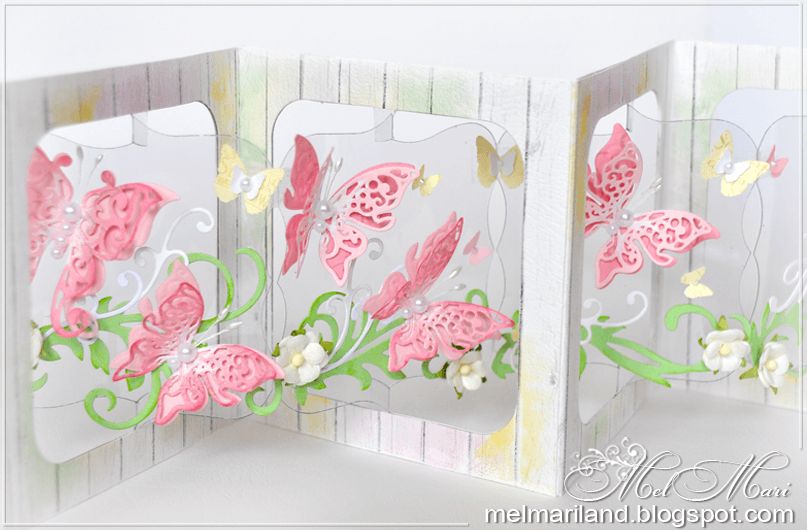
To create such a postcard you will need: thick scrap paper for the base frame, a die-cut scrap knife or stationery knife, transparent plastic for the internal parts, stamens, semi-pearls and other materials for decoration.
We take the template and make blanks for the postcard. We cut out 8 blanks for the base frame from thick scrap paper and 4 from transparent plastic.

Thick paper blank...

...and transparent plastic
We glue the plastic blanks to a paper base. To make the card fold, we make a double crease of about 2 mm on the outer folds. We connect the resulting 4 parts - glue them with glue or use 2-sided tape. Glue the remaining 4 frames on the opposite side.


Now you can begin the most creative part of creating a card - decorating it! Glue fluttering butterflies and twisted greenery to the plastic. The postcard is ready!


Original master class
See below for various templates for making the bases of such postcards:


Using your imagination, you can create all sorts of variants of such folding postcards. For example, with a predominance of children's themes. The number of components may vary.


Birds, flowers, butterflies always look very light and airy on postcards!


Postcards for all occasions
We have already seen that handmade postcards are more original than those you can simply buy.
YOU'LL LOVE IT!
Let's give, and sometimes for no reason at all! 🙂

A pleasant and very sincere gift for a themed celebration can be postcards made of bright, unusual colored paper, which were created manually.
This option is the most in a simple way to make a person happy, to express your warmest feelings. Often a card complements the main gift.

You can learn how to make a postcard with your own hands from paper on the Internet, because there are a huge number of master classes and templates for various postcards that describe the process of creating such crafts. The cards turn out bright and beautiful, unique and inimitable.
Paper Product Base
Numerous photos of homemade paper cards show that the main thing in the product is not only the congratulatory speech and decorations, but also the base. Either thick scrap paper or a thin sheet of cardboard is suitable for it.

As for color preference, you should choose a neutral light color color palette so that against its background all other elements are bright and stand out.
A cardboard sheet with embossing and textured patterns looks very original as a base.

To do beautiful postcard more solemn and unusual, it is worth rounding the rectangular ends, or using curly scissors to give the edges a carved outline.
Card with colorful balls
To create a cute and romantic card that can be presented for a celebration on any occasion, you should take thin beige cardboard and fold it in half, rounding the corners. To decorate the outside of the product, you need to prepare multi-colored paper balls of different shapes: oval and round.

If the card is intended to be given to a girl, then the color of the balloons can be chosen predominantly pink, if for a boy - blue, neutral shades are suitable for congratulating an adult.

You will need about 15 blanks for future balls. They will be placed both on the front side and inside the product.

Since the shape and size of the elements are different, it is better to prepare cardboard templates in advance and cut them out. After the templates are prepared, you can select the appropriate scrap sheets and cut out the balls.

When the ball blanks are cut out, a piece of paper is glued to each of them. reverse side a piece of thick thread. Now you can start decorating the front side of the card. To do this, start gluing balls on top, then subsequent lower layers until the desired result is achieved.

To create voluminous non-standard paper postcards, you can glue the elements onto double-sided tape.

We attach a small piece of tape to the back of the ball, and then to the front base. The result will be a magnificent ornament.

When the balls are glued, you should tie all the threads, tie them with a beautiful ribbon and secure them at the bottom of the balls. Then the edges need to be trimmed.

Several elements are also glued inside the product, leaving space for writing congratulatory words.

Homemade New Year cards
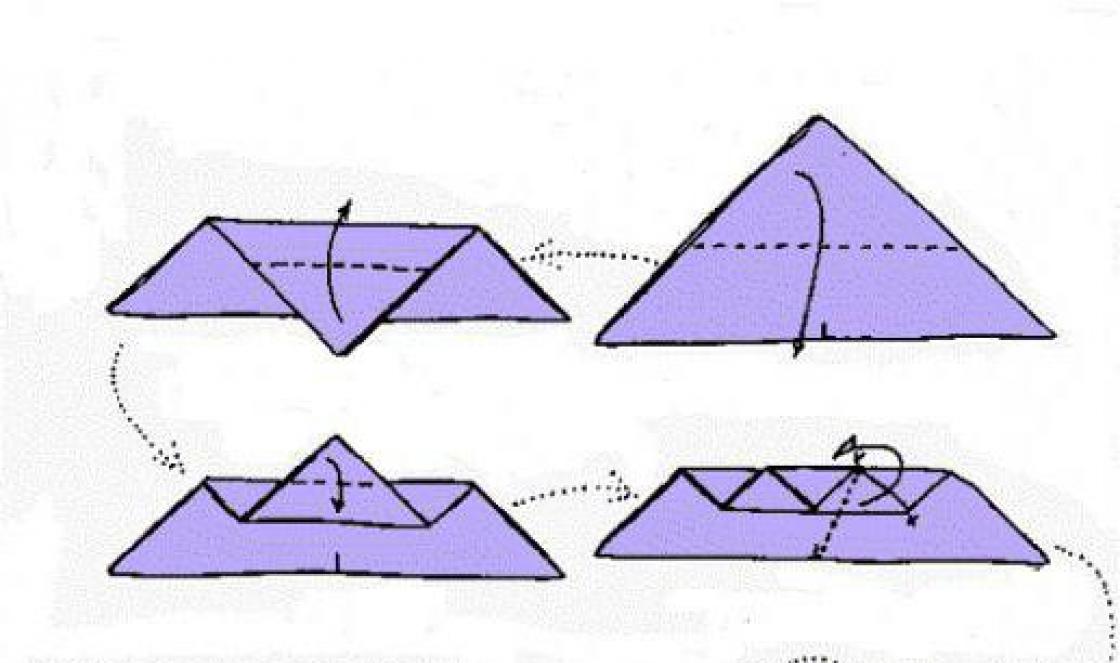
To congratulate you on New Year holidays, as a rule, they choose more thematic decorations in the form of Christmas trees, garlands, snowflakes and other paraphernalia. Great gift will be a hand-made postcard with a voluminous pine beauty using origami technique.
Pay attention!

To make origami blanks, it is better to choose thin paper sheets so that they can be easily crumpled. You should also give preference to materials with an interesting pattern, then the Christmas tree will turn out colorful.

To create a Christmas tree you need to prepare 5 square blanks from the selected paper. The dimensions of the sides of the squares are as follows: 10; 9; 7.5; 6.5; and 5.5 centimeters, respectively. All squares are added according to the same principle.

First, the square is folded diagonally, then it returns to its original shape and folds diagonally on the other side. You will get a workpiece with two diagonal fold lines.


Now the first origami blank is ready. There should be 5 of them in total. The Christmas tree is assembled from the top smallest element.

Pay attention!

Quilling cards
A greeting card made using the quilling technique will be simple to make, but very attractive and original.
To create an owl that will be placed on the front side of the product, you need to twist several tight spirals from paper of the color you like.

For the owl's body, a spiral is selected, which will consist of three different shades in the form of orange, brown and beige shades. The width of the paper strip to create the body is 5 mm. Each subsequent strip should be glued to the previous one, and the tip should be glued to the spiral itself.

For the eyes and wings of the owl you need to take thinner paper strips. Each bird wing consists of three twisted spirals that are glued together. The paws are also represented by three spirals.

When all the elements are twisted, they can be glued to the base, decorating the composition with leaves and tree branches, which are also cut out of paper.

A card with flowers made using the quilling technique looks very beautiful.
Pay attention!


Photos of DIY paper postcards


An ordinary postcard will not surprise anyone. That's why I had the idea to make a 3D card with flowers. It’s not difficult to make, but it looks unusual and interesting. This card will be remembered for a long time.
To make a postcard we will need:
- a sheet of double-sided colored cardboard (card base) of any color;
- double-sided colored paper (for flowers) of any color;
- pencil glue;
- scissors;
- pencil;
- felt-tip pens.
Step 1. Cut out 7 10x10 cm squares from double-sided colored paper.

Step 2. Fold the square 3 times to form a triangle.

Step 3. Draw a petal.

Step 4. Cut and open.


Step 5. In this way we make all 7 flowers.

Step 7. Using a blue and blue felt-tip pen, draw small strokes from the middle, also along the edges of the flower. We leave two petals uncolored!

Step 8. Also color the remaining 7 flowers.

Step 9. Cut out one of the unpainted petals. We do the same with the rest of the flowers.

Step 10. Coat the remaining unpainted petal with glue and connect it to the adjacent petal. It should be voluminous. We do all the other flowers the same way.


Step 11. Take 3 flowers. We bend each flower in half. We mark crosses on one of the flowers. We coat the places marked with a cross with glue and glue the other 2 flowers bent in half there.


Step 12. Coat the places marked with a cross with glue and glue another flower bent in half.

Step 13. Place the crosses again, coat these places with glue and glue 2 more flowers, bent in half.

Step 14. Place the crosses again, coat with glue and glue one flower bent in half.

And since the holidays come one after another, we need to prepare for them. Better in advance. Today I looked at postcards. When it’s beautiful, original, with all your heart and with your own hands - it’s still better than the most expensive postcard from the store.
And the children nearby can learn something
The dress is wonderful...

A really killer card called I miss you

And this is already a standing dress postcard... You can decorate it however you like: ribbons, rhinestones, chiffon, lace. And the fabric will give each card a unique character. Girlfriends need to do

Postcard template; print in the required size. Yes, it’s not difficult to draw him. First on paper, then glued to cardboard, and then turn on your imagination and... go ahead

A template for a fun dress with a pleated skirt. The folds are laid, as you understand

My topic: I love typewriters. Ready to glue them everywhere and always

Another one of my favorite machines is a sewing machine. But I guess I'm not the only one who likes it

Card for a lady with rhinestones. The hangers are especially touching. A piece of wallpaper or beautiful paper+ wire hangers (even suitable for champagne) + plus fabric, lace (by the way, you can paint it with silver paint). Did you notice the handbag? I can imagine how delighted such a postcard would cause a lady I know.

As a lesson, here are the shapes of postcards, so you know what they are and how they fold:

butterfly patterns. They are printed, cut out and put to work.


If you can’t print it, then you need to draw it
I like this option even better

Examples of cards with butterflies
On the first - title page - we cut out the outlines of butterflies, on the second sheet we paste colored paper, colored with a spectrum

Colored paper, butterflies made of several layers so that the wings are voluminous. And we attach it to the card with a button, a bead, a flower - whatever we find in our little boxes

Well, I don’t know about you, but I would paint some spikelets with gold paint, maybe a couple hand stitch embroider, some can be printed on an old letter. Butterflies made of plain paper on which the outline and veins on the wings are drawn with white paint or a felt-tip pen. The braid at the bottom can also be painted in the desired color

Butterflies in glitter. Glitter goes well with glue. Or, as an option - velvet paper

Folding card.

For Valentine's Day
a postcard with a romantic plot and a hint of eternal love

and a template for it

The two-layer card is wonderful!

Postcard Flower Pot

Postcard template Flower pot. Not for the postcard in the photo above, but still...

Another flower pot so you have plenty to choose from

But cards just for all the upcoming holidays
Apron postcard template

And the Aprons themselves:
for mom or grandma

Male version - for dad or grandfather

And for those who sew