The next lesson on creating flowers from ribbons on the site is dedicated to his majesty of fields - the poppy. Poppy from satin ribbons will decorate a hair clip, a flower arrangement, or become a component for weaving a wreath.
Prepare the following materials:
satin ribbons of red (any choice of your choice) and green, 5 cm wide; thin satin ribbon, up to 1 cm wide, light green or green; green and black threads; PVA glue and “Moment”; semolina; a small piece of any filler.
You will also need tools:
needle; scissors; ruler; tweezers; pencil; a small sheet for drawing a sketch of a petal; lighter or candle.

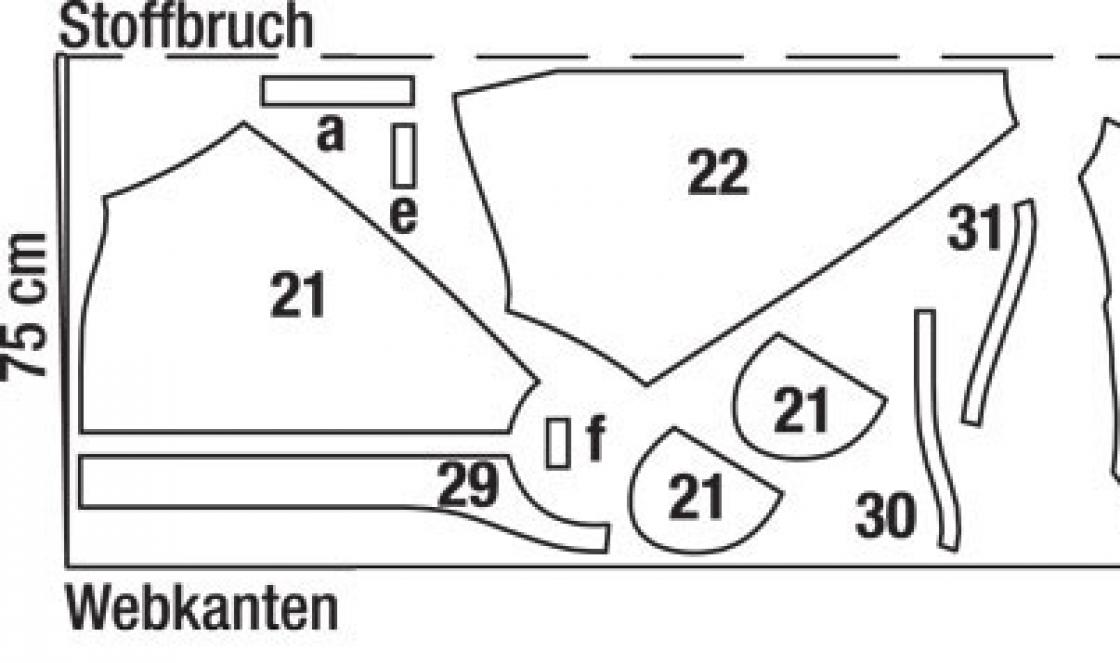
On a small sheet of paper or cardboard, develop a sketch of the future petal. The length of our workpiece is 4 cm, width 5 cm (marked with straight solid lines in the photo). The base of the petal is from 1.5 to 2 cm.

By using a simple pencil transfer the petal template diagonally onto the red ribbon.

Cut it out.

For one poppy flower you need to prepare a minimum number of petals - four.
The maximum number is ten, five petals in two circles.

Burn the petals with a candle or lighter, giving the edges a “wave” by stretching and twisting them with your fingers.

Then fold each petal in the middle.

Step back from the edge and cut at an angle (about 45°) with scissors.

Connect the cuts using heat from a lighter or candle. The petal turned out to be “rounded”. Make such “undercuts” on each workpiece.

Distribute the petals.

Cut a circle from satin ribbon (diameter about 2 cm). Scorch its edges.

Using “Moment” glue, secure the petals to the prepared circle.

First row first.

Then the second row.

Now let's start making the poppy box.
Cut out a circle with a diameter of up to 4 cm.
Using matching thread, sew along the edges of the circle with the needle stitch first.
Place any suitable filler inside and tighten the thread.
Thread a black thread through the needle.
“Pull” a needle with black thread from the inside in the middle of the poppy box and make stitches in different directions from the center, as shown in the photographs of the collage.

During the work done, the box and petal blanks have already been prepared. Cut out two circles with a diameter smaller than the box (less than a centimeter).

Glue stamen threads onto the circles in a circle.
Stamens are made as follows: wrap black threads around two or three fingers (as convenient for you) and cut them at the top and bottom. To prevent the threads from falling out, glue them on both sides with satin circles.

Then dip the ends of the threads into PVA glue.

And then, without wasting time, immediately dip the threads in glue in semolina.

Glue the stamens to the petal blank.

Attach the finished box on top.

Using a narrow light green ribbon, make a simple petal as shown in the following photos.
Fold the ribbon in half with the wrong side. Cut the satin at an angle and seal it with fire.

Turn it inside out.

Connect the free edges, cut at the required distance from the top of the sheet and singe.

Glue the petal to the circle on back side poppy

Another lesson has come to an end. We hope that making a poppy from satin ribbons did not seem difficult, you liked it and will find it useful in your future creativity.
The poppy flower is incredibly beautiful and mesmerizing. It attracts the eye and holds your attention for a long time. It is precisely because of this attractiveness that poppy flowers are very often used in needlework as decorative elements for clothing and various accessories: hairpins, headbands, brooches. Ribbon poppies, which are easy to make with your own hands, are popular.
Making poppies from satin ribbon is not at all difficult, and the result will not tire of pleasing you for a very long time.
Step-by-step master class on making poppies from ribbon with your own hands
We will tell and show a master class with step by step photos about how to make an unusual flower from a satin ribbon.
You will need the following material:
- red satin ribbon five centimeters wide
- fabric or green ribbon, measuring five by five centimeters
- black threads
- superglue
- PVA glue
- semolina
- candle
Let's start making the stamens of our poppy. To do this, take a black thread and wrap it around your fingers in the shape of a number eight. Remove it from your fingers, cut it and tie it in the middle. Then trim the ends and coat them with PVA glue. Dip this entire structure in semolina. Thus, we have stamens with pollen.
Now take a square of green fabric or ribbon and cut a circle out of it. Treat the edges of the circle with a candle and sew around the perimeter. Place padding polyester or cotton wool inside and tighten the fabric with thread. It turned out to be a ball. Tie the entire ball with threads, forming the core of the poppy, and glue the stamens with superglue.

Next, work on the poppy petals. First of all, make two patterns different sizes. It is necessary to cut out ten smaller petals and eight larger ones. Place the pattern on the tape along the bias thread. Then, again using a candle, process the edges of the poppy petals and glue the first five petals to the core. The first row is ready.
Start assembling the second row of five petals. Glue it to the previous row. Then glue the third row, consisting of eight petals. Now the ribbon poppy is ready.
In Kanzashi style.For work you will need: satin ribbons up to five centimeters wide, thick cardboard, glue, black thread, ruler, lighter, wire, cotton wool and semolina.
Making poppy seeds using the kanzashi technique is quite simple. To do this, follow the following instructions:
- On paper, draw eighteen petals of different sizes for your flower, cut them out, and then transfer them to satin ribbon fabric. Treat the edges with the fire of a lighter.
- Cut small squares of satin and soften the ends.
- Sew a small pocket from two squares.
- Wrap the wire in cotton wool and place this structure in your pocket. The end of the wire should come out.
- Pull this pocket into a ball and tie the resulting poppy box with thread.
- Make a fringe from black threads.
- Using wire, attach the poppy box and fringe. Moisten the ends of the fringe with PVA glue and roll in semolina.
- Glue fabric petals to the base of the poppy. Start gluing from the petals smallest size. Finish the work with larger sheets.
- Cover the wire stem of the flower with green thread or paper.
Your kanzashi style ribbon poppy is ready. In order to decide how to use it further, just use your imagination!
We would like to show you a master class about another very in a simple way How to make a red poppy from a satin ribbon with your own hands.

Made from wide satin ribbon scarlet color you need to cut 15 identical petals two to three centimeters wide and three to four centimeters long. Finish all the edges of the poppy petals with a candle flame. The hot air will warp the fabric a little, but this will make the poppy bud look very realistic.

The bud is ready. Make the core of your poppy from black beads and fasten them with threads. Sew ribbon to the base of the poppy. Now your flower is ready.
By making several of these flowers or even just one, you can decorate any outfit with them, complement your look, or create a completely new product.
Thematic video on the topic of the article
We invite you to watch several videos on the technique of making poppy flowers from satin ribbon with your own hands. We hope you find them useful. Enjoy watching!
Master class on creating poppies from satin ribbons
Master class on creating poppies from satin ribbons. Author Tatyana Kurilova
For the poppy we need:
1. Satin ribbon 5 cm wide, 70 cm long (desired petal color);
2. Satin ribbon 5 x 5 cm for the middle cone of the flower (color at your discretion);
3. Satin ribbon 1.2 cm wide, 50 cm long, it can be longer, depends on how many leaves you want to make (any shades of green);
4. Matches or lighter, candle:
5. PVA glue, Moment crystal, hot glue gun;
6. Scissors, threads of 2-3 colors, needle;
7. Pencil, piece of cardboard 3 x 4 cm, petal template, pin;
8. I replaced microbeads with semolina;
9. You will also need one cotton pad or any filler, such as padding polyester.

Here is the petal template.

We take the tape, apply our template diagonally and bend the tape like an accordion, secure the template on all layers with a pin, many layers are not needed, 3-5 are enough (Figure a), in total you will need 10 such petals (Figure b).

We cut out two circles with a diameter of 2.5 cm or 25 mm and melt the edges of the blanks on a candle or lighter, whichever is more convenient for you. If you melt on a candle, then try to keep the petal at the bottom of the flame, where t is lower and there is no soot.

The edges can be left smooth when scorching.
Or you can stretch the edges a little: scorch a small section of the petal and while it is still warm, stretch it, as shown in the figure; if the threads come out somewhere, they need to be scorched again.

After processing the edges of the petal, we will make a small recess at the base: fold the petal in half with the front side inward, use tweezers or a clamp to fix the inner edge at an angle of 45 degrees, trim off the excess fabric and singe it (Fig. a). The result should be a petal, as in (Figure b).

All 10 petals are ready, now you can start assembling the flower, let's start with the bottom row of petals. Lubricate the pre-prepared circle with Moment Crystal glue over the entire area and let it dry a little (Figure a).
Now we lubricate the edge of the base circle with glue again and press the petal, approximately 5-7 mm from the edge (it turns out to be the size of the recess), each subsequent petal should overlap the previous one at the base by half (Fig. b).
The last one in this row (the fifth petal) is tucked under the first one (Fig. c).
Wrong side (Fig. d).

The inner petals are assembled according to the same principle, but closer to the center and in the middle of the joints of the lower petals.

Let’s put the finished flower aside, let it dry, and let’s work on its central part. For this we will need: threads of 2-3 colors; piece of cardboard 3x4 cm; semolina; PVA glue, a piece of tape of the main color 1.8-2.0 cm and a piece of paper, for me it’s a piece of paper from a note block.

On a piece of cardboard, on its narrow part, we wind threads, first all the desired colors, so that the coils do not run away, put them in a jar (Fig. a), about 20-25 turns are enough (Fig. b). Then the colored threads need to be cut off and another 20-25 turns made with one black thread ( rice c-d).

Cut the resulting skein along the edges (Fig. a). Now, onto one of the prepared small circles, glue the threads in small bunches, periodically dripping a drop of glue into the center of the base (Figure b). Make the workpiece as thick as you like, and then cover it with a second circle, having previously greased it with glue (Fig. c-d). If some threads are too loose, just cut them off.

Place a drop of PVA glue on a piece of paper and dip the edge of our resulting fluffy, if you feel like there is too much glue, blot the edges on the paper and then dip it in semolina (Figure a). Do this all over the circle and leave the workpiece to dry (Fig. b). Excess grains will fall off after drying.

While the previous preparations are drying, we will make a central cone for our poppy.
From a cotton pad, cut out several circles of different diameters, but no larger than 2.0-2.2 cm (Figure a). From a piece of satin ribbon prepared for the bump, cut a circle with a diameter of 4 cm, singe the edges and thread it on a thread (Fig. b). Collect circles from a cotton pad in a stack and pull them together by tying a knot (Fig. c-d). If you feel that the cone is not voluminous and dense enough, you can add more filler.

Finally, all the main elements for the poppy are ready, you can start assembling them!
I assemble all these elements using hot glue, but for those who don’t, you can use Moment. We drop a drop of glue into the center of the flower and first press the fluffy one (Fig. b), but do not forget to first shake off the excess semolina from it. Then we glue the cone in the same way - a drop of glue and press the cone, literally for 5 seconds, and our poppy flower is ready! (Figure c-d)

Or a hoop and decorate your hair with it - and you are guaranteed a wonderful look for the whole day.
I bring to your attention a master class on making red poppies using the technique. This flower is easy to make, but it looks elegant and very beautiful.
1. red satin measuring 6x5 cm;
2. pieces of green satin measuring 5x5 and 5x7 cm;
3. black threads;
4. candle and lighter;
5. semolina;
6. “Dragon” glue;
7. ruler;
8. scissors;
9. PVA glue or nail polish;
10. a small piece of cotton wool.
Work process
Step 1: making the petals
From a piece of satin or scarlet satin ribbon, cut into pieces measuring 5x6 cm. For one poppy you will need 11 pieces.
Take one of the pieces of satin and carefully cut it as shown in the photo. The leaves should be approximately the same shape and size, but without precision.
We light a candle. Over the candle, carefully melt all the edges of the leaf. You need to melt it like this: first, hold a small piece of petal over the candle, and while it is hot, immediately turn the melted edge of the petal in different directions with your fingers. Thus, we get wavy-raised edges of the petal.
Then fold the petal in half lengthwise with the front side facing inward. We bring the folded line of the petal to the lit candle and hold it for a while. Immediately use your fingers to form a median line on the petal - an edge.
Then we fold the left edge of the petal towards the middle edge, forming another lateral edge on the petal. After this, we fold the right edge of the petal towards the middle, making the third edge on the petal.
After this, lightly hold the entire petal over the candle fire. Use your fingers to push the edges of the petal apart, turning it from the middle to the edges. This way we give the petal a realistic curved shape.
Working according to this scheme, we make 11-12 petals.
Step 2: glue the petals
Cut out a circle from a piece of red satin measuring 5x5 cm. Carefully melt the edges of the circle over the candle.
Take one of the petals. Apply Dragon glue (or hot glue) to the bottom wrong edge of the petal and apply it to the edge of the circle. Glue the petal.
Take the next petal and apply glue to it. Place the petal on the circle, slightly overlapping the previous petal. Thus, we glue 6 overlapping petals onto the circle. This will be the bottom row of petals.
On top of the bottom row, slightly going inside the circle, we glue 5 more petals, also overlapping a little. This will be the top row of petals.
Step 3: making stamens
To make stamens we take black threads (I took a thick nylon thread). We wind the threads on the palm around 4 fingers. I made a total of 30 turns, but if you used thin black thread, you will need to make about 50 turns.
Then remove the threads from the palm. We wrap the threads along their middle.
Cut the edges of the threads. Using scissors, we carefully trim the stray and protruding threads so that future stamens are the same length.
Apply PVA glue (or nail polish) to the edges of the threads and dip them in semolina. We set aside the stamens for a while so that they dry thoroughly.
Step 4: forming a poppy box
From green satin we cut out a square measuring 5x5 cm. From this square we cut out an even circle. Melt the edges of the circle over the candle.
Take a needle with black thread and carefully stitch the circle around the edges. After this, we pull the thread towards ourselves a little so that a bag is formed.
We insert a twisted ball of cotton wool the size of a fingernail into this bag. Then we pull the thread again to completely close the cotton wool in the bag. We make a few stitches to secure the bag.
We insert the needle into the bag so that it hits exactly the middle of the front side of the ball. We wind the thread in one direction and then in the other direction. After this, we wind the black thread along this line 2 more times so that a neat furrow is formed.
After this, we wind the threads 3 times perpendicular to the previous winding, forming a crosswise line.
Then we wind 3 turns of thread diagonally, first in one direction and then in the other direction. Try to wind very carefully so that the lines are clear and even.
Step 5: collect the flower
Remove the threads wound in the middle from the stamens. Carefully glue the stamens in the center of the flower.
We glue a poppy box on top of the stamens. We immediately lift the petals and stamens around the poppy box: this way the flower will be more voluminous and realistic.
Actually, the poppy is ready, all that remains is to make the leaves.
Step 6: making leaves
To make leaves, we take pieces of green satin measuring 5x7 cm.
Cut out the leaves. Since in nature poppy leaves have a dissected shape, I decided to cut them out as shown in the photo. Then we melt the edges of the leaves over a candle.
After this, we give the leaves ribs by alternately folding them in half with the front side inward and melting all the edges of the leaf with wrong side over the candle. During the manufacturing process, I decided that one flower needs no more than 2 leaves.
Apply glue to the front side of the bottom of the leaves and attach them under the flower. After this, it will be enough to glue the flower onto a felt base, and then attach it to a hairpin or hairband.
Our flower is ready!
Purpose of the master class: for gifts to friends, for interior decoration.
I love flowers! In flower beds, in bouquets, in fields and meadows! Each flower lives its own life and gives joy. Flowers inspired me to create. To realize my ideas, I used satin ribbons.
There are many ways to make flowers. I bring to your attention a master class on making red poppies.
I imagine these flowers as a symbol of the soldiers who defended Russia and the Great Patriotic War and in other difficult times for our Motherland.
In folk poetry, the poppy is known as a sign of short-term happiness: “my life passes like a poppy.” There is a belief that poppy grows on battlefields. The main reason for this was, of course, the blood-red color of its flowers, and therefore they say that it is not the color, but the blood of the killed.
Let this flower emerging from the ground become a symbol of victory over evil and cruelty.
I dedicate my work to soldiers who did not return from the battlefields and living veterans.
And clouds are floating across the sky
An impenetrable and gray wall
And the clouds look at the crosses,
Shedding an unearthly tear.
I look at the tired guys
And in my soul I remember God
And I dream about
So that every soldier
Didn't become a red poppy on the road.
GOALS AND OBJECTIVES OF THE MASTER CLASS
Aim Master- the class for teachers is to transfer to colleagues personal professional experience, unique author’s developments in the field of creative and pedagogical activity master conducting a master class.
General objectives of the master class for teachers:
Creating conditions for professional communication, self-realization and stimulating the growth of creative potential of teachers;
Improving the professional skills and qualifications of teachers;
Dissemination of advanced pedagogical experience;
Introduction of new technologies of training and education.
Materials and tools.
To make red poppies we will use the following materials:
· satin ribbon 5 cm wide, 60 cm long
black floss threads
· PVA glue
· scissors
· gel ball tube
· red thread and needle;
· red fabric
I prepare petal templates from ribbons
.jpg)
We cut strips of 10 cm, singe the edges. We bend each petal at the edges and collect it on a thread at the bottom.
We tighten it.
.jpg)
Set the finished petals aside
Let's start making the middle. Wrap the cotton wool with threads.
.jpg)
We make a circle, it is advisable to wind it more.
.jpg)
We make stamens. Using scissors, carefully cut the threads from the top, but not all the threads.
.jpg)
Let's straighten it out. The result was stamens.
Glue the prepared petals to the middle of the base: 1st and 2nd row of 4 petals each.
.jpg)
.jpg)