For this craft you will need a DVD disc, thick colored paper, PVA glue and a black marker.
Take the disk and turn the shiny side towards you. This will be the front side of our goldfish. Then use a black marker to carefully draw scales on the fish.

Depending on the fish, you can decorate it with scales of the same size or, dividing it into a head and a body, with scales of different sizes: the head with smaller scales, and the body with larger scales.


Drawing scales is a painstaking and unhurried job, and if the baby gets tired quickly, take short breaks in the work, for example, finger gymnastics. If the baby is in a hurry to finish the scales and is not trying, then keep him busy by switching his attention to other details of the craft.

From thick colored paper, cut out fins for the fish: dorsal, lateral and ventral. They can be made even and smooth, or they can be corrugated. Use paper of other colors to make a mouth and tail. We strengthen the side fin in the middle in the round hole of the disk. Attach all the parts to the fish with PVA glue from the reverse side and leave to dry well.
Also make an eye for the fish using two colored circles.


Do-it-yourself paper crafts for children create a three-dimensional illustration of Pushkin’s immortal fairy tale. Ask this goldfish for your cherished wish - and your dream will definitely come true! The magic fish will be a wonderful decoration for your desktop and a wonderful gift for your beloved parents. We will tell you how to make a goldfish with your own hands so that your three wishes come true!
What do we need
To make a goldfish with your own hands, you will need:
- Thick yellow paper
- Set of felt-tip pens
- Scissors and glue
- Ruler and used ballpoint pen
What are we doing
Printing the pattern on colored material. We arm ourselves with felt-tip pens, draw the lines of the fins and tail, draw a smile, and color the scales. Take your time with this DIY paper craft for kids. accuracy is important!
Working carefully with scissors, cut out the blank. Using a used ballpoint pen, we walk along the fold lines: they are indicated by a dotted line. This will help fold the homemade product and ensure that there are no unwanted bulges and depressions. We make four cuts with scissors (the places for them are indicated by a solid black line) on both halves of the tail and on the valves. Connecting paper snaps together. For reliability, you can apply glue to the stripes on the abdomen.
 Congratulations– you have a magical talisman! We advise you to connect both upper fins with a thread and hang the precious character from the ceiling or from a closet shelf. By the way, in the section of our website dedicated to, you will find even more exciting projects for every age and taste. It's time for creativity!
Thank you for your work! DIY paper crafts for children: there is always a place for magic in life!
The goldfish has long been known to us from the fairy tale by A.S. Pushkin; we all undoubtedly remember this character. If you have not yet caught your own goldfish that fulfills all your wishes, you can try to make it yourself.
A goldfish made from coins will definitely bring financial success and prosperity to your home. The process of making such crafts from coins is quite simple.
In this master class, I will describe step by step how to make such a souvenir with your own hands - a symbol of prosperity and fulfillment of desires.
For this master class, I will make a goldfish made entirely of coins, including a stand; for such a fish you need 250-300 coins. If you make a simpler version, with a tail without coins or partially made of coins, you will need 100-200 coins.
To make a goldfish from coins you will need:
- coins of the same denomination (preferably 5 or 10 kopecks),
- strong wire,
- thin floral wire, 4-5 twigs,
- a jar lid, a small plate or something similar,
- a piece of polystyrene foam,
- any threads,
- a little baby mass for modeling,
- adhesive plaster,
- aerosol can with gold paint,
- stationery knife,
- scissors,
- hot glue gun.
Step 1: Preparatory stage.
Bend the wire as shown in the photo and secure it in the cup with hot glue.


When the glue has completely hardened, we make a tail for the fish from thin floral wire and secure it well.

We cut out the body of our future goldfish from a piece of foam plastic and wrap it with any thread.

We place the body on the wire and fix it with hot glue.

We make the head and fins from the children's modeling mixture, and adjust the tail a little.
To ensure that the side fins adhere well to the body, we mold them directly onto the wire. To do this, we will pass a couple of pieces of wire through the abdomen of our fish and bend it a little.

These are the fins...

It takes a day for the modeling mixture to harden well, but in the meantime you can work on the stand.
Step 2: Coin stand.
I decided to completely cover the stand with coins, since the tail of my goldfish would be quite heavy and consist entirely of coins.
In order for the coins to hold well, the cup must be wrapped with a regular adhesive plaster.

Using hot glue, carefully attach the coins.


Step 3: Cover the tail and body of the fish with coins.
I started with the ponytail. We take 2 coins and glue them together on a wire. In this way we cover each wire.


The scales of our goldfish will also be made of coins.
We glue the coins in a checkerboard pattern, with an overlap of half a coin.


This is how it should turn out...

Since the coins have already been in use and have a rather unsightly appearance, we will paint them with an aerosol can of gold paint.

You can add a little glitter. Mix 1:1 PVA glue and water, add dry gold glitter.


As I already said, a fish made entirely of coins will cost approximately 250-300 coins. You can make a more economical option, for example like this...


Or so...

Let this coin fish fulfill all your wishes, just like the fairytale goldfish.
Imagine!!! If we were guided by those around us, then there would be no creativity in the world. Creativity is always a challenge to thinking stereotypes.
I was glad to help!
Paper crafts are not just a way to have fun with your child. Sometimes such activities turn into a real hobby or become a great idea for interior decor. Below we will look at three options for making a fish craft with your own hands.
How to make an origami fish?
So, the first option is to make a fish using a very interesting origami technique. This is one of the simplest ways to make a goldfish with your own hands:
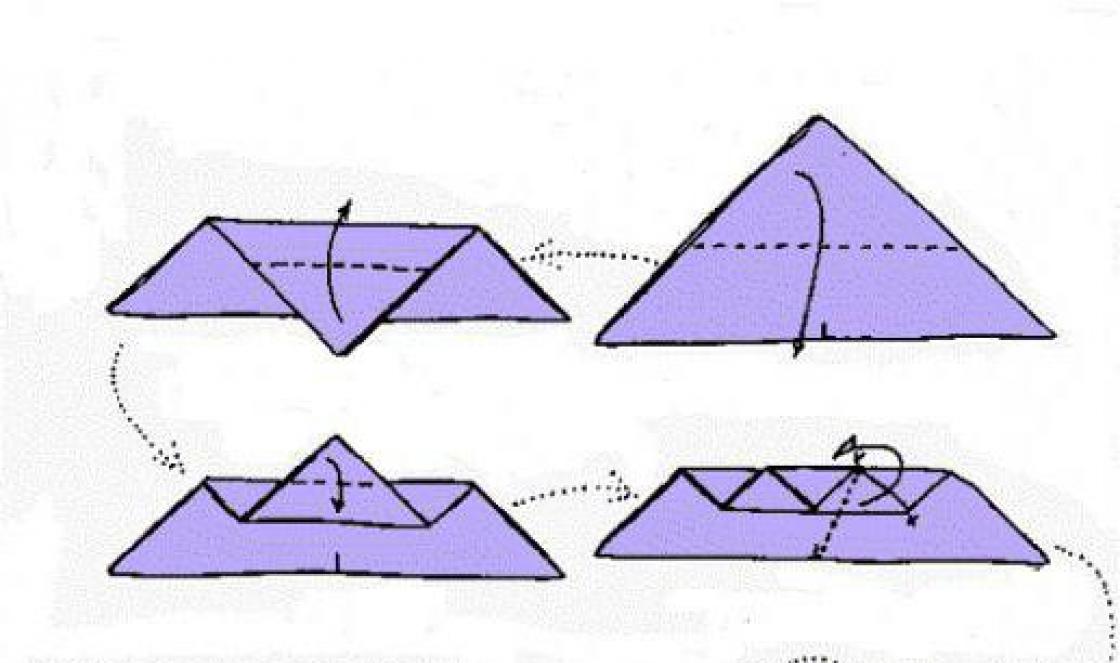
- Fold the square paper blank diagonally. The colored part is out.

- Next, fold the two corners of the resulting triangle towards the center down.

- Now we need to bend the corners that we bent down to the center again towards the top.
- We bend the corners as shown in the picture.

- We bend the bottom part up, then fold it as shown in the picture so that the wrong side comes out.

- We turn the workpiece over and also bend the edge inside out.

- Next, you need to open the envelope and fold it into a diamond shape to make fins.
- We bend the edge, as if outlining the tail fin.

- Unfold and make a cut along the top edge to the fold line.
- Similarly, we make a cut along the bottom edge to the fold.

- All that remains is to bend the cut piece, as shown in the photo, and make the tail fin of the fish out of paper.

Do-it-yourself voluminous (large) goldfish
Working with paper and glue can be much larger. Here is one of the options for making a goldfish with your own hands using the papier-mâché technique:
- We print or draw blanks for the fins by hand on cardboard.
- We will make the body of the fish from an inflatable ball. We will attach the blanks for the fins to it using tape.

- Next, coat the newspaper pieces with PVA glue layer by layer and form the body of the fish.
- Don't forget to leave a small hole at the bottom so you can remove the ball.
- Since this option is proposed to be used as a piñata, the hole is left quite large so that sweets can be placed. If your goal is room decor, you won't need it.

- Let's proceed to the last stage of the lesson on how to make a paper fish, namely decoration.

- To do this, we cut small squares from corrugated paper, then fix them with glue, having previously crumpled them.
- All that remains is to glue on the eyes with a smile and the origami fish making master class is completed!
Fish using quilling technique - master class
Making a fish craft with your own hands using this technique is even easier. What works here is not the complexity of the technology, but the correctly selected materials.
Instead of ordinary strips of paper, we will take these thick and corrugated ones.

We roll them up, like any quilling workpiece, and then press a little along the edges.
One large one for the body and two smaller ones for the fins. Glue on the toy eyes and the fish is ready.

How to make a goldfish:: what you can make a fish out of paper:: Hand-made
Golden fish can be made from a wide variety of materials. The main thing is that it is shiny, with a “fluffy” tail and fins. You can “plant” it in a small aquarium or a large glass with pebbles.

The question “what happens if you drink hydrogen peroxide?” - 1 answer
Instructions
1. Do fish from plasticine - yellow or brown. Make an oblong shape and mark the gills with a knife. Sprinkle the mold with broken Christmas tree decorations. Make eyes, for example, from black peppercorns. The tail and fins are made of bright feathers. Cat toys on a stick are very suitable for this purpose.
2. Make it golden fish from two sheets of thick oval paper or cardboard. Cut to create a convex shape and connect the sheets together. Place shiny golden foil on the sheets. Other colors can be added. From the same material, cut out wide simple or shaped strips and glue on the fins and tail. Draw eyes with a disc marker.
3. If you know how to sew, take a piece of shiny material and sew an oval or round bag. Fill it with foam rubber crumbs or scraps of fabric. Make button eyes. Make the tail and fins from feathers or from the same shiny material.
4. Tie a gold one fish made of thread with lurex.
Video on the topic
Useful advice
If you want to give a gift to a child, do not use broken glass or other material that could injure the baby. A knitted or sewn toy is best.
How to make a paper goldfish with your own hands (Origami / Kirigami)
Origami fish | How to make a paper fish
How to make a paper fish.
How to make a paper goldfish with your own hands origami
Goldfish origami paper
Paper goldfish / How to make a floating paper fish
How to make a paper fish with your own hands (Oigami)
Many crafts are available for kindergarten children; they are made using different techniques. This develops children’s imagination well; you can decorate a wall, cabinet or shelf with crafts. Let's look at the easiest ways to make a fish: from paper, plastic caps, CDs, using the origami technique, etc. You can sculpt fish from dough and plasticine.
Application
Fish made from colored paper, paper cupcake tins. Cardboard, multi-colored paper, even colored paper cups for cupcakes or sweets are suitable for work.

Master class on making fish with your own hands:
To get a beautiful aquarium of several fish, you need to take a blue sheet of A4 paper. According to the size of the multi-colored candy wrappers, we cut out small triangles (fish tails) from colored paper that matches the color of our future fish.

First we glue the triangle tail, and a round corrugated wrapper onto it. The fish should swim at different heights, slightly at an angle, but not touching in the aquarium (leaf).

To resemble real fish, you need to glue toy eyes. Using a black felt-tip pen (marker), draw on the eyes and mouth in a semicircle, as shown in the figure.


Air bubbles made from sequins or confetti circles (punch a hole punch from a bright postcard) look very realistic. We glue the circles of bubbles well from each fish upwards.

Our aquarium is ready!

Plasticine fish
Children love to sculpt from plasticine; you can choose any fish.

Prepare for work:
- plasticine 1 color;
- small scissors with rounded ends;
- plastic knife;
- clear nail polish.

You can even take 1 color of plasticine, for example, orange. To get a goldfish, you need to add a little acrylic paint to the plasticine.


Stages of work:
Take a piece of plasticine, roll it into a “sausage”, cut off 1/3 with a plastic knife. Divide the smaller piece into 2 equal parts. They will go on the fins of the fish, and the big one will go on the body. We take a small piece of plasticine, first we need to roll it into a “droplet”, then flatten it with the side of a knife.

Using scissors, cut out a beautiful curved tail of the fish, as shown in the picture. To decorate, use a knife to draw long diverging lines along the tail. From the 2nd piece you need to make fins: 1 large and 2 very small. We repeat the technique as on the ponytail.

We return to the large piece of plasticine and roll it into a round ball. Then we draw scales on it with a knife - small semicircles in a checkerboard pattern, as in the picture.

Now you need to attach the large vertical rear fin to the base (ball), then the upper one and 2 small fins at the bottom on the sides. For the eyes, roll 2 small balls of each color: white ones are larger than the others, slightly smaller green ones (blue), even smaller black ones.

Then flatten the white balls and attach them to our fish from the center to the left, the other to the right. The eyes should be large and touching in the center.


On top of the white circles we attach flattened green circles from the center to the sides. Then flattened black circles on top. The result was voluminous eyes made of 3 colors. On the sides of the black circles we sculpt 2 small white circles on each side, as shown in the figure. Below the peephole we make a semicircle - a smile.

You can completely paint your eyes with clear nail polish (nail or acrylic). They will shine beautifully and become more durable. Leave the craft for 15-20 minutes, the varnish should dry.

Later, you can place the “golden” fish among beads, colored plastic balls and algae in a symbolic aquarium in a container or on a flat surface.

The plasticine craft can be taken into the water to play, it is durable and will retain its original appearance.

Origami fish
The ancient art of origami from China has spread throughout the world. Translated from Japanese as “folded paper.” Let's look at the simplest method.


We will need:
- two-color (colored) paper 2 sheets of A4 in different colors (for example, orange and pale pink);
- a simple pencil;
- ruler.


Step-by-step instructions on how to make a fish craft:
It is better to take two-color paper specifically for origami or colored paper on both sides. We cut out a square 20 x 20 cm. The square must be bent diagonally to form a triangle with a right angle of 90 degrees.

Turn the wide base up. We divide the sides approximately in half and bend the corners into the center, creating a rhombus. At the top, you need to bend the corners up, connecting them into a small triangle, as shown in the diagram. The resulting corners at the top of the rhombus must be bent at an angle of 20 degrees. So the ends of the bent corners protrude slightly beyond the boundaries of our workpiece.

Bottom of the diamond. We divide the lower triangle into 2 equal halves by eye and mark it horizontally with a pencil. From another paper, cut out the 2nd square and apply it to the bottom corner, as in the diagram.

Now the bottom part is made of 2 sheets. You need to bend the upper corner of 1 sheet along the diagonal of the overall rhombus. This way the bottom of the diamond will overlap the top. The remaining half of the upper part must be folded to the central common line. In a rhombus, the lower part must be folded back.

At the bottom of the diamond there is a “pocket”. If you press down on the craft a little, the pocket unfolds. Now we turn it 90 degrees and bend it so as to move the fold lines, again getting a rhombus, as in the diagram.

In the rhombus, we divide the left half into 4 identical parts, bend 1 of them, then unbend it and return the pocket to its original position, as it was in step 10 (see diagram). Then you need to bend the back part to get a square, and 2 corners will look out from behind.

Next, you need to cut the square to the fold that was obtained in the previous paragraph. Now we need to return to step 11, ¼ of the part must be bent inward. Now the back part can be slowly pulled out to form the tail of a fish. Now all that remains is to start decorating our product. We glue an eye on a two-color fish, it turns out very realistic.

Now you know different techniques on how to make a fish from paper, plasticine, origami. If you use a little imagination, make colored fish of different sizes, they will be different and create a school in an aquarium or on cardboard.

Don't be afraid to experiment, get creative! We offer original photos of fish crafts.

Photos of fish crafts